Page is loading ...

INSTRUCTION MANUAL
BOL-SSTOR-42-5.5 BOLPP
MODEL NO. ________________________
SERIAL NO. ________________________
VESTIL MANUFACTURING CORP.
2999 NORTH WAYNE STREET, P.O. BOX 507, ANGOLA, IN 46703
TELEPHONE: (260) 665-7586 -OR- TOLL FREE (800) 348-0868
FAX: (260) 665-1339
URL: WWW.VESTILMFG.COM EMAIL: SALES@VESTIL.COM
TABLE OF CONTENTS: PAGE
Safety Principles & Safety Recommendations…………………..…………………………............. 2
Product Introduction……………………………………………………………………………………. 3
Installation Instructions………………………………………………………………………………… 3-5
Use Instructions ……………………………………………………………………………………. 5
TABLE OF FIGURES:
FIG. 1: Determine Ground Level……………………………………………………………………… 3
FIG. 2: Dig Hole………………………………………………………………………………………… 3
FIG. 3: Set Bollard in Concrete…………………………………………………………………......... 3
FIG. 4: Cutaway view of BOL-SSTOR-42-5.5…..…………………………………………………… 4
FIG. 5: Lock Tab in Contact with Lock Plate………………………………………………………… 5
FIG. 6: Insert Cover Plates……………………………………………………………………………. 5
FIG. 7: Padlock Bollard when Raised………………………………………………………………… 5
FIG. 8: Bollard Stored………………………………………………………………………………….. 5
FIG. 9: Cover Plates Closed……………………………………………………………….………….. 5

SAFETY PRINCIPLES
Each unit conforms to the generalized specifications disclosed in this manual and fulfills our demanding
standards for quality, durability and safety.
Vestil Manufacturing Corp. recognizes the critical importance of workplace safety. Each person who might
participate in the installation, use, operation, or maintenance of the product must read this manual. Read the
entire manual and fully understand the directions BEFORE using or maintaining the bollard. If you do not
understand an instruction, contact Vestil for clarification.
Vestil is not liable for any injury or property damage that occurs as a consequence of failing to apply the
procedures explained in this manual or that appear on labels affixed to the product. Failure to exercise good
judgment and common sense may result in property damage, serious personal injury, or death, and also are not
the responsibility of Vestil. Although Vestil strives to identify foreseeable hazardous situations, this manual
cannot address every conceivable danger. The end-user is ultimately responsible for exercising sound judgment.
This manual applies the hazard identification methods suggested for instruction manuals by the American
National Standards Institute (ANSI) in ANSI standard Z535.6-2006. In accordance with ANSI guidelines for
hazard warning language, this manual identifies personal injury risks and situations that could lead to property
damage with SIGNAL WORDS. These signal words announce an associated safety message. The reader must
understand that the signal word chosen to identify a particular safety hazard categorizes the seriousness of that
hazard according to the following convention:
Identifies a hazardous situation which, if not avoided, WILL result in DEATH
or SERIOUS INJURY. Use of this signal word is limited to the most extreme situations.
Identifies a hazardous situation which, if not avoided, COULD result in DEATH
or SERIOUS INJURY.
Indicates a hazardous situation which, if not avoided, COULD result in MINOR
or MODERATE injury. Although Z535.6-2006 approves the use of “CAUTION” without an
accompanying safety alert symbol (black equilateral triangle with yellow exclamation point) as an
alternative to “NOTICE”, this manual differentiates between hazards that pose a risk of personal injury
and those that create mere property damage situations. In this manual, “CAUTION” appears
exclusively in conjunction with the safety alert symbol to identify injury risks.
Identifies practices not related to personal injury, such as operation that could
damage the bollard. No safety alert symbol (equilateral triangle enclosing an exclamation point)
accompanies this signal word.
SAFETY RECOMMENDATIONS
Failure to read and understand the instructions included in this manual before installing, deploying or
storing, or servicing the bollard constitutes misuse of the product. Study the entire manual before you use
the cart for the first time and before each subsequent use. If questions remain after you finish reading the
manual, contact Vestil for answers. DO NOT attempt to resolve any problems with the bollard unless you are
certain
that it will be safe to use afterwards.
DO NOT contact live electrical wires, buried cables, or underground gas lines during
installation. Determine the locations of all underground utility lines BEFORE beginning to dig the hole for
the bollard. Choose a location that is at least 3 feet away from all underground lines on all sides.
Safe operation is the responsibility of the operator!
• DO NOT attempt to install the bollard if you cannot comfortably lift it. Determine the net weight of the bollard
from the table on p. 3.
• DO NOT modify the bollard or storage tube (BOL-SSTOR-42-5.5) without the express, written approval
of Vestil. Unauthorized modifications could render the device unsafe to use. Additionally,
unauthorized modification(s) automatically voids the warranty.
- 2 -

PRODUCT INTRODUCTION
- 3 -
Thank you for purchasing a fixed position bollard made by Vestil Manufacturing
Corporation (“Vestil”). Our bollards are durable, high-quality products designed for low-
speed traffic control. Despite the product’s relatively simple mechanics, all personnel must
familiarize themselves with the instructions provided in this manual.
Specifications for both bollard models appear in the table below:
Model
Maximum Above Ground
Height (after Installation)
Overall Length
Outer Diameter
Net Weight
(pounds)
BOLPP-24-5.5 24in. (~61cm) 34in. (~86cm) 5.5in. (~14cm) 44 (~20kg)
BOLPP-36-5.5 36in. (~91cm) 46in. (~117cm) 5.5in. (~14cm) 59 (~27kg)
BOLPP-42-5.5 42in. (~107cm) 52in. (~132cm) 5.5in. (~14cm) 73 (~33kg)
BOLPP-48-5.5 48in. (~122cm) 58in. (~147cm) 5.5in. (~14cm) 88 (40kg)
BOL-SSTOR-42-5.5 42in. (~107cm) 100.75in. (~256cm) 4.5in. (~11cm) 163 (~74kg)
Vestil Manufacturing Corp. created this manual to acquaint owners and users of our bollards with safe use and
maintenance procedures. Employers are responsible for instructing employees to use the product properly.
Employees and any other persons, who might foreseeably install, use, repair, or perform maintenance on the
device must read and understand every instruction beforehand. All persons designated to install, use, repair
or maintain the bollard should have access to the manual at all times and should review the directions before
each use. Contact Vestil for answers to any question you have after reading the entire manual.
Mark
Ground
level on
bollard
INSTALLATION INSTRUCTIONS:
BOLPP
STEP 1 Determine ground level: Measure the bollard from
the top to determine the ground level. Mark the bollard
at the point that corresponds to the above ground height
of your model. For example, if you ordered a BOLPP-
24-5.5, measure 24 inches from the top. Measure the
below ground portion (~10in.) as well. Described
measurements are depicted in FIG. 1 at right.
20IN
(~51
CM)
20IN
(~51
CM)
20
IN
(~51
CM)
Step 2 Dig a hole for the below ground portion
:
Remove a 20inx20inx20in cube (~51cm x 51cm x
51cm) of dirt to contain the concrete that will fix
the bollard in position. [Cube shown in FIG. 2].
Step 3 Partially fill hole and set bollard
: Pour 3,000psi
compression rated concrete into the hole, until the top of
the concrete is a few inches from the top of the hole.
Press the bollard into the concrete. Make sure that the
mark you made on the bollard to indicate ground level
aligns with the top of the hole. Fill the hole the rest of
the way, so that the top of the concrete matches the
ground level mark on the bollard.
FIG. 3: Setting bollard in concrete
Ground level
mark
Ground
Concrete
Step 4 Cap the Bollard
: Press the rubber cap into the
opening at the top of the bollard.

BOL-SSTOR-42-5.5
Parts:
- 4 -
Item
Description
TOP VIEW
RETRACTABLE
HANDLE
LOCK
TAB
Sleeve
weldment
Bollard weldment
Cover plate
(smaller)
Cover Plate
(larger)
Part No.
23-514-093 23-514-155 23-514-092 23-514-094
Quantity
1 1 1 1
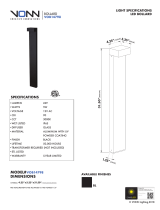
Step 1 Determine the Necessary Dimensions of the Hole
: The depth of the hole should equal the length of the
sleeve weldment (top to bottom) plus 16-20 inches. The opening should measure approximately 24in x 24in.
FIG. 4: CUTAWAY VIEW OF
BOL-SSTOR-42-5.5
LENGTH
OF
SLEEVE
PLUS
16-20
IN.
DIRT
G
RAVEL
CONCRETE
24IN.
BOLLARD
SLEEVE
PVC
PIPE
GRAVEL

Step 2 Attach a short drain pipe to the end of the sleeve: Use a 10–12in. (25-30cm) piece of PVC tube to function
as a drain pipe to allow moisture to flow out of the sleeve. Center the PVC pipe on the hole in the bottom of the
sleeve and affix it to the sleeve, for instance with silicone adhesive. Allow the adhesive to dry before proceeding
to step 3.
Step 3
: Fill the bottom of the hole with 16-20 inches of gravel, and then set the sleeve in the hole. Press the PVC
drain into the gravel until the top of the sleeve is flush with the ground, as shown in FIG. 4.
Step 4 Slowly fill the hole with concrete
: Use 3,000psi compression rated concrete to fill the space around the
sleeve. Steadily fill the hole with concrete, and check the orientation of the sleeve as the hole fills. Adjust the
position of the sleeve as necessary. Do not completely fill the hole. Instead, stop pouring/adding concrete when
the level is 4-6inches below ground level.
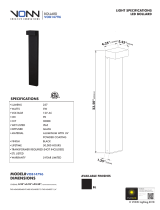
Step 5 Set the bollard into position and check vertical levelness
: Set the bollard on the support ledge of the sleeve
box, and rotate the bollard until the lock tab contacts the lock plate as shown in FIG. 5. Check the vertical
levelness of the bollard. Adjust the position of the bollard sleeve as needed to level the bollard. Fill the remainder
of the hole with concrete. Check the levelness of the bollard and adjust the position of the sleeve if necessary.
SUPPORT
LEDGE
FIG.
5: LOCK
TAB IN
CONTACT WITH
LOCK PLATE
FIG. 6
Step 6: Allow the concrete to cure according to the instructions that accompany the concrete mixture used.
Step 7 Install the cover plates
: Slide the cover plates into the slots on each side of the sleeve box (see FIG. 6).
Insert the plates into the slots, welded sides facing each other so that they will lay flat across the opening of the
sleeve box.
FIG. 7
USE INSTRUCTIONS
To deploy the bollard:
1. Raise the bollard out of the sleeve by grasping and pulling
upwards on the retractable handle.
2. Rotate the bollard to place the lock tab and lock plate in contact.
See FIG. 7.
PADLOCK
TOGETHER
3. Lock the bollard in the raised position if desired, by inserting the
shackle of a padlock through the holes in the lock tab and the
lock plate. See FIG. 7.
FIG. 9
FIG. 8
To store the bollard:
1. Rotate the bollard until the lock tab
aligns with the slot in the sleeve.
2. Lower the bollard into the storage
compartment.
3. Raise the cover plates and lay them
across the opening. See FIG. 9.
- 5 -
/