Fujitsu C150-E187-01EN User manual
- Category
- Copiers
- Type
- User manual

Scanner Utility for
Microsoft
Windows
<32bit>
Version 8.0
C150-E187-01EN

i
Introduction
Thank you for purchasing the "Scanner Utility for Microsoft Windows V8.0".
This software contains a TWAIN-compliant image scanner driver (simply called "driver" in this
guide) and utilities.
This guide provides a description summary of the driver, as well as a description of the
installation method and procedures for appropriate use. Please read this guide before starting to
use the software.
In addition, read the README.TXT file on the CD-ROM for the latest information not included
in this manual.
In this guide, product names are abbreviated as follows:
•
"Microsoft
Windows
95 operating system": "Windows
95"
•
"Microsoft
Windows NT
Workstation operating system Version 4.0" and "Microsoft
Windows NT
Server operating system Version 4.0": "Windows NT
4.0"
•
"Microsoft
Windows
98 operating system": "Windows
98"
•
"Microsoft
Windows
2000 operating system": "Windows
2000"
•
"Microsoft
Windows
Millennium Edition": "Windows
Me"
When "Windows
95," "Windows
98," "Windows NT
4.0," "Windows
2000"and
"Windows
Me" are referred to collectively, they are simply referred to as "Windows
". Unless
otherwise indicated, explanations refer to "Windows
95," "Windows
98," "Windows NT
4.0," "Windows
2000,"and"Windows
Me" collectively.

ii
Trademarks
MS-DOS, Microsoft, Windows, and Windows NT are registered trademarks of Microsoft
Corporation.
IBM PC/AT and DOS/V are registered trademark of International Business Machine
Corporation.
Adaptec is a registered trademark of Adaptec Inc.
EZ-SCSI is a trademark of Adaptec Inc.
Other product names are the trademarks or registered trademarks of the respective companies.

iii
Organization
This manual explains how to install and use this driver, and how to use the TWAIN scanning
utility.
•
TWAIN
This section gives an overview of the TWAIN specification.
•
Installation
This section explains the procedure for installing the environments in which this driver may
operate.
•
Using the Driver
This section explains how to use the driver.
•
Using the Utilities
Use of the following utilities is explained:
−
Using the Gamma Pattern Editor
•
Troubleshooting
This section explains the possible causes of error messages and operation errors and the
corresponding recommended actions.
•
Appendix
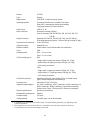
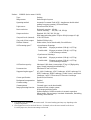
The appendix contains the specifications of image scanners.

iv
Contents
1. Outline............................................................................................. 1
1.1 Characteristics of this Driver...........................................................................1
1.2 Operating Environment...................................................................................1
1.3 Explanatory Notes..........................................................................................2
1.4 Explanation of terms.......................................................................................3
2. TWAIN ............................................................................................. 4
2.1 TWAIN............................................................................................................4
2.2 TWAIN Application.........................................................................................4
3. Installation ...................................................................................... 6
3.1 Preparation.....................................................................................................6
3.2 Starting Installation.........................................................................................6
3.3 Uninstall..........................................................................................................7
4. Using the Driver.............................................................................. 8
4.1 Selecting the Driver........................................................................................8
4.2 Screen Configuration......................................................................................9
4.3 Displaying Driver Information .......................................................................10
4.4 Setting Information on Image Scanning .......................................................11
4.5 Specifying Driver Operation..........................................................................18
4.6 Setting "Scanning Area"...............................................................................20
4.7 Setting Options.............................................................................................21
4.8 Setting Advance Options..............................................................................31
4.9 Setting the Configuration Options.................................................................43
4.10 Basic Scan Dialog......................................................................................46
4.11 Download Pattern File................................................................................48
5. Using the Gamma Pattern Editor ................................................ 52

v
5.1 Start-up.........................................................................................................52
5.2 [File] menu....................................................................................................53
5.3 [Help] menu..................................................................................................54
5.4 Gamma Pattern Editing................................................................................55
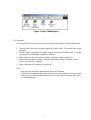
6. How to Use the FUJITSU Scanner Control Center..................... 56
6.1 Outline..........................................................................................................56
6.2 How to Start the FUJITSU Scanner Control Center .....................................56
6.3 Pop-up Menu................................................................................................57
7. Troubleshooting........................................................................... 62
7.1 Error Messages............................................................................................62
7.1.1
Messages from the TWAIN Driver......................................................................62
7.1.2
Error messages relating to gamma correction pattern editing.............................69
7.1.3
Messages concerning to FUJITSU Scanner Control Center...............................70
8. Appendix....................................................................................... 72
8.1 Relevant Image Scanner Specification.........................................................72
8.2 Maintenance Service....................................................................................87

1
1. Outline
1.1 Characteristics of this Driver
•
This driver complies with TWAIN regulations V1.8 (the latest version as of May 2000),
which are global standards for image scanners. The driver can be used in all TWAIN-
compliant applications.
•
This driver also supports an image scanner that has the "double-sided scan" function. If the
application supports continuous scan, a double-sided document can be scanned.
1.2 Operating Environment
This driver can be used in the following systems:
•
An IBM PC/AT compatible machine (recommended: Intel Pentium 100MHz or higher) on
which one of the following operating systems are installed
−
Microsoft
Windows
95
−
Microsoft
Windows
98
−
Microsoft
Windows
Me
−
Microsoft
Windows NT
Server Version 4.0 (Installation of Service Pack 3 or later
recommended)
−
Microsoft
Windows NT
Workstation Version 4.0 (Installation of Service Pack 3 or
later recommended)
−
Microsoft
Windows
2000 Professional Edition
•
Adaptec
SCSI adapter or Fujitsu FMV SCSI adapter
−
In some cases, the driver may not operate with the above systems. Please check in
advance with your place of purchase.
−
Notes are provided on the accepted SCSI adapters in README.TXT, which is included
in the installation media. Please read these notes before use.
•
Adaptec
EX-SCSI
TM
Pro Version 4.5 or later or the following 32-bit versions of ASPI
Manager (included, for example, in the Adaptec SCSI installer for Windows 95/Windows
NT or on Fujitsu SCSI driver disk V1.2):
Windows
95, Windows
98, Windows NT
4.0
V4.01 or later
Windows
2000, Professional Edition
V4.60 or later
•
RAM of 16 megabytes or more
•
Free hard disk space of 4 megabyte or more
•
CD-ROM drive (required for installation)
•
Mouse (recommended)

2
1.3 Explanatory Notes
The descriptions in this manual are prepared based on the following rules:
◊
Menus and buttons
The menus and buttons used in the program description are enclosed in [].
Example: [File] menu, [OK] button
◊
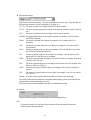
Keyboard
The keytop indications comply with the standard keyboard of the Fujitsu FMV series.
Major differences between the Fujitsu FMV keyboard and other keyboards are shown below.
FMV keytops Other possible keytops
Alt Previous screen, GRPH
Ctrl CTRL
Esc ESC
Enter Return,
Shift SHIFT
Back space Backspace, BS
F1 PF1, f-1
◊
Terms related to mouse operation
Terms related to major mouse operations are explained below.
Click: To press and release the mouse button
Double click: To quickly press the mouse button twice
Drag: Move the mouse while keeping the mouse button pressed
◊
Notes on operation procedures
If some menus need to be operated in a certain order, the procedural order is described as
follows:
[A] - [B] - [C]
In accordance with this description, operation [A] is executed first, followed by [B] and [C]
in that order.
◊
Figures
Figures and screen operations in this guide refer to Microsoft
Windows
2000. They are
also followed when using other operating systems.
Note that the expressions may vary with the type of scanner connected.

3
1.4 Explanation of terms
◊
IPC option board
IPC-2/2D in this guide refers to the IPC-2 and IPC-2D image processing circuit.
IPC-3/3D in this guide refers to the IPC-3 and IPC-3D option board.

4
2. TWAIN
2.1 TWAIN
TWAIN is the specification that defines the standard software protocol and application
programming interface (API) for data exchange between a software application program and an
image input device such as the image scanner.
[TWAIN development background]
In the past, development of a new scanner inevitably required the development of a compatible
driver and a sample (demonstration) program exclusively designed for the new scanner. As the
scanner is upgraded, the driver may need to be upgraded as well to maintain its compatibility
with the upgraded scanner. Therefore, the use is most likely to be restricted to one specific
scanner model to avoid the complication of learning new operation methods and replacing the
peripheral driver, etc., involved in scanner replacement.
In view of the incompatibility among different scanners and peripheral equipment and the
accompanying inconvenience, there was a demand for standardization of the related hardware
and software, and TWAIN was established as a result.
The user may now choose among all the input devices and software (driver or application
programs) conforming to the TWAIN standard, and configure a most suitable system for himself,
without being restricted to the products of a certain series or a certain manufacturer.
2.2 TWAIN Application
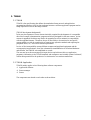
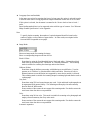
TWAIN mainly applies to the following three software components:
• Application software
‚ Source manager
ƒ Source
The components are related to each other as shown below.

5
•
Application software
(photo retouching software, etc)
‚
Source manager
(TWAIN.DLL/TWAIN_32.DLL, etc)
ƒ
Source
(Image scanner control of the driver, etc)
Image scanner
,
etc.
Figure TWAIN Application

6
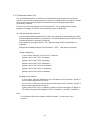
3. Installation
3.1 Preparation
1. Check that the operating system is installed correctly.
2. Check that the SCSI adapter is connected to the computer.
3. Check whether the SCSI driver and ASPI manager are installed correctly and operating (For
windows
2000, 4.60 or later)
Note
Version 4.01 or later of the ASPI Manager is required. Use Explorer or a similar program
to check the version number of the WNASPI32.DLL file.
The environment setup tools described later can be used for checking.
4. If the previous version was installed, first confirm that it has been uninstalled (deleted).
5. Confirm that there is sufficient free space on the hard disk to install the software.
3.2 Starting Installation
1. Start Windows.
Note
A user name with administrator authority must be used to log on to Windows(R) 2000 or
Windows NT(R) 4.0.
Ask the system administrator for the details of logging on.
2. Close any other currently open applications.
3. Insert the setup CD-ROM in the CD-ROM drive. Here, the CD-ROM drive is temporarily
called "D:". (If the environment you are using is different, replace the appropriate parts
below.)
4. Double-click on "install.exe" in the "D: \Driver1\ASPI" folder of the CD-ROM using
Explorer. Then, installation starts.
When an automatic start is specified, the start screen of the setup disk is displayed.
Installation can be started from this screen too.
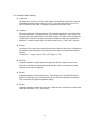
5. When the setup screen is displayed, continue the process by following the on-screen
instructions.
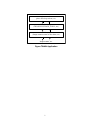
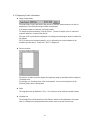
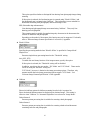
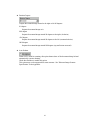
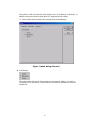
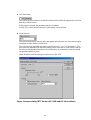
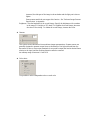
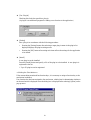
6. Confirm that the following group is created when setup has been completed. The displayed
icon depends on the selection of "Components" during installation.

7
Figure Fujitsu TWAIN group
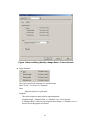
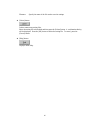
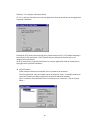
3.3 Uninstall
The uninstall process removes the software and returns the hard disk to its pre-installation state.
1. Click on [Start], followed by [Settings], and then [Control Panel]. The Control Panel is then
displayed.
2. Double-click on "Add/Remove Programs" from the icon list of the Control Panel. The panel
of properties of [Add/Remove Programs] is displayed.
3. Select "Scanner Utility for Microsoft Windows" from the "Install/Uninstall" list.
4. Click on the [Add/Remove] button. When the confirmation dialog is displayed, click on
[OK] if you are ready to uninstall.
5. When uninstallation is completed, click on [OK.]
Note
Image files that have been scanned and saved will not be deleted.
If other TWAIN-compliant applications and drivers have been installed and you are asked
whether or not to delete files shared with them such as the TWAIN Manager, select [NO]
to avoid deleting them.

8
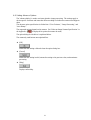
4. Using the Driver
4.1 Selecting the Driver
To use this driver from the TWAIN application, select "FUJITSU TWAIN32" from the TWAIN
data source (driver) selection screen. For general application, the data source selection screen is
displayed by selecting the [Select Scanner] or [Acquire ...] menu. Refer to the instruction
manual for the application used for details.

9
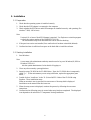
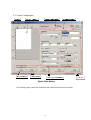
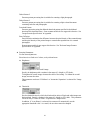
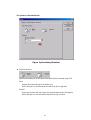
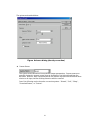
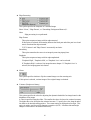
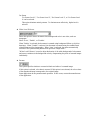
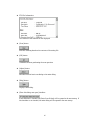
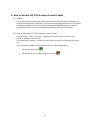
4.2 Screen Configuration
Figure Main Dialog
The following pages contain the explanation and operation description for each part.

10
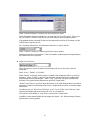
4.3 Displaying Driver Information
♦
Image scanner name
The model name, option port name, and capacity of internal scanner memory (in units of
megabytes) of the connected image scanner are displayed.
If no image scanner is connected, this field is blank.
To change the selected scanner, click the [Select ...] button to display a list of connected
scanners and select a scanner from the list.
The type of IPC option board is displayed if an image-processing option board is installed in
the scanner.
IPC-3/3D may not be detected normally, as it is affected by the version number of the
machine type and device. In this case, "IPC2" is displayed.
♦
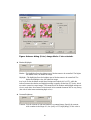
Preview window
The preview window is used to display the temporary image of read data and for setting the
"Scanning Area."
For settings, see "Scanning Area" later in this manual. Also see the description of the
[Preview] button later in this manual.
♦
Ruler
The large divisions are labeled as "Unit". The scale also varies with the selected scanner.
♦
Message line
The message line is the bottom line of the dialog in which a brief explanation of an input
item or a setting item is displayed when the mouse cursor is moved over the item.

11
♦
Data size
The approximate amount of data per image when data is scanned in the present option.
Note
This value is the amount of uncompressed data. The size of the stored file will differ from
this value and is usually smaller if image compression is chosen and the image is
compressed.
4.4 Setting Information on Image Scanning
♦
Current side
When a scanner that allows duplex scanning is used, specifies the page which sets the image
scanning information.
To scan using the same settings as those for "Front side" and "Back side," clear the checks in
the "Individual Setting" checkbox on the "Front" and "Back" tabs. A single "Duplex" tab
will be displayed at the left so that the same image scanning information can be set for
"Front side" and "Back side."
To scan using different settings for "Front side" and "Back side," check the "Individual
Setting" checkbox on the "Front" and "Back" tabs. Two tabs, "Front" and "Back," will be
displayed at the left. Select each tab and enter the desired settings.
This is only effective when ADF (Duplex) is selected for the method of paper feed. For
scanner types which permit duplex scanning, see "Relevant Image Scanner Specification" in
the Appendix.
♦
Resolution
Specifies the number of pixels (dots) per inch.
Select a fixed resolution from the list or [Custom].
High resolution requires more memory.
The supported resolution depends on the type of scanner and the options installed. See
"Relevant Image Scanner Specification" in the Appendix.

12
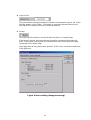
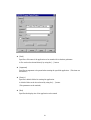
♦
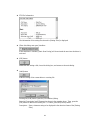
Paper Size
Selects a paper size corresponding to the size of the document to be scanned.
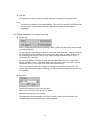
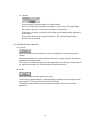
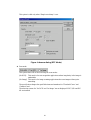
Select a standard paper size from the list or [Custom]. If [Custom] is selected, the "Custom
Paper Size Setting" dialog appears. Enter the size of the document to be scanned.
Some paper sizes may not be accepted by your device. See "Relevant Image Scanner
Specification" in Appendix.
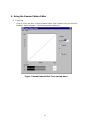
Figure Custom paper size setting dialog
To specify a custom paper size, use the slider or enter the paper size directly. The applicable
unit here is the unit specified under [Option]-[Generic]-[Unit/Scaling].
♦
Scanning Area
Specifies the start position, width and length for the image scan. The maximum allowable
size is the paper size selected previously.
In addition, the minimum size is 1.000 inch, 26 millimeters, or pixels (number of dots per
inch) according to the unit that has been set.
"Left": The left end of the scan area on the scanned document (X coordinate)
"Top": The top end of the scan area or the scanned document (Y coordinate)
"Width": The width of the scan area
"Length": The length of the scan area
These values are related to one another in the following way:
0
≤
left end coordinate < (paper width - minimum scan area size)
0
≤
top end coordinate < (paper length - minimum scan area size)
Minimum value
≤
width
≤
(paper width - left end coordinate)
Minimum value
≤
length
≤
(paper length - top end coordinate)

13
♦
Scan Type
Selects the feeding device.
The image scanner uses a document bed called the flat bed as well as an automatic document
feeder (ADF) for feeding scanned document. The ADF usually enables the documents to be
scanned only once. The flat bed allows scanning the same documents repeatedly.
♦
Flatbed
Reads a document placed on the flat bed of the device.
♦
ADF (Simplex)
Reads the document on the device's automatic document feeder (ADF). Here, only one side
is read.
♦
ADF (Duplex)
To scan both the front and the back of a page, select this option.
If this option is selected, the document is scanned in the "front to back to front to back ..."
order.
This option can be used only for scanner models that support duplex scanning.
The "Duplex Function" requires that the calling application supports "continuous scan." If
the application does not support "continuous scan," only the data for the front side of the
page is passed to the application.
Some scanner models do not support this option. See "Relevant Image Scanner
Specification" in the Appendix.
♦
Long page (front)
To scan the entire side of a long page whose length exceeds the vertical size of an A3 sheet,
select this option.
The front side and back side can be specified using the same method used for ADF.
If this option is selected, the "Paper Size Setting" dialog box opens. Specify the size of the
document to be scanned.
In this mode, however, the preview window cannot be displayed and the scanning area
cannot be specified.
Scanner models that do not support this option do not display the "Scan Type" selection item.

14
♦
Long page (front and backside)
In the same case as that for scanning the front of a long page, this option is selected in order
to scan the entire side of a long page whose length exceeds the vertical size of an A3 sheet.
If this option is selected, the document is scanned in the "front to back to front to back…"
order.
Paper feeding method that is to be supported varies with the type of scanner. See "Relevant
Image Scanner Specification" in the Appendix.
Note
To specify duplex scanning, the number of copies designated should be based on the
number of pages, not the number of paper sheets . In other words, one original with a
front and back is regarded as two pages.
♦
Image Mode
Selects an image mode for scanning the image.
Select a corresponding image mode from the list.
Black & White
Scans data by using the fixed threshold binary, black-and-white. Distinguishes black
from white by the setting in the "Threshold" of "Scanning Parameter." This scanning
mode is suitable for scanning line drawings and text documents.
Halftone (Dither)
Scans data using the halftone processing, with dithering or error diffusion. Uses the
patterns set in "Halftone" to simulate data in black-and-white. Selection of built-in
dithered patterns or error diffusion (not supported by some device models) is allowed.
This scanning mode is suitable for scanning images containing light and shadow such as
a photograph.
Gray scale
Scans data using 256-level monochrome gray scale. Light and shade in photographs can
be represented with greater fidelity. This scanning mode employs far more memory
than the Black & White mode.
Some versions of the scanner do not support this scanning mode. For details contact the
retail store where the device was purchased.
Color
Scans data using 24 bits color. This mode is suitable for scanning color photograph and
employs far more memory that Gray scale mode.
Some versions of the scanner do not support this scanning mode. For details contact the
retail store where the device was purchased.
Automatic separation
Page is loading ...
Page is loading ...
Page is loading ...
Page is loading ...
Page is loading ...
Page is loading ...
Page is loading ...
Page is loading ...
Page is loading ...
Page is loading ...
Page is loading ...
Page is loading ...
Page is loading ...
Page is loading ...
Page is loading ...
Page is loading ...
Page is loading ...
Page is loading ...
Page is loading ...
Page is loading ...
Page is loading ...
Page is loading ...
Page is loading ...
Page is loading ...
Page is loading ...
Page is loading ...
Page is loading ...
Page is loading ...
Page is loading ...
Page is loading ...
Page is loading ...
Page is loading ...
Page is loading ...
Page is loading ...
Page is loading ...
Page is loading ...
Page is loading ...
Page is loading ...
Page is loading ...
Page is loading ...
Page is loading ...
Page is loading ...
Page is loading ...
Page is loading ...
Page is loading ...
Page is loading ...
Page is loading ...
Page is loading ...
Page is loading ...
Page is loading ...
Page is loading ...
Page is loading ...
Page is loading ...
Page is loading ...
Page is loading ...
Page is loading ...
Page is loading ...
Page is loading ...
Page is loading ...
Page is loading ...
Page is loading ...
Page is loading ...
Page is loading ...
Page is loading ...
Page is loading ...
Page is loading ...
Page is loading ...
Page is loading ...
Page is loading ...
Page is loading ...
Page is loading ...
Page is loading ...
Page is loading ...
Page is loading ...
-
 1
1
-
 2
2
-
 3
3
-
 4
4
-
 5
5
-
 6
6
-
 7
7
-
 8
8
-
 9
9
-
 10
10
-
 11
11
-
 12
12
-
 13
13
-
 14
14
-
 15
15
-
 16
16
-
 17
17
-
 18
18
-
 19
19
-
 20
20
-
 21
21
-
 22
22
-
 23
23
-
 24
24
-
 25
25
-
 26
26
-
 27
27
-
 28
28
-
 29
29
-
 30
30
-
 31
31
-
 32
32
-
 33
33
-
 34
34
-
 35
35
-
 36
36
-
 37
37
-
 38
38
-
 39
39
-
 40
40
-
 41
41
-
 42
42
-
 43
43
-
 44
44
-
 45
45
-
 46
46
-
 47
47
-
 48
48
-
 49
49
-
 50
50
-
 51
51
-
 52
52
-
 53
53
-
 54
54
-
 55
55
-
 56
56
-
 57
57
-
 58
58
-
 59
59
-
 60
60
-
 61
61
-
 62
62
-
 63
63
-
 64
64
-
 65
65
-
 66
66
-
 67
67
-
 68
68
-
 69
69
-
 70
70
-
 71
71
-
 72
72
-
 73
73
-
 74
74
-
 75
75
-
 76
76
-
 77
77
-
 78
78
-
 79
79
-
 80
80
-
 81
81
-
 82
82
-
 83
83
-
 84
84
-
 85
85
-
 86
86
-
 87
87
-
 88
88
-
 89
89
-
 90
90
-
 91
91
-
 92
92
-
 93
93
-
 94
94


Fujitsu C150-E187-01EN User manual
- Category
- Copiers
- Type
- User manual
Ask a question and I''ll find the answer in the document
Finding information in a document is now easier with AI
Related papers
-
Fujitsu 8.4 User manual
-
-
-
-
-
-
Fujitsu-siemens fi-5950 User manual
-
-
-