Page is loading ...

LG A340
User Guide
All screen shots in this guide are simulated.
Actual displays and the color of the phone may vary.
Some of the contents in this manual may differ from your phone
depending on the software of the phone or your service provider.
www.lg.comP/NO: MFL67476401(1.0)

LIMITED WARRANTY STATEMENT
1. WHAT THIS WARRANTY COVERS :
LG offers you a limited warranty that the enclosed
subscriber unit and its enclosed accessories
will be free from defects in material and
workmanship, according to the following terms
and conditions:
1. The limited warranty for the product extends
for TWELVE (12) MONTHS beginning on the
date of purchase of the product with valid
proof of purchase, or absent valid proof of
purchase, FIFTEEN (15) MONTHS from date
of manufacture as determined by the unit’s
manufacture date code.
2. The limited warranty extends only to the
original purchaser of the product and is not
assignable or transferable to any subsequent
purchaser/end user.
3. This warranty is good only to the original
purchaser of the product during the warranty
period as long as it is in the U.S, including
Alaska, Hawaii, U.S. Territories and Canada.
4. The external housing and cosmetic parts shall
be free of defects at the time of shipment and,
therefore, shall not be covered under these
limited warranty terms.
5. Upon request from LG, the consumer must
provide information to reasonably prove the
date of purchase.
6. The customer shall bear the cost of shipping
the product to the Customer Service
Department of LG. LG shall bear the cost of
shipping the product back to the consumer
after the completion of service under this
limited warranty.
2. WHAT THIS WARRANTY DOES NOT
COVER :
1. Defects or damages resulting from use of the
product in other than its normal and customary
manner.
2. Defects or damages from abnormal use,
abnormal conditions, improper storage, exposure
to moisture or dampness, unauthorized
modifications, unauthorized connections,
unauthorized repair, misuse, neglect, abuse,
accident, alteration, improper installation, or
other acts which are not the fault of LG, including
damage caused by shipping, blown fuses, spills
of food or liquid.
3. Breakage or damage to antennas unless caused
directly by defects in material or workmanship.
4. That the Customer Service Department at LG was
not notified by consumer of the alleged defect or
malfunction of the product during the applicable
limited warranty period.
5. Products which have had the serial number
removed or made illegible.
6. This limited warranty is in lieu of all other
warranties, express or implied either in fact or
by operations of law, statutory or otherwise,
including, but not limited to any implied warranty
of marketability or fitness for a particular use.
7. Damage resulting from use of non-LG approved
accessories.
8. All plastic surfaces and all other externally
exposed parts that are scratched or damaged due
to normal customer use.

9. Products operated outside published maximum
ratings.
10. Products used or obtained in a rental program.
11. Consumables (such as fuses).
3. WHAT LG WILL DO:
LG will, at its sole option, either repair, replace or
refund the purchase price of any unit that does
not conform to this limited warranty. LG may
choose at its option to use functionally equivalent
reconditioned, refurbished or new units or parts
or any units. In addition, LG will not re-install or
back-up any data, applications or software that
you have added to your phone. It is therefore
recommended that you back-up any such data
or information prior to sending the unit to LG to
avoid the permanent loss of such information.
4. STATE LAW RIGHTS :
No other express warranty is applicable to
this product. THE DURATION OF ANY IMPLIED
WARRANTIES, INCLUDING THE IMPLIED
WARRANTY OF MARKETABILITY, IS LIMITED TO
THE DURATION OF THE EXPRESS WARRANTY
HEREIN. LG INFOCOMM INC. SHALL NOT BE
LIABLE FOR THE LOSS OF THE USE OF THE
PRODUCT, INCONVENIENCE, LOSS OR ANY
OTHER DAMAGES, DIRECT OR CONSEQUENTIAL,
ARISING OUT OF THE USE OF, OR INABILITY
TO USE, THIS PRODUCT OR FOR ANY BREACH
OF ANY EXPRESS OR IMPLIED WARRANTY,
INCLUDING THE IMPLIED WARRANTY OF
MARKETABILITY APPLICABLE TO THIS PRODUCT.
Some states do not allow the exclusive of
limitation of incidental or consequential damages
or limitations on how long an implied warranty
lasts; so these limitations or exclusions may not
apply to you. This warranty gives you specific legal
rights and you may also have other rights which
vary from state to state.
5. HOW TO GET WARRANTY SERVICE :
To obtain warranty service, please call or fax to
the following telephone numbers from anywhere
in the continental United States:
Tel. 1-800-793-8896 or Fax. 1-800-448-4026
Or visit www.lg.com.
Correspondence may also be mailed to:
LG Electronics MobileComm U.S.A., Inc.
201 James Record Road Huntsville, AL 35824
DO NOT RETURN YOUR PRODUCT TO THE ABOVE
ADDRESS.
Please call or write for the location of the LG
authorized service center nearest you and for the
procedures for obtaining warranty claims.

4
Table of Contents
Your Phone . . . . . . . . . . . . . . . . . . . . . .8
Phone Components . . . . . . . . . . . . . . . . . . . 8
Rear view . . . . . . . . . . . . . . . . . . . . . . . . . . 10
Getting Started . . . . . . . . . . . . . . . . . .11
Installing the SIM card and battery . . . . . 11
Charging your phone . . . . . . . . . . . . . . . . . 13
Installing a memory card. . . . . . . . . . . . . . 13
General Functions . . . . . . . . . . . . . . .15
Making a Call . . . . . . . . . . . . . . . . . . . . . . . 15
Answering a Call . . . . . . . . . . . . . . . . . . . . 16
Adjusting the Volume . . . . . . . . . . . . . . . . . 17
Entering Text . . . . . . . . . . . . . . . . . . . . . . . . 17
In-Call Menu . . . . . . . . . . . . . . . . . . . .22
During a Call . . . . . . . . . . . . . . . . . . . . . . . . 22
Making a Second Call . . . . . . . . . . . . . . . . . . 22
Swapping Between Two Calls . . . . . . . . . . . . . 22
Answering an Incoming Call . . . . . . . . . . . . . . 22
Rejecting an Incoming Call . . . . . . . . . . . . . . . 22
Muting the Microphone . . . . . . . . . . . . . . . . . 23
Using the Speakerphone . . . . . . . . . . . . . . . . 23
Conference Calls . . . . . . . . . . . . . . . . . . . . 23
Making a Second Call . . . . . . . . . . . . . . . . . . 24
Setting Up a Conference Call . . . . . . . . . . . . . 24
Place the Conference Call on Hold . . . . . . . . . 24
Adding Calls to the Conference Call . . . . . . . . 24
Private Call in a Conference Call. . . . . . . . . . . 24
Ending a Conference Call . . . . . . . . . . . . . . . . 24
Menu Tree . . . . . . . . . . . . . . . . . . . . . .25
Address Book . . . . . . . . . . . . . . . . . . .28
Contact List. . . . . . . . . . . . . . . . . . . . . . . . . 28
ICE - Emergency Contacts . . . . . . . . . . . . . 28
New Contact . . . . . . . . . . . . . . . . . . . . . . . . 29
Caller Groups . . . . . . . . . . . . . . . . . . . . . . . 29
Speed Dial . . . . . . . . . . . . . . . . . . . . . . . . . . 29
SIM Management . . . . . . . . . . . . . . . . . . . . 29
Service Number . . . . . . . . . . . . . . . . . . . . . 30
My contact info . . . . . . . . . . . . . . . . . . . . . 30
About . . . . . . . . . . . . . . . . . . . . . . . . . . . . . . 30
Messaging . . . . . . . . . . . . . . . . . . . . .31
Create Message . . . . . . . . . . . . . . . . . . . . . 31
Inbox . . . . . . . . . . . . . . . . . . . . . . . . . . . . . . 34
Drafts . . . . . . . . . . . . . . . . . . . . . . . . . . . . . 34

5
Outbox .............................35
Voicemail .......................... 35
Message Settings .................... 36
Message Alert ........................36
Save To ............................. 36
Signature ........................... 36
Text Message ........................ 36
Multimedia Message ................... 37
Voicemail Number ..................... 38
Service Message ...................... 38
YPmobile .......................39
Mobile Web .....................40
AppCenter ......................42
AT&T Navigator ..................43
AT&T FamilyMap .................45
Social Net ......................46
AT&T Radio .....................47
My Stuff .......................48
Audio .............................. 48
Pictures ............................ 48
Video .............................. 48
AT&T GPS .......................... 48
AT&T Music ......................... 49
Tools .............................. 54
Voice Command ...................... 54
Recent Calls ......................... 56
Alarm Clock .......................... 56
Calendar ............................ 57
Notepad ............................ 58
Calculator ........................... 58
World Clock .......................... 58
Tasks .............................. 59
Stopwatch ........................... 59
Tip Calculator ........................60
Unit Converter ........................ 60
Applications & Games ................ 60
Camera & Recordings ................ 61
Take Photo .......................... 61
Record Video ......................... 62
Camera Album ....................... 63
Record Voice ......................... 64

6
Other Files .......................... 64
File Manager ........................ 65
Settings ........................66
Audio & Ringtones ...................66
Shop Tones .......................... 66
Ringtone ............................ 66
Message Tone ........................ 66
Alert Tone ........................... 66
Keypad Tone ......................... 67
Multimedia .......................... 67
Call ................................ 67
Phone Settings ...................... 67
Date & Time ......................... 67
Languages .......................... 68
Set Hotkeys .......................... 68
Flight Mode .......................... 68
Security ............................. 68
Reset Settings ........................ 69
Display ............................ 70
Shop Wallpapers ...................... 70
Wallpapers .......................... 70
Fonts .............................. 70
Clocks & Calendar ..................... 70
Brightness ........................... 70
Backlight Timer ....................... 70
Color Schemes ....................... 70
Menu Styles ......................... 70
Call ............................... 70
Call Forwarding ....................... 71
Send My Number. . . . . . . . . . . . . . . . . . . . . . 71
Auto Redial .......................... 71
Answer Mode ........................ 71
Senior Mode ......................... 71
Minute Minder ........................ 71
Call Waiting .......................... 72
Call Reject ........................... 72
Send DTMF Tones ..................... 72
Accessability ......................... 72
Time & Cost ......................... 72
Noise Cancelation .....................72
Connection ......................... 72
Bluetooth ............................ 73
USB Connection ....................... 74
Internet Profiles ....................... 74
Access Points ........................ 75
Memory ............................ 75
Used Space .......................... 75
Set Default Storage .................... 75
Applications ........................ 75

7
Messaging . . . . . . . . . . . . . . . . . . . . . . . . . . 76
Browser . . . . . . . . . . . . . . . . . . . . . . . . . . . . 76
Voice Command . . . . . . . . . . . . . . . . . . . . . . 78
TTS (Text-to Speech) . . . . . . . . . . . . . . . . . . . 78
Software Update . . . . . . . . . . . . . . . . . . . . . 78
Phone Info. . . . . . . . . . . . . . . . . . . . . . . . . . 78
myAT&T . . . . . . . . . . . . . . . . . . . . . . . .79
Q&A . . . . . . . . . . . . . . . . . . . . . . . . . . .80
Accessories . . . . . . . . . . . . . . . . . . . .81
For Your Safety . . . . . . . . . . . . . . . . . .82
Safety Guidelines . . . . . . . . . . . . . . . .87
Glossary . . . . . . . . . . . . . . . . . . . . . .108
Index . . . . . . . . . . . . . . . . . . . . . . . . .110

8
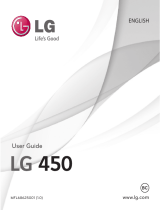
Your Phone
Phone Components
12
3
4
7
11
Press and hold
to acess Voice
Recorder.
Press and hold to
activate/deactivate
Vibrating Mode.
5
6
9
10
8
1
2
14
13

9
1. Earpiece: Lets you hear the caller during a
call.
2. Main LCD: Displays phone status icons,
menu items, web items, web information,
pictures and more, in full color.
3. Left Soft Key/Right Soft Key: Each of
these keys perform the functions indicated
by the text on the display immediately above
them.
4. Navigation Keys
Standby Mode Shortcut Keys:
Address Book
New Message
Calendar
My Stuff
In a menu: Navigates between menus.
5. Camera Key: Lets you activate the Camera
and take pictures.
6. Alarm Clock Key: Allows you to set an
alarm.
7. Send Key: Press this key in standby mode
to quickly access the most recent missed,
dialed, and received calls.
8. Browser/OK Key: Lets you access the
Mobile Web in standby mode. When
navigating through a menu, selects a
highlighted choice.
9. Clear/Back Key: Allows you to return to the
previous screen. Press and hold to activate
the Voice Command function.
10. Multi-tasking Key: Opens the multi-
tasking menu.
11. TTS Mode Key: Lets you turn the TTS
mode on/off.
12. End/Power Key: Allows you to power
the phone on or off, end calls, or return to
standby mode.
13. Volume Keys: Allows you to control the
Master Volume while in standby mode and
the earpiece volume during a call.
14. Charger/USB Port: Allows you to connect
a charger or other compatible accessories.
Your Phone

10
Rear view
Back Cover
Camera Lens
SIM Card Slot
Battery
Your Phone

11
Getting Started
Installing the SIM card and
battery
1. Remove the battery cover
Use your thumb to press on the top center
of the back cover, then slide the cover
downwards (as depicted below). Then lift the
cover to remove it.
2. Remove the battery
Hold the top edge of the phone and use the
fingernail cutouts near the bottom of the
battery to lift the battery from the phone.
Warning
Do not remove the battery when the phone is
turned on; this can damage the phone.

12
Getting Started
3. Install the SIM card
Slide the SIM card into the SIM card slot
(as shown below). Make sure that the
gold contact area on the card is facing
downwards. To remove the SIM card, slide it
gently in the opposite direction.
4. Install the battery
Insert the top of the battery first into the
battery compartment. Ensure that the
battery contacts align with the terminals on
the phone. Press the bottom of the battery
down until it snaps into place.
5. Replace the back cover
Place the back cover over the battery
compartment, then slide the cover upwards
until it clicks into place (as depicted below).

13
Getting Started
Charging your phone
Locate the Charger/USB Port on the right side
of your phone. Insert the charger connector
to the phone (the ‘B’ side of the connector
has to be facing up when connecting to the
phone) and then plug the other end into the
wall socket. Your LG-A340 will need to be
charged until the Full Battery message appears
on the screen.
Important!
You must insert the battery before charging.
Warning
Use of unauthorized accessories could damage
your phone and void your warranty.
Installing a memory card
You can expand the memory available on your
phone by using a microSD™ memory card.
Tip
A memory card is an optional accessory and
must be purchased separately.
1. Remove the back cover.
2. Locate the microSD card slot on the right
side of the phone’s rear view.
3. Position the microSD card with the label
side facing up and slide it into place until it
is fully inserted and locked in place.
4. Replace the back cover back.
Note
If your memory card has existing content, it
will automatically be filed in the correct folder.
For example, videos will be accessible from the
Videos folder.

14
On-Screen Icons
The table below describes various display indicators or icons that appear on the phone’s display
screen.
Getting Started
ICON/
INDICATOR
DESCRIPTION
Multitasking
Network signal strength
(number of bars will vary)
No network signal
Low Battery
New text message
An alarm is set
Ring profile in use
Silent All profile in use
EDGE network available
Bluetooth is active
3G network available
The browser is active
ICON/
INDICATOR
DESCRIPTION
Vibrating Mode On
Speakerphone activated
Call in Progress
Voicemail
Battery Full
Battery Charging
Flight Mode On

15
General Functions
Making a Call
1. Make sure your phone is powered on.
2. Enter a phone number including the area
code. To edit a number on the display
screen, simply press the Clear/Back Key
to erase one digit at a time.
Ź Press and hold the Clear/Back Key
to erase the entire number.
3. Press the Send Key
to call the
number.
4. To end the call, press the End/Power Key
.
Making a Call with the Send Key
1. Press the Send Key to display the
most recent missed, dialed and received
calls.
2. Highlight the desired number by using the
Navigation Keys.
3. Press the Send Key
.
Making International Calls
1. Press and hold and the international
access character ‘+’ will appear.
2. Enter the country code, area code, and the
phone number.
3. Press the Send Key
to call the
number.

16
General Functions
Ending a Call
To end a call, press the End/Power Key
.
Making a Call from the Contacts
You can store frequently called names and
phone numbers in the SIM card as well as in
the phone memory known as the Contacts.
You can dial a number by simply highlighting
a name in the Contacts List and pressing the
Send Key .
1. Press Down Navigation Key to
access the Contact List.
2. Highlight the Contact and press the Send
Key
.
Answering a Call
When you receive a call, the phone displays
a notification on the screen and rings and/or
vibrates. If the caller can be identified, the
caller’s phone number (or name, if stored in
your Address Book) is displayed.
1. Press the Send Key or the Left Soft
Key Accept to answer an incoming
call.
If the Answer Mode has been set as Any
Key ( Menu > Settings >
Call > Answer Mode), any key press
will answer a call, except for the End/
Power Key , the Right Soft Key
, or the Volume Keys .
2. End the call by pressing the End/Power
Key
.
Note
You can answer a call while using other functions
or features.

17
Adjusting the Volume
Use the Volume Keys during a call to adjust
the earpiece volume.
While in standby mode, you can adjust the
Master Volume using the Volume Keys.
Vibrating Mode (Quick)
Vibrating Mode can be activated by pressing
and holding down or the down Volume
Key .
Signal Strength
If you are inside a building, being near a
window may give you better reception. You can
see the strength of your signal by the signal
indicator on your phone’s display screen.
Entering Text
You can enter alphanumeric characters by
using the phone’s keypad. For example, storing
names in the Address Book, writing a message,
or scheduling events in the calendar all require
text to be entered.
Changing the Text Input Mode
Change the text input mode by holding down
when in a text entry field.
You can check the current text input mode in
the upper right corner of the screen.
The following text input modes are available
on the phone.
ABC Mode
This mode allows you to enter letters by
pressing the key labeled with the required
letter one, two, three, or four times until the
desired letter is displayed.
General Functions

18
General Functions
T9 Mode
The T9 mode allows you to enter words easily
with only one keystroke per letter. Each key
on the keypad has more than one letter.
The T9 mode automatically compares your
keystrokes with an internal linguistic dictionary
to determine the correct word, thus requiring
far fewer keystrokes than the traditional ABC
mode.
Note
You can select a different T9 language from
the Options menu (
Options > Text
Entry Settings >
Language).
123 Mode (Numbers Mode)
Type numbers using one keystroke per number.
To change to 123 mode in a text entry field,
press the key until 123 mode is displayed
in the upper right corner.
Symbol Mode
The Symbol Mode enables you to enter various
symbols or special characters. To enter a
symbol, press . Use the Navigation Keys
to highlight the desired symbol and press .
Using the ABC Mode
Use the alphanumeric keypad to enter your
text.
1. Press the key labeled with the required
letter:
Ź Once for the first letter.
Ź Twice for the second letter.
Ź And so on.
2. To insert a space, press once. To
delete letters, press the Clear/Back Key
. Press and hold down the Clear/
Back Key to erase all of the
entered text.
Note
Refer to the table below for more information on
the characters available using the keys.

19
Key
Characters in the Order Displayed
Upper Case Lower Case
1 . , ’ @ ? ! - : / 1 . , ’ @ ? ! - : / 1
2 A B C 2 a b c 2
3 D E F 3 d e f 3
4 G H I 4 g h i 4
5 J K L 5 j k l 5
6 M N O 6 m n o 6
7 P Q R S 7 p q r s 7
8 T U V 8 t u v 8
9 W X Y Z 9 w x y z 9
0
Space Key,
0 (Long press)
Space Key,
0 (Long press)
Using the T9 Mode
The T9 predictive text input mode allows you to
enter words easily with a minimum number of
key presses. As you press each key, the phone
begins to display the characters that it thinks
you are typing based on a built-in dictionary.
As new letters are added, the word changes
to reflect the most likely candidate from the
dictionary.
1. When you are in the T9 predictive text input
mode, begin entering a word by pressing
keys to . Press one key per letter.
Ź The word changes as letters are typed
- ignore what is displayed on the screen
until the word is typed completely.
Ź If the word is still incorrect after typing
completely, press or the Right Soft
Key Next once (or more if needed)
to cycle through the other word options.
Ź If the desired word is missing from the
word choices list, press the Right Soft
Key Add to add the word.
2. Enter the whole word before editing or
deleting any keystrokes.
General Functions

20
General Functions
3. Complete each word with a space by
pressing or the Right Navigation
Key .
To delete letters, press the Clear/Back Key
. Press and hold down the Clear/Back
Key to erase all of the entered text.
T9 Dictionary
The T9 Dictionary is a feature that allows the
user to add any unique or personal words
to the T9 standard language database. The
T9 Dictionary function can be found in the
Options menu ( Options > Text
Entry Settings > T9 Dictionary). Within
the T9 Dictionary function, the user can add,
modify, delete, or reset personal words.
Using the Korean Mode
Allows you to type in Korean when you set the
language to Korean.
Characters
in the Order
Displayed
Keys
/