Wayne EEAUP250 User manual

Category
Water pumps
Type
User manual
EEAUP250
For parts, product & service information
visit www.waynepumps.com
REMINDER: Keep your dated proof of purchase for warranty purposes!
Attach it to this manual or file it for safekeeping.
Auto On-Off Water Removal Portable Pump
OPERATING INSTRUCTIONS & PARTS MANUAL
Please read and save these instructions. This manual contains important Safety Warnings and Operating
Instructions. You will need to refer to it before attempting any application or maintenance. Always keep this
manual with the unit so that it will be easily accessible. Failure to read and follow these warnings and instructions
could result in property damage, serious injury or death.
Risk of electric shock. This pump
has NOT been tested for use in
swimming pool or marine areas. NEVER place pump in
pools while people are in the water. Failure to follow
COULD result in death or serious injury.
Risk of electric shock! Do NOT
handle pump with wet hands or
when standing in water or on a damp surface. Failure to
follow COULD result in death or serious injury.
Electric shock hazard! For installation
by a qualifi ed electrician only. GFCI receptacles
will provide protection against line to ground faults only. The ground
fault receptacle does NOT limit the magnitude of fault current and will
NOT prevent an electrical shock.
1. Wear safety glasses at all times when working
with pumps.
2. The unit MUST be plugged into a GFCI. For
installation by a qualified electrician only.
3. Damage to the power cord or discharge hose may occur.
Use the handle supplied on the pump.
APPLICATION AND OPERATION
Do NOT use pump if any part of the housing
switch or probe is cracked, broken, or missing.
Always disconnect
electric supply
before attempting to install, service,
relocate, or perform any maintenance. If
the power source is out of sight, lock and
tag in open (off) position to prevent unexpected power application.
Failure to do so could result in fatal electrical shock!
Electric shock hazard. Use only
Underwriters Laboratories
(UL)- listed extension cord with #16 gauge or larger wire
that is labeled for outdoor use. Use polarized grounding
type plugs only. Polarized plugs have one blade slightly
wider than the other and can only be inserted one way into the
outlet. Do NOT handle plug connector near water. Failure to follow
these instructions will result in serious injury or death.
This unit is NOT designed for use
as a sump pump or in sump
applications. This unit is NOT designed for use in septic
tanks or underground vaults to pump raw sewage or
effl uents. NEVER use in hazardous or explosive locations.
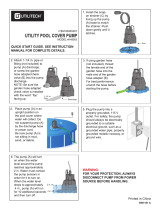
1. This pump has been designed with 1-1/4 in. NPT discharge
connection size. Attach pipe or fitting to the discharge or use
the supplied garden hose adapter. Thread the female end of
the garden hose to the male end of the elbow.
2. Be certain to use a hose washer (not included) on the garden
hose for correct pump operation.
DESCRIPTION
This portable, submersible utility pump is designed for automatic
use in water. The units are equipped with a 9 ft. 3-prong
grounding type power cord. The provided discharge adapter can
be used for convenient attachment to a garden hose.
UNPACKING
Inspect this unit before it is used. Occasionally, products are
damaged during shipment. If the pump or components are
damaged, contact customer service at 1-800-237-0987.
READ & FOLLOW ALL INSTRUCTIONS
SAVE THESE INSTRUCTIONS — DO NOT DISCARD
SAFETY GUIDELINES
This manual contains information that is important to know
and understand. This information is provided for SAFETY and
to PREVENT EQUIPMENT PROBLEMS. To help recognize this
information, observe the following symbols.
Danger indicates an imminently hazardous
situation which, if NOT avoided, WILL result
in death or serious injury.
Warning indicates a potentially hazardous
situation which, if NOT avoided, COULD
result in death or serious injury.
Caution indicates a potentially hazardous
situation which, if NOT avoided, MAY result
in minor or moderate injury.
Notice indicates important information, that if
NOT followed, MAY cause damage to equipment.
This is the safety alert symbol. It is used to alert you to potential
bodily injury hazards. Obey all safety messages that follow this
symbol to avoid possible injury or death.
NOTE: Note indicates information that requires special attention.
GENERAL SAFETY INFORMATION
CALIFORNIA PROPOSITION 65
This product or its power cord may contain
chemicals, including lead, known to the
State of California to cause cancer and birth defects or other
reproductive harm. Wash hands after handling.
GENERAL SAFETY
Read the manual(s) included with this product
carefully. Be thoroughly familiar with the controls
and the proper use of the equipment. Follow all
instructions.
Only persons well acquainted with these rules of safe
operation should be allowed to use the unit.
Keep away from children!
Risk of fi re, explosion and/or death!
death! Pump is NOT rated for use
with fl ammable/combustible liquids, vapors or dusts. Do
NOT pump liquids that are NOT clear. Failure to follow
these instructions will result in bodily injury or death.
© 2011,
WAYNE/Scott Fetzer Company.
353901-001 4/11
2
Operating Instructions and Parts Manual
www.waynepumps.com
APPLICATION AND OPERATION (CONTINUED)
3. To verify pump is operating correctly.
a. Disconnect pump from power source.
b. Connect hose adapter and discharge hose to pump.
c. Immerse pump in a bucket or tub of water at least 1-3/4
inches in depth.
d. Place the other end of the discharge hose outside the
bucket, so the water will pump out.
e. Plug power cord into a grounded 120 volt GFCI power
outlet. The pump should start after 2 seconds of
detecting water. Once the pump removes the water to a
depth of 3/8 inch, the pump will stop automatically.
f. If pump does NOT operate, unplug power cord and
proceed to maintenance – step 5.
4. To verify discharge hose is free from a blockage.
a. Connect hose to another water source such as a faucet.
If water flows through hose, return to step 3a. If water is
restricted, verify discharge hose is unwound. Remove all
kinks, bends, or obstructions in hose.
b. If pump is still NOT operating, proceed to step 6.
5. Periodic cleaning of pump is required to maintain
performance of the pump. Follow the cleaning steps listed
below:
a. Unplug the power cord.
b. Remove the four (4) base screws (Figure 2).
c. Remove the base and impeller plate.
d. Remove the debris and make sure the impeller turns
freely.
e. Reinstall impeller plate, base, and screws.
6. Check the priming hole for obstruction. (Figure 2).
Follow the cleaning steps listed below:
a. Unplug the power cord.
b. Remove the four (4) base screws (Figure 2).
c. Remove the base and impeller plate.
d. Use a pin or paperclip to clean the priming hole and air
escape channel.
e. Reinstall impeller plate, base and screws.
3. For best pump performance, unwind the hose before starting
the pump. This will help remove any kinks or binds in the
hose and allow the unit to pump with less restriction.
4. Set the pump on a hard, flat surface in the water. Do not set
the pump directly on mud or sand surfaces. This will cause
the inlet screen to clog.
5. The water level must be at least 1-3/4 inches for the pump
to cycle, prime, and operate. Water levels less than 1-3/4
inches will not allow the impeller to contact water therefore
no water will be pumped.
Do NOT handle pump with wet
hands or when standing in water
or on a damp surface when the unit is operating or fails to
operate. ALWAYS disconnect pump power cord from
power source before handling.
6. Plug the pump into a 120 volt GFCI protected outlet. The
pump will start automatically when the water reaches a depth
of 1-3/4 inches. A priming delay of 2 seconds is programmed
into the control to allow time for air to escape from the
pumping chamber.
7. The pump will stop automatically once water has been
removed to a depth of approximately 3/8 of an inch above
the hard surface. The pump will not restart until the water
depth rises to 1-3/4 inches or greater.
8. The pump will not allow itself to run dry. Once the pump
detects that water is no longer being removed, it will shut down
automatically. The pump must remain upright at all times in
order for the water detection to function. The shaft seal depends
on water for lubrication. Do not allow the pump to operate on its
side or inverted.
Do NOT alter the pump to override the automatic
water detector. The shaft seal depends on water
for lubrication. Overriding this pump feature can cause the pump to run
dry and may damage the shaft seal and cause pump failure.
MAINTENANCE AND TROUBLESHOOTING
Pump starts automatically
.
Always disconnect electric supply
before attempting to install, service, relocate, or
perform any maintenance. Failure to do so could result
in fatal electrical shock.
Minimal service is required for this pump. The motor housing of
the pump is completely sealed and requires no service. If pump
should fail to operate, perform the following troubleshooting
guidelines:
1. Verify pumping height does NOT exceed 15 feet (See Figure
1). If pumping height is greater than 15 feet, this pump will
NOT operate.
2. Verify water depth is 1-3/4 inches or greater (See Figure 1).
Do NOT disassemble or alter this
product in any way. Failure to
follow these instructions will result in serious injury or
death.
15 FT MAXIMUM
PUMPING HEIGHT
Figure 1 - Pumping Height
WATER LEVEL MINIMUM:
1-3/4 INCHES
3
www.waynepumps.com
EEAUP250
7. If pump runs continuously, unplug the unit. Once unplugged,
check for debris stuck inside the sensor body (Figure 3).
Remove any trapped leaves, debris or dirt.
8. If the pump cycles on and off too often the electronic switch may
need cleaning. Unplug the pump and turn upside down. The
sensor probe will be visible inside the switch housing. Clean inside
the housing gently scrubbing with a small brush using soapy water.
MAINTENANCE AND TROUBLESHOOTING
(CONTINUED)
Figure 3 - Remove Debris From Sensor
CLEAN DEBRIS
INSIDE SENSOR
PRIMING HOLE
BASE SCREWS (4)
INLET SCREEN/
BASE
IMPELLER PLATE
Figure 2 - Priming Hole Location
WHEN REATTACHING THE BASE (INLET SCREEN), BE SURE THAT THE
FOUR (4) "PLUGGED" SCREENS ARE ORIENTED BELOW THE SWITCH.
Do not use pump if any part of the switch
housing or probe is cracked, broken or missing.
PUMPING HEIGHT
When water is pumped to an elevated position, any volume that has
not reached the discharge outlet can flow back through the pump
when the pump shuts off. This back-flow can cause the water level
in small areas to rise enough to re-start the pump. A check valve
[Check Valve Sold Separately] is required in this situation. For proper
operation, make certain the check valve is oriented as instructed.
In small areas a check valve is required to prevent
backfl ow. Without a check valve the pump may
cycle continuously and potentially wear out the pump components.
Troubleshooting
Chart
Electrocution Hazard! Pump starts automatically. Disconnect the power before
attempting any repairs. Failure to follow will result in serious injury or death.
Symptom Possible Cause(s) Corrective Action
Pump will not
start or run
1. Tripped home electrical breaker
2. GFCI tripped
3. Low line voltage
4. Defective motor
5. Dirty switch
6. Impeller obstructed
7. Inlet screen clogged
8. Priming hole plugged
1. Reset breaker
2. Check for damaged wiring or moisture
3. If voltage is under 108 volts, check wiring size
4. Replace pump
5. Rinse out switch with clean water (Figure 3 on page 3)
6. Remove base and impeller plate (Figure 2 on page 3) check for
debris; clean
7. Clean inlet screen (Figure 2 on page 3)
8. Clean hole, inside volute housing, with a pin or paper clip (Figure
2 on page 3)
Pump starts and
stops too often
1. Backflow of water from piping
2. Dirty switch
3. Priming hole plugged
1. Install or replace check valve [Sold Separately: CAT No. 40138]
2. Rinse out switch with clean water (Figure 3 on page 3)
3. Clean hole, inside volute housing, with a pin or paper clip
(Figure 2 on page 3)
Pump will not
shut off or runs
continuously
1. Debris in switch
2. Discharge height exceeds capability
1. Rinse out switch with clean water (Figure 3 on page 3)
2. Raise pump or reduce discharge height
Pump operates
but delivers little
or no water
1. Impeller obstructed
2. Priming hole plugged
3. Obstructed piping
4. Discharge height exceeds capability
1. Remove base and impeller plate (Figure 2 on page 3), check for
debris; clean
2. Clean hole, inside volute housing, with a pin or paper clip
(Figure 2 on page 3)
3. Check for kinks, reposition hose or check for debris
4. Reposition pump to reduce discharge height
4
www.waynepumps.com
Limited Warranty
For one year from the date of purchase, WAYNE Water Systems Division ("WAYNE Pumps") will repair or re place, at its
option, for the original purchaser any part or parts of its Water Pumps (“Product”) found upon examination by Wayne to
be defective in materials or work man ship. Please call WAYNE Pumps (800-237-0987) for instructions or see your dealer.
Be pre pared to provide the model number and the serial number when exercising this warranty. All transportation charges
on Products or parts submitted for repair or replacement must be paid by purchaser.
This Limited Warranty does not cover Products which have been damaged as a result of accident, abuse, misuse,
neglect, improper application, improper maintenance, or failure to operate in accordance with WAYNE Pumps' written
instructions.
THERE IS NO OTHER EXPRESS WARRANTY. IMPLIED WARRANTIES, IN CLUD ING THOSE OF MER CHANT-
ABIL I TY AND FITNESS FOR A PARTICULAR PUR POSE, ARE LIMITED TO ONE YEAR FROM THE DATE
OF PURCHASE. THIS IS THE EXCLUSIVE REM E DY AND ANY LIABILITY FOR ANY AND ALL INDIRECT OR
CONSEQUENTIAL DAM AG ES OR EXPENSES WHATSOEVER IS EXCLUDED.
Some states do not allow limitations on how long an implied warranty lasts, or do not allow the exclusions or limitations
of incidental or consequential damages, so the above lim i ta tions might not apply to you. This limited war ran ty gives you
specific legal rights, and you may also have other legal rights which vary from state to state.
In no event, whether as a result of breach of contract warranty, tort (in clud ing negligence) or otherwise, shall WAYNE
Pumps or its suppliers be liable for any special, consequential, incidental or penal damages including, but not limited to
loss of profit or revenues, loss of use of the products or any associated equipment, damage to associated equip ment,
cost of capital, cost of substitute products, facilities, services or replacement power, downtime costs, or claims of buyer’s
cus tom ers for such damages.
You MUST retain your purchase receipt along with this form. In the event you need to exercise a warranty claim, you
MUST send a copy of the purchase receipt along with the material or correspondence. Please call WAYNE Pumps (800-
237-0987) for return authorization and instructions.
DO NOT MAIL THIS FORM TO WAYNE PUMPS. Use this form only to maintain your records.
MODEL NO._______________ SERIAL NO.__________________________ DATE_____________
ATTACH YOUR RECEIPT HERE
Operating Instructions and Parts Manual
For Replacement Parts or
Technical Assistance, call
1-800-237-0987
Please provide following information:
- Model number
- Serial number (if any)
- Part description and number as shown in parts list
Address parts correspondence to:
WAYNE Water Systems
101 Production Drive
Harrison, OH 45030 U.S.A.
Ref. No. Description Order No. Quantity
1 Adapter Kit 62060-001 1
1
  • Page 1 1
  • Page 2 2
  • Page 3 3
  • Page 4 4
  • Page 5 5
  • Page 6 6
  • Page 7 7
  • Page 8 8
  • Page 9 9
  • Page 10 10
  • Page 11 11
  • Page 12 12

Wayne EEAUP250 User manual

Category
Water pumps
Type
User manual

Ask a question and I''ll find the answer in the document

Finding information in a document is now easier with AI