Oregon Scientific AWS888N Owner's manual
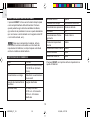
- Category
- Smartwatches
- Type
- Owner's manual
This manual is also suitable for

1
EN
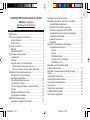
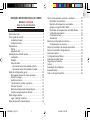
TABLE OF CONTENTS
About this guide ......................................................... 2
Product overview ....................................................... 2
Main unit ............................................................... 2
Remote unit .......................................................... 4
Getting started ........................................................... 7
Batteries ............................................................... 7
AC adaptor ........................................................... 7
Remote unit set up .................................................... 7
Installation ............................................................ 8
Clock .................................................................... 8
Radio signal ......................................................... 8
Remote sensor searching ................................ 8
Main unit sensor searching .............................. 9
General settings mode .............................................. 9
Navigating through main menu ............................ 9
Changing settings ................................................ 9
Clock setting ....................................................... 10
Alarm setting ....................................................... 11
Alarm type (daily / weekday) ............................... 11
Snooze ................................................................ 11
Weather setting mode ........................................ 12
Altitude compensation function .......................... 12
Clock alarm mode .................................................... 13
Turning alarm on/off ........................................... 13
Weather forecast mode ........................................... 13
Temperature, pressure & hygro mode ..................... 14
Barometer display .............................................. 14
Thermo & hygro memory ................................... 14
Clear MIN / MAX records ................................... 15
Current thermo-hygro display ............................. 15
Auto scan function .............................................. 15
Comfort zone ...................................................... 15
Trends ................................................................ 15
System setting mode ............................................... 16
System settings .................................................. 16
Volume ........................................................... 16
Language ....................................................... 16
Silence mode ................................................. 16
Auto rotation frequency .................................. 16
Sleep mode .................................................... 16
Auto rotation display mode ...................................... 16
Clock alarm display mode ....................................... 17
Reset system ........................................................... 17
Default settings ........................................................ 17
Low battery detection .............................................. 18
Safety & care ........................................................... 18
Warnings.................................................................. 18
Troubleshooting ....................................................... 19
Specifications .......................................................... 19
About Oregon Scientific ........................................... 20
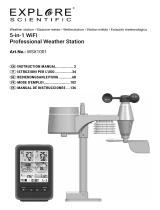
COLOUR WEATHER STATION
MODEL: AWS888N
USER’S MANUAL
AWS888N_En_R2 8/16/04, 4:28 PM1

EN
2
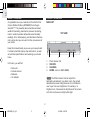
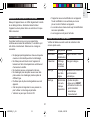
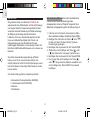
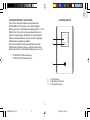
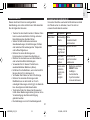
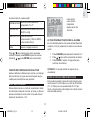
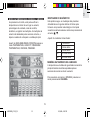
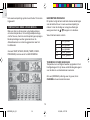
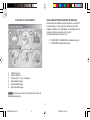
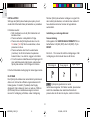
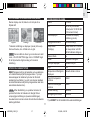
ABOUT THIS GUIDE
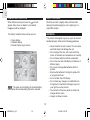
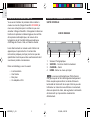
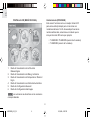
Congratulations on your selection of the World’s first
Colour Weather Station (AWS888N) from Oregon
Scientific
TM
. This powerful device bundles animated
weather forecasting, barometric pressure monitoring,
indoor / outdoor wireless temperature and humidity
readings, time / date keeping, and dual alarm features
into a single tool you can use from the convenience of
your home.
Keep this manual handy as you use your new product.
It contains practical step-by-step instructions, as well
as technical specifications and warnings you should
know.
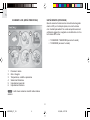
In this box, you will find:
• Main unit
• Remote sensor
• Batteries
• AC adaptor
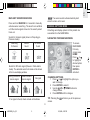
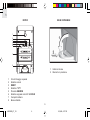
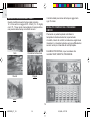
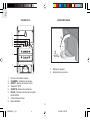
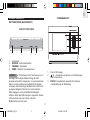
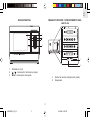
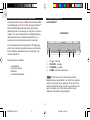
PRODUCT OVERVIEW
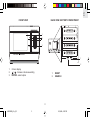
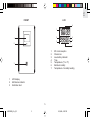
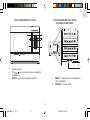
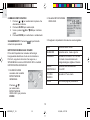
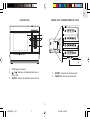
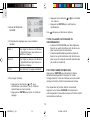
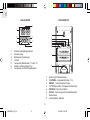
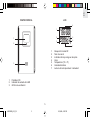
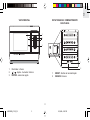
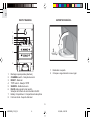
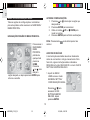
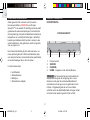
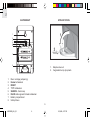
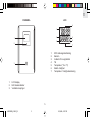
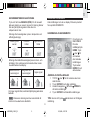
MAIN UNIT
TOP VIEW
1. Photo Sensor Cell
2. SNOOZE
3. CHANNEL
4. HOME - return to MAIN MENU
The Photo Sensor Cell can adjust the
backlight automatically. In a darker room, the cell will
decrease the screen’s brightness as to not irritate the
user’s eye from over-brightness. Conversely, in a
brighter room, it increases the brightness of the screen
so that it can be seen in bright white light.
NOTE
2341
AWS888N_En_R2 8/16/04, 4:28 PM2

3
EN
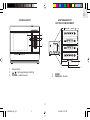
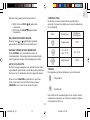
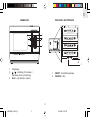
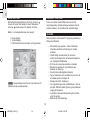
FRONT VIEW
1. Colour display
2.
/
-
Increase / decrease setting
3. ENTER - select option
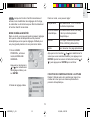
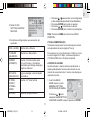
BACK VIEW / BATTERY COMPARTMENT
1. RESET
2. SEARCH
1
2
3
1
2
AWS888N_En_R2 8/16/04, 4:28 PM3

EN
4
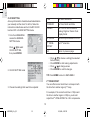
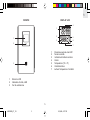
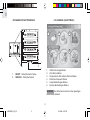
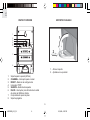
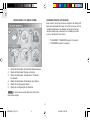
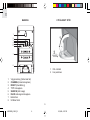
REMOTE UNIT (RTGR328N)
This sensor works as an RF clock receiver for this
main unit but does not work with previous models. If
you want to purchase additional remote sensors,
select a model that does not include the RF function
such as:
• THGR228N / THGR238N (3-channel sensor)
• THGR328N (5-channel sensor)
NOTE
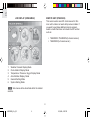
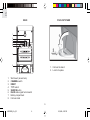
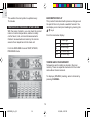
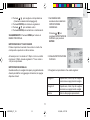
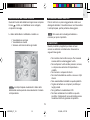
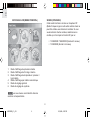
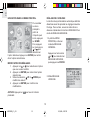
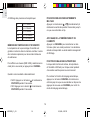
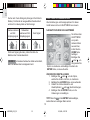
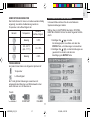
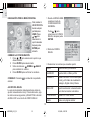
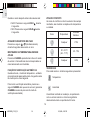
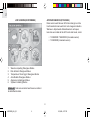
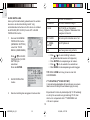
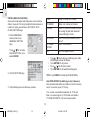
LCD DISPLAY (HOME MENU)
1. Weather Forecast Display Mode
2. Clock & Alarm Display Mode
3. Temperature / Pressure / Hygro Display Mode
4. Auto Rotation Display Mode
5. General Setting Mode
6. System Setting Mode
Sub menus will be described within the related
sections.
1
2
3
4
5 6
AWS888N_En_R2 8/16/04, 4:28 PM4

5
EN
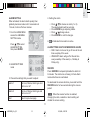
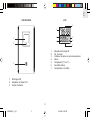
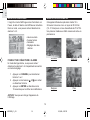
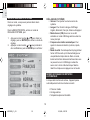
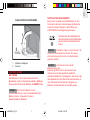
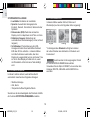
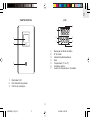
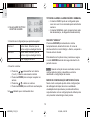
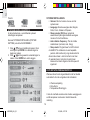
FRONT
1. LCD display
2. LED status indicator
3. Ventilation duct
1
2
3
LCD
1. RF clock reception
2. Channel no.
3. Low battery indicator
4. Time
5. Temperature (°C or °F)
6. Relative humidity
7. Temperature / Humidity reading
1
2
3
5
6
4
7
AWS888N_En_R2 8/16/04, 4:28 PM5

EN
6
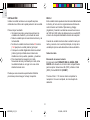
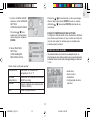
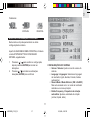
BACK
1
2
3
4
5
6
7
8
1. Wall mount (recess hole)
2. CHANNEL switch
3. RESET
4. °C/°F switch
5. SEARCH button
6. EU/UK radio signal format switch
7. Battery compartment
8. Fold-out stand
FOLD-OUT STAND
1. Fold-out the stand.
2. Lock it into place.
AWS888N_En_R2 8/16/04, 4:28 PM6

7
EN
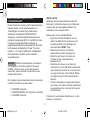
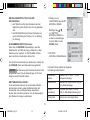
GETTING STARTED
BATTERIES
Batteries for the remote and main units are supplied
with this product. Press the RESET button whenever
you change batteries.
Insert the batteries in the remote unit before
you set up the main unit. Do not use rechargeable
batteries.
AC ADAPTOR (main unit)
When the main unit is plugged into the power socket
or batteries are inserted for the first time, an opening
animation will be shown before the MAIN menu
screen.
NOTE
Connect the AC adaptor to your
weather station’s AC socket located
on the side of the main unit.
Batteries are for memory backup purposes
only; the AC adaptor should power the main unit.
NOTE
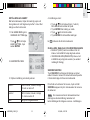
REMOTE UNIT SET UP
Up to 5 remote units can be used with this product to
monitor outdoor temperature and humidity. The remote
unit included in this package is used to receive radio
frequency signals for the radio-controlled clock, and to
measure temperature and humidity. The measurement
unit (°C or °F) and channel number (1, 2, 3, 4, or 5)
switches are located in the battery compartment of the
remote unit, and should be set prior to installation.
Additional remote units that measure
temperature and humidity are sold separately. If you
are using more than one remote unit, be sure to select
a different channel number for each unit.
The following remote units are compatible with this
product:
• THGR228N
• THGR238N
• THR228N
• THGR328N
NOTE
AWS888N_En_R2 8/16/04, 4:28 PM7

EN
8
When the remote unit receives the radio-controlled
clock signal and is paired up with the main unit, the
clock in the main unit will automatically be updated.
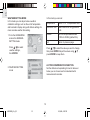
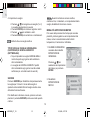
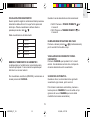
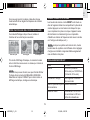
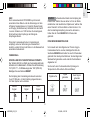
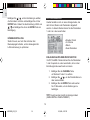
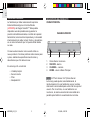
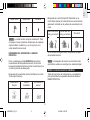
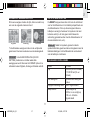
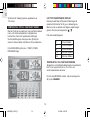
RADIO SIGNAL
REMOTE SENSOR SEARCHING
The RADIO SIGNAL FORMAT switch is located
inside the battery compartment. Select EU (DCF)
or UK (MSF). Press RESET.
Reception takes 2 - 10 minutes to complete. Once
complete, the icon will stop blinking.
Strong signal Weak signal
No signal
Press SEARCH to manually activate search for radio-
controlled clock signal. The tower icon will blink until the
clock signal is found or the search period times out.
The remote unit collects RF signals. For best
results, place it away from metallic or electrical
objects, and in a location with a clear view to the sky.
NOTE
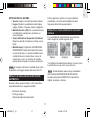
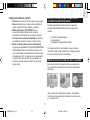
INSTALLATION
Mount the remote unit on a flat surface using the
recess holes on the back of the unit.
For best results:
• Insert the batteries and select the measurement
unit and channel number first.
• Place the unit out of direct sunlight and
moisture.
• Do not place the remote unit more than
50 meters (164 feet) from the main (indoor)
unit.
• Position the unit so that it faces the main
(indoor) unit. Minimize obstructions such as
doors, walls, and furniture.
• To maximize radio frequency reception for the
radio-controlled clock, place the remote unit in a
location with a clear view to the sky.
You may need to experiment with various locations to
get the best reception.
CLOCK
This remote unit can automatically synchronize the
date and time with official time-keeping organizations
in Frankfurt (Germany) and Rugby (England). When
the unit is within 1500 km (932 miles) of a RF signal,
the reception icon will blink during reception.
AWS888N_En_R2 8/16/04, 4:28 PM8

9
EN
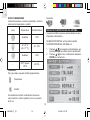
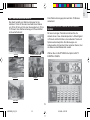
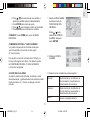
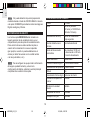
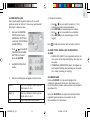
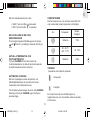
MAIN UNIT SENSOR SEARCHING
Press and hold SEARCH for 2 seconds to manually
activate sensor searching. The search icon will blink
until the remote signal is found or the search period
times out.
Search for channel signal (shown in Temp-Hygro-
Pressure mode):
Searching
for Sensor
Sensor
found
No sensor
found
Search for RF clock signal (Shown in Clock-Alarm
mode). The selected sensor's channel will be shown
in the house display window:
NOTE
The sensor search will automatically start
when the main unit is reset.
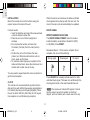
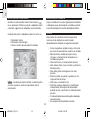
GENERAL SETTINGS MODE
All settings and display options for this product are
accessible from the MAIN MENU.
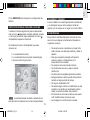
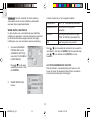
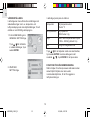
NAVIGATING THROUGH MAIN MENU
To access
MAIN MENU
from any
screen press
HOME.
Press
or
to highlight a
desired option
then press
ENTER to
activate it.
CHANGING SETTINGS
1. Press
or
to highlight the option you
wish to change.
2. Press ENTER to select it.
3. Use the
UP or
DOWN buttons to
change values.
4. Press ENTER confirm changes.
TIP: Pressing the
will return you to the previous
screen.
Strong clock and
remote signal
Weak clock and
remote signal
No signal
If no signal is found, check remote unit batteries.
AWS888N_En_R2 8/16/04, 4:28 PM9

EN
10
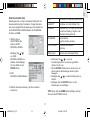
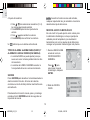
CLOCK SETTING
Auto-synchronization should be deactivated before
you manually set the clock. To do this, follow the
instructions stated below and turn the RF CLOCK
function OFF in CLOCK SETTING mode.
1. From the HOME MENU
access the GENERAL
SETTING mode.
Press
/
to select
CLOCK SETTING,
then press ENTER.
2. CLOCK SETTING mode
3. Choose the settings that need to be adjusted:
TIME Set Hour and Minute
YY-MM-DD Set Year, Month and Date
FORMAT
Set 12 or 24 hour format and
Analog, Digital or Classic Clock
display format
RF CLOCK Set Auto synchronization on or off
2
nd
ZONE-
OFFSET
Set 2
nd
zone-time
Exit Return to previous page
• Press
/
to choose a setting (the selected
item will flash).
• Press ENTER to start making adjustments.
• Press
/
to change values.
• Press ENTER to confirm changes.
TIP: Press HOME to return to MAIN MENU.
2
nd
ZONE-OFFSET
You can offset current local time to correspond with
the time from another region (2
nd
zone).
For example, if the current local time is 1:30pm and
the time in another region is 3:30pm, you should
adjust the 2
nd
ZONE-OFFSET to +02 to compensate.
AWS888N_En_R2 8/16/04, 4:28 PM10

11
EN
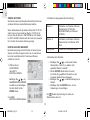
ALARM SETTING
When activated, the alarm starts quietly, then
gradually becomes louder until it crescendos at
1 minute; it shuts off at two minutes.
Alarm 1 Set Hour, Minute, Alarm type and
Alarm on or off
Alarm 2
Set Hour, Minute, Alarm type and
Alarm on or off
Return to previous pageExit
1. From the HOME MENU
access the GENERAL
SETTING mode.
Press
/
to select
ALARM SETTING,
then press ENTER
2. ALARM SETTINGS
mode
3. Choose the settings that you want to adjust:
NOTE
4. Setting the alarm:
• Press
/
to choose an alarm (1 or 2).
The selected alarm will be swinging.
• Press ENTER begin adjusting values.
• Press
/
change values.
• Press ENTER to confirm changes.
A
will indicate that an alarm is active.
ALARM TYPES: DAILY AND WEEKDAYS ALARM
• DAILY alarm can be set to go off once at the set
time everyday of the week.
• WEEKDAYS alarm will go off at the set time
every weekday of the week (i.e., Monday to
Friday only).
SNOOZE
Press SNOOZE to temporarily disable the alarm for
8 minutes. The alarm icon will swing in Clock-Alarm
mode while Snooze is activated.
To deactivate the snooze function, press and hold the
SNOOZE button for two seconds during the snooze
period.
When the snooze function is enabled,
changing the clock, calendar or alarm setting will
disable the snooze setting.
AWS888N_En_R2 8/16/04, 4:28 PM11

EN
12
WEATHER SETTING MODE
In this mode you can adjust various weather
calibration settings, such as the unit of temperature
and barometric display along with altitude settings for
more accurate weather forecasting.
1. From the HOME MENU
access the GENERAL
SETTING mode.
Press
/
to select
weather settings,
then ENTER.
2. WEATHER SETTING
mode
Temperature
Select °C or °F temperature units
Barometric Unit
Select Mb/hPa or inHg pressure
units
Altitude
Set the compensated altitude
[-100m to 2500m] (default 0m)
Exit Return to previous page
In this mode you can set:
Press
/
to select the value you wish to change,
then press ENTER. Adjust the values using
/
,
press ENTER to keep them.
ALTITUDE COMPENSATION FUNCTION
Set the altitude corresponding to how far above or
below you are to sea level to make barometric
measurements accurate.
AWS888N_En_R2 8/16/04, 4:28 PM12

13
EN
CLOCK-ALARM MODE
This is basically a viewing mode where time, date and
alarm information is conveniently displayed. In this
mode you can turn alarms 1 or 2 ON/OFF.
• Current time
• Zone time
• Calendar
• Two alarm settings
TURNING THE ALARM ON/OFF
In Clock-Alarm mode you can switch ON/OFF alarm
1 or 2 separately without going into the setting mode:
1. Press CHANNEL to select alarm 1 or 2
2. Press
/
to switch alarm on or off.
3. Press ENTER or wait 10 seconds to
confirm the changes.
TIP: You can change the look of your display.
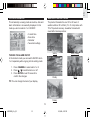
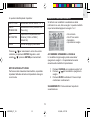
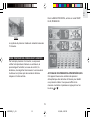
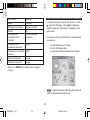
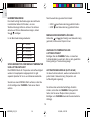
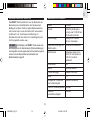
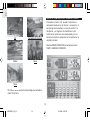
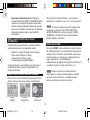
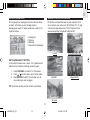
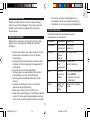
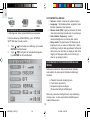
WEATHER FORECAST MODE
This product forecasts the next 12 to 24 hours of
weather within a 30 to 50 km (19 - 31 mile) radius with
70 to 75 percent accuracy. A weather forecast with
sound effect is always active:
Sunny Partly Cloudy
Cloudy
Rainy
Snowy
AWS888N_En_R2 8/16/04, 4:29 PM13

EN
14
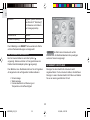
BAROMETER DISPLAY
This product tracks barometric pressure changes over
the past 24 hours to provide a weather forecast. You
can display current and past readings by pressing the
/
keys.
From the barometer display:
THERMO AND HYGRO MEMORY
Temperature and humidity are stored in the main
memory. There are separate memories for the indoor
and outdoor channel sensors.
To display a (MIN/MAX) reading, select a channel by
pressing CHANNEL.
-1 1 hour ago
-3
3 hours ago
-6
6 hours ago
-12 12 hours ago
-24 24 hours ago
The weather forecast symbol is updated every
15 minutes.
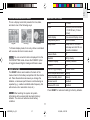
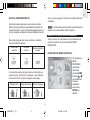
TEMPERATURE / PRESSURE / HYGRO MODE
With the press of a button, you can check the current
indoor or outdoor temperature, relative humidity
comfort level, trend, and record measurements.
Outdoor measurements are taken by the remote
sensors then relayed back to the main unit.
From the MAIN MENU access TEMP, HYGRO,
PRESSURE mode.
AWS888N_En_R2 8/16/04, 4:29 PM14

15
EN
When the desired channel has been selected:
• MAX: Press and HOLD
for 2 seconds.
• MIN: Press and HOLD
for 2 seconds.
CLEAR MIN / MAX RECORDS
Press and hold
and
(simultaneously) for
2 seconds until you hear a beep.
CURRENT THERMO-HYGRO DISPLAY
Press CHANNEL to switch between 5 outdoor
channels. A current trend corresponding to the
selected channel will be displayed.
AUTO SCAN FUNCTION
When enabled, the thermo-hygro display for each
channel will be displayed for 4 seconds before
changing to the next channel.
To start auto scan, press and hold CHANNEL until you
hear a beep (press CHANNEL again to exit auto scan
mode).
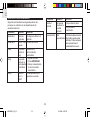
COMFORT ZONE
The indoor and outdoor comfort zones are always
shown, they display the relationship between
temperature and humidity.
Zone Temperature
Relative
Humidity
Any >70%
20 - 25 ° C
(68 - 77 ° F)
40 - 70%
Any <40%
TRENDS
For each channel the following symbols represent:
Temperature
Humidity
A trend will show the changes along with the
recorded maximum and minimum values taken over
a 24-hour period.
AWS888N_En_R2 8/16/04, 4:29 PM15

EN
16
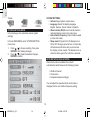
SYSTEM SETTINGS
• Volume: Adjust system volume levels
• Language: Select the display language,
English, German, French, Italian or Spanish.
• Silence mode: (ON) No sound will be heard in
animated display mode or the main menu.
• Auto rotation frequency: Adjust rotation speed
(normal, fast, slow).
• Sleep mode: Program the LCD display to turn
ON or OFF during a period of time. In this mode
all features are still active but you cannot see
the display or hear sounds. The display turns on
when the alarm goes off or a button is pressed.
AUTO ROTATION DISPLAY MODE
When this function is enabled, the unit will
automatically switch between the following modes:
• Weather forecast
• Clock-alarm
• Temperature/pressure/Hygro
You can adjust the speed at which each mode is
displayed via the auto rotation frequency setting.
DOWNUP STEADY
Trends:
SYSTEM SETTING MODE
In this mode you can customize various system
settings.
From the MAIN MENU, enter SYSTEM SETTING
mode, then:
1. Press
/
to choose a setting, then press
ENTER to start making changes.
2. Press
/
to make the desired changes,
ENTER to confirm.
AWS888N_En_R2 8/16/04, 4:29 PM16

17
EN
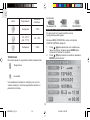
CLOCK ALARM DISPLAY MODE
This is a display mode that presents the time, date,
and alarm one of the following ways:
*In Classic display mode, the hourly chime is animated
with a cuckoo bird and cuckoo sound.
You can set which clock is displayed from the
CLOCK SETTNG mode. Access the FORMAT option
to toggle between Digital, Analog and Classic views.
RESET SYSTEM
The RESET buttons are located on the back of the
main unit and in the battery compartment for the remote
unit. Press these buttons whenever you change the
batteries, or whenever performance is not behaving as
expected (e.g., unable to establish radio frequency link
with remote unit or automatic clock, etc.).
After resetting the system all system
information will be erased and returned to factory
defaults. The main unit will also check battery
condition.
NOTE
NOTE
AnalogDigital Classic*
DEFAULT SETTINGS
1/1/2003
Time 00:00:00 (24 hour format)
or 12:00:00 am (12 hour
format)
Clock display Time-second display mode
Daily/weekly alarm Alarm disabled
Sleep Mode Sleep start at 12:00 a.m.
and sleep end at 6:00 a.m.
& function disabled
Silence Mode Off
Weather
Partly cloudy
Pressure display Current pressure
Altitude 0m
Thermo-hygro display Current indoor
Indoor temperature trend Steady
Indoor humidity trend Steady
Sensor search Enabled
Receive RF clock Enabled
Press RESET to restore all settings to factory defaults.
Date
AWS888N_En_R2 8/16/04, 4:29 PM17

EN
18
LOW BATTERY DETECTION
When battery levels get too low, the
icon will
appear. Also, when no adaptor is connected,
the
icon will be displayed.
The battery / adaptor status can be seen on:
• Clock display
• Weather display
• Remote thermo-hygro sensor
NOTE
The main unit will display the channel battery
status when the corresponding channel is selected.
SAFETY AND CARE
Wash the unit with a slightly damp cloth and mild
detergent. Avoid dropping the unit or placing it in a
high-traffic location.
WARNINGS
This product is designed to give you years of service if
handled properly. Observe the following guidelines:
• Never immerse the unit in water. This can cause
electrical shock and damage the unit.
• Do not subject the main unit to extreme force,
shock, or fluctuations in temperature or humidity.
• Do not tamper with the internal components.
• Do not mix new and old batteries or batteries of
different types.
• Do not use rechargeable batteries with this
product.
• Remove the batteries if storing this product for
a long period of time.
• Do not scratch the LCD display.
• Do not make any changes or modifications to
this product. Unauthorized changes may void
your right to use the product.
• The contents of this user guide are subject to
change without notice.
• Images not drawn to scale.
AWS888N_En_R2 8/16/04, 4:29 PM18

19
EN
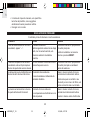
Temp Shows
“LLL” or
“HHH”
Temperature is
out-of-range
Set altitude / unit
Calendar Unusual
date /
month
Change language
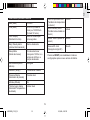
TROUBLESHOOTING
Check here before contacting our customer service
department.
Clock Cannot
adjust
clock
Disable auto-
synchronization
Clock Cannot
auto-
synch
1. Adjust batteries
2. Press RESET
3. Manually activate
auto-synch
Remote unit Cannot
locate
remote
unit
Check batteries
Check location
Problem Symptom Remedy
Barometer Unusual
readings
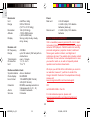
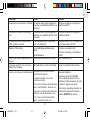
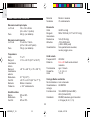
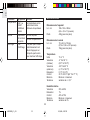
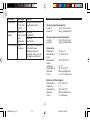
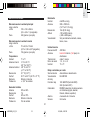
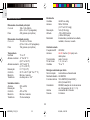
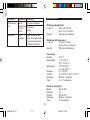
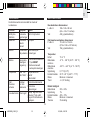
SPECIFICATIONS
Main unit dimensions
L x W x H 165 x 124 x 39mm
(6.5 x 4.88 x 1.54 inches)
Weight 432g (with batteries)
Remote unit dimensions
L x W x H 70 x 24.5 x 116mm
(2.76 x 0.96 x 4.57 inches)
Weight 156g (with batteries)
Temperature
Unit °C or °F
Indoor Range -5 °C to 50 °C
(23 °F to 122 °F)
Outdoor Range -20 °C to 60 °C
(-4 °F to 140 °F)
Resolution 0.1 °C (0.2 °F)
Comfort 20 °C to 25 °C (68 °F to 77 °F)
Memory Minimum / maximum
Trend +/- 0.5° change
Relative humidity
Range 25% to 95%
Resolution 1%
Comfort 40% to 70%
Memory Minimum / maximum
Trend 3% change
Display No display Sleep Mode may be on.
Press any key to activate
the display again.
AWS888N_En_R2 8/16/04, 4:29 PM19

EN
20
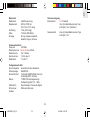
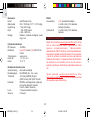
Power
Main unit 4.5V AC adaptor
4 x UM-3 (AA) 1.5V alkaline
batteries (back-up)
Remote unit 2 x UM-3 (AA) 1.5V alkaline
batteries
ABOUT OREGON SCIENTIFIC
Visit our website (www.oregonscientific.com) to learn
more about Oregon Scientific products such as digital
cameras; MP3 players; children's electronic learning
products and games; projection clocks; health and
fitness gear; weather stations; and digital and
conference phones. The website also includes contact
information for our customer care department in case
you need to reach us, as well as frequently asked
questions and customer downloads.
We hope you will find all the information you need on
our website, however if you'd like to contact the
Oregon Scientific Customer Care department directly,
please visit:
www2.oregonscientific.com/service/support
OR
call 949-608-2848 in the US.
For international enquiries, please visit:
www2.oregonscientific.com/about/international/
default.asp.
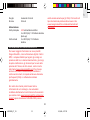
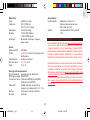
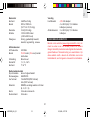
Barometer
Unit mb/hPa or inHg
Range 500 to 1050 mb
(14.77 to 31.01 inHg)
Resolution 1mb (0.03 inHg)
Altitude -100 to 2500 meters
(-328 to 8202 feet)
Display Sunny, partly cloudy, cloudy,
rainy, snowy
Remote unit
RF frequency 433 MHz
Range up to 50 meters (164 feet) with no
obstructions
Transmission every 1 minute
Channel No. 1, 2, 3, 4 or 5
Unit °C or °F
Radio-controlled clock
Synchronization Auto or disabled
Clock display HH:MM:SS
Hour format 12hr AM/PM (MSF format)
24hr (DCF format)
Calendar DD/MM; weekday selection in
5 languages (E, G, F, I, S)
Alarm 2 minute crescendo
Snooze 8 minutes
AWS888N_En_R2 8/16/04, 4:29 PM20
Page is loading ...
Page is loading ...
Page is loading ...
Page is loading ...
Page is loading ...
Page is loading ...
Page is loading ...
Page is loading ...
Page is loading ...
Page is loading ...
Page is loading ...
Page is loading ...
Page is loading ...
Page is loading ...
Page is loading ...
Page is loading ...
Page is loading ...
Page is loading ...
Page is loading ...
Page is loading ...
Page is loading ...
Page is loading ...
Page is loading ...
Page is loading ...
Page is loading ...
Page is loading ...
Page is loading ...
Page is loading ...
Page is loading ...
Page is loading ...
Page is loading ...
Page is loading ...
Page is loading ...
Page is loading ...
Page is loading ...
Page is loading ...
Page is loading ...
Page is loading ...
Page is loading ...
Page is loading ...
Page is loading ...
Page is loading ...
Page is loading ...
Page is loading ...
Page is loading ...
Page is loading ...
Page is loading ...
Page is loading ...
Page is loading ...
Page is loading ...
Page is loading ...
Page is loading ...
Page is loading ...
Page is loading ...
Page is loading ...
Page is loading ...
Page is loading ...
Page is loading ...
Page is loading ...
Page is loading ...
Page is loading ...
Page is loading ...
Page is loading ...
Page is loading ...
Page is loading ...
Page is loading ...
Page is loading ...
Page is loading ...
Page is loading ...
Page is loading ...
Page is loading ...
Page is loading ...
Page is loading ...
Page is loading ...
Page is loading ...
Page is loading ...
Page is loading ...
Page is loading ...
Page is loading ...
Page is loading ...
Page is loading ...
Page is loading ...
Page is loading ...
Page is loading ...
Page is loading ...
Page is loading ...
Page is loading ...
Page is loading ...
Page is loading ...
Page is loading ...
Page is loading ...
Page is loading ...
Page is loading ...
Page is loading ...
Page is loading ...
Page is loading ...
Page is loading ...
Page is loading ...
Page is loading ...
Page is loading ...
Page is loading ...
Page is loading ...
Page is loading ...
Page is loading ...
Page is loading ...
Page is loading ...
Page is loading ...
Page is loading ...
Page is loading ...
Page is loading ...
Page is loading ...
Page is loading ...
Page is loading ...
Page is loading ...
Page is loading ...
Page is loading ...
Page is loading ...
Page is loading ...
Page is loading ...
Page is loading ...
Page is loading ...
Page is loading ...
Page is loading ...
Page is loading ...
Page is loading ...
Page is loading ...
Page is loading ...
Page is loading ...
Page is loading ...
Page is loading ...
Page is loading ...
Page is loading ...
Page is loading ...
Page is loading ...
Page is loading ...
Page is loading ...
Page is loading ...
Page is loading ...
Page is loading ...
Page is loading ...
Page is loading ...
Page is loading ...
Page is loading ...
Page is loading ...
Page is loading ...
Page is loading ...
Page is loading ...
Page is loading ...
Page is loading ...
Page is loading ...
Page is loading ...
Page is loading ...
Page is loading ...
Page is loading ...
Page is loading ...
Page is loading ...
Page is loading ...
Page is loading ...
Page is loading ...
Page is loading ...
Page is loading ...
Page is loading ...
Page is loading ...
Page is loading ...
-
 1
1
-
 2
2
-
 3
3
-
 4
4
-
 5
5
-
 6
6
-
 7
7
-
 8
8
-
 9
9
-
 10
10
-
 11
11
-
 12
12
-
 13
13
-
 14
14
-
 15
15
-
 16
16
-
 17
17
-
 18
18
-
 19
19
-
 20
20
-
 21
21
-
 22
22
-
 23
23
-
 24
24
-
 25
25
-
 26
26
-
 27
27
-
 28
28
-
 29
29
-
 30
30
-
 31
31
-
 32
32
-
 33
33
-
 34
34
-
 35
35
-
 36
36
-
 37
37
-
 38
38
-
 39
39
-
 40
40
-
 41
41
-
 42
42
-
 43
43
-
 44
44
-
 45
45
-
 46
46
-
 47
47
-
 48
48
-
 49
49
-
 50
50
-
 51
51
-
 52
52
-
 53
53
-
 54
54
-
 55
55
-
 56
56
-
 57
57
-
 58
58
-
 59
59
-
 60
60
-
 61
61
-
 62
62
-
 63
63
-
 64
64
-
 65
65
-
 66
66
-
 67
67
-
 68
68
-
 69
69
-
 70
70
-
 71
71
-
 72
72
-
 73
73
-
 74
74
-
 75
75
-
 76
76
-
 77
77
-
 78
78
-
 79
79
-
 80
80
-
 81
81
-
 82
82
-
 83
83
-
 84
84
-
 85
85
-
 86
86
-
 87
87
-
 88
88
-
 89
89
-
 90
90
-
 91
91
-
 92
92
-
 93
93
-
 94
94
-
 95
95
-
 96
96
-
 97
97
-
 98
98
-
 99
99
-
 100
100
-
 101
101
-
 102
102
-
 103
103
-
 104
104
-
 105
105
-
 106
106
-
 107
107
-
 108
108
-
 109
109
-
 110
110
-
 111
111
-
 112
112
-
 113
113
-
 114
114
-
 115
115
-
 116
116
-
 117
117
-
 118
118
-
 119
119
-
 120
120
-
 121
121
-
 122
122
-
 123
123
-
 124
124
-
 125
125
-
 126
126
-
 127
127
-
 128
128
-
 129
129
-
 130
130
-
 131
131
-
 132
132
-
 133
133
-
 134
134
-
 135
135
-
 136
136
-
 137
137
-
 138
138
-
 139
139
-
 140
140
-
 141
141
-
 142
142
-
 143
143
-
 144
144
-
 145
145
-
 146
146
-
 147
147
-
 148
148
-
 149
149
-
 150
150
-
 151
151
-
 152
152
-
 153
153
-
 154
154
-
 155
155
-
 156
156
-
 157
157
-
 158
158
-
 159
159
-
 160
160
-
 161
161
-
 162
162
-
 163
163
-
 164
164
-
 165
165
-
 166
166
-
 167
167
-
 168
168
-
 169
169
-
 170
170
-
 171
171
-
 172
172
-
 173
173
-
 174
174
-
 175
175
-
 176
176
-
 177
177
-
 178
178
-
 179
179
-
 180
180
-
 181
181
-
 182
182
-
 183
183
-
 184
184


Oregon Scientific AWS888N Owner's manual
- Category
- Smartwatches
- Type
- Owner's manual
- This manual is also suitable for
Ask a question and I''ll find the answer in the document
Finding information in a document is now easier with AI
in other languages
- italiano: Oregon Scientific AWS888N Manuale del proprietario
- français: Oregon Scientific AWS888N Le manuel du propriétaire
- español: Oregon Scientific AWS888N El manual del propietario
- Deutsch: Oregon Scientific AWS888N Bedienungsanleitung
- Nederlands: Oregon Scientific AWS888N de handleiding
- português: Oregon Scientific AWS888N Manual do proprietário
- svenska: Oregon Scientific AWS888N Bruksanvisning
Related papers
-
Oregon Scientific BAR936HG User manual
-
Oregon BAR908HGU User manual
-
-
 Oregon Scientific AWS888N User manual
-
 Oregon Scientific BAR986HGA User manual
-
 Oregon Scientific BAR916HG User manual
-
Oregon Scientific SL102 User manual
-
 Oregon Scientific BAR609HGA User manual
-
 Oregon Scientific AWS899 photo Frame Owner's manual
-
 Oregon Scientific RRA200 User manual


Other documents
-
Bresser 7002540 PROFI W-LAN WETTER CENTER Owner's manual
-
Bresser Profi 7002540CM3000 User manual
-
Bresser 7002534 Owner's manual
-
-
La Crosse WS-9037U-IT User manual
-
 Explore Scientific WSX1001 Owner's manual
-
 Explore Scientific professional 7-in-1 Wi-Fi Weather Centre Owner's manual
-
National Geographic Weather Expert Owner's manual
-
Irox HBR623I Owner's manual
-

