Classic Flame 80649 User manual
- Category
- Fireplaces
- Type
- User manual

1
Lowes.com
Questions, problems, missing parts? Before returning to your retailer, call our
customer service department at 1-877-888-8225, 8 a.m. - 8 p.m., EST, Monday - Friday.
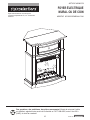
ITEM #0386378
MODEL #76185/23DM6344-C244
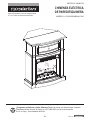
WALL/CORNER
ELECTRIC FIREPLACE
Français p.15
Español p. 29
Style Selections® is a registered trademark of
LF, LLC. All Rights Reserved.
AB1219

2
Lowes.com
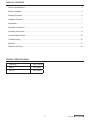
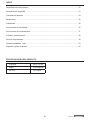
Product Specifi cations ......................................................................................................................... 2
Safety Information ................................................................................................................................ 3
Package Contents ................................................................................................................................ 6
Hardware Contents............................................................................................................................... 7
Preparation ........................................................................................................................................... 7
Assembly instructions ........................................................................................................................... 8
Operating Instructions .......................................................................................................................... 9
Care and Maintenance ....................................................................................................................... 10
Troubleshooting .................................................................................................................................. 12
Warranty ............................................................................................................................................. 13
Replacement Parts ............................................................................................................................. 14
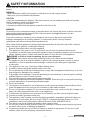
PRODUCT SPECIFICATIONS
TABLE OF CONTENTS
VOLTAGE 120 V, 60 Hz
AMPS 12.5 Amps
WATTS 1500 Watts

3
Lowes.com
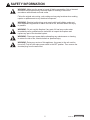
Please read and understand this entire manual before attempting to assemble, operate or install the
product.
WARNING
• Before assembly, carefully use scissors or utility knife to cut and unwrap all parts.
Make sure you do not discard the hardware.
CAUTION
• Use care in assembling the fireplace. Take your time and use the hardware provided and a quality
Phillips screwdriver. Never overtighten bolts.
• Do not sit on any part of the mantel.
• All panels are labeled left and right as viewed from the front of unit.
WARNING
To avoid injury from unexpected starting or electrical shock, do not plug the power cord into a source of
power during unpacking and assembly. The cord must remain unplugged whenever you are
adjusting/assembling the fi replace.
If any part is missing or damaged, do not attempt to use or plug in the power cord until the
missing or damaged part is correctly replaced. To avoid electric shock, use only identical
replacement parts when servicing double-insulated tools.
When using electrical appliances, always follow basic precautions to reduce the risk of fi re, electrical
shock, and injury to persons, including the following:
1. Read all instructions before using this appliance.
2. This appliance is hot when in use. To avoid burns, do not touch hot surfaces with bare skin.
If provided, use handles when moving this appliance. Keep combustible materials, such as furniture,
pillows, bedding, papers, clothes and curtains at least 3 ft. from the front of this appliance.
WARNING: In order to avoid overheating, do not cover the heater.
WARNING: Use extreme caution when operating heater near children and the disabled.
3. The appliance is not to be used by children or persons with reduced physical, sensory or mental
capabilities, or lack of experience and knowledge, unless they have been given supervision
or instruction.
4. This appliance is not a toy. Supervise children playing near it.
5. If possible, always unplug this appliance when not in use.
6. Do not operate any heater with a damaged cord or plug, after the appliance malfunctions, or if it has
been dropped or damaged in any manner.
7. If the supply cord is damaged, it must be replaced by the manufacturer, its service agent or similarly
qualifi ed persons in order to avoid a hazard.
8. Only a qualifi ed service person should repair this product.
9. Under no circumstances should this fi replace be modifi ed. Parts having to be removed for servicing
must be replaced prior to operating this fi replace again.
10. Do not use outdoors.
11. This heater is not intended for use in bathrooms, laundry areas and similar indoor locations. Never
locate this appliance where it may fall into a bathtub or other water container.
12. Do not run cord under carpeting. Do not cover cord with throw rugs, runners or the like. Arrange cord
away from traffi c areas and where it will not be tripped over.
13. To disconnect this appliance, turn controls to the off position, and then remove plug from outlet.
14. Connect to properly grounded outlets only.
15. This appliance, when installed, must be electrically grounded in accordance with local codes or, in
the absence of local codes, with the current CSA C22.1 Canadian Electrical Code or for U.S.A.
installations, follow local codes and the National Electrical Code, ANSI/NFPA NO.70.
16. The heater must not be located immediately below a socket-outlet.
17. Do not insert or allow foreign objects to enter any ventilation or exhaust opening as this may cause
an electric shock or fi re, or damage the appliance.
18. To prevent a possible fi re, do not block air intakes or exhaust in any manner. Do not use on soft
surfaces, like a bed, where opening may become blocked.
SAFETY INFORMATION

4
Lowes.com
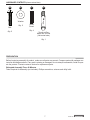
B
A
C
D
Fig. 1
Grounding Pin
Cover Of Grounded
Outlet Box
Metal
Screws
Adapter
Grounding
Means
Grounding
Pin
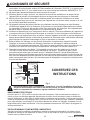
SAVE THESE
INSTRUCTIONS
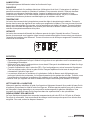
19. This appliance has hot and arcing or sparking parts inside. Do not use it in areas where gasoline,
paint or fl ammable liquids are used or stored. This fi replace should not be used as a drying rack for
clothing. Do not hang Christmas stockings or other decorations on or near this product.
20. Use this appliance only as described in the manual. Any other use not recommended by the
manufacturer may cause fi re, electric shock or injury to persons.
21. There is a thermostat limiter inside the heater. When inner temperature overheating or abnormal
heating occurs, the thermostat protective device will cutoff the power supply to avoid damage to the
fi replace or risk of fi re.
22. Avoid the use of an extension cord because the extension cord may overheat and cause risk of fi re.
However, if you have to use an extension cord, the cord must be No.14 AWG minimum size and rated
not less than 1,875 watts. The extension cord must be a three-wire cord with grounding type plug and
cord connection. The extension cord shall not be more than 20 ft. in length.
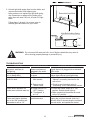
23. See directions in Figure 1. This heater is for use on 120 volts. The cord has a plug as shown in figure
1. See Figure 1 for grounding instruction. An adapter as shown at C is available for connecting three-
blade grounding type plugs to two-slot receptacles. The green grounding plug extending from the
adapter must be connected to a permanet ground such as a properly grounded outlet box. The
adapter should not be used if a three-slot grounded receptacle is available.
ELECTRICAL CONNECTION
A 15-Amp, 120-volt, 60 Hz circuit with a properly grounded outlet is required. Preferably, the fi replace will
be on a dedicated circuit as other appliances on the same circuit may cause the circuit breaker to trip or
the fuse to blow when the heater is in operation. The unit comes standard with 6-ft. three-wire
cord, exiting from the rear of the fi replace. Avoid using an extension cord. If an extension cord must be
used, it must be a minimum 14 AWG, three-wire cord with grounding-type plug connector and rated not
less than, 1,875 watts. The cord shall not be more than 20 ft. in length.
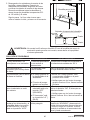
CLEARANCE TO COMBUSTIBLES
Keep electrical cords, drapery, furniture and other combustibles at least 3 ft. from the front of the heater
and away from the sides.
Cold climate installation recommendation: When installing this unit against a non-
insulated exterior wall or chase, it is mandatory that the outer walls be insulated to
conform to applicable insulation codes.
SAFETY INFORMATION

5
Lowes.com
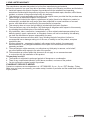
WARNING: Make sure the power is turned off before proceeding. Only a licensed
electrician should perform any electrical repairs or rewiring of this unit in
accordance with national and local codes.
Follow the original wire routing, color coding and securing locations when making
repairs or replacements to any electrical component.”
WARNING: Electrical outlet wiring must comply with local building codes and
other applicable regulations to reduce the risk of fi re, electrical shock and injury
to persons.
WARNING: Do not use this fi replace if any part of it has been under water.
Immediately call a qualifi ed service technician to inspect the fi replace and
replace any part of the electrical system.
WARNING: Disconnect power before attempting any maintenance or cleaning
to reduce the risk of fi re, electrical shock or personal injury.
WARNING: During any service of this appliance, the power to the unit must be
turned off. First turn the main power switch to the OFF position. Then remove the
electrical plug from the wall outlet.
SAFETY INFORMATION

6
Lowes.com
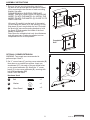
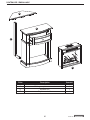
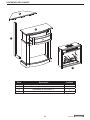
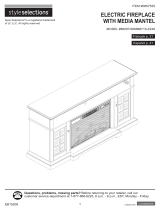
PACKAGE CONTENTS
Part Description Quantity
A Mantel 1
B Top Corner Extension 1
C “L” Corner Brace 1
D Insert 1
B
A
D
C

7
Lowes.com
W3304
PREPARATION
Before beginning assembly of product, make sure all parts are present. Compare parts with package con-
tents list and diagram above. If any part is missing or damaged, do not attempt to assemble, install or oper-
ate the product. Contact customer service for replacement parts.
Estimated Assembly Time: 60 Minutes
Tools Required for Assembly (not included): Phillips screwdriver, scissors and utility knife
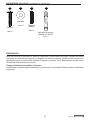
HARDWARE CONTENTS (shown actual size)
Bolt
Qty. 5
Washer
Qty. 5
Wood
Dowel
Qty. 4
Touch-up Pen
Model No. W3304
(Not actual size)
Qty. 1
AA BB CC DD

8
Lowes.com
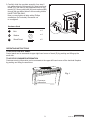
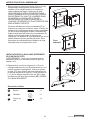
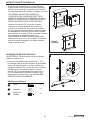
ASSEMBLY INSTRUCTIONS
1. Remove the two mounting brackets attached to
the back of the left and right front panels on mantel
(A) by removing the two screws on each mounting
bracket. Set aside.
PLEASE READ ALL “ELECTRIC FIREPLACE
INSERT” INSTRUCTIONS PRIOR TO INSTALLING
INSERT (D) INTO THE MANTEL (A). INSTALL THE
INSERT (D) INTO THE MANTEL (A) CLOSE TO ITS
FINAL POSITION.
Lift insert (D) carefully into the back of the mantel
(A) and center the insert (D) in the opening. Do not
drag insert (D) as it may scratch the unit. Re-install
the previously removed mounting brackets to hold
the insert (D) fl ush against the inside of the front
panels of mantel (A).
Note: Move the completed unit only short distances
and with great care. It takes two people to move
completed unit into its fi nal position.
Completed
Unit
Mounting
Bracket
1
CC
B
A
A
D
D
C
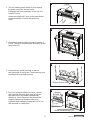
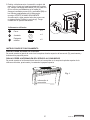
OPTIONAL CORNER EXTENSION
WARNING: Two people are recommended to
perform steps 2 and 3.
2. Set “L” corner brace (C) and top corner extension (B)
face down on a scratch-free surface. Insert one
wood dowel (CC) into each of the pre-drilled holes
on top corner extension (B). Attach the “L” corner
brace (C) to top corner extension (B), securing with
bolt (AA) and washer (BB)
HAND TIGHTEN ONLY.
Hardware Used
CC
AA
AA
BB
BB
Wood Dowel
Bolt
Washer
x 2
x 1
x 1
2

9
Lowes.com
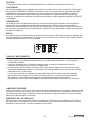
3. Carefully slide the complete assembly from step 2
into place at back of the mantel (A). Insert one wood
dowel (CC) into each of the pre-drilled holes on the
mantel (A). Secure with bolts (AA) and washers (BB)
through the pre-drillled holes in the mounting blocks.
HAND TIGHTEN ONLY.
Now you may tighten all bolts with a Phillips
screwdriver (not included). Be careful not
to overtighten.
Hardware Used
CC
AA
BB
Wood Dowel
Bolt
Washer
x 2
x 4
x 4
CC
AA
BB
3
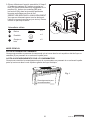
TO ACCESS CONTROL PANEL
Control panel can be accessed at upper right-hand corner of insert (D) by pushing and lifting up the
small door.
TO ACCESS CONSUMER INFORMATION
Consumer service information can be accessed at the upper left-hand corner of the electrical fi replace
by pushing and lifting the small door.
OPERATING INSTRUCTIONS
Consumer
Information
Fig. 1

10
Lowes.com
POWER
The power switch supplies power to all of the functions of the fi replace.
HEATER
The fi replace consists of a fan-forced wire-element-type heater. The heater switch turns the heater
ON and OFF. As an important safety feature, the heating element is designed with a
delayed activation sequence. When the heater is turned ON it will take several seconds for the unit
to begin blowing hot air and the fan blower will continue to run for several seconds after the heater is
switched OFF.
TEMPERATURE
The temperature control knob regulates the temperature level of the heater. Turning the knob
clockwise will increase the heat output. The further the knob is rotated clockwise, the higher the
set point temperature. Turning the knob counterclockwise will lower the set point temperature.
Use this function to help regulate the ambient temperature level.
BRIGHTNESS
The fl ame brightness control knob adjusts the fl ame brightness. Turning the knob to the left
(counterclockwise) dims the lights and fl ame effect. Turning the knob to the right brightens the lights
and fl ame effect.
CARE AND MAINTENANCE
CLEANING TRIM
Clean the metal trim using a soft cloth, slightly dampened with a citrus oil-based product and buff with a
clean soft cloth. Do not use brass polish or household cleaners as these products will damage the metal
trim. Citrus oil-based products can be obtained at supermarkets or hardware stores.
REPLACING THE LIGHT BULBS
This electric fi replace uses two clear 120-volt, 40-watt, E12 candelabra-base light bulbs.
For convenience, if a bulb burns out, it is a good idea to replace all the bulbs at the same time.
Refer to the steps below.
• Dust your fi replace regularly with a soft non-lint producing cloth or household dusting product.
• Clean your fi replace with a gentle non-abrasive household cleaner. Make sure to dry your fi replace
immediately with a soft cloth or towel.
• Tips for using touch-up pen (DD): For scratches, stroke in direction of scratch. For worn areas,
stroke in direction of wood grain. Rub excess colorant promptly with a soft cloth.
• The motors used on the fan and the fl ame generator assembly are pre-lubricated for extended
bearing life and require no further lubrication. However, we recommend periodic cleaning/vacuuming
of the fan/heater.
• Make sure the unit is turned off and unplugged whenever you are cleaning the heater or fi replace.

11
Lowes.com
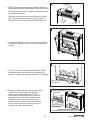
2. Carefully tilt glass and frame forward a couple of
inches. Then pull complete glass assembly up and
away from unit.
3. Locate the two ember bed nuts on the left
and right sides of the log set. These securing nuts
are disguised as wooden embers.
4. Turn nuts counterclockwise to loosen; remove
and set aside. Securely grab logs on left and
right side and lift log/ember bed assembly
straight up. Once ember bed has cleared the
support bracket and threaded rods, bring
log/ember bed assembly forward and out of unit
and set aside in a safe place.
1. Turn the master power switch off, then unplug
the power cord from the wall outlet.
If fi replace has been operating, let the unit cool
at least 2 hours.
Locate and rotate the 2 nuts on the glass holder
counterclockwise to loosen the glass from
insert.
2 Nuts
1
1
2
2
1
2
Wooden Ember Nuts
3
Wooden
Ember Nut
Logs/Ember bed
Ember bed Mounting Post
4

12
Lowes.com
5. Unhook light bulb spring clips from the bulbs, and
unscrew the bulbs. After replacing the
bulbs make sure to replace the light bulb spring
clip. Remember to replace all the bulbs at the
same time with clear 120-volt, 40-watt E12 light
bulbs.
Follow steps 1 through 4 in reverse order to
reinstall glass and frame into your insert.
Ember bed Light Bulb
Light Bulb Holding Spring
Pull
Pull
5
TROUBLESHOOTING
PROBLEM POSSIBLE CAUSE CORRECTIVE ACTION
No power, switches do
not light up.
Power cord was not
plugged in the outlet.
Check that unit is plugged into a standard
120V outlet.
Switches light up,
but no fl ame effect.
Bulbs are broken
or loose
Remove front glass door and check for any
broken light bulbs or loose light bulbs.
Logs glow, fl ame effect
does not work.
a. Spinner has fallen off
from bracket.
b. Spinner motor
doesn’t work.
a. Open back of unit. Check to see if
“spinner” is correctly mounted to the
rear of unit.
b. Check to see if spinning motor is
functioning. If not, call customer service.
Flame effect operates, but
heater does not blow warm air.
a. Heater switch is in
“OFF” position.
b. “Thermostat” is
on “LO”
a. Check that heater switch is in “ON”
position. Switch should light up.
b. Make certain that thermostat is turned
to the “HI” position.
Heater doesn’t work, but
Power and Heater switches
are in the “ON” position and
thermostat is set on “HI”.
The product is on the
protected status.
Turn all switches to the “OFF” position and
unplug the unit from the wall outlet for 5
minutes. After 5 minutes plug the unit back
into wall outlet, and operate as normal.
WARNING: Do not exceed 40 watts per bulb. Use of higher-rated bulbs may result in
a fi re, causing property damage or personal injury.

13
Lowes.com
1-YEAR LIMITED WARRANTY
The manufacturer warrants this product to be free from manufacturing and material
defects for a period of one year from date of purchase, subject to the following conditions and limitations.
1. Install and operate this electric fi replace in accordance with the installation and operating
instructions furnished with the product at all times. Any unauthorized repair, alteration, willful abuse,
accident, or misuse of the product shall nullify this warranty.
2. This warranty is non-transferable and is made to the original owner, provided that the purchase was
made through an authorized supplier of the product.
3. The warranty is limited to the repair or replacement of part(s) found to be defective in material or
workmanship, provided that such part(s) have been subjected to normal conditions of use and
service, after said defect is confi rmed by the manufacturer’s inspection.
4. This warranty does not cover the light bulb(s) included with the electric fi replace.
5. The manufacturer may, at its discretion, fully discharge all obligations with respect to this warranty
by refunding the wholesale price of the defective part(s).
6. Any installation, labor, construction, transportation, or other related costs/expenses arising from
defective part(s), repair, replacement, or otherwise of same, will not be covered by this warranty,
nor shall the manufacturer assume responsibility for same.
7. The owner/user assumes all other risks, if any, including the risk of any direct, indirect or
consequential loss or damage arising out of the use, or inability to use the product, except as
provided by law.
8. All other warranties – expressed or implied –with respect to the product, its components
and accessories, or any obligations/liabilities on the part of the manufacturer are hereby
expressly excluded.
9. The manufacturer neither assumes, nor authorizes any third party to assume, on its behalf,
any other liabilities with respect to the sale of the product.
10. The warranties as outlined within this document do not apply to non accessories used
in conjunction with the installation of this product.
This warranty is void if:
a. The fi replace is subjected to prolonged periods of dampness or condensation.
b. There is any unauthorized alteration, willful abuse, accident, or misuse of the product.
c. You do not have the original receipt of purchase.
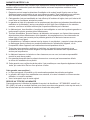
IF WARRANTY SERVICE IS NEEDED
Contact our customer service department at 1-877-888-8225, 8 a.m. - 8 p.m., EST, Monday - Friday.
Make sure you have your warranty, your sales receipt, location of purchase and the model/serial number
of your product.

14
Lowes.com
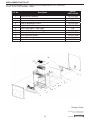
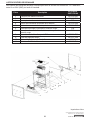
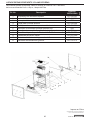
REPLACEMENT PARTS LIST
For replacement parts, call our customer service department at 1-877-888-8225,
8 a.m. - 8 p.m., EST, Monday - Friday.
2
8
5
6
6
3
7
9
11
10
1
4
I.D. No. Description
Part No.
23EF010GAA
1 Heater/Blower Assembly Y07-C26-P01
2 Ember bed Y07-C27-P02
3 Thermostat Switch P03
4 Knob for Brightness Control Y07-C26-P04
5 Knob for Heater Temperature Control Y07-C26-P05
6 Main Power Switch - Red Toggle P06
7 Heater On/Off Switch - Red Toggle P06
8 E-12 Light Bulb Socket Assembly Y07-C29-P08
9 Front Projection Screen Y07-C27-P09
10 Flame Generator Drive Motor P10-Q
11 Flame Generator/Spinner Y07-C27-P11
Printed in China
Style Selections
®
is a registered trademark
of LF, LLC. All rights reserved.
Page is loading ...
Page is loading ...
Page is loading ...
Page is loading ...
Page is loading ...
Page is loading ...
Page is loading ...
Page is loading ...
Page is loading ...
Page is loading ...
Page is loading ...
Page is loading ...
Page is loading ...
Page is loading ...
Page is loading ...
Page is loading ...
Page is loading ...
Page is loading ...
Page is loading ...
Page is loading ...
Page is loading ...
Page is loading ...
Page is loading ...
Page is loading ...
Page is loading ...
Page is loading ...
Page is loading ...
Page is loading ...
-
 1
1
-
 2
2
-
 3
3
-
 4
4
-
 5
5
-
 6
6
-
 7
7
-
 8
8
-
 9
9
-
 10
10
-
 11
11
-
 12
12
-
 13
13
-
 14
14
-
 15
15
-
 16
16
-
 17
17
-
 18
18
-
 19
19
-
 20
20
-
 21
21
-
 22
22
-
 23
23
-
 24
24
-
 25
25
-
 26
26
-
 27
27
-
 28
28
-
 29
29
-
 30
30
-
 31
31
-
 32
32
-
 33
33
-
 34
34
-
 35
35
-
 36
36
-
 37
37
-
 38
38
-
 39
39
-
 40
40
-
 41
41
-
 42
42


Classic Flame 80649 User manual
- Category
- Fireplaces
- Type
- User manual
Ask a question and I''ll find the answer in the document
Finding information in a document is now easier with AI
in other languages
- français: Classic Flame 80649 Manuel utilisateur
- español: Classic Flame 80649 Manual de usuario
Related papers
Other documents
-
 Walker Edison Furniture Company HD8758 User manual
-
JAXPETY HG61B1158 18 Inch Freestanding and Recessed Electric Fireplace Insert Heater User manual
-
 ZUO 90250057 Operating instructions
-
 Style Selections 73092 Instructions Manual
-
ROOMS TO GO 90129757 Assembly Instructions
-
Windmere 3148T User guide
-
 Style Selections 0781458 User manual
-
 Style Selections 88287/26MM8715-Z248 User manual
-
Everbilt 15292 Operating instructions
-


