Page is loading ...

– INSTRUCTION MANUAL –
DESIGN BY NAOTO FUKASAWA
PAO GLASS PENDANT


TECHNICAL DATA
This product is supplied with an integrated LED
light source. The expected lifespan of the LED
light source is 25,000 hours, which equates to
810 years of general use. When the light source
reaches its end of life, the whole luminaire should
be replaced. For dimming, please check which
wall mounted dimmers are compatible with the
included LED driver.
FITTING TYPE | Integrated LED
POWER W | 10 W
COLOUR TEMPERATURE | 2600K warm white
ATTENTION
Ensure that the power supply to the circuit has
clearly been turned OFF before installing the
product. In some countries, electrical installation
must be carried out by authorised electricians/
contractors; please check with your local
authority for guidance.
The product must not be modified in any way.
HAY accepts no responsibility for any products
that have been modified or tampered with. The
external flexible cable or cord of this luminaire
cannot be replaced. If the cord is damaged,
the luminaire should be replaced. This lamp is
designed for indoor use only.
NOTE | This equipment has been tested and
found to comply with the limits for a Class
B digital device, pursuant to part 15 of the
FCC Rules. These limits are designed to
provide reasonable protection against harmful
interference in a residential installation. This
equipment generates, uses and can radiate radio
frequency energy and, if not installed and used
in accordance with the instructions, may cause
harmful interference to radio communications.
However, there is no guarantee that interference
will not occur in a particular installation. If this
equipment does cause harmful interference
to radio or television reception, which can be
determined by turning the equipment off and
on, the user is encouraged to try to correct the
interference by one or more of the following
measures:
∆ Reorient or relocate the receiving antenna.
∆ Increase the distance between the
equipment and receiver.
∆ Connect the equipment to an outlet on a
different circuit to the one the receiver is
connected to.
∆ Consult the dealer or an experienced
radio/TV technician for help.
CAUTION | Changes or modifications to this unit
not expressly approved by the party responsible
for compliance could void the user’s authority to
operate the equipment. This device complies with
part 15 of the FCC Rules. Operation is subject to
the following two conditions:
∆ This device may not cause harmful
interference.
∆ This device must accept any interference
received, including interference that may
cause undesired operation.
CARE AND MAINTENANCE
The product can be cleaned with a soft damp
cloth and mild detergent, or a dry microfibre
cloth. Do not use alcohol or any other solvents
to clean the product and avoid using abrasive or
rough sponges. Ensure that the power supply has
been turned OFF before cleaning the product.
CARE AND MAINTENANCE

Light Source
Shade
Ceiling Canopy
with Steel Bracket &
LED Driver
PARTS
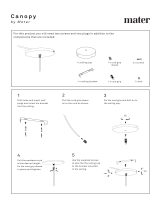
Please note that the parts shown are packaged in two separate boxes.

1.
Unpack all the components and check that you have received all the
components listed.
It is important to take extra care when assembling the Pao Glass Pendant.
Follow the instructions carefully and only suspend the lamp from a reliable
ceiling, where it is not in danger of falling down.
Make sure that the mains power is turned off before installing the lamp.
To remove the plastic ceiling canopy, twist it counter-clockwise and pull away from
the internal steel bracket. Loosen the cable grip with a screwdriver and carefully pull
a section of the cable through the cord grip to allow for some movement while
removing the cable from the LED driver.

2.
Loosen the two screws holding the terminal cover and remove the terminal cover.
3.
Loosen the screws on the terminal block and remove the cable, pulling it through
the cable grip.

4.
Use a pencil to mark fixing holes in the ceiling where the pendant is to be mounted.
If there is a junction box in the ceiling, then the steel bracket has slots which can be
used in conjunction with standard European and US junction boxes. If relevant, the input
mains cable can be inserted through the centre hole in the steel bracket and passed be-
neath the LED driver. The input mains cable can also be inserted through the mousehole
on the side of the plastic ceiling canopy if needed.
ATTENTION
Ensure that the mains power is OFF.
(A)
(B)

5.
Drill holes and insert wall plugs. Ensure you use the correct
type of drill and anchor for the type of ceiling you are drilling into.
1 2
6.
Screw the ceiling bracket to the ceiling, using the appropriate screws for
the wall plugs used.

7.
Trim the cable to the desired length, leaving 35mm/ 1.4 in of basic single insulation
exposed for wiring and 3 mm / 0.12 in of exposed cable with no insulation. The cable
is fitted with an internal fibre support cable for securing the weight of the glass shade.
Leave approximately 50 mm / 2 in of the fibre support cable exposed for support.
ATTENTION
Blue cable (LED -)
Brown cable (LED +)
Yellow fibre cable for support
50 mm / 2 in Max. 35 mm / 1.4 in

8.
It is advised that any wire exposed with just a single basic layer of insulation is
covered with the protective heat shrink provided. (Two sleeves for the basic
insulated wire and one sleeve for covering the opening of the source cable). A heat gun
can be used to shrink and fix this protective insulation in place (2). The double insulated
mains power cable that connects to the LED driver should have a diameter
between 2 x 0.75 mm
2
- 2 x 1.5 mm
2
.
Protective Heat Shrink
1
2
Max 50 mm / 2 in
Max. 1 5mm / 0,6 in

9.
Carefully unbox the glass shade and pass the cable from the light source through the
hole at the top of the shade.
10.
Insert the cable from the light source through the hole in the ceiling canopy.

11.
Loosen the screws on the terminal covers on the LED driver and remove
both terminal covers.
1
2

12.
Loosen the screws on the terminal blocks so that the cable can be inserted when wiring.
13.
Insert the cable from the light source through the cable grip.

14.
After inserting the cable through the cable grip, as shown in the previous step, locate
the fibre support cable and feed it through the small hole next to the exit hole on the
cable grip (1). Once the fibre support cable has exited the other side, as shown below,
the smaller fixed screw on the side of the cable grip can be fastened with the provided
hex key, securing the fibre support cable in place (2).
1
2

15.
When wiring the LED driver, each cable is inserted into its respective slot in one of the
two terminal blocks on the LED driver and then the corresponding screw is tightened
to secure the cable in place. The cables from the light source are inserted into the right
hand side terminal block on the LED driver, as shown below.
Insert the brown cable (+) into the positive (+) slot and the blue cable (-) into the nega-
tive (-) slot. The mains cables are inserted into the left hand side terminal block on the
LED driver. The live mains cable into the live (L) slot and the neutral mains cable into the
neutral (N) slot. Make sure that all the cables are fixed firmly in place and not in danger
of coming loose.
LL
NN
LEDLED
ATTENTION
Blue cable (LED -)
Brown cable (LED +)

16.
Once all the cables are fixed firmly in place, the terminal covers can be screwed back
onto the LED driver.

17.
Adjust the cable from the light source, making sure that it is not pulling on the LED driver
or in way of the plastic canopy. Tighten the cable grip again and make sure that the
cable cannot be moved. The plastic canopy
can now be replaced on the bracket.

18.
Due to the handmade manufacturing of the glass shade some shades will have a slight
difference in the distribution of weight, which can cause them to tilt slightly.
If this happens, you should reposition the three supportive legs inside the shade,
adjusting them until the shade is level.
19.
The light source features a ball and socket joint, which allows the glass diffuser to be
visually aligned within the shade, if necessary. Carefully take hold of the glass diffuser
and gently tilt it until it is visually level within the shade. The lamp is now ready for use.

Our Care & Maintenance offers guidance for optimal
maintenance of your HAY product. It includes advice
and instructions on cleaning and caring for specific
materials to prolong the life of your lighting.
Please find our Care & Maintenance
guide by scanning the QR code
You can find more relevant information on
Pao Glass Pendant by scanning the QR code
You can also find the same information here
hay.dk/downloads
CARE & MAINTENANCE

/