Page is loading ...

FB 86 P
FO 97 P
FC 97 P
FD 96 P
FD 97 P
Four multifonction à nettoyage par fast clean
Instruction pour l'installation et l'emploi 3
Forno multifunzione a pulizia con fast clean
Istruzioni per l'installazione e per l'uso 14
Multifunction oven with self-cleaning by fast clean
Instruction for installation and use 26
Multifunktions-Backofen mit Fastcleanreinignung
Installations- und Bedienungshinweise 38
ARISTON

27
Safety is a good habit to get into
Before using your appliance, read the instructions in
this owner's manual carefully since it contains all the
instructions you require to ensure safe installation,
use and maintenance. Always keep this owner's
manual close to hand as you may need to refer to it in
the future.
1. This appliance is designed for non-professional,
household use.
2. When you have removed the packing, check whether
the appliance is intact. If you have any doubts, contact a
qualified professional before using the appliance. Never
leave the packing components (plastic bags, polystyrene
foam, nails, etc.) within the reach of children since these
are a source of potential danger.
3. The appliance must only be installed by a qualified
person in compliance with the instructions provided by
the manufacturer. The latter denies all responsibility for
improper installation which may harm persons and animals
and damage property.
4. The electrical safety of this appliance can only be
guaranteed if the latter is correctly and efficiently earthed,
in compliance with regulations on electrical safety. Always
ensure that the earthing is efficient; if you have any doubts,
call in a qualified technician to check the electrical system
thoroughly. The manufacturer denies all responsibility for
damage resulting from a system which has not been
earthed.
5.The openings used for ventilation and dispersion of heat
must never be obstructed.
6. The user must not replace the power supply cable of
this appliance. Always call an after-sales servicing centre
authorised by the manufacturer in the event of cable
damage or replacement.
7. This appliance must only be used for the purpose for
which it was expressly designed. Any other use (such as
heating a room) is considered to be improper and
consequently dangerous. The manufacturer denies all
responsibility for damage resulting from improper use of
the appliance.
8. A number of fundamental rules must be followed when
using electrical appliances. The following are of particular
importance:
• do not touch the appliance when your hands or feet
are wet
First use
The first time you use your appliance, we recommend that you set the thermostat to the highest setting (250°C) and
leave the oven on for about half an hour with nothing in it.
Then let the room air. The odour that is often detected during this initial use is due to the evaporation of substances
used to protect the oven during storage and until it is installed.
• never use the appliance barefoot, do not use
extensions, but if these are necessary caution must
be exercised.
• never pull on the power supply cable or the appliance
itself to unplug it from the mains socket.
• never leave the appliance exposed to atmospheric
agents (rain, sun, etc.).
• do not allow children or persons who are not familiar
with the appliance to use it, without supervision.
9. Always unplug the appliance from the mains or switch
off the main switch before cleaning or performing any
maintenance operations.
10. If the appliance malfunctions and/or breaks down, turn
it off. For all repairs, call only an authorised after-sales
service centre and demand the use of original spare parts
only. Failure to comply with the above may compromise
the safety of the appliance.
11. Cut the power supply cable after disconnecting it from
the power mains when you decide not to use the appliance
any longer. Also make all potentially dangerous parts of
the appliance safe, above all for children who could play
with the appliance.
12. Remember to keep children away from the appliance
when you use the grill or oven, since these parts become
very hot.
13. When the appliance is in use, it becomes quite hot.
Take care not to touch the heating elements inside the
oven.
14. Make sure the knobs are in the “•”/”
¡”position when
the appliance is not in use.
15. Use oven gloves to place cookware in the oven or
when removing it;
16. Never use the oven to store inflammable material.
17. Never use flammable liquids such as alcohol or petrol,
etc. near the appliance when it is in use.

28
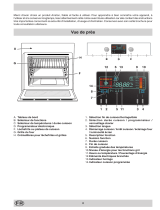
Front view
A. The mode selector
B. The temperature selector
C. The programmer
A
B
C
D
E
o
˚C
MIN
MAX
23.58
5 s.
A
B
C

29
The different cooking modes available
ARISTON ovens are equipped with controls and
indicator lights to ease operation, all situated on the
control panel.
THE COOKING MODE SELECTOR
It comprises 10 marks represented in order by the following
pictograms:
«0» : stop
: oven light
: "Traditional"
This is the oldest cooking mode suitable for cooking
individual dishes. Two heating elements (one at the top of
the oven and the other at the bottom) work together.
The air heats up upon contact with these heat sources,
and circulates around the inside of the oven to provide
uniform heat, as the hot, lighter air tends to rise. This is
caused by natural convection. This cooking mode is
especially recommended when cooking simmered recipes
using covered casserole dishes (hotpots, tripe, etc.) or
for Bain Marie cooking (crème caramel, terrines, etc.).
In this case, use the dripping pan as a dish support and
place it on the 2
nd
rack from the oven bottom.
We recommend you pre-heat the oven before placing your
dishes in it.
: "Pastry"
Only the circular heating element at the back of the oven
and the fan come on to provide delicate heat, suitable for
baking cakes and pastries such as brioches, chocolate
cake, fruitcake, sponge cake, mini cup cakes, meringues,
etc.
In this case, use the dripping pan as a dish support and
place it on the 2
nd
rack from the oven bottom.
We recommend you pre-heat the oven before placing your
dishes in it.
: "Fast cooking"
The combination of all the heating elements together with
the fan guarantees a uniform distribution of heat throughout
the oven.
This particular cooking mode is ideal for fast cooking
(not requiring any pre-heating) and for cooked dishes
(frozen, pre-cooked food).
In this case, use the dripping pan as a dish support and
place it on the 2nd rack from the oven bottom.
: "Multicooking"
The combination of all the heating elements together with
the fan guarantees a uniform distribution of heat throughout
the oven.
This cooking mode is recommended for cooking several
dishes on more than one rack.
Even if the dishes vary in nature, their respective flavours
are maintained during cooking.
When using this cooking mode, all the dishes should
require the same cooking temperature (you just need to
take them out gradually as each one is ready). When
cooking on two racks, for example, use the dripping pan
as a dish support on the first oven rack from the bottom
and the grid on the third rack from the bottom.
We recommend you pre-heat the oven before placing your
dishes in it.
: "Pizza"
The heating elements (bottom and circular) are turned on
to heat the oven up quickly.
Your pizzas and tarts will benefit from a greater amount
of heat from below, thus guaranteeing the rapid baking of
the dough during cooking. As for the fan, the latter browns
the surface as necessary, making the food even more
appetising.
Use the dripping pan as a dish support and place it on the
1st rack from the oven bottom.
We recommend you pre-heat the oven before placing your
dishes in it.
: "Grill"
The top heating element comes on: the grill goes red and
emits infrared rays just like those contained in sunlight.
In fact, this cooking mode does not essentially intend to
heat up the air inside the oven, but rather to expose the
food directly to these rays.
Use this cooking mode with the oven door closed. We
recommend you start with the oven cold.
The amount of heat radiated is adjustable on the
temperature selector.
Place the dripping pan on the first rack from the bottom in
order to catch any fat or juices that may drip from the dish
and place the grid on one of the top racks depending on
the size of the meat.
: "Gratin"
Only the top heating element comes on, with the emission
of infrared rays. The forced circulation of air caused by
the fan at the back of the oven ensures the uniform
distribution of heat throughout the latter, and all foods thus
benefit from the following at the same time:
• the infrared rays that guarantee the perfect cooking
of the food surface, thus sealing in the tenderness and
juices in the case of meat,
• the hot air that also allows for the food to be cooked
thoroughly via conduction.
This cooking mode is recommended when cooking roasts
(red or white meats), and for poultry.
Place the grid on the 2
nd
rack from the oven bottom as a
support for the meat and the dripping pan on the 1st rack
from the bottom to catch any dripping fat or juices.
Always place your food in the oven when it is cold.
If your furnace is equipped with a rotisserie, you can use
it with the functions grill and gratin. Always keep the oven
door shut when using the rotisserie and start with the oven
cold in order to avoid scalding yourselves when positioning
the spit.
Place the dripping pan on the 1st oven rack from the bottom
to catch any dripping fat or juices and position the rotisserie
on the 3
rd
rack from the oven bottom (please see the next
paragraph for instructions on positioning the rotisserie).
When using the "grill" or "gratin" modes, remember
to keep children away from the accessible parts of
the appliance as they become very hot.
: fast clean
This process cleans the oven fully.
For further details on the oven's fast clean properties,
please see page 31.

30
The accessories
Your oven offers you many differing cooking modes. These
can only be achieved thanks to a certain number of
accessories which we have chosen for you.
These accessories slide in and out of the different oven racks
inside your oven and can thus be positioned in accordance
with the individual cooking requirements of differing foods
and dishes.
For each cooking mode and each example suggested, we
specify the oven rack to use (from the oven bottom up).
Rung n˚ 5
Rung n˚ 4
Rung n˚ 3
Rung n˚ 2
Rung n˚ 1
Trammels
The dripping pan
Use it:
• as a dish support for all dishes when cooking on
one rack only and in Bain Marie cooking,
• as a support for food (mini cup cakes, etc.),
• as a dripping pan to catch juices and fat dripping
from food situated on the large grid.
We advise against using the dripping pan on the 4th and 5th
racks from the oven bottom.
The large grid
Always use the large grid with the edges upwards and
together with the dripping pan.
• When it is positioned on the 2
nd
rack from the oven
bottom, it acts as a meat support, with the dripping pan
placed on the 1st rack from the bottom to catch any
dripping fat or juices.
• When it is positioned on the top rack (depending on
the size of the foodstuff) for grilled food, the dripping
pan is to be placed on the 1st rack from the oven bottom
to catch any dripping fat or juices.
• When it is positioned on the top rack for cooking on
more than one rack.
We advise against placing meat directly onto the
dripping pan when using the "gratin" mode as the fat
and juices heated from below in this particular cooking
mode could in fact char and splash onto the oven inside
panels and create smoke.
The rotisserie
Wing screw
Spit
Spit handle
Prong
Spit cradle
This specific accessory is ideal for roasting meats, as the
latter rotate slowly and are browned uniformly until cooking
is done. It is comprised of the following:
• a support situated on the 3
rd
oven rack from the oven
bottom so the rotisserie fits into the hollow shaft of
the rotisserie motor located at the back of the oven,
behind the perforated oven back panel.
• a spit that passes through the roast, which is kept
firmly in place on both ends by two adjustable sliding
forks each fastened onto the spit by means of a wing
nut.
Warning: when positioning the rotisserie assembly, ensure
the spit fits firmly into the hollow shaft connected to the motor.
Make sure you position the following correctly:
- the spit in the centre of the roast
- the roast at an equal distance from both ends of the spit.
• a removable handle made of insulating material to
screw onto the front of the spit allows you:
- to have a rotisserie which is long enough for even
the largest of roasts
- to avoid scalding yourself when removing the roast
at the end of cooking.
Screw on the handle tightly to take out the spit (the handle
should be removed from the spit during cooking).
Rotisserie timer
ARISTON ovens are fitted with a rotisserie timing device.
When cooking is done, the rotisserie motor continues to turn
the spit and only comes to a stop when the temperature
inside the oven has dropped sufficiently: this prevents the
surface of the meat from burning.
When cooking is done, leave the mode selector set to the
cooking mode under way and set the temperature selector
back to the minimum setting.
Continued ventilation
The fan stays on when cooking is done in order to cool the
oven down. So do not worry if you hear the fan going even
after you have turned the oven off: the ventilation will come
to a stop when the temperature has dropped below 120°.
Oven light
To turn the oven light on, set the mode selector knob to the
symbol.
The oven light stays on during cooking, whatever the cooking
mode (with the exception of the self-cleaning mode).
If you decide to delay the cooking start, the oven light comes
on as soon as you programme the start and stays on until
cooking is done.

31
Fast clean
How to set the cleaning process in motion
– Take all the accessories out of the oven. Remove the
toughest grease and food spots and especially all
substantial overflows in order to avoid the creation of
flames or smoke.
– Shut the oven door.
– Set the mode selector to
– Programme it. You can choose between
· an immediate start: same procedure as for cooking,
· a delayed start: same procedure as for cooking,
– The pyrolytic self-cleaning process takes approximately
90 minutes.
What happens during the fast clean process?
When the temperature reaches 325°C, the oven door is
automatically locked: the letter "P" comes up on the display,
along with the remaining process time, as it decreases.
The oven door stays locked for as long as the temperature
inside the oven remains high.
What happens at the end of the fast clean
process?
When the process is over,
"P. 0.00""P. 0.00"
"P. 0.00""P. 0.00"
"P. 0.00"comes up on the display.
To be able to open the oven door, you will have to:
• wait for the temperature inside it to have dropped
back to an acceptable level,
• have set the mode selector knob back to 0.
You will notice some white dust deposits on the bottom and
sides of the oven, remove them with a damp sponge when
the oven has cooled down completely.
If on the other hand you want to take advantage of the heat
accumulated during the process to start cooking, the dust
can stay where it is: it does not form a source of danger to
your food.
Safety devices
In fast clean mode, the temperature inside the oven reaches
500°, which is necessary for the destruction of food and fat
residue, as illustrated below.
Given this high temperature, your oven is fitted with some
safety devices:
• the oven door is locked automatically as soon as
the temperature is high in order to avoid all risks of
burns.
• the heating elements are no longer powered if an
anomaly occurs.
Notes:
1- Despite the high temperature inside the oven during the
pyrolytic self-cleaning process, the external surfaces of the
appliance remain lukewarm, thanks to:
• a reinforced insulation of the oven compartment
• a fan that ensures the circulation of air to cool down
the oven wall panels.
2- When looking through the oven door, you may notice some
particles that light up when they are destroyed by pyrolysis
upon contact with the heating elements: this is simply
spontaneous combustion, it is extremely normal and
without danger.
Precautions to be taken before performing the
fast clean process
1- Try to remove the larger food residue from inside the
oven using a wet sponge. We highly advise against the use
of detergents or all other products recommended for cleaning
ovens.
2- Remove all the accessories from the oven: they are
not designed to withstand such high temperatures. What's
more, some of these accessories would alter the result of
the pyrolytic self-cleaning process and obstruct the circulation
of heat inside the oven. The accessories can easily be
cleaned like everyday crockery and are dishwasher-proof.
3- Don't leave any tea towels on the oven door handle.
Warning: the oven surfaces may get hot during the fast
clean process: keep children well away.
Troubleshooting
DO NOT WORRY IF…
Some operating anomalies may arise. These are generally due to incorrect handling or to the erroneous valuation of a
phenomenon.
If your oven releases a lot of smoke during cooking:
• Make sure you have selected the correct cooking mode for the type of dish you want to prepare and that you have
selected the right accessories and put the dish in the oven at the recommended rack height.
• Check the temperature selected: it is no doubt too high for the type of cooking required.
• Check the degree of soil of the oven, and whether the latter needs to be cleaned. Food residue encrusted onto the
enamel coating inside the oven becomes charred and creates both smoke and pungent smells.
• Splashes of grease or overflows onto very hot surfaces could crate smoke.

32
The programmer
Setting the time
You can only set the time if the mode selector is set to "0".
After the appliance has been connected to the power
supply (or following a power failure), a flashing "0.00" is
displayed. Press keys "+" and/or "-" to set the time.
The time set is memorised, but you still have another 3
seconds to modify it, as all the other buttons remain
disabled for that time.
Setting the timer
The timer only works when the oven is switched off (mode
selector set to 0).
Press key briefly and set the time using keys "+"
and/or "-". As soon as you release the keys, the selected
duration is memorised and can still be modified for 3
seconds, indicator light comes on and the countdown
begins.
When the end of the time set is reached, an acoustic signal
sounds for 1 minute; to turn it off, just press any of the
keys; indicator light comes off.
The timer operation is independent from that of the
oven.
Acoustic signal volume
You can adjust the volume of the acoustic signal by
pressing button "-" (when the signal sounds) until you attain
the required volume.
Cooking without the programmer
When the oven is switched off (mode selector set to 0), all
the keys (except for "-" to adjust the volume of the acoustic
signal) are disabled.
Select a cooking mode by turning the mode selector knob
clockwise. Each function has a predefined cooking time
that you can visualise by pressing . You can modify the
cooking time according to the recipes you use. Simply
press and choose the cooking time you require using
the “-” and/or “+”.
The display indicates a recommended temperature,
which is independent from that indicated on the
temperature selector: you can change it by turning the
temperature selector knob.
The grill display indicates a power level between 1 and 5
(1 for minimum power and 5 for maximum power).
Your oven is now ready to start cooking: press the
key. The oven begins the pre-heating phase, during which
symbol blinks. It stops blinking when pre-heating is done
(after approximately 10 minutes).
If you fail to press the cooking start key one minute after
having selected a mode, the word "OFF" comes up on the
display and the keys are disabled. In this case, set the
mode selector back to "0" and proceed with the various
adjustments.
WARNING
Your appliance is fitted with a diagnosis system which
detects any malfunctions and displays "FnFm" on the
programmer (n and m are numbers).
In this case, please contact your nearest after-sales
service centre for assistance.
Indicator light for a programmed
operation:
- lit : operation underway
- off: operation finished
- flashing: programmed operation
has finished
Letter A:
- off: manual mode
- lit: an operation has been programmed
Display for all functions
:
clock, timer,
cooking duration and
end-of-cooking/fast-cleaning time
Timer indicator light
Button to set the timer
Buttons + and - to set the clock, timer,
cooking duration and end-of-operation
time, press on:
+ to increase the time
- to reduce the time
Button to start cooking
Button to set the
cooking duration
Button to set the
end-of-cooking time
5 s.

33
Programmed cooking
Programmed cooking with immediate start
Cooking starts immediately and comes to an automatic
stop when the end cooking time is reached.
Proceed as follows:
• set the mode selector to the selected mode,
• set the temperature using the temperature selector
knob (in steps of 10° at a time) if the recommended
one is not to your liking,
The grill display indicates a power level between 1 and 5
(1 for minimum power and 5 for maximum power).
• a recommended cooking time is associated with
each cooking mode. You may change the
recommended cooking time by pressing and keys
"+" and/or "-" (cooking time must include approximately
10 minutes for the oven to pre-heat). The cooking time
is memorised, but you still have another 3 seconds to
modify it.
During the pre-heating phase, symbol blinks and
the cooking time is displayed. When pre-heating is
done, symbol stops blinking and the oven emits 3
acoustic beeps.
There is no pre-heating phase when using the "fast
cooking" and "grill" modes.
The amount of time left until cooking is done is displayed
during cooking. To see the temperature, press key "+".
The minimum programmable cooking time is 2 minutes.
The maximum programmable cooking time is 10 hours.
• press key to start cooking.
If you fail to press the cooking start key one minute after
having selected a mode, the word "END" comes up on
the display and the keys are disabled. In this case, set the
mode selector back to "0" and proceed with the various
adjustments.
When cooking is done, an acoustic signal sounds for
one minute and the word "END" comes up on the
display; you can stop this acoustic signal by pressing any
of the keys.
• Set the mode selector knob back to "0": the word
"END" disappears and "OFF" comes up for 3 seconds.
During cooking, you can change the cooking mode
(without affecting the cooking time or temperature), the
temperature (without affecting the cooking time) and the
cooking time.
You can bring the cooking to a stop and turn the oven off
just by setting the mode selector knob to "0". In this case,
the word "OFF" is displayed for 3 seconds before it comes
off.
Programmed cooking with delayed start
The programmer automatically selects the cooking start
time according to the parameters you have set: cooking
time and end cooking time.
Proceed as follows:
• set the mode selector to the selected mode,
• set the temperature using the temperature selector
knob if the recommended one is not to your liking,
The grill display indicates a power level between 1 and 5
(1 for minimum power and 5 for maximum power).
• press key to set the cooking time,
• set the cooking time by pressing keys "+" and/or "-
" (cooking time should include the pre-heating time):
the cooking time is memorised, but you still have
another 3 seconds to modify it.
• to delay cooking, you need to set the end cooking
time by pressing and then "+" and/or "-" repeatedly:
the end cooking time is memorised, but you still have
another 3 seconds to modify it.
The minimum programmable cooking time is 2 minutes.
The maximum programmable cooking time is 10 hours.
• press key , symbol "A" comes on.
From the time of your programming to the start of cooking,
only the temperature and the mode can be modified.
When the cooking start time has been reached, the oven
is turned on and pre-heating begins, during which symbol
blinks; the cooking time is displayed.
When pre-heating is done, cooking starts, symbol
stops blinking and the oven emits 3 acoustic beeps.
There is no pre-heating phase when using the "fast
cooking" and "grill" modes.
• Set the mode selector knob back to "0".

34
A FEW EXAMPLES OF COOKING ON ONE LEVEL
Dish Cooking mode Temperature Time Shelf level Remarks Preheat
Bread (1 kg loaf)
Multicooking 210°C 30-35' 2 On enamelled tray Yes
Savoury pasties
Multicooking 200°C
20-25'
Depending on thickness
2 On enamelled tray Yes
Pizza (bread dough)
Pizza 240°C 10-15' 1 On enamelled tray Yes
Quiche
Pizza 220°C 30' 1 Tin on enamelled tray Yes
Cheese soufflé
Multicooking 200°C 30-40' 2
Tin diam. 20 cm on enamelled
tray
Ye s
Pâté
Traditional 180°C 50-60' 2
Bain-marie on enamelled tray
(start with hot water)
Ye s
Leg of lamb
Gratin 210°C 1 hour for 1,5 à 2 kg 2-1* Meat on shelf No
Potatoes au gratin
cooked with cream
Gratin 200°C
40-45'
Depending on thickness
2 Tin on enamelled tray Yes
Fish
Traditional
Gratin
Grill
200°C
240°C
250°C
Depending on type and
thickness of fish
2
2-1*
2-1*
Fillets + liquid, enamelled tray
Whole on shelf
Fish on shelf for grilling
Ye s
Chicken
Gratin
Rotisserie grill
210°C
250°C
1 hour for
1,2 à 1,5 kg
2-1*
3-1*
Meat on shelf
Rotisserie,oven door shut
No
Roast beef
Gratin 210°C
Depends on how well
cooked required
2-1* Meat on shelf No
Roast pork
Gratin 210°C 1 hour for 1kg 2-1* Meat on shelf No
Roast veal
Gratin 210°C 1 hour for 1kg 2-1* Meat on shelf No
Stuffed tomatoes
Multicooking 200°C 20-25' 2 Tin on enamelled tray Yes
Frozen meals
Fast cooking
Follow
instructions on
packet
Follow instructions on
packet
2 Tin on enamelled tray No
Lasagne
Fast cooking 200°C
Depending on
thickness
2 Tin on enamelled tray No
Moussaka
Fast cooking 200°C
Depending on
thickness
2 Tin on enamelled tray No
Buns
Pastry 160°C 35-45' 2
Aluminium tin on enamelled
tray
Ye s
Cake
Pastry 160°C 60' 2
Aluminium tin on enamelled
tray
Ye s
Profiteroles
Pastry 200°C 20-25' 2
Small savoury profiteroles on
enamelled tray
Ye s
Crème caramel
Traditional 180°C 30' 2
Individual ramekins in bain-
marie (start with hot water)
Ye s
Sponge cake
Pastry 190°C 30' 2
Aluminium tin on enamelled
tray
Ye s
Macaroons
Pastry 180°C
15-20'
Depending on thickness
2 On enamelled tray Yes
White meringues
Pastry 70-80°C
3 hour
Depending on thickness
2 Drying small meringues Yes
Blond meringues
Pastry 110°C
2 hour
Depending on thickness
2 Drying small meringues Yes
Baked apples
Multicooking 210°C
20-25'
Depending on thickness
2 Tin on enamelled tray Yes
Shortbread biscuits
Pastry 190°C 10-15' 2 Dripping pan Yes
Apple tart
Pizza 220°C 30' 1 Cake tin on the dripping pans Yes
X - Y* in the "Shelf level" column
X = shelf or spit rod at level X
Y = enamelled tray at level Y to catch the roasting juices
Reminder: always place the shelf with the indentations facing downwards

35
Maintenance
Cooking advice
Cooking is by definition the passage from a raw state to a cooked one.
The consequent result is appreciated according to different criteria: the colouring, any development in the
dish, its smoothness or tenderness, how cooked you want it to be, etc… .
The oven settings (temperatures and cooking time) obviously depend on two important parameters:
- the size of the food or dish,
- the ability of the food to brown (quantity of sugar and eggs in the recipe).
The cooking settings contained in our table were calculated according to precise parameters and you may feel
the need to make slight changes to the same in order to adapt them to your own dish and your desired degree
of cooking.
Inside the oven
We recommend you clean your oven each time you use it,
especially after cooking roasts. In fact, it is advisable to
prevent food residue from building up during cooking: the
residue would be re-cooked each time the oven is used
and would char and release smoke and unpleasant
odours.
Oven exterior
Clean the enamelled or stainless steel exterior surfaces of
your oven using a sponge soaked in soapy water, making
sure you rinse and dry these thoroughly, without using
abrasive or corrosive products which could damage them.
Stainless steel
Rinse stainless steel parts and dry them thoroughly using
a soft cloth. Use a specific non-abrasive product to remove
tougher stains,
Using aluminium foil
To avoid having to clean the bottom of the oven, you may
be tempted to line the same with some aluminium foil. We
strongly advise against this. The aluminium foil sheet
in direct contact with the heated enamel coating could
melt and damage the enamel coating inside the oven
irreversibly.
Cleaning the rotisserie and other accessories
The rotisserie can be removed completely thanks to the 2
wing nuts. The elements comprising the rotisserie assembly
should be cleaned together with the other accessories
(dripping pan, grid) in the sink using a damp sponge and
ordinary detergent or even in your dishwasher.
Disassembling the oven door
The oven door can easily be removed to clean the space
between the bottom of the door and the front of the oven. To
disassemble the door, proceed as follows:
• open the oven door fully,
• lift up and turn the small levers situated on the two hinges,
• shut the door, but not completely,
• grip the door on the two external sides and pull it towards
you, pulling it out of its seat.
Glass door
Seal
Lamp
Oven
compartment
132
123
Disassembling oven door FO 97 P - FD 97 P - FD 96 P
Disassembling oven door FC 97 P - FB 86 P
Re-assemble the door by following the above procedures
backwards.
Replacing the oven lamp
• Always unplug the appliance from the mains or switch
off the main switch before all operations.
• With the aid of a narrow, flat item (such as a screwdriver
or a spoon handle, etc…), remove the glass cover.
• Unscrew the lamp and replace it with another featuring
the same characteristics:
- voltage 230/240 W
- wattage 15 W
- type E 14
• Replace the glass cover and ensure you reposition the
seal correctly.

36
Installation
Built-in installation
This oven can be built into all standard furniture cabinet
units featuring dimensions conforming to European
standards.No particular precautions need to be taken
when performing the built-in installation of the oven, thanks
to:
- its reinforced insulation that limits the heat exchanges
- its frontal cooling ventilation requiring no air inlet.
Installation must be performed by a qualified professional
and in all cases in compliance with the safety norms in
force, failing which the appliance guarantee will not be
valid in the event of an accident caused by incorrect
installation.
This is also important for the safety of the user and the
long life of your appliance.
The panels of the adjacent cabinets must be made of heat-
resistant material. In particular, cabinets with a veneer exte-
rior must be assembled with glues which can withstand
temperatures of up to 100°C.
In compliance with current safety standards, contact with
the electrical parts of the appliance must not be possible
once it has been installed.
All protective parts which ensure the safe operation of the
appliance must be removable only with the aid of a tool.
Built-in installation of FO97 P - FD97 P - FD96 P - FB86 P
Position the 4 tabs on the sides of the oven in correspondence
with the 4 holes on the perimeter of the frame. In particular,
if the cabinet side panel:
• is 20 mm thick: the removable part of the tab must be
removed (Fig. A);
• is 18 mm thick: use the first groove, which is factory-set
(Fig. B);
• is 16 mm thick: use the second groove (Fig. C).
To fasten the oven to the cabinet, open the oven door
and screw the 4 screws (supplied with the appliance) into
the 4 holes located on the perimeter of the frame.
595 mm.
595 mm.
545 mm.
5 mm.
567 mm.
575-585 mm.
558 mm.
595 mm.
45 mm.
min.
45 mm.
min.
20/28 mm.
20/23 mm.
595 mm.
595 mm.
20/28 mm.
545 mm.
5 mm.
567 mm.
20/23 mm.
593 mm.
45 mm.
558 mm.
Fig. A Fig. B
Fig. C

37
Installation
Connection
First check the mains electricity supply available (number
of phases - voltage - maximum power necessary) to
ensure these are compatible with the requirements of the
Ariston appliance to be connected.
Ariston ovens can adapt to the following electrical systems:
You can connect your furnace to the electric installation
by means of a case of connection. You defer to the table
for the minimal wire sections and the calibration of the
protection measures according to the branch.
If the appliance is installed with a junction box, an
omnipolar circuit breaker - with a minimum contact opening
of 3 mm - should be installed between the appliance and
the mains.
We recommend you use a power supply cable which is
long enough to allow you to take the oven out of its recess
in the event of maintenance operations (only use HAR -
H 05 - RRF quality cables fitted with a plug conforming to
the regulations in force in the country where the appliance
is fitted).
The plug must be accessible at all times.
Unplug the appliance before all operations, even when
replacing the oven lamp.
Built-in installation of FC 97 P (see figure on the right)
1. Place brackets "A" well against the oven support blocks
"B".
2. Place the tabs "C" well against brackets "A". In particular,
if the cabinet side panel:
• is 16 mm thick: mount the tab so that the number 16 it
features is facing you;
• is 18 mm thick: mount the tab so that the part without
any wording is facing you;
• is 20 mm thick: do not mount the tab.
3. Fasten the brackets and tabs on the oven cabinet side
panel using screws "D".
4. Fasten the oven to the cabinet using the screws and
plastic washers "E".
D
A
B
D
D
16
16
16
16
C
C
C
E
E
Electrical connection
Electrical connections
Voltage
Frequency
Fuse
Section
FR-AT-BE-DE-GP-ES-IE-IL-IS-IT-DK
LU-RE-FI-GB-GR-PT-SE-MA-NZ-NL
230 V-1+N ~ 50 Hz
CY-MT-AU-NZ-KW
240 V-1+N ~ 50 Hz
16 A
1,5 mm²
FR-BE-NO
230 V-2 ~ 50 Hz
16 A
1,5 mm²
This appliance conforms with the following European
Community directives:
DBT 73/23 EEC modified by 93/68/EEC directive
CEM 89/336/EEC modified by 92/31/EEC and 93/68/EEC
directives
Inner dimensions of the oven:
width 43.5 cm
depth 40.0 cm
height 32.0 cm
Inner volume of the oven:
54 litres
Voltage and frequency of power supply:
230V~50Hz : 2800 W
240V~50Hz : 3050 W
Using the appliance without correct earthing is highly
dangerous.
Important: After connecting the appliance to the flexible
cable, tighten all the screws on the terminal board.
LN
L1L2

Merloni Electroménager S.A.
BP 80048 - 57101 Thionville Cedex
tél 03.82.55.75.00 - fax 03.82.55.77.80
http://www.merloni.com
11/02 - 19503064204 - Xerox Business Services - Docutech
/