Page is loading ...

3
Read the instructions, keep them safe, pass them on if you pass the appliance on. Remove all
packaging before use.
A IMPORTANT SAFEGUARDS
1 This appliance can be used by children aged from 8 years and
above and persons with reduced physical, sensory or mental
capabilities or lack of experience and knowledge if they have
been supervised/instructed and understand the hazards involved.
Children shall not play with the appliance. Cleaning and user
maintenance shall not be done by children unless they are older
than 8 and supervised. Keep the appliance and cable out of reach
of children under 8 years.
2 Don’t connect the appliance via a timer or remote control system.
3 If the cable is damaged, it must be replaced by the manufacturer,
its service agent, or someone similarly qualified, to avoid hazard.
¬ The surfaces of the appliance will get hot.
¬ The door gets hot – wear oven gloves.
H Don’t immerse the appliance in liquid.
4 Sit the appliance on a stable, level, heat-resistant surface, at least 75cm above floor level.
5 Leave a space of at least 50mm all round the appliance.
6 Don’t use the appliance near or below combustible materials (e.g. curtains).
7 Wear oven gloves when filling or emptying the appliance.
8 Check that you can open the door without causing an obstruction.
9 Don’t rest anything on the door when it’s open – you’ll break it.
10 Don’t cover the appliance or put anything on top of it.
11 Unplug the appliance when not in use, before moving and before cleaning.
12 Don’t use accessories or attachments other than those we supply.
13 Don’t use the appliance for any purpose other than those described in these instructions.
14 Don’t operate the appliance if it’s damaged or malfunctions.
household use only
U BEFORE USING FOR THE FIRST TIME
1 Check that you’ve removed all packaging from inside the appliance, and round the elements.
2 Put the plug into the power socket.
3 Set the temperature control to 230.
4 Set the oven control to H.
5 Set the timer to 10.
instructions
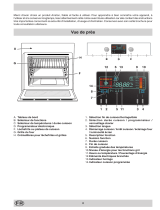
diagrams
c temperature control
A oven control
T timer
0 off
1 light
2 top element
3 shelf supports
4 guide
5 rotisserie drive
6 bottom element
7 door
8 handle
9 rack
10 tray
11 handle
12 top hooks
13 bottom hooks
14 screws
15 skewers
16 rotisserie
17 point
18 cut-outs
19 rotisserie fork

4
6 Operate the appliance empty.
7 This may smell a bit, but it’s nothing to worry about. Ensure the room is well ventilated.
C THE RACK AND TRAY
8 The rack and tray slide into the shelf supports at the sides of the oven.
9 Use the lower supports for baking and roasting.
10 Use the upper supports for grilling, toasting, and browning toppings.
11 If you’re not cooking on the tray, put it on the bottom shelf support, to catch drips.
C THE HANDLE
12 To fit the handle to the rack/tray:
a) catch the hooks on the top of the rack/tray
b) lower the handle till the bottom catches the underside of the rack/tray
c) lift the handle, and the rack/tray comes with it
d) the top hooks fit the tray, the bottom hooks fit the rack
C USING THE OVEN
13 Put the plug into the power socket.
14 Set the temperature control to the required temperature (100-230°C).
15 Set the oven to the function you require: / all elements off
O top element and rotisserie
F bottom element
H both elements
16 Turn the timer clockwise to the required time. The light will glow.
, If you need to cook for more than 60 minutes, simply re-set the timer when it returns to zero.
17 When the timer returns to 0, it will switch off. You’ll hear a “ding”. The light will go off.
18 When using the bottom element, or both elements (F H), preheat the oven, and wait till
the light goes out before cooking.
C THE DOOR – OPEN OR CLOSED?
19 The door has 3 stable positions, open, closed, and half open (about 30°).
20 Keep the door half open if using the top element O, either as a grill, or with the rotisserie.
21 This will prevent the thermostat operating and switchhing off the element.
22 Keep the door closed when using the bottom element F, for baking, or both elements
together H for traditional oven cooking.
C GRILLING AND SPITTING
23 When grilling, or cooking anything that comes close to the top element, keep an eye on the
food, to avoid fat or juices spitting on the top element.
24 If you see spitting, move the food down, away from the top element.
25 You may have to extend the cooking time slightly, to make up for the extra distance.
26 Spitting will make cleaning difficult.
27 Residues burned on to the top element may shorten its life.
28 Burned residues falling back into the food may affect the look and taste of the food.
C THE ROTISSERIE
29 Whatever you are roasting, a bird, a rabbit, or a piece of meat, it must be mounted centrally
on the rotisserie.
30 If it is not mounted centrally, then one side will cook faster than the other.
31 There must be no loose bits, or they will be unevenly cooked.
32 The closer you can get to a cylinder shape, with the rotisserie exactly in the centre, the better
will be the results.
33 Tie loose bits, like wings, or small legs, with string.
34 Loosen both screws, then remove the skewer from the pointed end of the rotisserie.
35 Push the pointed end through the centre of the meat, and out the other side.

5
36 Replace the skewer on the rotisserie, and push both skewers into the ends of the meat.
37 The meat will shrink as it is cooked, and it must not fall off the skewers, so push them well in.
38 Move the meat and skewers along the rotisserie till the meat is roughly in the centre, then
tighten both screws, to hold it in place.
39 Fit the pointed end of the rotisserie into the rotisserie drive, then lower the other end into
the guide on the other side of the oven.
40 Check that nothing will touch the inside of the oven as the rotisserie rotates.
41 Slide the tray into the bottom support, to catch the drips.
42 Leave the door half open.
43 Set the temperature control to the required temperature (100-230°C).
44 If the temperature is too high, the outside will cook faster than the centre.
45 We suggest you cook at low to medium temperatures.
46 If you want to crisp the outside of the meat, then turn the temperature up towards the end of
the cooking time.
47 Set the oven control to O.
48 Turn the timer clockwise to the required time.
49 Use the rotisserie fork to lift the rotisserie out of the oven.
50 Fit the ends of the fork under the cut-outs in the rotisserie.
51 Hold the fork with both hands.
52 Lift the left side a little, to free the end from the guide, then move the rotisserie to the right,
to free the pointed end.
53 Carefully remove the fork and rotisserie from the oven.
54 We suggest that you practise a few times before you start cooking.
C CARE AND MAINTENANCE
55 Unplug the appliance and let it cool before cleaning or storing away.
56 Wipe all surfaces with a clean damp cloth.
57 Wash the removable parts in warm soapy water, rinse well, drain, and air dry.
58 Don’t use scourers, wire wool, or soap pads.
59 Don’t put any part of the appliance in a dishwasher.
discolouration
60 With use, the surfaces of the appliance will discolour.
61 This is inevitable, harmless, and won't affect the operation of the appliance.
W
ENVIRONMENTAL PROTECTION
To avoid environmental and health problems due to hazardous substances in electrical and
electronic goods, appliances marked with this symbol mustn’t be disposed of with unsorted
municipal waste, but recovered, reused, or recycled.
C COOKING TIMES & FOOD SAFETY
• Use these times purely as a guide.
• Cook meat, poultry, and derivatives (mince, burgers, etc.) till the juices run clear. Cook fish till
the flesh is opaque throughout.
• When cooking pre-packed foods, follow any guidelines on the package or label.
food temperature food temperature
beef 190-210 °C pastry 190-210 °C
bread 200-220 °C pork 190-210 °C
casseroles 140-160 °C quiche/flan 160-180 °C
chicken 190-210 °C rich fruit cake 140-160 °C
fish 170-190 °C scones 190-220 °C
lamb 190-210 °C sponge cake 160-180 °C
meringue 90 -110 °C Yorkshire pudding 200-220 °C
milk pudding 140-160 °C
/