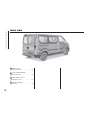
Fiat TALENTO Owner's Handbook Manual
- Category
- Cars
- Type
- Owner's Handbook Manual

The data contained in this publication is intended merely as a guide. FCA Italy S.p.A. reserves the right to modify
the models and versions described in this booklet at any time for technical and commercial reasons.
If you have any further questions please consult your FIAT dealer.
Printed in recycled paper without chlorine.
OWNER HANDBOOK
FIATTALENTO
ENGLISH
COP TALENTO LUM GB.qxp 29/04/16 12:11 Pagina 1

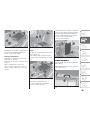
We really know your vehicle because we invented,
designed and built it: we really know every single detail. At Fiat Professional Service authorised workshops
you can find technicians directly trained by us, offering quality and professionalism for all service operations.
Fiat Professional workshops are always close to you for the regular servicing operations, season checks and practical
recommendations by our experts.
With Fiat Professional Genuine Parts you keep the reliability, comfort and performance features of your
new vehicle unchanged in time: that's why you bought it for.
Always ask for Genuine Parts for the components used on our vehicles; we recommend them because they come from
our steady commitment in research and development of highly innovative technologies.
For all these reasons: rely on Genuine Parts,
because they are the only ones designed by Fiat Professional for your vehicle.
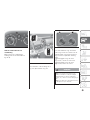
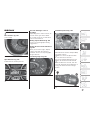
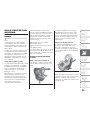
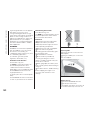
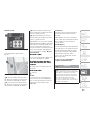
WHY CHOOSING
GENUINE PARTS
SAFETY: BRAKING
SYSTEM
ENVIRONMENT: PARTICULATE FILTERS,
CLIMATE CONTROL SYSTEM MAINTENANCE
COMFORT:
SUSPENSION AND WINDSCREEN WIPERS
PERFORMANCE:
SPARK PLUGS, INJECTORS AND
BATTERIES
LINEACCESSORI:
ROOF RACK BARS, WHEEL RIMS
COP TALENTO LUM GB.qxp 29/04/16 12:11 Pagina 2

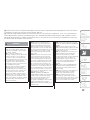
Dear Customer,
We would like to congratulate and thank you for choosing a Fiat Professional.
We have written this handbook to help you get to know all the features of your vehicle and use it in the best possible way.
Here you will find information, advice and important warnings regarding use of your vehicle and how to achieve the best
performance from the technical features of your Fiat Talento.
You are advised to read it right through before taking to the road for the first time, to become familiar with the controls and
above all with those concerning brakes, steering and gearbox; at the same time, you can understand the vehicle behaviour on
different road surfaces.
This document also provides a description of special features and tips, as well as essential information for the safe driving, care
and maintenance of your Fiat Talento over time.
In the attached Warranty Booklet you will also find a description of the Services that Fiat offers to its customers, the Warranty
Certificate and the detail of the terms and conditions for maintaining its validity.
We are sure that these will help you to get in touch with and appreciate your new vehicle and the service provided by the
people at Fiat Professional.
Enjoy reading. Happy motoring!

READ THIS CAREFULLY
REFUELLING
Only refuel with automotive diesel conforming to the European specification EN590. The use of other products or mixtures may damage the
engine beyond repair and consequently invalidate the warranty, due to the damage caused.
STARTING THE ENGINE
Make sure that the handbrake is engaged, put the gear in neutral, fully press the clutch without pressing the accelerator, then turn the ignition
key to AVV and release it as soon as the engine has started. In versions with an electronic key, the engine will start as soon as the button on
the starter device is pressed.
PARKING ON FLAMMABLE MATERIAL
The catalytic converter develops high temperatures during operation. Do not park on grass, dry leaves, pine needles or other flammable
material: fire hazard.
RESPECTING THE ENVIRONMENT
The vehicle is fitted with a system that allows continuous diagnosis of the emission-related components in order to help protect the
environment.
ELECTRICAL ACCESSORIES
If, after buying the vehicle, you decide to add electrical accessories (with the risk of gradually draining the battery), visit a Fiat Dealership. They
can calculate the overall electrical requirement and check that the vehicle's electrical system can support the required load.
SCHEDULED SERVICING
Correct maintenance enables the vehicle to perfectly maintain performance and safety characteristics, its environmental friendliness and low
running costs over time.

USE OF THE OWNER HANDBOOK
OPERATING INSTRUCTIONS
Each time direction instructions (left/right or forwards/backwards) about the vehicle are given, these must be intended as
regarding an occupant in the driver's seat. Special cases not complying with this rule will be specified as appropriate in the text.
The figures in the Owner Handbook are provided by way of example only: this might imply that some details of the image do
not correspond to the actual arrangement of your vehicle. In addition, the Handbook has been conceived considering cars with
steering wheel on the left side; it is therefore possible that on cars with steering wheel on the right side, the position or
construction of some controls is not exactly mirror-like with respect to the figure.
To identify the chapter with the information needed you can consult the index at the end of this Owner Handbook.
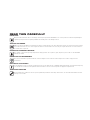
Chapters can be rapidly identified with dedicated graphic tabs, at the side of each odd page. A few pages further there is a key
for getting to know the chapter order and the relevant symbols in the tabs. There is in any case a textual indication of the
current chapter at the side of each even page.

WARNINGS AND PRECAUTIONS
While reading this Owner Handbook you will find a series of WARNINGS to prevent procedures that could damage your
vehicle.
There are also PRECAUTIONS that must be carefully followed to prevent incorrect use of the components of the vehicle,
which could cause accidents or injuries.
Therefore all WARNINGS and PRECAUTIONS must always be carefully followed.
WARNINGS and PRECAUTIONS are recalled in the text with the following symbols:
personal safety;
vehicle integrity;
environmental protection.
NOTE These symbols, when necessary, are indicated besides the title or at the end of the line and are followed by a number.
That number recalls the corresponding warning at the end of the relevant section.
IMPORTANT
This Owner Handbook describes all Fiat Talento versions. Options, equipment dedicated to specific markets or
versions are not explicitly indicated in the text: as a consequence, you should only consider the information which
is related to the trim level, engine and version that you have purchased. Any content introduced throughout the
production of the model, outside the explicit request of options at the time of purchase, will be identified with the
wording (for versions/markets, where provided).
All data contained in this publication are intended to help you use your vehicle in the best possible way. FCA Italy
S.p.A. aims at a constant improvement of the vehicles produced. For this reason it reserves the right to make
changes to the model described for technical and/or commercial reasons.
For further information, contact a Fiat Dealership.
SYMBOLS
Some vehicle components have coloured labels whose symbols indicate precautions to be observed when using this
component.
4

VEHICLE MODIFICATIONS / ALTERATIONS
WARNING
Any modification or alteration of the vehicle might seriously affect its safety and road holding, thus causing accidents, in which
the occupants could even be fatally injured.
ACCESSORIES PURCHASED BY THE OWNER
If after buying the vehicle, you decide to install electrical accessories that require a permanent electrical supply (e.g. radio,
satellite anti-theft system, etc.) or accessories that in any case burden the electrical supply, contact a Fiat Dealership, whose
personnel will check whether the vehicle's electrical system is able to withstand the load required, or whether it needs to be
integrated with a more powerful battery.
IMPORTANT Take care when fitting additional spoilers, alloy wheel rims or non-standard wheel hubs: they could reduce the
ventilation of the brakes and affect efficiency under sharp, repeated braking or on long descents. Make sure that nothing
obstructs the pedal stroke (mats, etc.).
INSTALLING ELECTRICAL/ELECTRONIC DEVICES
Electrical and electronic devices installed after buying the vehicle and available as after-sales must carry the following label: .
Fiat authorises the installation of transceivers provided that installation is carried out at a specialised centre, in a workmanlike
fashion and in compliance with manufacturer's specifications.
IMPORTANT Traffic authorities may not allow the vehicle on the road if devices are fitted that involve modifications to the
features of the vehicle. This may also cause lapse of the warranty in relation to faults caused by the change or either directly or
indirectly related to it.
Fiat shall not be liable for damage caused by the installation of accessories either not supplied or recommended by Fiat and/or
not installed in compliance with the provided instructions.
RADIO TRANSMITTERS AND MOBILE PHONES
Radio transmitter equipment (vehicle mobile phones, CB radios, amateur radio, etc.) cannot be used inside the car unless a
separate aerial is mounted on the roof of the vehicle.
Transmission and reception of these devices may be affected by the shielding effect of the vehicle body. As far as the use of
EC-approved mobile phones is concerned (GSM, GPRS, UMTS, LTE), follow the usage instructions provided by the mobile
phone Manufacturer.
IMPORTANT The use of such devices inside the passenger compartment (without an external aerial) may, in addition to
potential damage to the health of the passengers, cause malfunctions in the vehicle’s electronic systems, compromising the
safety of the vehicle.
5

6

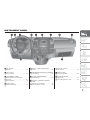
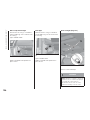
GRAPHICAL INDEX
KNOWING YOUR VEHICLE
KNOWING THE INSTRUMENT PANEL
SAFETY
STARTING AND DRIVING
IN AN EMERGENCY
SERVICING AND CARE
TECHNICAL DATA
INDEX


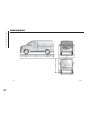
GRAPHICAL INDEX
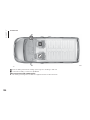
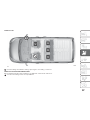
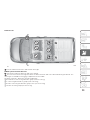
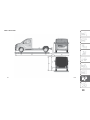
FRONT VIEW
HEADLIGHTS
Daytime running lights ...........35
Side lights/dipped headlights ....35
Main beam headlights ...........35
Bulb replacement ..............147
WHEELS
Rims and tyres ................. 191
Inflation pressure ...............176
Changing a wheel .............. 155
Tyre inflation kit ................158
DOOR MIRRORS
Adjustment ..................... 34
DOORS
Opening/closing .................20
WINDSCREEN WIPERS
Operation .......................40
Blade replacement .............178
ENGINE
Checking levels ................171
Technical data .................186
1
9

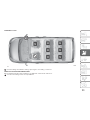
REAR VIEW
REAR LIGHTS
Bulb replacement ..............147
LOAD COMPARTMENT
Opening/closing .................22
THIRD BRAKE LIGHT
bulb replacement ..............147
RADAR PARKING
Operation .......................56
2
10
GRAPHICAL INDEX

INSTRUMENT PANEL
AIR VENTS
Diffusers ........................48
LEFT STALK
External lights ...................35
INSTRUMENT PANEL
Control panel and on-board
instruments ....................... 87
Warning lights ................... 79
RIGHT STALK
Window washing ................ 40
RADIO / TOUCH-RADIO NAV
System .........................68
PASSENGER SIDE FRONT AIRBAG
Front airbag .....................97
GLOVE COMPARTMENT
Interior fittings ................... 62
HEATER / CLIMATE CONTROL
SYSTEM
Heating and ventilation ..........47
Manual climate control .......... 49
Automatic climate
control system ..................... 52
GEAR LEVER
Using the gearbox ............. 136
STEERING WHEEL
Adjustment ..................... 31
Front airbag driver's side ........ 62
3
11

KNOWING YOUR VEHICLE
In-depth knowledge of your new vehicle
starts here.
The handbook that you are reading
simply and directly explains how it is
made and how it works.
That’s why we advise you to read it
seated comfortably on board, so that
you can see what is described here for
yourself.
THE KEYS .................13
DOORS ...................20
HEADRESTS................27
SEATS....................28
STEERING WHEEL/POWER
STEERING .................31
START&STOP SYSTEM .........32
REAR VIEW MIRRORS .........34
EXTERNAL LIGHTS ...........35
INTERIOR LIGHTS ............38
WINDSCREEN / REAR WINDOW
WIPERS ..................40
REFUELLING THE VEHICLE ......42
AdBlue (Urea) ADDITIVE TANK ....44
IGNITION DEVICE ............45
CLIMATE CONTROL ...........46
RADAR PARKING.............56
REAR CAMERA ..............58
ELECTRIC WINDOWS..........59
ENGINE BONNET ............61
INTERIOR FITTINGS ...........62
MULTIMEDIA EQUIPMENT .......68
RADIO ....................68
BAGGAGE COVER............69
CRUISE CONTROL
(constant speed regulator) .......69
SPEED LIMITER..............72
PROTECTING THE ENVIRONMENT .74
DIESEL VERSION
PARTICULARITIES ............75
12
KNOWING YOUR VEHICLE

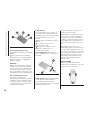
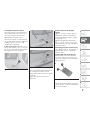
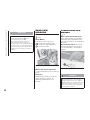
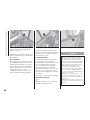
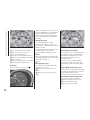
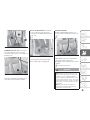
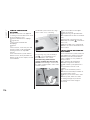
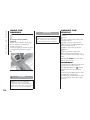
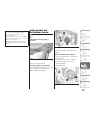
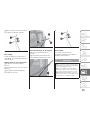
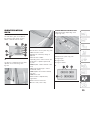
THE KEYS
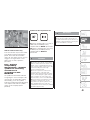
KEY WITH REMOTE
CONTROL
1)
Radio frequency remote control
fig. 4 — fig. 5
1 Metallic insert device for starting,
locking/unlocking bezel doors.
2 Locking of all parts that open.
3 Unlocking all parts that open or,
depending on the version, only the
driver's door.
4 Locking/unlocking the boot (for
versions/markets where provided) and,
depending on the version, of the side
sliding door.
IMPORTANT The key must never be
used for any other function except the
one described.
IMPORTANT Do not put the remote
control near a source of heat, cold, or
humidity.
Radio frequency remote operating
range
This varies according to the
surroundings: therefore be careful to
handle the remote control that could
cause it to lock or unlock the doors
unexpectedly because of involuntary
pressure on the buttons.
NOTE For some vehicles, if none of the
doors is opened in (around) 2 minutes,
the doors lock again automatically.
Interference
Depending on the surrounding
circumstances (external systems or use
of devices that operate on the same
frequency as the remote control) the
remote's operation could be disrupted.
IMPORTANT To replace the remote or
to have an additional one: please see a
Fiat Dealer only.
If a remote is to be replaced go to a
Fiat Dealership with the vehicle and all
its keys: to initialise the system, the
vehicle and its remote are needed;
depending on the vehicle version,
you can have as many as four remote
controls.
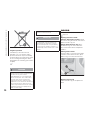
IMPORTANT Make sure your batteries
are always in good condition, they are
the type required and inserted correctly.
A battery's life span is usually two
years. To familiarise yourself with
battery replacement procedure, please
read the paragraph on it.
Unlocking the opening parts
For vehicles that do not have driver's
door exclusive unlock, pressing on
button 2 fig. 6lets you unlock all the
opening parts.
For vehicles that do have driver's door
exclusive unlock, pressing on button
2 lets you unlock the driver's door.
4
T26519
5
T25028
13

Pressing a second time within
20 seconds of the first time will unlock
all the doors.
Briefly pressing on button 3 (for
versions/markets where provided)
fig. 7lets you unlock the rear doors and,
depending on the version, the side
sliding doors.
Unlocking is indicated by the
emergency and turn signal lights
flashing.
NOTE If none of the doors is opened in
around 2 minutes after the relative
remote control unlocking, the doors
lock again automatically.
Locking the opening parts
Pressing button 2 fig. 8once will lock all
opening parts.
Briefly pressing on button 4 (for
versions/markets where provided)
fig. 8lets you lock the rear doors and,
depending on the vehicle version, the
side sliding doors.
Locking is confirmed by the emergency
and turn signal lights flashing.
If a door is open or not closed correctly,
the opening parts will enable opening
then closing them in rapid succession,
without the emergency or turn signal
lights flashing.
Centralised door closing (DEAD
LOCKING)
2)
If the vehicle is thus equipped,
centralised closing lets you lock the
opening parts and stop door opening
with the inside handles (in case
attempted door opening from the inside
breaks the glass).
To activate the central locking, press
button 1 fig. 9- fig. 10twice in
succession.
6
T103A
7
T25028-1
8
T25028
9
T26519-1
14
KNOWING YOUR VEHICLE

Locking is confirmed by the emergency
and turn signal lights flashing five times.
NOTE Deadlock centralised locking is
not possible if the vehicle hazard
warning lights or side lights are on.
Replacing the remote control
battery
1)
Undo screw 1 fig. 11to take off the
remote control cover.
IMPORTANT Batteries are available at a
Fiat Dealership, and they last about two
years. Make sure there are no ink traces
on the battery: there is a risk of
improper electrical contact.
Replace the battery 2 fig. 12respecting
the polarity etched on the cover.
NOTE When replacing a battery, do not
touch the electronic circuit located in
the key cover.
IMPORTANT When refitting, make sure
that the cover is correctly set and that
the screw is tightened.
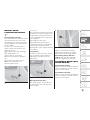
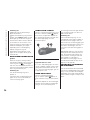
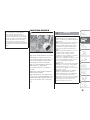
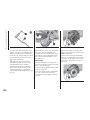
ELECTRONIC KEY
(Keyless ENTRY / Keyless GO)
1)
1 fig. 14 Unlocking of all parts that
open.
2 Locking of all parts that open.
3 Turning on inside lights from a
distance.
4 Locking/unlocking the boot and
side sliding doors.
5 Integrated key.
10
T25028-2
11
T29999
12
T31574
13
T26913
15

The electronic key lets you:
lock/unlock the doors (see following
pages);
turn on the vehicle's inside lights
from a distance (see following pages);
start the ignition, see paragraph
"Start the engine".
Autonomy
Make sure your batteries are in good
condition, they are the type required
and inserted correctly. The battery has
a two-year life span: replace it when
you see the apposite message on the
instrument panel (see following pages).
The electronic key's scope
This varies according to the
surroundings; therefore be careful to
handle the remote control that could
cause it to lock or unlock the doors
accidentally because of involuntary
pressure on the buttons.
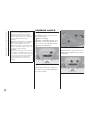
Integrated key
The integrated key 5 fig. 15 serves to
lock or unlock the front left door and,
depending on the vehicle, the rear door
when the electronic key cannot
function:
the electronic key might have dead
batteries;
use of devices on the same
frequency as the card;
the vehicle is located in an area
known for a high presence of
electro-magnetic waves.
Accessing the key: press button 6
fig. 15 and pull the key 5, then release
the button.
Using the key: please read paragraph
"Lock, unlock the opening parts".
Once inside the vehicle with the
integrated key, put it back in its housing
with in the electronic key.
Insert the electronic key in the card
reader to start the engine.
IMPORTANT Do not put the key near a
source of heat, cold, or humidity. Do
not place the electronic key where it
could be accidentally folded or ruined
(for example, when you put the key in
your trousers back pocket then sit on
it).
IMPORTANT Please see a Fiat
Dealership to replace the electronic key,
or if you need a supplementary one in
case of loss. If you replace an electronic
key, you will have to bring the vehicle
and all the electronic keys to a Fiat
Dealership to be re-initialised. Every
vehicle can be assigned up to four
electronic keys.
Keyless ENTRY
This lets you lock/unlock without
needing to use the electronic key, if you
are in the access area 1 fig. 16.
14
T26787
15
T26788
16
T36509
16
KNOWING YOUR VEHICLE

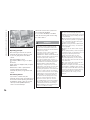
Locking/unlocking the vehicle
There are two ways to lock/unlock the
vehicle: being physically in the access
area or by using the electronic key.
IMPORTANT Do not place the
electronic key where it could come into
contact with other electronic equipment
(computer, phone, etc.) that could
compromise its operation.
In the access area: Depending on the
vehicle, press button 2 fig. 17 – fig. 18 –
fig. 19 on one of the front door handles,
the tailgate or the rear swing door.
The danger warning lights will flash to
let you know the vehicle's status:
two flashes indicate that the vehicle
is locked;
one flash means the vehicle is
unlocked.
Details relative to locking the
vehicle
When closing, if a door is open or
not properly closed, a rapid vehicle
lock/unlock without emergency lights
flashing will occur;
after locking by pressing button 2
fig. 17 – fig. 18 – fig. 19, you need to
wait about three seconds to be able to
unlock the vehicle.
Unlocking using the electronic key:
Press button 3 fig. 20. The emergency
lights will flash once to confirm the
vehicle is open.
Locking with the electronic key:
With the doors shut, press button 4
fig. 20: the vehicle is locked. You can
see it is locked because the emergency
lights flash twice.
NOTE The maximum distance from the
vehicle where it can be locked depends
on the surroundings.
17
T36508
18
T36533
19
T36513
20
T26787-1
17

NOTE You cannot lock the vehicle if:
a door is open or closed badly;
the key is not in the area 1 fig. 21.
IMPORTANT After locking/unlocking the
vehicle with the electronic key buttons,
the "easy access" lock and unlock
mode is disabled. To get it back: restart
the engine.
With the engine started, if after opening
and closing a door, the key is not longer
in area 5 fig. 22, a specific message
(together with an acoustic signal when
you are going over a certain speed) will
tell you that the key is no longer in the
vehicle. This prevents departing after
leaving a passenger with the key
behind, for example.
The notice disappears when the key is
once again detected.
"Remote lighting" function
By pressing button 6 fig. 23 once, the
inside lighting will go on for about
30 seconds. This lets you find your
vehicle in a parking lot from a distance,
for example.
NOTE If button 6 is pressed again the
lighting goes out.
Locking/unlocking the rear opening
parts
Press button 7 fig. 23 to lock/unlock
the rear swing doors or, for some
versions, the tailgate and side doors
fig. 18 – fig. 19.
The emergency lights will flash, telling
you the status of the rear opening
doors:
two flashes mean the rear opening
parts are locked;
one flash means the rear opening
parts are unlocked.
IMPORTANT After locking/unlocking the
vehicle with the electronic key buttons,
the "easy access" lock and unlock
mode is disabled. To get back to "easy
access", restart the vehicle.
Centralised door closing (DEAD
LOCKING)
If the vehicle has a centralised closing
function, this lets you lock the opening
parts and stop door opening with the
inside handles (in case attempted door
opening from the inside breaks the
glass).
2)
21
T36509
22
T36626
23
T26787-2
18
KNOWING YOUR VEHICLE
Page is loading ...
Page is loading ...
Page is loading ...
Page is loading ...
Page is loading ...
Page is loading ...
Page is loading ...
Page is loading ...
Page is loading ...
Page is loading ...
Page is loading ...
Page is loading ...
Page is loading ...
Page is loading ...
Page is loading ...
Page is loading ...
Page is loading ...
Page is loading ...
Page is loading ...
Page is loading ...
Page is loading ...
Page is loading ...
Page is loading ...
Page is loading ...
Page is loading ...
Page is loading ...
Page is loading ...
Page is loading ...
Page is loading ...
Page is loading ...
Page is loading ...
Page is loading ...
Page is loading ...
Page is loading ...
Page is loading ...
Page is loading ...
Page is loading ...
Page is loading ...
Page is loading ...
Page is loading ...
Page is loading ...
Page is loading ...
Page is loading ...
Page is loading ...
Page is loading ...
Page is loading ...
Page is loading ...
Page is loading ...
Page is loading ...
Page is loading ...
Page is loading ...
Page is loading ...
Page is loading ...
Page is loading ...
Page is loading ...
Page is loading ...
Page is loading ...
Page is loading ...
Page is loading ...
Page is loading ...
Page is loading ...
Page is loading ...
Page is loading ...
Page is loading ...
Page is loading ...
Page is loading ...
Page is loading ...
Page is loading ...
Page is loading ...
Page is loading ...
Page is loading ...
Page is loading ...
Page is loading ...
Page is loading ...
Page is loading ...
Page is loading ...
Page is loading ...
Page is loading ...
Page is loading ...
Page is loading ...
Page is loading ...
Page is loading ...
Page is loading ...
Page is loading ...
Page is loading ...
Page is loading ...
Page is loading ...
Page is loading ...
Page is loading ...
Page is loading ...
Page is loading ...
Page is loading ...
Page is loading ...
Page is loading ...
Page is loading ...
Page is loading ...
Page is loading ...
Page is loading ...
Page is loading ...
Page is loading ...
Page is loading ...
Page is loading ...
Page is loading ...
Page is loading ...
Page is loading ...
Page is loading ...
Page is loading ...
Page is loading ...
Page is loading ...
Page is loading ...
Page is loading ...
Page is loading ...
Page is loading ...
Page is loading ...
Page is loading ...
Page is loading ...
Page is loading ...
Page is loading ...
Page is loading ...
Page is loading ...
Page is loading ...
Page is loading ...
Page is loading ...
Page is loading ...
Page is loading ...
Page is loading ...
Page is loading ...
Page is loading ...
Page is loading ...
Page is loading ...
Page is loading ...
Page is loading ...
Page is loading ...
Page is loading ...
Page is loading ...
Page is loading ...
Page is loading ...
Page is loading ...
Page is loading ...
Page is loading ...
Page is loading ...
Page is loading ...
Page is loading ...
Page is loading ...
Page is loading ...
Page is loading ...
Page is loading ...
Page is loading ...
Page is loading ...
Page is loading ...
Page is loading ...
Page is loading ...
Page is loading ...
Page is loading ...
Page is loading ...
Page is loading ...
Page is loading ...
Page is loading ...
Page is loading ...
Page is loading ...
Page is loading ...
Page is loading ...
Page is loading ...
Page is loading ...
Page is loading ...
Page is loading ...
Page is loading ...
Page is loading ...
Page is loading ...
Page is loading ...
Page is loading ...
Page is loading ...
Page is loading ...
Page is loading ...
Page is loading ...
Page is loading ...
Page is loading ...
Page is loading ...
Page is loading ...
Page is loading ...
Page is loading ...
Page is loading ...
Page is loading ...
Page is loading ...
Page is loading ...
Page is loading ...
Page is loading ...
Page is loading ...
Page is loading ...
Page is loading ...
Page is loading ...
Page is loading ...
Page is loading ...
Page is loading ...
Page is loading ...
Page is loading ...
Page is loading ...
Page is loading ...
Page is loading ...
Page is loading ...
Page is loading ...
Page is loading ...
Page is loading ...
Page is loading ...
Page is loading ...
Page is loading ...
Page is loading ...
Page is loading ...
Page is loading ...
Page is loading ...
Page is loading ...
Page is loading ...
Page is loading ...
Page is loading ...
Page is loading ...
Page is loading ...
Page is loading ...
Page is loading ...
Page is loading ...
Page is loading ...
-
 1
1
-
 2
2
-
 3
3
-
 4
4
-
 5
5
-
 6
6
-
 7
7
-
 8
8
-
 9
9
-
 10
10
-
 11
11
-
 12
12
-
 13
13
-
 14
14
-
 15
15
-
 16
16
-
 17
17
-
 18
18
-
 19
19
-
 20
20
-
 21
21
-
 22
22
-
 23
23
-
 24
24
-
 25
25
-
 26
26
-
 27
27
-
 28
28
-
 29
29
-
 30
30
-
 31
31
-
 32
32
-
 33
33
-
 34
34
-
 35
35
-
 36
36
-
 37
37
-
 38
38
-
 39
39
-
 40
40
-
 41
41
-
 42
42
-
 43
43
-
 44
44
-
 45
45
-
 46
46
-
 47
47
-
 48
48
-
 49
49
-
 50
50
-
 51
51
-
 52
52
-
 53
53
-
 54
54
-
 55
55
-
 56
56
-
 57
57
-
 58
58
-
 59
59
-
 60
60
-
 61
61
-
 62
62
-
 63
63
-
 64
64
-
 65
65
-
 66
66
-
 67
67
-
 68
68
-
 69
69
-
 70
70
-
 71
71
-
 72
72
-
 73
73
-
 74
74
-
 75
75
-
 76
76
-
 77
77
-
 78
78
-
 79
79
-
 80
80
-
 81
81
-
 82
82
-
 83
83
-
 84
84
-
 85
85
-
 86
86
-
 87
87
-
 88
88
-
 89
89
-
 90
90
-
 91
91
-
 92
92
-
 93
93
-
 94
94
-
 95
95
-
 96
96
-
 97
97
-
 98
98
-
 99
99
-
 100
100
-
 101
101
-
 102
102
-
 103
103
-
 104
104
-
 105
105
-
 106
106
-
 107
107
-
 108
108
-
 109
109
-
 110
110
-
 111
111
-
 112
112
-
 113
113
-
 114
114
-
 115
115
-
 116
116
-
 117
117
-
 118
118
-
 119
119
-
 120
120
-
 121
121
-
 122
122
-
 123
123
-
 124
124
-
 125
125
-
 126
126
-
 127
127
-
 128
128
-
 129
129
-
 130
130
-
 131
131
-
 132
132
-
 133
133
-
 134
134
-
 135
135
-
 136
136
-
 137
137
-
 138
138
-
 139
139
-
 140
140
-
 141
141
-
 142
142
-
 143
143
-
 144
144
-
 145
145
-
 146
146
-
 147
147
-
 148
148
-
 149
149
-
 150
150
-
 151
151
-
 152
152
-
 153
153
-
 154
154
-
 155
155
-
 156
156
-
 157
157
-
 158
158
-
 159
159
-
 160
160
-
 161
161
-
 162
162
-
 163
163
-
 164
164
-
 165
165
-
 166
166
-
 167
167
-
 168
168
-
 169
169
-
 170
170
-
 171
171
-
 172
172
-
 173
173
-
 174
174
-
 175
175
-
 176
176
-
 177
177
-
 178
178
-
 179
179
-
 180
180
-
 181
181
-
 182
182
-
 183
183
-
 184
184
-
 185
185
-
 186
186
-
 187
187
-
 188
188
-
 189
189
-
 190
190
-
 191
191
-
 192
192
-
 193
193
-
 194
194
-
 195
195
-
 196
196
-
 197
197
-
 198
198
-
 199
199
-
 200
200
-
 201
201
-
 202
202
-
 203
203
-
 204
204
-
 205
205
-
 206
206
-
 207
207
-
 208
208
-
 209
209
-
 210
210
-
 211
211
-
 212
212
-
 213
213
-
 214
214
-
 215
215
-
 216
216
-
 217
217
-
 218
218
-
 219
219
-
 220
220
-
 221
221
-
 222
222
-
 223
223
-
 224
224
-
 225
225
-
 226
226
-
 227
227
-
 228
228
-
 229
229
-
 230
230
-
 231
231
-
 232
232
-
 233
233
-
 234
234
-
 235
235
-
 236
236
-
 237
237
-
 238
238
-
 239
239
-
 240
240


Fiat TALENTO Owner's Handbook Manual
- Category
- Cars
- Type
- Owner's Handbook Manual
Ask a question and I''ll find the answer in the document
Finding information in a document is now easier with AI
Related papers
-
Fiat 500X Owner's Handbook Manual
-
-
-
-
-
-
-
-
-
Other documents
-
Renault New Master User manual
-
-
Renault Modus Ph2 User manual
-
Jeep Renegade Owner's Handbook Manual
-
Solstice Sculptures TYRE SWING STATUE BRONZE EFFECT User manual
-
Ford Ranger Owner's manual
-
 EcoJet by Joape 737WMG User manual
-
-
Lancia NUOVA YPSILON Owner's manual
-
 Rugged Ridge Fog Light Euro Guards Installation guide

