Compaq AA-Q88CE-TE User manual
- Category
- Networking
- Type
- User manual
This manual is also suitable for

ReliableTransactionRouter
SystemManager’sManual
Order Number: AA-Q88CE-TE
June, 1999
This manual describes how to configure, manage and monitor Reliable
Transaction Router, Version 3.2 (RTR).
Revision/Update Information: This manual supersedes Version 3.1D
of the System Manager’s Manual
Software Version: Reliable Transaction Router, Version
3.2
Compaq Computer Corporation
Houston, Texas

June, 1999
COMPAQ COMPUTER CORPORATION SHALL NOT BE LIABLE FOR TECHNICAL OR
EDITORIAL ERRORS OR OMISSIONS CONTAINED HEREIN, NOR FOR INCIDENTAL OR
CONSEQUENTIAL DAMAGES RESULTING FROM THE FURNISHING, PERFORMANCE,
OR USE OF THIS MATERIAL. THIS INFORMATION IS PROVIDED "AS IS" AND
COMPAQ COMPUTER CORPORATION DISCLAIMS ANY WARRANTIES, EXPRESS,
IMPLIED OR STATUTORY AND EXPRESSLY DISCLAIMS THE IMPLIED WARRANTIES
OF MERCHANTABILITY, FITNESS FOR PARTICULAR PURPOSE, GOOD TITLE AND
AGAINST INFRINGEMENT.
This publication contains information protected by copyright. No part of this publication
may be photocopied or reproduced in any form without prior written consent from
Compaq Computer Corporation.
© Digital Equipment Corporation 1999. All Rights Reserved..
The software described in this guide is furnished under a license agreement or nondisclosue
agreement. The software may be used or copied only in accordance with the terms of the
agreement.
Compaq and the Compaq logo are registered in the United States Patent and Trademark Office.
The following are trademarks of Compaq Computer Corporation: AlphaGeneration, AlphaServer,
AlphaStation, Compaq Internet Personal Tunnel, DEC, DECconnect, DECdtm, DECnet, DIGITAL,
OpenVMS, PATHWORKS, POLYCENTER, Reliable Transaction Router, TruCluster, Tru64 UNIX,
VAX, and VMScluster.
The following are third-party trademarks:
AIX and IBM are registered trademarks of International Business Machines Corporation.
Encina is a registered trademark of Transarc Corporation.
Hewlett-Packard and HP-UX are registered trademarks of Hewlett-Packard Company.
Intel is a trademark of Intel Corporation.
Microsoft, Microsoft Access, Microsoft SQL Server, Internet Explorer, MS–DOS, Visual Basic,
Visual C++, Windows, Windows 95, Windows 98, and Windows NT are trademarks or registered
trademarks of Microsoft Corporation.
Netscape, Netscape Communicator, and Netscape Navigator are registered trademarks of Netscape
Communications Corporation.
Oracle, ORACLE7, PL/SQL, SQL*Net, AND SQL*Plus are trademarks or registered trademarks of
Oracle Corporation.
Solaris, SPARCstation, SUN, SunOS, and Sunlink are trademarks or registered trademarks of Sun
Microsystems, Inc.
UNIX is a registered trademark in the United States and other countries, licensed exclusively
through X/Open Company, Ltd.
This document was prepared using VAX DOCUMENT, Version 2.1.

Contents
Preface ............................................................ xi
1 Introduction
1.1 Getting Started ............................................. 1–1
1.2 Entering Commands . ........................................ 1–1
1.3 Online Help ................................................ 1–2
1.4 Command Procedures ........................................ 1–3
1.5 Remote Commands . . ........................................ 1–3
2 Starting and Setting Up RTR
2.1 Introduction ................................................ 2–1
2.2 Setting Up—An Example ...................................... 2–1
2.3 Creating a Recovery Journal . . . ................................ 2–3
2.4 Changing a Facility . . ........................................ 2–4
2.5 Setting up Callout Servers ..................................... 2–7
2.6 Router Load Balancing........................................ 2–8
2.7 RTR Privileges .............................................. 2–9
2.8 RTR ACP Virtual Memory Sizing................................ 2–10
2.8.1 OpenVMS Virtual Memory Sizing ............................ 2–10
2.8.2 UNIX Virtual Memory Sizing................................ 2–12
2.9 Network Transports . . ........................................ 2–13
2.9.1 Specifying the Link Transport Protocol . ....................... 2–13
2.9.2 Using RTR with DHCP and Internet Tunnels ................... 2–14
2.9.3 Interoperation with RTR Version 2 Using DECnet ............... 2–15
2.10 Network Protocol Selection on OpenVMS . . ....................... 2–16
2.11 Running RTR as a Service on Windows NT . ....................... 2–16
2.11.1 Customizing the RTR Windows NT Service ..................... 2–17
2.11.2 Files Created by the RTR Windows NT Service . . . ............... 2–17
2.12 How RTR Selects Processing-states (Roles) for Nodes . ............... 2–18
2.12.1 Role Assignment for Backend Node Partitions ................... 2–18
2.12.2 Router Selection . . ........................................ 2–21
3 Partition Management
3.1 Overview . . ................................................ 3–1
3.1.1 What is a Partition? ....................................... 3–1
3.1.2 What is Partition Management? ............................. 3–1
3.2 Partition Naming ............................................ 3–2
3.2.1 Default Partition Names . . . ................................ 3–2
3.2.2 Programmer Supplied Names ............................... 3–2
3.2.3 System Manager Supplied Partition Names..................... 3–2
3.2.4 Name Format and Scope . . . ................................ 3–2
iii

3.3 Life Cycle of a Partition . . . .................................... 3–2
3.3.1 Implicit Partition Creation .................................. 3–3
3.3.2 Explicit Partition Creation .................................. 3–3
3.3.3 Persistence of Partition Definitions ........................... 3–3
3.4 Binding Server Channels to Named Partitions . . ................... 3–3
3.5 Entering Partition Commands .................................. 3–4
3.5.1 Command Line Usage . .................................... 3–4
3.5.2 Programmed Partition Management .......................... 3–4
3.6 Managing Partitions ......................................... 3–5
3.6.1 Controlling Shadowing . .................................... 3–5
3.6.1.1 Command Line Example ................................ 3–5
3.6.1.2 Programming Information . . . ............................ 3–5
3.6.2 Controlling Transaction Presentation.......................... 3–6
3.6.2.1 Command Line Example ................................ 3–6
3.6.2.2 Programming Information . . . ............................ 3–6
3.6.3 Controlling Recovery . . .................................... 3–6
3.6.3.1 Command Line Example ................................ 3–7
3.6.3.2 Programming Information . . . ............................ 3–7
3.6.4 Controlling the Active Site .................................. 3–7
3.6.4.1 Command Line Example ................................ 3–7
3.6.4.2 Programming Information . . . ............................ 3–8
3.6.5 Controlling Failover . . . .................................... 3–8
3.6.5.1 Command Line Example ................................ 3–8
3.6.5.2 Programming Information . . . ............................ 3–8
3.6.6 Controlling Transaction Replay . . ............................ 3–9
3.6.6.1 Command Line Example ................................ 3–9
3.6.6.2 Programming Information . . . ............................ 3–9
3.7 Displaying Partition Information ................................ 3–10
3.7.0.1 Command Line Example ................................ 3–10
4 Transaction Management
4.1 Overview .................................................. 4–1
4.1.0.1 Command Line Examples . . . ............................ 4–2
4.1.1 Exception Transactions .................................... 4–2
4.1.2 Transaction State Changes ................................. 4–3
5 RTR Monitoring
5.1 Introduction ................................................ 5–1
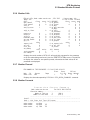
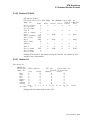
5.2 Standard Monitor Pictures . .................................... 5–1
5.2.1 Monitor ACCFAIL (Link Acceptance Failures) ................... 5–4
5.2.2 Monitor ACP2APP ........................................ 5–5
5.2.3 Monitor Active ........................................... 5–6
5.2.4 Monitor APP2ACP ........................................ 5–6
5.2.5 Monitor Broadcast ........................................ 5–6
5.2.6 Monitor Calls ............................................ 5–7
5.2.7 Monitor Channel ......................................... 5–7
5.2.8 Monitor Connects ......................................... 5–7
5.2.9 Monitor Event ........................................... 5–8
5.2.10 Monitor Facility .......................................... 5–8
5.2.11 Monitor Flow ............................................ 5–9
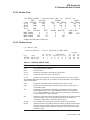
5.2.12 Monitor Group ........................................... 5–9
5.2.13 Monitor IPC . ............................................ 5–10
iv

5.2.14 Monitor IPCRATE ........................................ 5–10
5.2.15 Monitor Journal . . ........................................ 5–10
5.2.16 Monitor Link ............................................ 5–11
5.2.17 Monitor Netbytes . ........................................ 5–11
5.2.18 Monitor Netstat . . ........................................ 5–12
5.2.19 Monitor Partit . . . ........................................ 5–12
5.2.20 Monitor Queues . . ........................................ 5–13
5.2.21 Monitor Quorum . ........................................ 5–13
5.2.22 Monitor Recovery . ........................................ 5–13
5.2.23 Monitor Rejects . . ........................................ 5–14
5.2.24 Monitor Rejhist . . ........................................ 5–15
5.2.25 Monitor Response. ........................................ 5–15
5.2.26 Monitor Rolequorum ...................................... 5–16
5.2.27 Monitor Routers . . ........................................ 5–16
5.2.28 Monitor Routing . . ........................................ 5–16
5.2.29 Monitor RSCBE . . ........................................ 5–17
5.2.30 Monitor RTR ............................................ 5–17
5.2.31 Monitor Stalls . . . ........................................ 5–18
5.2.32 Monitor System . . ........................................ 5–19
5.2.33 Monitor TPS ............................................ 5–20
5.2.34 Monitor Traffic . . . ........................................ 5–20
5.2.35 Monitor Trans . . . ........................................ 5–20
5.2.36 Monitor V2CALLS ........................................ 5–21
5.2.37 Monitor XA ............................................. 5–21
6 RTR Command Line Interface
6.1 Introduction ................................................ 6–1
6.2 RTR Command Reference ..................................... 6–1
ADD FACILITY ............................................. 6–2
CALL RTR_ACCEPT_TX ...................................... 6–3
CALL RTR_BROADCAST_EVENT .............................. 6–6
CALL RTR_CLOSE_CHANNEL ................................ 6–10
CALL RTR_ERROR_TEXT .................................... 6–12
CALL RTR_GET_TID ........................................ 6–13
CALL RTR_OPEN_CHANNEL . ................................ 6–15
CALL RTR_PREPARE_TX ..................................... 6–22
CALL RTR_RECEIVE_MESSAGE ............................... 6–25
CALL RTR_REJECT_TX ...................................... 6–28
CALL RTR_REPLY_TO_CLIENT ................................ 6–31
CALL RTR_REQUEST_INFO . . ................................ 6–35
CALL RTR_SEND_TO_SERVER ................................ 6–38
CALL RTR_START_TX ....................................... 6–42
CLEAR.................................................... 6–45
CREATE FACILITY . . ........................................ 6–47
CREATE JOURNAL . ........................................ 6–51
CREATE PARTITION ........................................ 6–54
DEFINE /KEY .............................................. 6–57
DELETE FACILITY . . ........................................ 6–61
DELETE JOURNAL . ........................................ 6–63
DELETE PARTITION ........................................ 6–65
v

DISPLAY BAR . . ............................................ 6–67
DISPLAY NUMERIC ......................................... 6–72
DISPLAY STRING........................................... 6–77
DISPLAY SYMBOLIC ........................................ 6–81
DISPLAY TEXT . ............................................ 6–83
DO....................................................... 6–86
FLUSH NAME_CACHE . . . .................................... 6–88
EXECUTE ................................................. 6–89
EXIT . .................................................... 6–90
EXTEND FACILITY ......................................... 6–91
INITIALIZE JOURNAL . . . .................................... 6–95
LOG...................................................... 6–96
MODIFY JOURNAL ......................................... 6–98
MONITOR ................................................. 6–100
QUIT . .................................................... 6–103
RECALL .................................................. 6–104
REGISTER RESOURCE MANAGER (REGISTER RM) ............... 6–105
SCROLL................................................... 6–107
SET ENVIRONMENT ........................................ 6–108
SET FACILITY . ............................................ 6–109
SET LINK ................................................. 6–112
SETLOG.................................................. 6–116
SET MODE ................................................ 6–118
SET NODE ................................................ 6–120
SET PARTITION ............................................ 6–122
SET TRANSACTION ......................................... 6–125
SHOW CHANNEL ........................................... 6–129
SHOW CLIENT . ............................................ 6–131
SHOW DISPLAY ............................................ 6–133
SHOW ENVIRONMENT . . .................................... 6–135
SHOW FACILITY ........................................... 6–136
SHOW JOURNAL ........................................... 6–140
SHOW KEY ................................................ 6–142
SHOW LINK . . . ............................................ 6–144
SHOW LOG ................................................ 6–146
SHOW MODE . . ............................................ 6–148
SHOW NODE . . ............................................ 6–150
SHOW PARTITION .......................................... 6–152
SHOW PROCESS ........................................... 6–156
SHOW REQUESTER ......................................... 6–158
SHOW RESOURCE MANAGER (SHOW RM) . . . ................... 6–159
SHOW RTR ................................................ 6–161
SHOW SEGMENT ........................................... 6–163
SHOW SERVER. ............................................ 6–165
SHOW TRANSACTION . . . .................................... 6–168
SPAWN ................................................... 6–171
STARTRTR................................................ 6–172
vi

STOP RTR . ................................................ 6–177
TRIM FACILITY ............................................ 6–179
UNREGISTER RESOURCE MANAGER (UNREGISTER RM) . . ....... 6–182
A Creating Monitor Pictures
A.1 Interactive Definition of a Monitor Picture . ....................... A–2
A.2 Substitution Symbols . ........................................ A–3
A.3 Arithmetic Expressions and Operators............................ A–3
B Server Shadowing and Recovery
B.1 Primary and Secondary Roles . . ................................ B–1
B.2 Automatic Features . . ........................................ B–1
B.2.1 Shadow Events . . ........................................ B–1
B.3 The RTR Journal System ...................................... B–2
B.4 Shadow Site Failure and Journaling ............................. B–3
B.4.1 Maximum Journal Size .................................... B–4
B.5 Standby for Shadows . ........................................ B–4
B.6 Performance ................................................ B–4
B.7 Shadows in Action . . . ........................................ B–5
B.8 Application Considerations .................................... B–5
B.9 Server States ............................................... B–6
B.10 Client States ............................................... B–8
B.11 Partition States ............................................. B–9
C XA Support
C.1 Introduction ................................................ C–1
C.1.1 MONITOR XA . . . ........................................ C–1
C.1.2 New Qualifier to CREATE FACILITY Command . . ............... C–1
C.1.3 Modified RTR API ........................................ C–2
C.1.4 RTR Open Channel ....................................... C–2
C.2 Microsoft DTC Support ....................................... C–2
D RTR Utility Error Messages
E RTR log messages
Index
Examples
2–1 Local Configuration of each Node ............................. 2–2
2–2 Remote Setup from one Node ................................ 2–3
2–3 Reconfiguration Using Delete and Create Facility . ............... 2–5
2–4 Reconfiguration Using Extend Facility . . ....................... 2–7
2–5 Configuration of Callout Servers ............................. 2–8
A–1 Interactive Picture Definition ................................ A–2
A–2 Arithmetic Operators Examples .............................. A–4
vii

Figures
2–1 Configuration Example .................................... 2–2
2–2 Extend Configuration Example . . ............................ 2–6
A–1 Interactively Defined Monitor Picture ......................... A–3
B–1 Four Node Shadow/Standby Configuration. . . ................... B–4
B–2 Server States ............................................ B–7
B–3 Client States ............................................ B–8
B–4 Router Partition States .................................... B–9
Tables
1 Conventions Used in this Guide . ............................ xiii
4–19 Valid Transaction State Transitions ........................... 4–3
5–1 Standard Monitor Pictures .................................. 5–2
5–2 MONITOR GROUP Fields .................................. 5–9
5–3 Monitor Partition States ................................... 5–12
5–4 Monitor Recovery States ................................... 5–14
5–5 MONITOR REJECTS Fields ................................ 5–14
5–6 MONITOR REJHIST Fields ................................. 5–15
6–1 Parameters for rtr_accept_tx ................................ 6–3
6–2 Parameters for rtr_broadcast_event ........................... 6–7
6–3 Generated Format Strings .................................. 6–8
6–4 Parameters for rtr_close_channel . ............................ 6–10
6–5 Parameters for rtr_error_text................................ 6–12
6–6 Parameters for rtr_get_tid .................................. 6–13
6–7 Parameters for rtr_open_channel . ............................ 6–16
6–8 Parameters for rtr_prepare_tx . . . ............................ 6–22
6–9 Parameters for rtr_receive_message........................... 6–25
6–10 Parameters for rtr_reject_tx ................................. 6–28
6–11 Parameters for rtr_reply_to_client ............................ 6–32
6–12 Generated Format Strings .................................. 6–33
6–13 Parameters for rtr_request_info . . ............................ 6–35
6–14 Parameters for rtr_send_to_server ............................ 6–39
6–15 Generated Format Strings .................................. 6–40
6–16 Parameters for rtr_start_tx ................................. 6–42
6–17 Platform Specific Information . . . ............................ 6–52
6–18 Key names . . ............................................ 6–57
6–19 Valid Transaction State Changes . ............................ 6–127
6–20 Key-Range States ......................................... 6–152
6–21 Router Partition States .................................... 6–153
6–22 Key-range States ......................................... 6–165
6–23 Server Flags . ............................................ 6–166
6–24 Transaction Invocation Types ................................ 6–168
6–25 Key-Range States ......................................... 6–169
A–1 Information Classes . . . .................................... A–1
A–2 Substitution symbols . . .................................... A–3
viii

A–3 Arithmetic Operators in Display Commands .................... A–4
ix


Preface
Purpose of this Manual
This manual describes how to configure, manage and monitor the operation of
Reliable Transaction Router (RTR) using the RTR Command Line Interface (CLI).
Intended Audience
The System Manager’s Manual is intended for persons who perform system
management functions to configure, test, monitor and maintain RTR applications.
The reader is assumed to be familiar with their operating system, but not
necessarily experienced with RTR operations.
New users of RTR are encouraged to read the first chapters of the Application
Programmer’s Reference Manual for a overall description of RTR.
Structure of Document
The manual contains the following chapters and appendices:
• Chapter 1 is an introduction to the RTR Command Line Interface (CLI) and
tells you how to use local and remote commands and command procedures.
• Chapter 2 explains how to start and configure RTR.
• Chapter 3 describes RTR’s Partition Management.
• Chapter 4 gives an overview of RTR’s Transaction Management tools.
• Chapter 5 describes how the RTR monitor is used to continuously observe the
performance and operation of RTR and applications using RTR.
• Chapter 6 describes how to use the CLI interface to RTR API calls and
contains a complete description of all RTR commands, listed alphabetically.
• Appendix A tells you how to create your own monitor pictures for special
monitoring needs.
• Appendix B describes server shadowing and recovery.
• Appendix C describes how to use RTR with XA and ORACLE.
• Appendix D contains a list of all the error messages that can be returned by
the RTR CLI.
• Appendix E contains a list of all messages that RTR can write to the RTR log.
xi

Related Documentation
• Release Notes
• Installation Guide
• Application Programmer’s Reference Manual
• Application Design Guide
• Migration Guide
Reader’s Comments
Compaq welcomes your comments on this manual. Please send us your comments
by email to
.
Include the title of the manual, section and page numbers with your comments or
suggestions.
Conventions
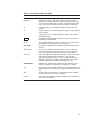
Table 1 describes the conventions used in this guide.
xii

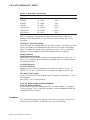
Table 1 Conventions Used in this Guide
Convention Meaning
UPPERCASE
lowercase
Some operating systems differentiate between lowercase and
uppercase characters. For these systems, examples, syntax
descriptions, function definitions, and literal strings that appear
in text must be typed exactly as shown. Commands typed to the
RTR CLI are not case sensitive unless enclosed in quote marks
# A number sign (#) is the default operating system superuser
prompt.
% A percent sign (%) is the default operating system user prompt on
UNIX systems.
$ A dollar sign ($) is the default operating system user prompt on
OpenVMS systems.
Return
In examples, a boxed symbol indicates that you must press the
named key on the keyboard.
Ctrl/C This symbol indicates that you must press the Ctrl key while you
simultaneously press another key (in this case, C).
user input
In interactive examples, this typeface indicates input entered by
the user.
filesystem
In text, this typeface indicates the exact name of a command,
routine, partition, pathname, directory, or file. This typeface is
also used in interactive examples and other screen displays.
italic text Italic text emphasizes important information, indicates variables,
and indicates complete titles of manuals. Italic text also
represents information that can vary in system messages (for
example, Internal error
number
), command lines (for example,
/PRODUCER=
name
), and command parameters in text.
boldface text Boldface text represents the introduction of a new term or the
name of a command, an argument, an attribute, or a reason.
[y]
In a prompt, square brackets indicate that the enclosed item is the
default response. For example,
[y]
means the default response is
Yes.
text A vertical bar next to the text | indicates changes or additions
since the previous version of this document.
HTML Red HTML text indicates changes or additions since the previous
version of this document.
xiii


1
Introduction
For a general introduction to Reliable Transaction Router, Version 3.2 (RTR),
you should read the introductory chapter in the Reliable Transaction Router
Application Design Guide. Additional information about the Reliable Transaction
Router is available in the Reliable Transaction Router Application Programmer’s
Reference Manual.
In order to use RTR, you must install the RTR software and your application. See
the Reliable Transaction Router Installation Guide for instructions for installing
RTR.
1.1 Getting Started
RTR applications use the API calls described in the Reliable Transaction Router
Application Programmer’s Reference Manual. Before an RTR application can be
used, RTR must be started on every node in your RTR network. You do this is by
issuing a
START RTR
command on each node. You may wish to include the
START
RTR
command in a startup command procedure for each node, so that RTR is
started whenever a node is booted.
Many applications can use RTR at the same time without interfering with one
another. This is achieved by defining a separate facility for each application.
A facility can be thought of as an application’s own runtime environment of
RTR. (In addition, distributed RTR applications may start and execute many
transactions. RTR is capable of massively parallel operation.)
Before application processes are started, a facility must be defined using the
CREATE FACILITY
command. You may wish to include the
CREATE FACILITY
command to the command procedure used to start the application.
The rest of this chapter explains how to use RTR commands. The
START RTR
and
CREATE FACILITY
commands are described in detail in Chapter 2 and Chapter 6.
1.2 Entering Commands
RTR is started, configured and maintained by using the RTR Command Line
Interface (CLI). The RTR CLI is used to start, set up and monitor the operation
of RTR.
The RTR CLI is accessed by entering
RTR
at the operating system prompt.
Commands can either be entered on the same line as the RTR verb, for example:
% rtr command
Introduction 1–1

Introduction
1.2 Entering Commands
or, when several commands are to be entered at the RTR prompt:
% rtr
RTR> start rtr
RTR> create journal
Note
For convenience, the user prompt for the operating system is shown here
as the ‘‘%’’ symbol. Your system may have a different prompt.
The RTR CLI accepts commands that you type and can process procedures
consisting of RTR commands.
Most RTR commands accept qualifiers: these are indicated by the forward slash
(/) character. For example, many RTR commands accept the ‘‘/OUTPUT’’ qualifier;
it directs the output from the command to a file.
The forward slash (/) character may also appear in the filenames of some
operating systems; such filenames must be enclosed in quotation marks to ensure
that RTR does not interpret the filename as a command qualifier.
When RTR commands are entered on a single line, you may need to use extra
quotation characters, depending on the operating system in use. For example,
when running on most UNIX platforms, additional single quotation marks are
required when entering quoted items such as filenames. Compare the following
commands.
% rtr
RTR> show facility/output="/usr/users/test/fac_output.lis"
% rtr show facility/output=’"/usr/users/test/fac_output.lis"’
The first command works for OpenVMS systems but not on UNIX. The second
command uses single quotation marks outside of double quotations to be correctly
interpreted on UNIX systems.
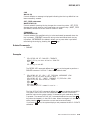
1.3 Online Help
You can get information about the RTR CLI by using the HELP command.
Entering the following command:
% rtr help
displays a complete list of help topics on your terminal.
If you require additional information then enter the topic directly on the same
line, for example:
% rtr help show
The help command can also be used to find out about errors returned by RTR.
The folowing sequence returns the error identifier:
% rtr help errors
error-identification
1–2 Introduction

Introduction
1.3 Online Help
where
error-identification
is the identification part of the returned error.
The following sequence returns an error message,
RTRALRSTA
, that can then be
explained by the
help errors rtralrsta
command option:
% rtr
RTR> start rtr
%RTR-F-RTRALRSTA, rtr already started
RTR> help errors rtralrsta
Errors
RTRALRSTA
RTR already started
Explanation: RTR was already running when the "START RTR" command
was executed. This error message is displayed by the RTR utility.
RTR>
1.4 Command Procedures
RTR commands can also be written in a command file and then executed as a
procedure using the
EXECUTE file-spec
or
@file-spec
commands. For example:
% rtr execute createfacil
or:
% rtr @createfacil
or at the RTR prompt:
% rtr
RTR> execute createfacil
or:
RTR> @createfacil
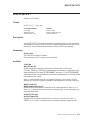
1.5 Remote Commands
Most RTR commands can be issued either locally (the default) or on one or more
remote nodes. To be able to issue commands to a remote node you must have an
account on that node with the necessary access privileges. Refer to your operating
system documentation for information on how to set up the access privileges.
To specify the remote node names explicitly:
RTR> command/node=node-list
To specify remote nodes implicitly, if for example the command is to be executed
in every node of a clustered environment use a command of the following form:
RTR> command/cluster
Examples:
RTR> start rtr/node=(nodeA,nodeB,nodeC)
Introduction 1–3

Introduction
1.5 Remote Commands
This command starts RTR on the three nodes.
Note
The /CLUSTER and /NOCLUSTER command qualifiers refer to cluster
support. These qualifiers are for operating systems that fully support
clustering. Use of the /CLUSTER qualifier on systems that do not have
clustering causes the relevant command to be executed on the local node
only. For example Windows 95 systems do not support clustering.
If several commands need to be executed remotely on the same nodes then the
set environment
command can be used to save typing.
For example:
% RTR
RTR> set environment/node=(nodeA, nodeC)
RTR> stop rtr
This example shows the use of the
set environment
command to stop rtr on
Node A and Node C. More details concerning the commands used in the above
examples are contained in Section 6.2.
1–4 Introduction

2
Starting and Setting Up RTR
This chapter describes how to configure and start an RTR environment. Recovery
journals, router load balancing and call-out servers are also discussed.
2.1 Introduction
Before RTR applications can run, RTR must be started and the application’s
facility
must be defined on each node of the application’s environment. This
is done by issuing the
start rtr
and
create facility
commands on each
participating node. There are several ways to accomplish this:
• You can log on to each node in turn and issue the commands interactively.
• You can log on to one node and use the remote command capability to
configure all the nodes from one session.
• You can include the necessary commands in a startup script or command file
on each node so the commands are automatically executed when the nodes
are booted.
The first two methods are more suited to a development or test environment, the
last method more suited to a production environment.
The remaining sections contain examples of the commands that are used to start
and configure RTR. Section 6.2 gives syntax details of the RTR commands.
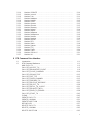
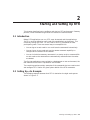
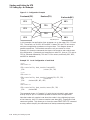
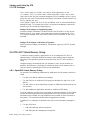
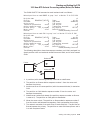
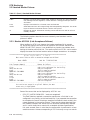
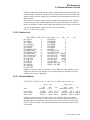
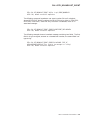
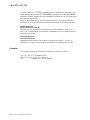
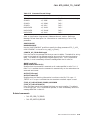
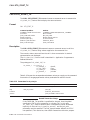
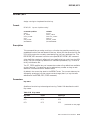
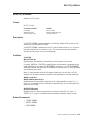
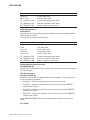
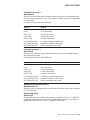
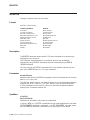
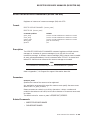
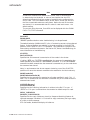
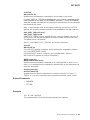
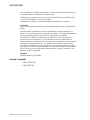
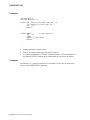
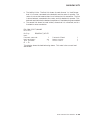
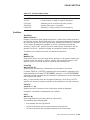
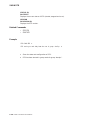
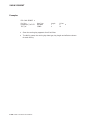
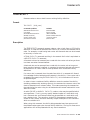
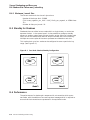
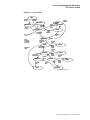
2.2 Setting Up—An Example
The following example assumes that RTR is started on the eight node system
shown in Figure 2–1.
Starting and Setting Up RTR 2–1

Starting and Setting Up RTR
2.2 Setting Up—An Example
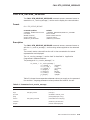
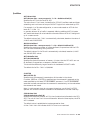
Figure 2–1 Configuration Example
F E 1
F E 2
F E 3
T R 1
T R 2
B E 1
B E 2
B E 3
SMM_CONFIG_EX 01−99
F r o n t e n d R o u t e r s ( T R )
B a c k e n d s ( B E )
s ( F E )
In this example, the application client processes run on the nodes FE1, FE2 and
FE3. The servers run on BE1, BE2 and BE3. Nodes TR1 and TR2 are routers
and have no application processes running on them. This diagram shows all
possible connections. The frontend connects to only one router at a time.
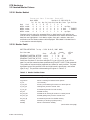
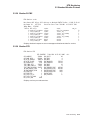
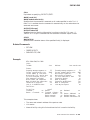
Example 2–1 shows the commands that have to be issued on each node to start
this configuration. Commands are issued first on node FE1, then on FE2, and on
FE3 for frontends followed by TR1 and TR2 for routers, and finally BE1, BE2,
and BE3 for backends.
Example 2–1 Local Configuration of each Node
% rtr
RTR> start rtr
RTR> create facility funds_transfer/frontend=FE1 -
_RTR> /router=(TR1, TR2)
% rtr
RTR> start rtr
RTR> create facility funds_transfer/frontend=(FE1, FE2, FE3) -
_RTR /router=TR1 -
_RTR> /backend=(BE1, BE2, BE3)
% rtr
RTR> start rtr
RTR> create facility funds_transfer/router=(TR1, TR2) -
_RTR> /backend=BE1
The commands shown in Example 2–1 could also be included in each node’s
startup script or put in a command procedure used to start the application.
Note that nodes only need to know about the nodes in the neighbouring layers
of the hierarchy, thus FE1 does not need to know about BE1. Superfluous node
names are ignored. This allows you to issue the same
CREATE FACILITY
command
on every node to simplify the maintenance of startup command procedures.
2–2 Starting and Setting Up RTR
Page is loading ...
Page is loading ...
Page is loading ...
Page is loading ...
Page is loading ...
Page is loading ...
Page is loading ...
Page is loading ...
Page is loading ...
Page is loading ...
Page is loading ...
Page is loading ...
Page is loading ...
Page is loading ...
Page is loading ...
Page is loading ...
Page is loading ...
Page is loading ...
Page is loading ...
Page is loading ...
Page is loading ...
Page is loading ...
Page is loading ...
Page is loading ...
Page is loading ...
Page is loading ...
Page is loading ...
Page is loading ...
Page is loading ...
Page is loading ...
Page is loading ...
Page is loading ...
Page is loading ...
Page is loading ...
Page is loading ...
Page is loading ...
Page is loading ...
Page is loading ...
Page is loading ...
Page is loading ...
Page is loading ...
Page is loading ...
Page is loading ...
Page is loading ...
Page is loading ...
Page is loading ...
Page is loading ...
Page is loading ...
Page is loading ...
Page is loading ...
Page is loading ...
Page is loading ...
Page is loading ...
Page is loading ...
Page is loading ...
Page is loading ...
Page is loading ...
Page is loading ...
Page is loading ...
Page is loading ...
Page is loading ...
Page is loading ...
Page is loading ...
Page is loading ...
Page is loading ...
Page is loading ...
Page is loading ...
Page is loading ...
Page is loading ...
Page is loading ...
Page is loading ...
Page is loading ...
Page is loading ...
Page is loading ...
Page is loading ...
Page is loading ...
Page is loading ...
Page is loading ...
Page is loading ...
Page is loading ...
Page is loading ...
Page is loading ...
Page is loading ...
Page is loading ...
Page is loading ...
Page is loading ...
Page is loading ...
Page is loading ...
Page is loading ...
Page is loading ...
Page is loading ...
Page is loading ...
Page is loading ...
Page is loading ...
Page is loading ...
Page is loading ...
Page is loading ...
Page is loading ...
Page is loading ...
Page is loading ...
Page is loading ...
Page is loading ...
Page is loading ...
Page is loading ...
Page is loading ...
Page is loading ...
Page is loading ...
Page is loading ...
Page is loading ...
Page is loading ...
Page is loading ...
Page is loading ...
Page is loading ...
Page is loading ...
Page is loading ...
Page is loading ...
Page is loading ...
Page is loading ...
Page is loading ...
Page is loading ...
Page is loading ...
Page is loading ...
Page is loading ...
Page is loading ...
Page is loading ...
Page is loading ...
Page is loading ...
Page is loading ...
Page is loading ...
Page is loading ...
Page is loading ...
Page is loading ...
Page is loading ...
Page is loading ...
Page is loading ...
Page is loading ...
Page is loading ...
Page is loading ...
Page is loading ...
Page is loading ...
Page is loading ...
Page is loading ...
Page is loading ...
Page is loading ...
Page is loading ...
Page is loading ...
Page is loading ...
Page is loading ...
Page is loading ...
Page is loading ...
Page is loading ...
Page is loading ...
Page is loading ...
Page is loading ...
Page is loading ...
Page is loading ...
Page is loading ...
Page is loading ...
Page is loading ...
Page is loading ...
Page is loading ...
Page is loading ...
Page is loading ...
Page is loading ...
Page is loading ...
Page is loading ...
Page is loading ...
Page is loading ...
Page is loading ...
Page is loading ...
Page is loading ...
Page is loading ...
Page is loading ...
Page is loading ...
Page is loading ...
Page is loading ...
Page is loading ...
Page is loading ...
Page is loading ...
Page is loading ...
Page is loading ...
Page is loading ...
Page is loading ...
Page is loading ...
Page is loading ...
Page is loading ...
Page is loading ...
Page is loading ...
Page is loading ...
Page is loading ...
Page is loading ...
Page is loading ...
Page is loading ...
Page is loading ...
Page is loading ...
Page is loading ...
Page is loading ...
Page is loading ...
Page is loading ...
Page is loading ...
Page is loading ...
Page is loading ...
Page is loading ...
Page is loading ...
Page is loading ...
Page is loading ...
Page is loading ...
Page is loading ...
Page is loading ...
Page is loading ...
Page is loading ...
Page is loading ...
Page is loading ...
Page is loading ...
Page is loading ...
Page is loading ...
Page is loading ...
Page is loading ...
Page is loading ...
Page is loading ...
Page is loading ...
Page is loading ...
Page is loading ...
Page is loading ...
Page is loading ...
Page is loading ...
Page is loading ...
Page is loading ...
Page is loading ...
Page is loading ...
Page is loading ...
Page is loading ...
Page is loading ...
Page is loading ...
Page is loading ...
Page is loading ...
Page is loading ...
Page is loading ...
Page is loading ...
Page is loading ...
Page is loading ...
Page is loading ...
Page is loading ...
Page is loading ...
Page is loading ...
Page is loading ...
Page is loading ...
Page is loading ...
Page is loading ...
Page is loading ...
Page is loading ...
Page is loading ...
Page is loading ...
Page is loading ...
Page is loading ...
Page is loading ...
Page is loading ...
Page is loading ...
Page is loading ...
Page is loading ...
Page is loading ...
Page is loading ...
Page is loading ...
Page is loading ...
Page is loading ...
Page is loading ...
Page is loading ...
Page is loading ...
Page is loading ...
Page is loading ...
Page is loading ...
Page is loading ...
Page is loading ...
Page is loading ...
Page is loading ...
Page is loading ...
Page is loading ...
Page is loading ...
Page is loading ...
Page is loading ...
Page is loading ...
Page is loading ...
Page is loading ...
Page is loading ...
Page is loading ...
Page is loading ...
Page is loading ...
Page is loading ...
Page is loading ...
Page is loading ...
Page is loading ...
Page is loading ...
Page is loading ...
Page is loading ...
Page is loading ...
Page is loading ...
Page is loading ...
Page is loading ...
Page is loading ...
Page is loading ...
-
 1
1
-
 2
2
-
 3
3
-
 4
4
-
 5
5
-
 6
6
-
 7
7
-
 8
8
-
 9
9
-
 10
10
-
 11
11
-
 12
12
-
 13
13
-
 14
14
-
 15
15
-
 16
16
-
 17
17
-
 18
18
-
 19
19
-
 20
20
-
 21
21
-
 22
22
-
 23
23
-
 24
24
-
 25
25
-
 26
26
-
 27
27
-
 28
28
-
 29
29
-
 30
30
-
 31
31
-
 32
32
-
 33
33
-
 34
34
-
 35
35
-
 36
36
-
 37
37
-
 38
38
-
 39
39
-
 40
40
-
 41
41
-
 42
42
-
 43
43
-
 44
44
-
 45
45
-
 46
46
-
 47
47
-
 48
48
-
 49
49
-
 50
50
-
 51
51
-
 52
52
-
 53
53
-
 54
54
-
 55
55
-
 56
56
-
 57
57
-
 58
58
-
 59
59
-
 60
60
-
 61
61
-
 62
62
-
 63
63
-
 64
64
-
 65
65
-
 66
66
-
 67
67
-
 68
68
-
 69
69
-
 70
70
-
 71
71
-
 72
72
-
 73
73
-
 74
74
-
 75
75
-
 76
76
-
 77
77
-
 78
78
-
 79
79
-
 80
80
-
 81
81
-
 82
82
-
 83
83
-
 84
84
-
 85
85
-
 86
86
-
 87
87
-
 88
88
-
 89
89
-
 90
90
-
 91
91
-
 92
92
-
 93
93
-
 94
94
-
 95
95
-
 96
96
-
 97
97
-
 98
98
-
 99
99
-
 100
100
-
 101
101
-
 102
102
-
 103
103
-
 104
104
-
 105
105
-
 106
106
-
 107
107
-
 108
108
-
 109
109
-
 110
110
-
 111
111
-
 112
112
-
 113
113
-
 114
114
-
 115
115
-
 116
116
-
 117
117
-
 118
118
-
 119
119
-
 120
120
-
 121
121
-
 122
122
-
 123
123
-
 124
124
-
 125
125
-
 126
126
-
 127
127
-
 128
128
-
 129
129
-
 130
130
-
 131
131
-
 132
132
-
 133
133
-
 134
134
-
 135
135
-
 136
136
-
 137
137
-
 138
138
-
 139
139
-
 140
140
-
 141
141
-
 142
142
-
 143
143
-
 144
144
-
 145
145
-
 146
146
-
 147
147
-
 148
148
-
 149
149
-
 150
150
-
 151
151
-
 152
152
-
 153
153
-
 154
154
-
 155
155
-
 156
156
-
 157
157
-
 158
158
-
 159
159
-
 160
160
-
 161
161
-
 162
162
-
 163
163
-
 164
164
-
 165
165
-
 166
166
-
 167
167
-
 168
168
-
 169
169
-
 170
170
-
 171
171
-
 172
172
-
 173
173
-
 174
174
-
 175
175
-
 176
176
-
 177
177
-
 178
178
-
 179
179
-
 180
180
-
 181
181
-
 182
182
-
 183
183
-
 184
184
-
 185
185
-
 186
186
-
 187
187
-
 188
188
-
 189
189
-
 190
190
-
 191
191
-
 192
192
-
 193
193
-
 194
194
-
 195
195
-
 196
196
-
 197
197
-
 198
198
-
 199
199
-
 200
200
-
 201
201
-
 202
202
-
 203
203
-
 204
204
-
 205
205
-
 206
206
-
 207
207
-
 208
208
-
 209
209
-
 210
210
-
 211
211
-
 212
212
-
 213
213
-
 214
214
-
 215
215
-
 216
216
-
 217
217
-
 218
218
-
 219
219
-
 220
220
-
 221
221
-
 222
222
-
 223
223
-
 224
224
-
 225
225
-
 226
226
-
 227
227
-
 228
228
-
 229
229
-
 230
230
-
 231
231
-
 232
232
-
 233
233
-
 234
234
-
 235
235
-
 236
236
-
 237
237
-
 238
238
-
 239
239
-
 240
240
-
 241
241
-
 242
242
-
 243
243
-
 244
244
-
 245
245
-
 246
246
-
 247
247
-
 248
248
-
 249
249
-
 250
250
-
 251
251
-
 252
252
-
 253
253
-
 254
254
-
 255
255
-
 256
256
-
 257
257
-
 258
258
-
 259
259
-
 260
260
-
 261
261
-
 262
262
-
 263
263
-
 264
264
-
 265
265
-
 266
266
-
 267
267
-
 268
268
-
 269
269
-
 270
270
-
 271
271
-
 272
272
-
 273
273
-
 274
274
-
 275
275
-
 276
276
-
 277
277
-
 278
278
-
 279
279
-
 280
280
-
 281
281
-
 282
282
-
 283
283
-
 284
284
-
 285
285
-
 286
286
-
 287
287
-
 288
288
-
 289
289
-
 290
290
-
 291
291
-
 292
292
-
 293
293
-
 294
294
-
 295
295
-
 296
296
-
 297
297
-
 298
298
-
 299
299
-
 300
300
-
 301
301
-
 302
302
-
 303
303
-
 304
304
-
 305
305
-
 306
306
-
 307
307
-
 308
308
-
 309
309
-
 310
310
-
 311
311
-
 312
312
-
 313
313
-
 314
314
-
 315
315
-
 316
316
-
 317
317
-
 318
318
-
 319
319
-
 320
320


Compaq AA-Q88CE-TE User manual
- Category
- Networking
- Type
- User manual
- This manual is also suitable for
Ask a question and I''ll find the answer in the document
Finding information in a document is now easier with AI
Related papers
-
Compaq AAR-88LB-TE User manual
-
-
-
-
-
-
-
Compaq 179740-001 - ProLiant - 3000 Important information
-
Other documents
-
HP Reliable Transaction Router User manual
-
Avaya Configuring Integrated IP Security User manual
-
-
Juniper IPV6 - CONFIGURATION GUIDE V11.1.X Configuration manual
-
-
ICP DAS USA CAN-2055C User manual
-
-
-
-