Page is loading ...

1
RocketStor 6414VS
User Manual
January 15
th
, 2016
Revision 1.4
HighPoint Technologies, Inc.

2
Copyright
Copyright © 2016 HighPoint Technologies, Inc. This document contains materials protected by
International Copyright Laws. All rights reserved. No part of this manual may be reproduced,
transmitted or transcribed in any form and for any purpose without the express written
permission of HighPoint Technologies, Inc.
Trademarks
Companies and products mentioned in this manual are for identification purpose only. Product
names or brand names appearing in this manual may or may not be registered trademarks or
copyrights of their respective owners. Backup your important data before using HighPoint's
products and use at your own risk. In no event shall HighPoint be liable for any loss of profits,
or for direct, indirect, special, incidental or consequential damages arising from any defect or
error in HighPoint's products or manuals. Information in this manual is subject to change
without notice and does not represent a commitment on the part of HighPoint.
Notice
Reasonable effort has been made to ensure that the information in this manual is accurate.
HighPoint assumes no liability for technical inaccuracies, typographical, or other errors
contained herein.
FCC Part 15 Class B Radio Frequency Interference statement
This equipment has been tested and found to comply with the limits for a Class B digital device,
pursuant to part 15 of the FCC Rules. These limits are designed to provide reasonable
protection against harmful interference in a residential installation. This equipment generates
uses and can radiate radio frequency energy and, if not installed and used in accordance with
the instructions, may cause harmful interference to radio communications. However, there is no
guarantee that interference will not occur in a particular installation. If this equipment does
cause harmful interference to radio or television reception, which can be determined by turning
the equipment off and on, the user is encouraged to try to correct the interference by one or
more of the following measures:
Reorient or relocate the receiving antenna.
Increase the separation between the equipment and receiver.
Connect the equipment into an outlet on a circuit different from that to which the receiver is
connected.
Consult the dealer or an experienced radio/TV technician for help.
Modifications not expressly approved by the manufacturer could void the user’s authority to
operate the equipment under FCC rules.
This device complies with part 15 of the FCC Rules. Operation is subject to the following two
conditions: (1) this device may not cause harmful interference, and (2) this device must accept
any interference received, including interference that may cause undesired operation.
European Union Compliance Statement
This Information Technologies Equipment has been tested and found to comply with the
following European directives:
European Standard EN55022 (1998) Class B
European Standard EN55024 (1998)

3
Table of Contents
Product Overview ....................................................................................................................... 5
Kit Contents.................................................................................................................................. 5
RocketStor 6414S Enclosure Overview .....................................................................................6
RocketRAID 644LS Overview .......................................................................................................7
Getting Started ............................................................................................................................. 8
Step 1: Setting Up the Hardware .................................................................................................8
Step 2: Install/Update Drivers .................................................................................................. 10
Step 3: Install HighPoint RAID Management (WebGUI) ...................................................... 15
Step 4: Create RAID Arrays using WebGUI ............................................................................ 18
Step 5: Initialize and format the RAID Array ....................................................................... 23
Manage your RAID array ......................................................................................................... 27
RAID Spare Pool .......................................................................................................................... 27
WebGUI Remote Login ............................................................................................................... 29
Storage Health Inspector (SHI) ................................................................................................. 30
Utilizing the Health Inspector Scheduler .............................................................................. 32
RAID Expansion (OCE/ORLM) ................................................................................................ 33
Troubleshooting - Hardware .................................................................................................. 34
Enclosure Mute Button ............................................................................................................... 34
LED Activity .................................................................................................................................. 34
Replacing a Failed Disk .............................................................................................................. 37
Troubleshooting - Software .................................................................................................... 37
WebGUI – Connection cannot be established ....................................................................... 37
Troubleshooting – RAID .......................................................................................................... 38
Critical Arrays .............................................................................................................................. 38
Disabled Arrays ........................................................................................................................... 39
Frequently Asked Questions .................................................................................................. 40
Recovering your Password ........................................................................................................ 40
Online Array Roaming ............................................................................................................... 41
Stuck WebGUI Installation ........................................................................................................ 41
Appendix A: Navigating the HighPoint WebGUI ................................................................ 41
How to Login HighPoint WebGUI ............................................................................................. 42

4
Appendix A-1: Global Tab ......................................................................................................... 43
Appendix A-2: Physical Tab ...................................................................................................... 44
Appendix A-3: Logical Tab ........................................................................................................ 47
Appendix A-4: Setting Tab ........................................................................................................ 55
Appendix A-5: Recover Tab ...................................................................................................... 58
Appendix A-6: Event Tab ........................................................................................................... 59
Appendix A-7: SHI (Storage Health Inspector) ..................................................................... 61
Appendix B: WebGUI Icon Guide ........................................................................................... 62
Appendix C: RAID Level Quick Reference .......................................................................... 64
Help .............................................................................................................................................. 65
HighPoint Recommended List of Hard Drives ...................................................................... 65
Contacting Technical Support .................................................................................................. 65

5
Product Overview
The RocketStor 6414VS bundle package includes an enclosure for housing your
physical drives and a RAID Controller to manage and create RAID arrays of different
levels.
RocketStor 6414S Enclosure
HighPoint RocketRAID 644LS Controller
Kit Contents
Item
Count
4-Bay Tower Enclosure
1
4-Port SATA 6Gb/s Value RAID PCIe
2.0 x4 Host Adapter
1
Low Profile Bracket
1
Disk Trays
4
SFF-8088 (Q-SATA) Cable
1
UL Power Cord
1
3.5” HDD mounting screws
16
2.5” SSD mounting screws
16
Quick Installation Guide
1
Feature Specifications
RocketStor 6414VS
Form Factor
4-Bay Enclosure
Host Interface
1x Mini-SAS (SFF-8088)
RAID Controller/ Bus Interface
RocketRAID 644LS / PCIe 2.0 x4
RAID Level
0, 1, 5, 10,and JBOD
Max. Capacity
Up to 32TB
# Of Drive
Up to 4

6
Drive Interface
SATA
Drive Form factor
3.5" HDD supported
Operating System Support
Window Server 2008 and above, Windows 7 and above, Major
Linux Distributions, FreeBSD, Mac OS X 10.8.5 and later.
Certification
CE, FCC, RoHS
Warranty
1 Year
Dimension
8.66”(H)x5.31”(W)x8.67”(D)
Weight
Enclosure Monitoring Feature Suite
Material
Brushed Aluminum housing
Alarm
Audible Alarm (mutable) for Fan Failure or Temperature
warning (over 50° C)
RAID Feature Suite
Flash ROM for Upgradeable Firmware
Storage Health Inspector
Redundant RAID Configurations
Multiple RAID Partitions supported
Online Array Roaming
Online RAID Level Migration (ORLM)
Online Capacity Expansion (OCE)
RAID Initialization Background/Foreground/Quick
Global Hot Spare Disk support
Automatic and configurable RAID Rebuilding Priority
Disk Format compatible: 512, 512e
Larger than 2 TB Drive and RAID Array support
Spin down Massive Arrays of Idle Disks support
Native Command Queuing
Stagger Drive Spin Up
Write Back and Write Through
RocketStor 6414S Enclosure Overview

7
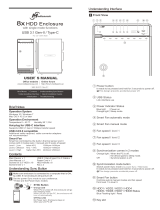
Front Panel Overview
Back Panel Overview
Front Panel
Disk Present LED
Indicates disk is present and available
Disk Status LED
Indicates disk is performing I/O
operations
Enclosure Power LED
Indicated enclosure is properly powered
Back Panel
Mini-SAS port
SFF-8088 port
Mute Button
Mutes enclosure alarm only. Alarm
sounds off only when FAN and
TEMPERATURE fail.
Power Receptacle
Connect power cord here
On/Off Switch
O – Off / I - On
RocketRAID 644LS Overview

8
RocketRAID 644LS Key
PORT1
mini-SAS (SFF-8088) Connection
Corresponds to channel 1-4
BEEP1
Alarm/Beeper
Getting Started
Thank you for purchasing HighPoint Technologies RocketStor 6414VS. You are only a
few steps away from utilizing RAID storage using the industry’s most affordable
hardware RAID solution.
To start using your RocketStor 6414VS take the following steps:
1. Setting up the Hardware (pg. 8)
2. Install/Update drivers (pg. 10)
3. Install HighPoint RAID Management (WebGUI) (pg. 15)
4. Create RAID Arrays (pg. 18)
5. Initialize and format RAID Volumes (pg. 23)
Step 1: Setting Up the Hardware
Ensure all items listed under Kit Contents are included in your package. For any
discrepancy contact your reseller or submit a support ticket online at www.highpoint-
tech.com/websupport.

9
Preparing the Enclosure
1. Press then pull the blue tab on the disk tray to unlock and slide the disk tray out.
Then mount your hard drives onto the tray using the provided screws. Repeat for
up to four hard drives.
3.5" HDD Mounting Holes
2.5” SSD Mounting Holes
2. Place the enclosure upright on a stable, flat surface.
3. Connect the enclosure to a power source with the AC Power Cord.
4. Connect the enclosure to the included RocketRAID 644LS using the mini-SAS to
mini-SAS cable (SFF-8088).
Preparing the HBA (Host Bus Adapter)
The following instructions describe how to prepare your RocketRAID 644LS HBA for
use.
To install your RocketRAID 644LS:
Important: Before installing the RocketRAID 644LS Controller, ensure that your system
is powered OFF.
1. Locate a PCIe 2.0 x4 slot (or compatible slot) on your PC motherboard.
Note 1: Refer to your PC manual for instructions on how to access your
motherboard.
Note 2: Refer to your motherboard manual for instructions on how to locate
your PCI Express slot.
2. Align the RocketRAID 644LS with the PCIe slot and push straight down until card is
fully seated.
3. Tighten the connection by fastening the RocketRAID bracket and enclosure
together.

10
A PCI-Express 2.0 x4 card is compatible with PCI-Express 2.0 x16 and PCI-Express 3.0
x16 slots, as well as PCIe 2.0 x8, PCIe 3.0 x8 slots.
Step 2: Install/Update Drivers
Drivers provide a way for your operating system to communicate with your new
hardware. Updating to the latest drivers ensures your product has the latest
performance, stability, and compatibility improvements. Drivers are updated regularly
at www.highpoint-tech.com
For Windows Users:
1. Download the latest driver files from our website www.highpoint-tech.com >
Support > Documents and Downloads > RocketStor 6414VS.
2. Extract the downloaded files onto your PC and note the location of the files.
3. Open Windows Device Manager (Control Panel > Hardware and Sound > Devices
and Printers > Device Manager).
4. Under Other devices, right-click RAID Controller.
5. Click Update Driver Software.

11
6. Click Browse my computer for driver software.
7. Navigate to where you saved the driver files.

12
8. Click OK.
9. Click Next, Windows security will prompt to ask if you are sure you want to install
HighPoint Software.
10. After clicking Install, driver will be installed.

13
11. Reboot for changes to take effect.
For Mac Users:
For OSX 10.9 and later, drivers are embedded in the OS and do not need to be installed.
1. Obtain latest RocketRAID 644LS driver online at www.hptmac.com> PCIe
Controller Card > 6 Gb/s SATA RAID HBA > RocketRAID 644LS > Download
2. Click the downloaded file.
3. A mounted volume (eg. HighPointRR) will appear on the desktop. Click to open the
volume.
4. Click the driver package to start installation (~.pkg file)

14
5. Follow the on-screen instructions of the installer.
6. Reboot computer for changes to take effect.

15
7. Make sure Driver Installed is Yes. Click Apple Icon > About this Mac... > System
Report > PCI to check driver status information.
Click Apple Icon > About this Mac... > System Report > PCI
Step 3: Install HighPoint RAID Management (WebGUI)
The HighPoint RAID Management (WebGUI) software is necessary to create, maintain,
and view your RAID arrays.


17
4. Follow the on-screen instructions to complete the WebGUI installation
5. Double-click the HighPoint RAID Management desktop icon to start the WebGUI
6. Your default web browser will open and prompt for username and password
(Default username: RAID / password: hpt). Username and password are case-
sensitive.
For Mac Users:
1. Download the latest WebGUI from our website www.hptmac.com> PCIe Controller
Card > 6 Gb/s SATA RAID HBA > RocketRAID 644LS > Download
2. Double Click the downloaded Mac WebGUI file.
3. Double click the HighPointWebGUI.pkg to start the WebGUI installer.
4. Follow the installer on-screen instructions to complete the WebGUI installation.
5. Double-click the HighPoint RAID Management desktop icon to start the WebGUI.

18
6. Your default web browser will open and prompt for username and password
(Default username: RAID / password: hpt). Username and password are case-
sensitive.
Uninstalling the WebGUI
For Windows Users:
1. Open Control Panel.
2. Click Uninstall a program.
3. Select HighPoint RAID Management to uninstall.
For Mac Users:
1. Navigate to /Applications/HPTWEBGUI/uninstall.
2. Click on the uninstall script.
3. Type in the Administrator password when prompted.
Step 4: Create RAID Arrays using WebGUI
For both Mac and Windows users:
1. Login to WebGUI (Default username: RAID / password: hpt).
2. Once logged in, click the Logical tab.

19
Click Logical to go to create array page.
3. Click Create Array:

20
4. The RAID creation page provides many features, options, and settings. Detailed
descriptions are provided on pg. 47.
5. Select RAID 5 for Array Type. (RAID Quick Reference on pg. 64)
6. Set array name as “Tutorial_Array”.
7. Select Quick Init as the initialization method. (Note: Quick Init gives immediate
access to the array by skipping parity synchronization. Recommended for
testing/verification purposes or when new disks are used.)
8. Select Write Back as the Cache Policy for better disk write performance.
9. Select 64K as the Block Size.
10. Select all 4 available disks.
11. Leave the Capacity, Sector Size, and Disk Cache Policy settings at their default
values.
12. Click Create
/