Page is loading ...

Tools/Outils/Herramientas
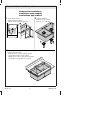
Important Information
Observe all local plumbing and building codes.
Provide your countertop manufacturer with your sink model number when
ordering your countertop; ensure the correct cut-out template is used.
For self-rimming installations: The number of clips included with your sink may
differ from the number of clips illustrated. Use all clips included with the sink.
For self-rimming installations: The fasteners included with the clip assembly will
accommodate countertops up to 1-3/4″ (4.4 cm) thick. Longer fasteners are
available for thicker countertops; contact the Customer Care Center.
For self-rimming installations: If possible, install the faucet to the sink prior to
installing the sink.
For undercounter installations: Provide the countertop manufacturer with the
required faucet hole locations to ensure countertop holes align with the sink faucet
holes.
For undercounter installations: Clean the underside of the countertop at the sink
installation area thoroughly before installing the sink.
Install the water supplies and drain piping according to the roughing-in
information.
Allow the sealant to cure following the sealant manufacturer’s instructions.
Informations importantes
Respecter tous les codes de plomberie et de bâtiment locaux.
Fournir le numéro du modèle de l’évier au fabricant du comptoir lors de la
commande du comptoir; s’assurer que le modèle de découpe correct est utilisé.
Pour des installations à rebord intégré: Le nombre de clips inclus avec l’évier
pourrait différer du nombre illustré. Utiliser tous les clips inclus avec l’évier.
Pour des installations à rebord intégré: Les dispositifs de fixation inclus avec
l’ensemble des clips peuvent s’adapter à des comptoirs d’une épaisseur maximum
de 1-3/4″ (4,4 cm). Des dispositifs d’attache plus longs sont disponibles pour des
comptoirs plus épais; contacter le service à la clientèle.
Pour des installations à rebord intégré: Si possible, installer le robinet sur l’évier
avant d’installer ce dernier.
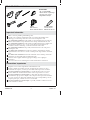
• 1/2" or larger Drill Bit
Mêche de 1/2" ou plus large
Broca de 1/2" o mayor
• Rags/Chiffons/Trapos
Plus/Plus/Más:
Jigsaw
Scie sauteuse
Sierra caladora eléctrica
Silicone Sealant
Joint en silicone
Sellador de silicona
1130284-2-B 2 Kohler Co.
Page is loading ...
Page is loading ...

Installation/Installation/Instalación
7
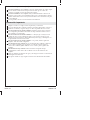
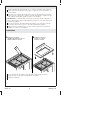
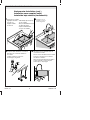
Verify fit. Adjust cutout if needed.
Vérifier l'ajustement. Régler la
découpe si nécessaire.
Verifique que quede bien. Ajuste
la abertura si es necesario.
56
Drill pilot hole and cut the countertop opening.
Percer un trou-pilote et découper l'ouverture
du comptoir.
Taladre el orificio guía y corte la abertura en
la cubierta.
Apply silicone sealant.
Appliquer du mastic
à la silicone.
Aplique sellador
de silicona.
8
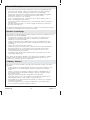
Immediately wipe away any
excess sealant.
Essuyer immédiatement tout
excédent de mastic.
Limpie inmediatamente
el exceso de sellador.
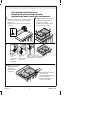
Self-rimming Installation (cont.)
Installation à rebord incorporé (suite)
Instalación de borde terminado (continuación)
Insert the
sink.
Insérer l'évier.
Inserte el
fregadero.
Rotate the
clip.
Pivoter le clip.
Gire el clip.
Tighten to secure sink.
Serrer pour fixer l'évier en place.
Apriete para fijar el fregadero.
Kohler Co. 5 1130284-2-B
Page is loading ...
Page is loading ...

Installation
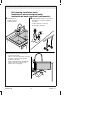
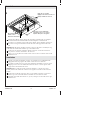
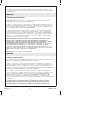
Measure the cabinet opening where the sink will be installed. Plan for adequate
clearance between the faucet handles and the backsplash or finished wall.
Construct a wood frame for the inside of the cabinet. Allow adequate clearance for
the faucet valving and sink basin. Ensure the frame will support the entire sink
rim.
IMPORTANT! The frame should be located so that once the sink is installed, the top
of the sink rim will be flush with the top of the cabinet walls.
Position the wood frame within the cabinet and secure. Locate the fasteners for
easy access in case the sink needs to be removed.
Apply a 1″ (2.5 cm) bead of sealant at each corner of the wood frame where it will
contact the sink.
Installation
Mesurer l’ouverture du meuble où l’évier sera installé. Prévoir suffisamment de
dégagement entre les poignées de robinet et le dosseret ou le mur fini.
Construire un cadre en bois pour la partie intérieure du meuble. Laisser un espace
adéquat pour les valves de robinet et le bassin de l’évier. S’assurer que le cadre
supportera le rebord entier de l’évier.
IMPORTANT! Le cadre devrait être localisé de manière à ce qu’une fois l’évier
installé, le dessus du rebord de ce dernier soit à égalité avec le dessus des murs du
meuble.
Positionner le cadre de support en bois avec le meuble et sécuriser. Localiser les
fixations pour un accès facile dans l’éventualité où l’évier doit être retiré.
Appliquer un boudin de mastic de 1″ (2,5 cm) à chaque coin du cadre en bois qui
touche l’évier.
Apply silicone sealant.
Appliquer du mastic à la silicone.
Aplique sellador de silicona.
Wood Frame
Cadre en bois
Estructura de madera
4
Clearance for the Sink Basin
Dégagement pour cuve d'évier
Espacio libre para el fregadero
1130284-2-B 8 Kohler Co.
Page is loading ...
Page is loading ...
Page is loading ...

Care and Cleaning
For best results, keep the following in mind when caring for your KOHLER product:
•
Always test your cleaning solution on an inconspicuous area before applying to
the entire surface. Cleaners containing chloride are not recommended.
•
Wipe surfaces clean and rinse completely with water immediately after applying
cleaner. Rinse and dry any overspray that lands on nearby surfaces.
•
Do not allow cleaners to soak on surfaces.
•
Use a soft, dampened sponge or cloth. Never use an abrasive material such as a
brush or scouring pad to clean surfaces.
•
Be careful not to leave staining materials in contact with the surface for extended
periods of time.
•
The ideal cleaning technique is to rinse thoroughly and blot dry any water from
the surface after each use.
For detailed cleaning information and products to consider, visit www.kohler.com/clean.
To order Care & Cleaning information, call 1-800-456-4537.
Entretien et nettoyage
Pour obtenir les meilleurs résultats possibles, prendre ce qui suit en considération lors de
l’entretien de votre produit KOHLER:
•
Toujours tester la solution de nettoyage sur une surface non visible avant de
l’appliquer sur l’ensemble de la surface. Les nettoyants qui contiennent du
chlorure ne sont pas recommandés.
•
Essuyer les surfaces et rincer complètement avec de l’eau immédiatement après
l’application du nettoyant. Rincer et sécher tout éclaboussement sur les surfaces
avoisinantes.
•
Ne pas laisser les nettoyants sur les surfaces.
•
Utiliser une éponge ou un chiffon doux et humide. Ne jamais utiliser de matériau
abrasif tel qu’une brosse ou une éponge à récurer pour nettoyer les surfaces.
•
Faire attention de ne pas laisser de matériaux qui tachent en contact avec la
surface pendant de longues périodes.
•
La technique idéale de nettoyage est de bien rincer et de sécher toute eau de la
surface après chaque usage.
Pour obtenir des informations détaillées sur le nettoyage et les produits à considérer,
consulter le site www.kohler.com/clean. Pour commander des informations sur
l’entretien & le nettoyage, appeler le 1-800-456-4537.
Cuidado y limpieza
Para obtener los mejores resultados, tenga presente lo siguiente al limpiar su producto
KOHLER:
•
Siempre pruebe la solución de limpieza en un área oculta antes de aplicarla a toda
la superficie. No se recomienda utilizar productos de limpieza que contengan
cloruro.
•
Limpie con un trapo las superficies y enjuague completa e inmediatamente con
agua después de aplicar el limpiador. Enjuague y seque las superficies cercanas
que se hayan rociado.
•
No deje por tiempo prolongado los limpiadores en las superficies.
•
Utilice una esponja o trapo suave y húmedo. Para limpiar las superficies nunca
utilice materiales abrasivos como cepillos o estropajos de tallar.
•
Tenga cuidado de no dejar sustancias que manchen, en contacto con la superficie
por periodos prolongados.
•
La técnica de limpieza ideal es enjuagar completamente y secar dando toques
suaves el agua de la superficie después de cada uso.
1130284-2-B 12 Kohler Co.

Cuidado y limpieza (cont.)
Para obtener información detallada de limpieza y los limpiadores a considerar, visite
www.kohler.com/clean. Para solicitar información sobre el cuidado y la limpieza, llame
al 1-800-456-4537.
Warranty
ONE-YEAR LIMITED WARRANTY
KOHLER plumbing products are warranted to be free of defects in material and
workmanship for one year from date of installation.
Kohler Co. will, at its election, repair, replace or make appropriate adjustment where
Kohler Co. inspection discloses any such defects occurring in normal usage within one
(1) year after installation. Kohler Co. is not responsible for removal or installation costs.
Use of in-tank toilet cleaners will void the warranty.
To obtain warranty service contact Kohler Co. either through your Dealer, Plumbing
Contractor, Home Center or E-tailer, or by writing Kohler Co., Attn.: Customer Care
Center, 444 Highland Drive, Kohler, WI 53044, USA, or by calling 1-800-4-KOHLER
(1-800-456-4537) from within the USA and Canada, and 001-800-456-4537 from within
Mexico, or visit www.kohler.com within the USA, www.ca.kohler.com from within
Canada, or www.mx.kohler.com in Mexico.
IMPLIED WARRANTIES INCLUDING THAT OF MERCHANTABILITY AND
FITNESS FOR A PARTICULAR PURPOSE ARE EXPRESSLY LIMITED IN
DURATION TO THE DURATION OF THIS WARRANTY. KOHLER CO. AND/OR
SELLER DISCLAIM ANY LIABILITY FOR SPECIAL, INCIDENTAL OR
CONSEQUENTIAL DAMAGES. Some states/provinces do not allow limitations on
how long an implied warranty lasts, or the exclusion or limitation of special,
incidental or consequential damages, so these limitations and exclusions may not
apply to you. This warranty gives you specific legal rights. You may also have other
rights which vary from state/province to state/province.
This is Kohler Co.’s exclusive written warranty.
Garantie
GARANTIE LIMITÉE D’UN AN
Les produits de plomberie KOHLER sont garantis contre tout défaut de matériau et de
fabrication pendant un an à partir de la date de l’installation.
Kohler Co. jugera, à son gré, de réparer, de remplacer ou d’effectuer un ajustement
approprié lorsque l’inspection effectuée par Kohler Co. révèle de telles défectuosités lors
d’une utilisation normale, et ce pendant un (1) an à partir de la date d’installation.
Kohler Co. n’est pas responsable des coûts de démontage ou d’installation. L’utilisation
de nettoyants à l’intérieur du réservoir annulera la garantie.
Pour obtenir un service de garantie, contacter Kohler Co., soit par l’intermédiaire de
votre concessionnaire, plombier, centre de rénovation, ou revendeur sur Internet ou en
écrivant à Kohler Co. à l’attention de: Customer Care Center, 444 Highland Drive,
Kohler, WI 53044, États-Unis, ou appeler le 1-800-4-KOHLER (1-800-456-4537) des
États-Unis et du Canada, et le 001-800-456-4537 du Mexique, ou consulter le site
www.kohler.com aux États-Unis, www.ca.kohler.com au Canada ou www.mx.kohler.com
au Mexique.
LA DURÉE DES GARANTIES TACITES, Y COMPRIS CELLES DE QUALITÉ
MARCHANDE ET D’APTITUDE À UN EMPLOI PARTICULIER, SE LIMITE
EXPRESSÉMENT À LA DURÉE DE LA PRÉSENTE GARANTIE. KOHLER CO.
Kohler Co. 13 1130284-2-B
Page is loading ...
Page is loading ...
Page is loading ...
-
 1
1
-
 2
2
-
 3
3
-
 4
4
-
 5
5
-
 6
6
-
 7
7
-
 8
8
-
 9
9
-
 10
10
-
 11
11
-
 12
12
-
 13
13
-
 14
14
-
 15
15
-
 16
16


Kohler K-RH3823-4-NA Installation guide
- Type
- Installation guide
- This manual is also suitable for
Ask a question and I''ll find the answer in the document
Finding information in a document is now easier with AI
in other languages
Related papers
-
Kohler 4774-95 Installation guide
-
Kohler K-3615-96 Installation guide
-
Kohler 5016-ET-0 User manual
-
Kohler K-3823-1-NA User manual
-
-
Kohler K-T10423-4S-G Installation guide
-
Kohler K-3838-4-NA User manual
-
Kohler K-4647-0 User manual
-
-
Kohler 6429-ST User guide
Other documents
-
Ticor PLZ-610 Installation guide
-
Ticor S5306 Installation guide
-
Sterling 1042-4-0 User manual
-
-
Sterling Plumbing S1206 User manual
-
BOCCHI 1362-006-0120 User manual
-
-
Sterling Ludington™ Installation guide
-
-
Ancona AN-3215 User manual