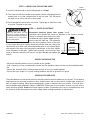
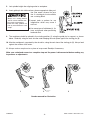
Grizzly C2320: This high-quality aluminum moulding head is designed for use on a vertical spindle shaper with a minimum 11⁄2 H.P. motor. It accepts matched pairs of interchangeable High Speed knives (not included) with either 60˚ or 90˚ cut corrugations spaced 1⁄16" apart. The knives lock into position by wedge-type gibs for maximum safety. The C2320 is capable of both straight edge and irregular shaping. For straight edge shaping, use the fence assembly. For irregular shaping, remove the fence assembly and use rub collars. Always use a starting pin/block and rub collar for freehand work.
Grizzly C2320: This high-quality aluminum moulding head is designed for use on a vertical spindle shaper with a minimum 11⁄2 H.P. motor. It accepts matched pairs of interchangeable High Speed knives (not included) with either 60˚ or 90˚ cut corrugations spaced 1⁄16" apart. The knives lock into position by wedge-type gibs for maximum safety. The C2320 is capable of both straight edge and irregular shaping. For straight edge shaping, use the fence assembly. For irregular shaping, remove the fence assembly and use rub collars. Always use a starting pin/block and rub collar for freehand work.


-
 1
1
-
 2
2
-
 3
3
-
 4
4


Grizzly C2320: This high-quality aluminum moulding head is designed for use on a vertical spindle shaper with a minimum 11⁄2 H.P. motor. It accepts matched pairs of interchangeable High Speed knives (not included) with either 60˚ or 90˚ cut corrugations spaced 1⁄16" apart. The knives lock into position by wedge-type gibs for maximum safety. The C2320 is capable of both straight edge and irregular shaping. For straight edge shaping, use the fence assembly. For irregular shaping, remove the fence assembly and use rub collars. Always use a starting pin/block and rub collar for freehand work.
Ask a question and I''ll find the answer in the document
Finding information in a document is now easier with AI
Related papers
Other documents
-
King Canada KW-091 User manual
-
Woodstock w1702 User manual
-
JET JWS-25X Owner's manual
-
Craftex CX Series CX06Z Owner's manual
-
Shop fox W1674 Owner's manual
-
 Grizzly Industrial G1026 User manual
-
-
-
Delta 43-424 User manual
-
 Grizzly Industrial G7214Z User manual

