Epson EasyMP.net Network Option Board Installation guide
- Category
- Projectors
- Type
- Installation guide
This manual is also suitable for

EasyMP.net Setup Guide
English

Notations Used in This Guide
When "projector" appears in the text of this guide, it may refer to items which are accessories
or optional equipment in addition to the main projector unit itself.
General information symbols
Indicates procedures which may result in damage or injury if
sufficient care is not taken.
Indicates additional information and points which may be use-
ful to know regarding a topic.
Indicates pages where related information or a more detailed
description is provided.
Indicates that an explanation of the underlined word or words
in front of this symbol appears in the glossary of terms. See
"Appendices : Glossary" in the User’s Guide.
Indicates operating methods and the order of operations.
The Procedure indicated should be carried out in the order of
the numbers.
[(Button Name)]
Shows the buttons on the control panel or on the remote con-
trol.
Ex: [ESC]
Meanings of "Projector"
PROCEDURE

3
Contents
Functions and Features of EasyMP.net 5
Projection by Network Connection ....................................................... 5
Using the Projector via Wireless LAN .................................................. 7
Operating the PC from the Projector .................................................... 8
Presentation ......................................................................................... 9
Reporting an Error Using the Mail Notification Function ...................... 9
Network Connection 10
Setting up EasyMP.net 11
Setting the Date and Time ..................................................................11
Renaming a Projector ........................................................................ 15
Establishing a Network Connection (via a Network Cable) ................ 17
Establishing a Network Connection (via Wireless LAN) .................... 19
EasyMP.net Software 21
Software Operating Environment ....................................................... 21
Installing the Software ........................................................................ 23
Uninstalling the Software ................................................................... 24
Using Input Devices 25
Remote Control .................................................................................. 25
On-screen Keyboard .......................................................................... 26
USB Devices ...................................................................................... 27
Startup and Shutdown of Functions 28
Startup from the Main Menu ............................................................... 28
Startup from Task Manager 29
User Registration and Data Management 30
User Types ......................................................................................... 30
Logon ................................................................................................. 31
Data Folder ........................................................................................ 32

4
Contents
Using the PC Card Slot 33
Inserting the Card ............................................................................... 33
Removing the Card ............................................................................ 33
Wireless LAN Card 34
Available Wireless LAN Cards ........................................................... 34
Hints on How to 35
Use PowerPoint for Presentation ....................................................... 35
Various Ways of Using the Projector .................................................. 36
Integrated Projector Management ...................................................... 40
Index 41

5
Functions and Features of EasyMP.net
A projector with EasyMP.net can provide various functions required for
presentation by network connection. The following section provides typical
application examples and available functions.
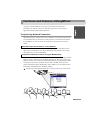
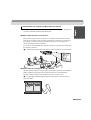
Projection by Network Connection
When the projector is used in class or in a conference room, the projector need not
be connected directly to the local PC. If the projector is connected to the network,
its EasyMP.net can process various PC and projector operations in the on-line
mode.
If a network environment has been established, you skip the preparation such as
data copy in a notebook PC or in the PC dedicated to the projector. You can start
data projection on a screen immediately.
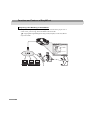
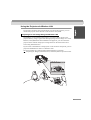
EasyBrowser allows you to connect the projector to the Internet and project the Web
page on a screen. And since you can display the page you need, you can also play
back the motion picture contents available on the Internet. (Java applet pages cannot
be displayed.) If you have saved the contents data in the Web server, you can
present it without using the notebook PC. And in addition you can utilize the real-
time Internet information that is routinely updated.
"Displaying a Web page (EasyBrowser)" in the EasyMP.net Operation Guide
Quick Start-up of Presentations via the Network
Projection of Network Contents Using the Web Browser

6
Functions and Features of EasyMP.net
EasyFile allows you to open a file residing on the network and to project it on a
screen. Also, you can copy, move and delete a file on the PC.
"Copying/Moving/Deleting/Executing a File (EasyFile)" in the EasyMP.net
Operation Guide
Projecting a File Residing on the Network

7
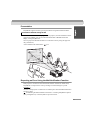
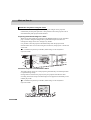
Using the Projector via Wireless LAN
If you insert a wireless LAN card into the PC card slot of the projector, you can
connect the projector to the network via the wireless LAN system.
If EasyMP.net is not installed in the projector, you must connect the PC to the
projector directly, using a signal cable when projecting a PC file image on a screen.
However, if EasyMP.net has been installed in the projector, you can connect the
projector to the network and project an image shown on the network PC onto a
screen using Network Screen.
If you connect a notebook PC to the projector via the wireless LAN system, you can
project the notebook PC's data in a conference room.
The next presenter can continue without resetting the PC's connection.
"Projecting PC Images (Network Screen)" in the EasyMP.net Operation Guide
Projecting a PC File Image Using the Wireless LAN

8
Functions and Features of EasyMP.net
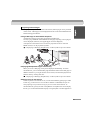
Operating the PC from the Projector
Using the Remote Desktop functions of EasyMP.net, you can easily connect your
projector to a network PC running on Windows XP Professional.
"Operating a Network PC (Remote Desktop)" in the EasyMP.net Operation
Guide
Remote Desktop allows you to control a PC running on Windows XP Professional
from the projector by remote control operations. You can start the software and
project any file image on a screen. You can access all the software and files on the
PC, so you can start projection in a conference room without a notebook PC.
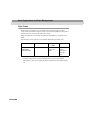
Projection by the Network PC
Remote Desktop Network Screen
Function Controls a PC from a remote
projector.
Operates the PC directly.
Available PC Allows you to operate a
network PC running on
Windows XP Professional.
• Allows you to project a file
image from the network PC
running on Windows
98/98SE/Me/2000/XP.
• The EMP NS Connection
software must be installed in
the PC.

9
Presentation
EasyMP.net supports various types of presentation using Microsoft PowerPoint.
You can install the PowerPoint program in this projector, and run PowerPoint on the
projector. In addition you can save the PowerPoint data in HTML format and
display it using EasyBrowser.
You can project the PowerPoint data in a conference room by using this projector
only (without PC).
"Use PowerPoint for Presentation" p.35
Reporting an Error Using the Mail Notification Function
If the projector connected to the network has failed or entered into alarm status,
EasyMP.net can report this to a PC by sending an e-mail message to a preset
IP address
.
An error in the projector can be known at a distant place when the Mail Notification
function is used.
"Establishing the Mail Notification Function" in "Setting EasyMP.net Options
(Easy Configuration)" in the EasyMP.net Operation Guide
Presentation without Using the PC

10
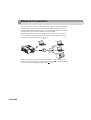
Network Connection
The projector can be used in a LAN system once a network connection has been
established. The connection can be established by means of EasyConfiguration.
Network configuration examples are given in the "Examples Network Connection
Configurations" section of the EasyMP.net Operation Guide.
When connecting the projector to the network using a network cable, plug the
network cable into the Network port of the projector, and establish a network
connection using EasyConfiguration ( p.17).
When connecting the projector to the network via the wireless LAN, plug the
wireless LAN card into the PC card slot of the projector ( p.33) and establish a
network connection using EasyConfiguration ( p.19)

11
Setting up EasyMP.net
EasyMP.net will be available once the system date and time and the network
parameters have been set by means of EasyConfiguration.
The following section explains the standard system setup using the remote control
unit supplied with the projector. Also, the mouse and keyboard keys can be used for
easier operation.
( p.25) Instructions on the operation of the remote control, mouse and keyboard
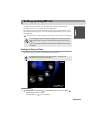
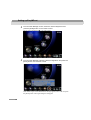
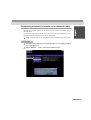
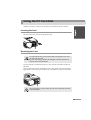
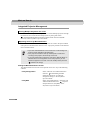
Setting the Date and Time
When the projector is turned on, the following screen appears.
1
Move the mouse pointer ( ) to the bottom of the screen using the
button on the remote control.
The Task Manager ( p.29) will appear.
Do not unplug the power cable when EasyMP.net is running (especially
when the screen is switched on or data is being read from the memory
card).
If you do, the system hardware may fail and the EasyMP.net screen may
not appear.
EasyMP.net will be ready for use approximately 1 minute and 30
seconds after the projector is turned on.
PROCEDURE

12
Setting up EasyMP.net
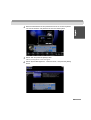
2
From the Task Manager screen, select the "Screen Keyboard" and
press the [Enter] button on the remote control.
The on-screen keyboard ( p.26) will appear.
3
From the Task Manager, select the "EasyConfiguration" and press the
[Enter] button on the remote control.
If the "Please log on as the administrator" message appears, select "OK" and press
the [Enter] button. The Logon dialog box will appear.

13
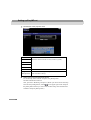
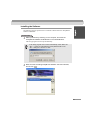
4
Enter the Administrator ID and password from the on-screen keyboard.
The user ID is Admin. No password is set in the initial system.
5
Select "OK" and press the [Enter] button.
The EasyConfiguration screen will appear.
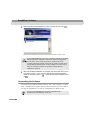
6
Select "System Management" - "Date and Time", and press the [Enter]
button.

14
Setting up EasyMP.net
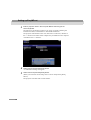
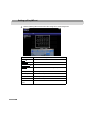
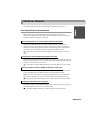
7
Set the time of the projector clock.
8
Select "OK" and press the [Enter] button.
To cancel setup, select "Cancel" and press the [Enter] button.
The date and time have been set.
Next, proceed to "Renaming a Projector." (When you need to cancel the setup
and close EasyConfiguration, select in the upper right corner and press
the [Enter] button. When you wish to start another setup, select the left-hand
side menu and press [Enter] button.)
Year Set the current calendar date and time.
The hour can be set from 0 to 23 (a 24-hour system).
Month
Day
Hours
Minutes
Time Zone Choose an area.
Daylight
Savings Time
U.S.A summer time (optional: you cannot set the summer
time of another country).


16
Setting up EasyMP.net
3
Enter a projector name in the "Projector Name" field using the on-
screen keyboard.
The easiest way to identify a projector is by giving it a name containing the
installation location, an ID number or other useful information.
The projector name should consist of no more than 15 characters, numbers or
the "-" character. The name cannot comprise only of numbers but can comprise
of numbers and a "-" character.
4
Select "OK" and press the [Enter] button.
A confirmation message will appear.
5
Select "OK" and press the [Enter] button.
(When you cancel the current setup, select "Cancel" and press the [Enter]
button.)
The projector will restart after several minutes.

17
Establishing a Network Connection (via a Network Cable)
The following section explains the standard setup of a network connection using a
network cable.
Use the following setup procedure on the projector. Also, EasyWeb allows you to
establish a network connection from the PC (EasyWeb).
"Projector Setup from the PC (EasyWeb)" of the EasyMP.net Operation Guide
1
Activate EasyConfiguration by following steps 1 to 5 of "Setting the Date
and Time ( p.11)".
2
Select "Network" - "LAN", and press the [Enter] button.
PROCEDURE

18
Setting up EasyMP.net
3
See the following table and set each item using the on-screen keyboard.
Item Explanation
DHCP
Select "ON" to use the DHCP.
IP address
Enter the fixed IP address.
Subnet mask
Enter the subnet mask.
Gateway
address
Enter the IP address of the default gateway.
Primary DNS Enter the primary IP address of the DNS.
Secondary DNS Enter the secondary IP address of the DNS.
WINS1 Enter the primary IP address of the WINS server.
WINS2 Enter the secondary IP address of the WINS server.
DNS domain
name
Enter the DNS domain name.

19
Establishing a Network Connection (via Wireless LAN)
The following section explains the standard setup of a network connection using a
wireless LAN system.
Use the following setup procedure on the projector. Also, EasyWeb allows you to
establish a network connection from the PC.
"Projector Setup from the PC (EasyWeb)" of the EasyMP.net Operation Guide
1
Activate EasyConfiguration by following steps 1 to 5 of "Setting the Date
and Time ( p.11)".
2
Select "Network" - "Wireless LAN", and press the [Enter] button.
PROCEDURE

20
Setting up EasyMP.net
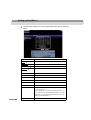
3
Set each item using the on-screen keyboard by referring to the following
table.
Item Explanation
DHCP
Select "ON" to use the DHCP.
IP address
Enter the fixed IP address.
Subnet mask
Enter the subnet mask.
Gateway
address
Enter the IP address of the default gateway.
Primary DNS Enter the primary IP address of the DNS.
Secondary DNS Enter the secondary IP address of the DNS.
WINS1 Enter the primary IP address of the WINS server.
WINS2 Enter the secondary IP address of the WINS server.
DNS domain name Enter the DNS domain name.
ESSID Enter the ESSID of the wireless LAN unit.
WEP Select "Enabled" and enter a WEP key for ciphering
of data to be sent.
Enter a WEP key consisting of ASCII characters : 5
or 13 characters, or of hexadecimal numbers:10 or 26
characters. (No key ID is required because only one
WEP key can be defined.)
Ad-hoc Mode Select "Enabled" to use ad-hoc access.
Page is loading ...
Page is loading ...
Page is loading ...
Page is loading ...
Page is loading ...
Page is loading ...
Page is loading ...
Page is loading ...
Page is loading ...
Page is loading ...
Page is loading ...
Page is loading ...
Page is loading ...
Page is loading ...
Page is loading ...
Page is loading ...
Page is loading ...
Page is loading ...
Page is loading ...
Page is loading ...
Page is loading ...
Page is loading ...
-
 1
1
-
 2
2
-
 3
3
-
 4
4
-
 5
5
-
 6
6
-
 7
7
-
 8
8
-
 9
9
-
 10
10
-
 11
11
-
 12
12
-
 13
13
-
 14
14
-
 15
15
-
 16
16
-
 17
17
-
 18
18
-
 19
19
-
 20
20
-
 21
21
-
 22
22
-
 23
23
-
 24
24
-
 25
25
-
 26
26
-
 27
27
-
 28
28
-
 29
29
-
 30
30
-
 31
31
-
 32
32
-
 33
33
-
 34
34
-
 35
35
-
 36
36
-
 37
37
-
 38
38
-
 39
39
-
 40
40
-
 41
41
-
 42
42


Epson EasyMP.net Network Option Board Installation guide
- Category
- Projectors
- Type
- Installation guide
- This manual is also suitable for
Ask a question and I''ll find the answer in the document
Finding information in a document is now easier with AI
Related papers
-
Epson 8300i User manual
-
Epson PowerLite 8150NL User manual
-
-
-
Epson PowerLite 1725 Specification
-
Epson PowerLite 7850pNL Product information
-
-
-
-
Other documents
-
Panasonic PT-LB50NTE User manual
-
Compaq mp3130 Owner's manual
-
HP xp8010 Release Notes
-
-
-
-
-
-
Hitachi WNM80 User manual
-
weintek cMT X Series Easyweb 2.0 User manual