Electrolux ESF8725ROX User manual
- Category
- Dishwashers
- Type
- User manual

ESF8725ROX
EN Dishwasher User Manual

CONTENTS
1. SAFETY INFORMATION....................................................................................3
2. SAFETY INSTRUCTIONS..................................................................................4
3. PRODUCT DESCRIPTION................................................................................ 6
4. CONTROL PANEL............................................................................................. 7
5. PROGRAMMES................................................................................................. 8
6. SETTINGS........................................................................................................10
7. OPTIONS..........................................................................................................12
8. BEFORE FIRST USE....................................................................................... 13
9. DAILY USE....................................................................................................... 13
10. HINTS AND TIPS........................................................................................... 15
11. CARE AND CLEANING..................................................................................16
12. TROUBLESHOOTING....................................................................................18
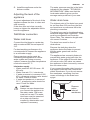
13. TECHNICAL INFORMATION......................................................................... 22
14. INSTALLATION.............................................................................................. 22
15. WARRANTY .................................................................................................. 24
WE’RE THINKING OF YOU
Thank you for purchasing an Electrolux appliance. You’ve chosen a product that
brings with it decades of professional experience and innovation. Ingenious and
stylish, it has been designed with you in mind. So whenever you use it, you can
be safe in the knowledge that you’ll get great results every time.
Welcome to Electrolux.
Visit our website for:
Get usage advice, brochures, trouble shooter, service information:
www.electrolux.com/webselfservice
Register your product for better service:
www.registerelectrolux.com
CUSTOMER CARE AND SERVICE
Always use original spare parts.
When contacting our Authorised Service Centre, ensure that you have the
following data available: Model, PNC, Serial Number.
The information can be found on the rating plate.
Warning / Caution-Safety information
General information and tips
Environmental information
Subject to change without notice.
www.electrolux.com2

1. SAFETY INFORMATION
Before the installation and use of the appliance, carefully
read the supplied instructions. The manufacturer is not
responsible for any injuries or damages that are the
result of incorrect installation or usage. Always keep the
instructions in a safe and accessible location for future
reference.
1.1 Children and vulnerable people safety
• This appliance can be used by children aged 8 years
and above and by persons with reduced capabilities
provided that they have been given instruction and/or
supervision regarding the safe use of the appliance
and understand the potential hazards involved.
• Do not let children play with the appliance.
• Keep detergents away from children.
• Keep children and pets away from the appliance door
when it is open.
• Children shall not carry out cleaning and user
maintenance of the appliance without supervision.
1.2 General Safety
• This appliance is intended to be used in household
and similar applications such as:
– farm houses; staff kitchen areas in shops, offices
and other working environments;
– by clients in hotels, motels, bed & breakfast and
other residential type environments.
• Do not change the specification of this appliance.
• The operating water pressure (minimum and
maximum) must be between 0.5 (50) / 8 (800) bar
(kPa)
• Obey the maximum number of 14 place settings.
• If the supply cord is damaged, it must be replaced by
the manufacturer, its Authorised Service Centre or a
similarly qualified persons in order to avoid a hazard.
ENGLISH 3

• Put knives and cutlery with sharp points in the cutlery
basket with the points down or in a horizontal position.
• Do not keep the appliance door open without
supervision to prevent to fall on it.
• Before any maintenance operation, deactivate the
appliance and disconnect the mains plug from the
socket.
• Do not use high pressure water sprays and/or steam
to clean the appliance.
• The appliance is to be connected to the water mains
using the new supplied hose-sets. Old hose sets must
not be reused.
• The ventilation openings in the base (if applicable)
must not be obstructed by a carpet.
• Some dishwasher detergents are strongly alkaline.
They can be extremely dangerous if swallowed. Avoid
contact with the skin and eyes and keep children away
from the dishwasher when the door is open.
• Check that the detergent receptacle is empty after
completion of the wash cycle.
2. SAFETY INSTRUCTIONS
2.1 Installation
• Remove all the packaging and the
transit bolts.
• Do not install or use a damaged
appliance.
• Do not install or use the appliance
where the temperature is less than 0
°C.
• Follow the installation instruction
supplied with the appliance.
2.2 Electrical connection
WARNING!
Risk of fire and electrical
shock.
• The appliance must be earthed.
• Make sure that the electrical
information on the rating plate agrees
with the power supply. If not, contact
an electrician.
• Always use a correctly installed
shockproof socket.
• Do not use multi-plug adapters and
extension cables.
• Make sure not to cause damage to
the mains plug and to the mains
cable. Should the mains cable need to
be replaced, this must be carried out
by our Authorised Service Centre.
• Connect the mains plug to the mains
socket only at the end of the
installation. Make sure that there is
access to the mains plug after the
installation.
• Do not pull the mains cable to
disconnect the appliance. Always pull
the mains plug.
2.3 Water connection
• Do not cause damage to the water
hoses.
www.electrolux.com4

• Before connection to new pipes, pipes
not used for a long time, where repair
work has been carried out or new
devices fitted (water meters, etc.), let
the water flow until it is clean and
clear.
• Ensure that there are no visible water
leaks during and after the first use of
the appliance.
• The water inlet hose has a safety
valve and a sheath with an inner
mains cable.
WARNING!
Dangerous voltage.
• If the water inlet hose is damaged,
immediately disconnect the mains
plug from the mains socket. Contact
the Authorised Service Centre to
replace the water inlet hose.
2.4 Use
• Do not sit or stand on the open door.
• Dishwasher detergents are
dangerous. Obey the safety
instructions on the detergent
packaging.
• Do not drink and play with the water in
the appliance.
• Do not remove the dishes from the
appliance until the programme is
completed. There can be detergent on
the dishes.
• The appliance can release hot steam
if you open the door while a
programme operates.
• Do not put flammable products or
items that are wet with flammable
products in, near or on the appliance.
2.5 Service
• Contact the Authorised Service
Centre to repair the appliance. We
recommend only the use of original
spare parts.
• When you contact the Authorised
Service Centre, ensure that you have
the following information that is
available on the rating plate.
Model :
PNC :
Serial Number :
2.6 Disposal
WARNING!
Risk of injury or suffocation.
• Disconnect the appliance from the
mains supply.
• Cut off the mains cable and discard it.
• Remove the door catch to prevent
children and pets to get closed in the
appliance.
ENGLISH 5

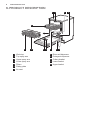
3. PRODUCT DESCRIPTION
12
6
5
8
9
3
4
21
10
711
1
Work-top
2
Top spray arm
3
Upper spray arm
4
Lower spray arm
5
Filters
6
Rating plate
7
Air vent
8
Rinse aid dispenser
9
Detergent dispenser
10
Cutlery basket
11
Lower basket
12
Upper basket
www.electrolux.com6

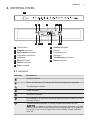
4. CONTROL PANEL
1
2 3 6 7
9
813 1214
4 5
11 10
1
2 3 6 7
9 813 1214
4 5
11 10
1
On/off button
2
Program touchpad
3
MyFavourite touchpad
4
Programme indicators
5
Indicators
6
Delay touchpad
7
Option touchpad
8
Start touchpad
9
XtraDry touchpad
10
Display
11
Programme bar
12
Indicators
13
TimeManager touchpad
14
Reset touchpad
4.1 Indicators
Indicator Description
XtraDry indicator.
Rinse aid indicator. It is always off while the programme operates.
TimeManager indicator.
Delay indicator.
XtraPower indicator.
Door indicator. It comes on when the appliance door is open or is not
correctly closed.
Turbidity Sensor indicator. It comes on when the sensor for the
programme operates. When the sensor operates, only this
indicator is on. All the other indicators, the display and the programme
bar go off. They come on again when the Turbidity Sensor indicator
goes off.
ENGLISH 7

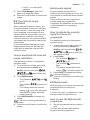
4.2 Programme bar
The programme bar shows information
related to the programme and to the
option TimeManager.
Start and progress of the programme
When the programme starts, the 2 lateral
segments of the programme bar flash.
As the programme is in progress, the
middle segments come on with fixed
light , while the 2 lateral segments contin‐
ue to flash.
When the programme is completed, all
the segments come on with fixed light.
Programme bar and TimeManager option
When you set a programme, that is appli‐
cable to the TimeManager option, all the
segments of the programme bar come on
with fixed light.
When you set the TimeManager option,
only the middle segment stays on with
fixed light.
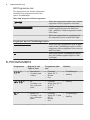
5. PROGRAMMES
Programme Degree of soil
Type of load
Programme pha‐
ses
Options
1)
• Normal soil
• Crockery and
cutlery
• Prewash
• Wash 50 °C
• Rinses
• Dry
• TimeManager
• XtraDry
2)
• All
• Crockery, cut‐
lery, pots and
pans
• Prewash
• Wash from 45 °C
to 70 °C
• Rinses
• Dry
• XtraDry
3)
• Mixed soil
• Crockery, cut‐
lery, pots and
pans
• Prewash
• Wash 50 °C and
65 °C
• Rinses
• Dry
• TimeManager
• XtraDry
www.electrolux.com8

Programme Degree of soil
Type of load
Programme pha‐
ses
Options
4)
• Heavy soil
• Crockery, cut‐
lery, pots and
pans
• Prewash
• Wash 70 °C
• Rinses
• Dry
• XtraPower
• TimeManager
• XtraDry
• Normal or light
soil
• Delicate crock‐
ery and glass‐
ware
• Wash 45 °C
• Rinses
• Dry
• XtraDry
• Light soil
• Crockery and
cutlery
• Wash 55 °C
• Rinses
• XtraDry
5)
• Fresh soil
• Crockery and
cutlery
• Wash 60 °C
• Rinses
• XtraDry
1)
With this programme you have the most efficient use of water and energy consumption
for crockery and cutlery with normal soil. (This is the standard programme for test institutes).
2)
The appliance senses the degree of soil and the quantity of items in the baskets . It auto‐
matically adjusts the temperature and the quantity of water, the energy consumption and the
programme duration.
3)
With this programme you can wash a load with mixed soil. Very heavy soil in the lower
basket and normal soil in the upper basket. The pressure and the temperature of the water
in the lower basket are higher than in the upper basket.
4)
This programme has a high temperature rinsing phase for better hygiene results. During
the rinsing phase, the temperature stays at 70 °C for at least 10 minutes.
5)
With this programme you can wash a load with fresh soil. It gives good washing results in
a short time.
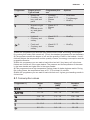
5.1 Consumption values
Programme
1)
Water
(l)
Energy
(kWh)
Duration
(min)
11.5 0.86 160
7.0 - 14 0.6 - 1.4 40 - 150
13.5 - 15 1.2 - 1.5 139 - 149
13.5 - 14.5 1.4 - 1.6 150 - 164
13 - 13.5 0.7 - 0.9 60 - 70
9.5 - 10 0.9 - 1.0 55 - 65
ENGLISH 9

Programme
1)
Water
(l)
Energy
(kWh)
Duration
(min)
9 0.8 30
1)
The pressure and the temperature of the water, the variations of the mains supply, the
options and the quantity of dishes can change the values.
5.2 Information for test
institutes
For all the necessary information for test
performance, send an email to:
Write down the product number (PNC)
that is on the rating plate.
6. SETTINGS
6.1 Programme selection mode
and user mode
When the appliance is in programme
selection mode it is possible to set a
programme and to enter the user mode.
In user mode, the following settings
can be changed:
• The activation or the deactivation of
the acoustic signal for end of
programme.
• The activation or deactivation of the
rinse aid empty notification.
• The level of rinse aid according to the
required dosage.
These settings will be saved until you
change them again.
How to set the programme
selection mode
The appliance is in programme selection
mode when the programme indicator
is on and the display shows the
programme duration.
When you activate the appliance, usually
it is in programme selection mode.
However, if this does not happen, you
can set the programme selection mode
in the following way:
Press and hold Reset until the appliance
is in programme selection mode.
6.2 The rinse aid dispenser
The rinse aid helps to dry the dishes
without streaks and stains.
The rinse aid is automatically released
during the hot rinse phase.
You can set the released quantity of
rinse aid between level 1 (minimum
quantity) and level 6 (maximum quantity).
Level 0 will deactivate the rinse aid
dispenser and no rinse aid will be
released.
Factory setting: level 4.
How to set the rinse aid level
The appliance must be in programme
selection mode.
1. To enter the user mode, press and
hold simultaneously Delay and
XtraDry until the indicators ,
and start to flash and
the display is blank.
2. Press TimeManager.
• The indicators and go
off.
• The indicator
continues to flash.
• The display shows the current
setting: e.g. = level 4.
– The levels of rinse aid are
from 0A to 6A.
www.electrolux.com10

– Level 0 = no rinse aid is
released.
3. Press TimeManager again and
again to change the setting.
4. Press the on/off button to confirm the
setting.
6.3 The rinse aid empty
notification
When rinse aid chamber is empty, the
rinse aid indicator is turned on notifying
to refill rinse aid. If you are using multi-
tabs containing rinse aid and you are
satisfied with the drying result, you can
deactivate the notification for refilling
rinse aid. However, we recommend that
you always use rinse aid for best drying
performance.
If you use standard detergent or multi-
tablets without rinse aid, activate the
notification to keep the rinse aid refill
indicator active.
How to deactivate the rinse aid
empty notification
The appliance must be in programme
selection mode.
1. To enter the user mode, press and
hold simultaneously Delay and
XtraDry until the indicators ,
and start to flash and
the display is blank.
2. Press MyFavourite.
• The indicators and
go off.
• The indicator
continues to
flash.
• The display shows the current
setting:
= the rinse aid empty
notification is always activated
(factory setting).
3. Press MyFavourite to change the
setting.
= the rinse aid empty notification is
deactivated.
4. Press the on/off button to confirm the
setting.
6.4 Acoustic signals
Acoustic signals sound when a
malfunction of the appliance occurs. It is
not possible to deactivate these acoustic
signals.
There is also an acoustic signal that
sounds when the programme is
completed. By default this acoustic signal
is deactivated but it is possible to
activate it.
How to activate the acoustic
signal for the end of
programme
The appliance must be in programme
selection mode.
1. To enter the user mode, press and
hold simultaneously Delay and
XtraDry until the indicators
,
and start to flash and
the display is blank.
2. Press Delay
• The indicators and
go off.
• The indicator
continues to
flash.
• The display shows the current
setting:
= Acoustic signal off.
3. Press Delay to change the setting.
= Acoustic signal on.
4. Press the on/off button to confirm the
setting.
6.5 MyFavourite
With this option you can set and save the
programme that you use more
frequently.
You can only save 1 programme. A new
setting cancels the previous one.
How to save the MyFavourite
programme
1. Set the programme that you want to
save
You can also set applicable options
together with the programme.
ENGLISH 11

2. Press and hold MyFavourite until the
segments of the programme bar flash
quickly.
How to set the MyFavourite
programme
Press MyFavourite.
• The indicators that are related to
the MyFavourite programme and
options come on.
• The display shows the duration of
the programme.
7. OPTIONS
Desired options must be
activated every time before
you start a programme.
It is not possible to activate
or deactivate options while a
programme is running.
Not all options are
compatible with each other.
If you have selected non
compatible options, the
appliance will automatically
deactivate one or more of
them. Only the indicators of
the options still active will
stay on.
7.1 XtraDry
Activate this option when you want to
boost the drying performance. With the
use of this option, the duration of some
programmes, water consumption and the
last rinse temperature can be affected.
The option XtraDry is not a permanent
option and must be selected at every
cycle.
How to activate XtraDry
Press XtraDry.
The related indicator comes on.
7.2 TimeManager
This option increases the pressure and
the temperature of the water. The
washing and the drying phases are
shorter.
The total programme duration decreases
by approximately 50%.
The washing results are the same as
with the normal programme duration. The
drying results can decrease.
How to activate TimeManager
Press TimeManager, the related
indicator comes on.
The display shows the updated
programme duration.
If the option is not applicable to the
programme:
• The programme bar does not come
on.
• The related indicator does not come
on or it flashes quickly for a few
seconds and then goes off.
7.3 XtraPower
This option increases the water pressure
in the prewash and washing phases.
The washing results are very good also
with heavy soiled loads.
How to activate XtraPower
Press Option until the indicator
comes on.
If the option is not applicable to the
programme, the related indicator does
not come on or it flashes quickly for a few
seconds and then goes off.
The display shows the updated
programme duration.
www.electrolux.com12

8. BEFORE FIRST USE
1. Fill the rinse aid dispenser.
2. Open the water tap.
3. Start a program to remove any
processing residuals that can still be
inside the appliance. Do not use
detergent and do not load the
baskets.
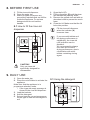
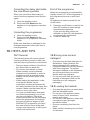
8.1 How to fill the rinse aid
dispenser
A
B
C
CAUTION!
Only use rinse aid
specifically designed for
dishwashers.
1. Open the lid (C).
2. Fill the dispenser (B) until the rinse
aid reaches the marking ''MAX''.
3. Remove the spilled rinse aid with an
absorbent cloth to prevent too much
foam.
4. Close the lid. Make sure that the lid
locks into position.
Fill the rinse aid dispenser
when the indicator (A)
becomes clear.
If you use multi-tablets and
the drying performance is
satisfactory, the rinse aid
refill indication can be
disabled.
We recommend to always
use rinse aid for better
drying performance, also in
combination with multi-
tablets containing rinsing
agent.
9. DAILY USE
1. Open the water tap.
2. Press the on/off button to activate the
appliance.
Make sure that the appliance is in
programme selection mode.
• If the rinse aid empty message is
shown fill the rinse aid dispenser.
3. Load the baskets.
4. Add the detergent.
5. Set and start the correct programme
for the type of load and the degree of
soil.
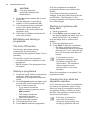
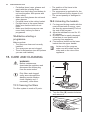
9.1 Using the detergent
A
B
C
ENGLISH 13

CAUTION!
Only use detergent
specifically designed for
dishwashers.
1. Press the release button (A) to open
the lid (C).
2. Put the detergent, in powder or
tablets, in the compartment (B).
3. If the programme has a prewash
phase, put a small quantity of
detergent on the inner part of the
appliance door.
4. Close the lid. Make sure that the lid
locks into position.
9.2 Setting and starting a
programme
The Auto Off function
This function decreases energy
consumption by deactivating
automatically the appliance when it is not
operating.
The function comes into operation:
• 5 minutes after the completion of the
programme.
• After 5 minutes if the programme has
not started.
Starting a programme
1. Press the on/off button to activate the
appliance. Make sure that the
appliance is in programme selection
mode.
2. Press Program again and again until
the indicator of the programme you
want to select comes on.
• If you want to select the
MyFavourite programme, press
MyFavourite.
• The display shows the
programme duration.
• The door indicator is on.
3. Set the applicable options.
4. Close the appliance door.
5. Press Start to start the programme.
Only the programme bar and the
programme duration are visible in the
display
If you want to see the programme
settings, press any button except for the
on/off button. The indicators of the
running programme and options come on
for a few seconds.
Starting a programme with
delay start
1. Set a programme.
2. Press Delay again and again until
the display shows the delay time you
want to set (from 1 to 24 hours).
Only the delay time is visible in the
display.
3. Close the appliance door.
4. Press Start to start the countdown.
• The delay indicator comes on.
• The countdown starts to decrease
with steps of 1 hour. Only the last
hour will decrease with steps of 1
minute.
If you want to see the
programme settings, press
any button except for the
on/off button. The indicators
of the programme and
options come on for a few
seconds.
When the countdown is completed, the
programme starts.
Opening the door while the
appliance operates
If you open the door while a programme
is running, the appliance stops. It may
affect the energy consumption and the
programme duration. When you close
the door, the appliance continues from
the point of interruption.
If the door is opened for
more than 30 seconds
during the drying phase, the
running programme will end.
www.electrolux.com14

Cancelling the delay start while
the countdown operates
When you cancel the delay start you
have to set the programme and options
again.
1. Open the appliance door.
2. Press and hold Reset until the
appliance is in programme selection
mode.
Cancelling the programme
1. Open the appliance door.
2. Press and hold Reset until the
appliance is in programme selection
mode.
Make sure that there is detergent in the
detergent dispenser before you start a
new programme.
End of the programme
When the programme is completed the
display shows 0:00. All the segments of
the programme bar are on with fixed
light.
All buttons are inactive except for the
on/off button.
1. Press the on/off button or wait for the
Auto Off function to automatically
deactivate the appliance.
If you open the door before the
activation of Auto Off, the appliance
is automatically deactivated.
2. Close the water tap.
10. HINTS AND TIPS
10.1 General
The following hints will ensure optimal
cleaning and drying results in daily use
and also help to protect the environment.
• Remove larger residues of food from
the dishes into the waste bin.
• Do not pre-rinse dishes by hand.
When needed, use the prewash
programme (if available) or select a
programme with a prewash phase.
• Always use the whole space of the
baskets.
• When loading the appliance, make
sure that the dishes can be
completely reached and washed by
the water released from the spray arm
nozzles. Make sure that items do not
touch or cover each other.
• You can use dishwasher detergent
and rinse aid separately or you can
use the multi-tablets. Follow the
instructions written on the packaging.
• Select the programme according to
the type of load and degree of soil.
With the ECO programme you have
the most efficient use of water and
energy consumption for crockery and
cutlery with normal soil.
10.2 Using rinse aid and
detergent
• Only use rinse aid and detergent for
dishwasher. Other products can
cause damage to the appliance.
• Detergent tablets do not fully dissolve
with short programs. To prevent
detergent residues on the tableware,
we recommend that you use the
tablets with long programs.
• Do not use more than the correct
quantity of detergent. Refer to the
instructions on the detergent
packaging.
10.3 Loading the baskets
• Only use the appliance to wash items
that are dishwasher-safe.
• Do not put in the appliance items
made of wood, horn, aluminium,
pewter and copper.
• Do not put in the appliance items that
can absorb water (sponges,
household cloths).
• Remove remaining food from the
items.
• Make soft the remaining burned food
on the items.
ENGLISH 15

• Put hollow items (cups, glasses and
pans) with the opening down.
• Make sure that cutlery and dishes do
not bond together. Mix spoons with
other cutlery.
• Make sure that glasses do not touch
other glasses.
• Put small items in the cutlery basket.
• Put light items in the upper basket.
Make sure that the items do not
move.
• Make sure that the spray arm can
move freely before you start a
programme.
10.4 Before starting a
programme
Make sure that:
• The filters are clean and correctly
installed.
• The spray arms are not clogged.
• There is dishwasher rinse aid (unless
you use multi- tablets).
• The position of the items in the
baskets is correct.
• The programme is applicable for the
type of load and for the degree of soil.
• The correct quantity of detergent is
used.
10.5 Unloading the baskets
1. For improved drying results with the
most efficient use of energy, open
the door by approximately 10cm at
the end of the program.
2. Allow the tableware to cool for 30 -
40 minutes.
3. Hot items can be easily damaged,
allow them to cool down before
removing from appliance.
4. First remove items from the lower
basket then the upper basket.
At the end of the program
water can still remain on the
sides and on the door of the
appliance.
11. CARE AND CLEANING
WARNING!
Before maintenance,
deactivate the appliance and
disconnect the mains plug
from the main socket.
Dirty filters and clogged
spray arms decrease the
washing results. Make a
check regularly and, if
necessary, clean them.
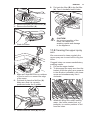
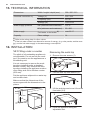
11.1 Cleaning the filters
The filter system is made of 3 parts.
C
B
A
1. Turn the filter (B) counterclockwise
and remove it.
www.electrolux.com16

2. Remove the filter (C) out of filter (B).
3. Remove the flat filter (A).
4. Wash the filters.
5. Make sure that there are no residues
of food or soil in or around the edge
of the sump.
6. Put back in place the flat filter (A).
Make sure that it is correctly
positioned under the 2 guides.
7. Reassemble the filters (B) and (C).
8. Put back the filter (B) in the flat filter
(A). Turn it clockwise until it locks.
CAUTION!
An incorrect position of the
filters can cause bad
washing results and damage
to the appliance.
11.2 Cleaning the upper spray
arm
We recommend to clean regularly the
upper spray arm to avoid soil to clog the
holes.
Clogged holes can cause unsatisfactory
washing results.
1. Pull out the upper basket.
2. To disengage the spray arm from the
basket, press the spray arm upwards
in the direction indicated by the lower
arrow and simultaneously turn it
clockwise.
3. Wash the spray arm under running
water. Use a thin pointed tool, e.g.
toothpick, to remove particles of soil
from the holes.
ENGLISH 17

4. To engage again the spray arm to
the basket, press the spray arm
upwards in the direction indicated by
the lower arrow and simultaneously
turn it counterclockwise until it locks
into place.
11.3 External cleaning
• Clean the appliance with a moist soft
cloth.
• Only use neutral detergents.
• Do not use abrasive products,
abrasive cleaning pads or solvents.
11.4 Internal cleaning
• Carefully clean the appliance,
including the rubber gasket of the
door, with a soft damp cloth.
• If you regularly use short duration
programmes, these can leave
deposits of grease and limescale
inside the appliance. To prevent this,
we recommend to run long duration
programmes at least 2 times per
month.
• To maintain the performance of your
appliance at its best, we recommend
to use monthly a specific cleaning
product for dishwashers. Follow
carefully the instructions on the
packaging of the product.
12. TROUBLESHOOTING
If the appliance does not start or it stops
during operation. Before you contact an
Authorised Service Centre, check if you
can solve the problem by yourself with
the help of the information in the table.
WARNING!
Repairs not properly done
may result in serious risk to
the safety of the user. Any
repairs must be performed
by qualified personnel.
With some problems, the display
shows an alarm code.
The majority of problems that can
occur can be solved without the need
to contact an Authorised Service
Centre.
www.electrolux.com18

Problem and alarm code Possible solution
You cannot activate the
appliance.
• Make sure that the mains plug is connected to the
mains socket.
• Make sure that there is no damaged fuse in the fuse
box.
The programme does not
start.
• Make sure that the appliance door is closed.
• If the delay start is set, cancel the setting or wait for
the end of the countdown.
• The appliance has started the procedure to recharge
the resin inside the water softener. The duration of
the procedure is approximately 5 minutes.
The appliance does not fill
with water.
The display shows .
• Make sure that the water tap is open.
• Make sure that the pressure of the water supply is
not too low. For this information, contact your local
water authority.
• Make sure that the water tap is not clogged.
• Make sure that the filter in the inlet hose is not clog‐
ged.
• Make sure that the inlet hose has no kinks or bends.
The appliance does not
drain the water.
The display shows .
• Make sure that the sink spigot is not clogged.
• Make sure that the drain hose has no kinks or bends.
The anti-flood device is on.
The display shows .
• Close the water tap and contact an Authorised Serv‐
ice Centre.
The appliance stops and
starts more times during
operation.
• It is normal. It provides optimal cleaning results and
energy savings.
The program lasts too
long.
• Select the TimeManager option to shorten the pro‐
gram time (if applicable).
• If the delayed start option is set, cancel the delay set‐
ting or wait for the end of the countdown.
The options of the program
have to be set again every
time.
• To save your favourite configuration use option My‐
Favourite.
Small leak from the appli‐
ance door.
• The appliance is not levelled. Loosen or tighten the
adjustable feet (if applicable).
• The appliance door is not centred on the tub. Adjust
the rear foot (if applicable).
The appliance door is diffi‐
cult to close.
• The appliance is not levelled. Loosen or tighten the
adjustable feet (if applicable).
• Parts of the tableware are protruding from the bas‐
kets.
ENGLISH 19

Problem and alarm code Possible solution
Rattling/knocking sounds
from inside the appliance.
• The tableware is not properly arranged in the bas‐
kets. Refer to basket loading leaflet.
• Make sure that the spray arms can rotate freely.
The appliance trips the cir‐
cuit-beaker.
• The amperage is insufficient to supply simultaneous‐
ly all the appliances in use. Check the socket amper‐
age and the capacity of the meter or turn off one of
the appliances in use.
• Internal electrical fault of the appliance. Contact an
Authorised Service Centre.
Refer to "Before first use",
"Daily use", or "Hints and
tips" for other possible
causes.
Once you have checked the appliance,
deactivate and activate the appliance. If
the problem occurs again, contact an
Authorised Service Centre.
For alarm codes not described in the
table, contact an Authorised Service
Centre.
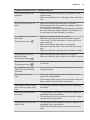
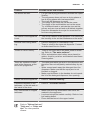
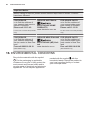
12.1 The washing and drying results are not satisfactory
Problem Possible cause and solution
Poor washing results. • Refer to "Daily use", "Hints and tips" and basket
loading leaflet.
• Use more intensive washing programmes.
• Clean spray arm jets and filter. Refer to "Care and
Cleaning".
Poor drying results. • Tableware has been left for too long inside a
closed appliance.
• There is no rinse aid or the dosage of rinse aid is
not enough. Set the rinse aid dispenser to a higher
level.
• Plastic items may need to be towel dried.
• For the best drying performance activate the option
XtraDry.
• We recommend to always use rinse aid, even in
combination with multi-tablets.
There are whitish streaks or
bluish layers on glasses and
dishes.
• The release quantity of rinse aid is too much. Ad‐
just the rinse aid level to a lower level.
• The quantity of detergent is too much.
There are stains and dry wa‐
ter drops on glasses and
dishes.
• The released quantity of rinse aid is not sufficient.
Adjust the rinse aid level to a higher level.
• The quality of the rinse aid can be the cause.
www.electrolux.com20
Page is loading ...
Page is loading ...
Page is loading ...
Page is loading ...
Page is loading ...
Page is loading ...
Page is loading ...
Page is loading ...
-
 1
1
-
 2
2
-
 3
3
-
 4
4
-
 5
5
-
 6
6
-
 7
7
-
 8
8
-
 9
9
-
 10
10
-
 11
11
-
 12
12
-
 13
13
-
 14
14
-
 15
15
-
 16
16
-
 17
17
-
 18
18
-
 19
19
-
 20
20
-
 21
21
-
 22
22
-
 23
23
-
 24
24
-
 25
25
-
 26
26
-
 27
27
-
 28
28


Electrolux ESF8725ROX User manual
- Category
- Dishwashers
- Type
- User manual
Ask a question and I''ll find the answer in the document
Finding information in a document is now easier with AI
Related papers
-
Electrolux GA60PLVC Quick start guide
-
Electrolux ESL4655RO User manual
-
Electrolux ESLP8815RA User manual
-
-
-
Electrolux ESF8735RKX User manual
-
-
-
-
Electrolux ECM1303W User manual