HP LASERJET 1005 PRINTER User manual
- Category
- Laser/LED printers
- Type
- User manual
This manual is also suitable for

use
hp LaserJet 1005 series

blank.fm Page 2 Thursday, October 10, 2002 9:27 AM

HP LaserJet 1005 Series Printer
User Guide

Hewlett-Packard Company
11311 Chinden Boulevard
Boise, Idaho 83714 U.S.A.
©
Copyright Hewlett-Packard Company 2003
All Rights Reserved. Reproduction,
adaptation, or translation without prior written
permission is prohibited, except as allowed
under the copyright laws.
A user of the Hewlett-Packard printer
associated with this user guide is granted a
license to: a) print hard copies of this user
guide for PERSONAL, INTERNAL or
COMPANY use subject to the restriction not to
sell, re-sell or otherwise distribute the hard
copies; and b) place an electronic copy of this
user guide on a network server, provided
access to the electronic copy is limited to
PERSONAL, INTERNAL users of the
Hewlett-Packard printer associated with this
user guide.
Publication number: Q2676-90906
Edition 1, 1/2003
Warranty
The information contained in this document is
subject to change without notice.
Hewlett-Packard makes no warranty of any
kind with respect to this information.
HEWLETT-PACKARD SPECIFICALLY
DISCLAIMS THE IMPLIED WARRANTY OF
MERCHANTABILITY AND FITNESS FOR A
PARTICULAR PURPOSE.
Hewlett-Packard shall not be liable for any
direct, indirect, incidental, consequential, or
other damage alleged in connection with the
furnishing or use of this information.
Trademark Credits
Microsoft
®
, MS Windows, Windows
®
, and
MS-DOS
®
are U.S. registered trademarks of
Microsoft Corporation.
E
NERGY STAR
®
is a U.S. registered mark of
the United States Environmental Protection
Agency.
Netscape is a U.S. trademark of Netscape
Communications Corporation.
Zenographics is a U.S. trademark of
Zenographics, Incorporated.
All other products mentioned herein may be
trademarks of their respective companies.

ENWW Content 3
Content
1 Getting started
Review the package contents . . . . . . . . . . . . . . . . . . . . . . . . . . . . . . . . . . . . . . . . . . . . . . . . . 8
Prepare the location . . . . . . . . . . . . . . . . . . . . . . . . . . . . . . . . . . . . . . . . . . . . . . . . . . . . . . . . 8
Regulate the environment . . . . . . . . . . . . . . . . . . . . . . . . . . . . . . . . . . . . . . . . . . . . . . . . . . . . 9
Install the printer software . . . . . . . . . . . . . . . . . . . . . . . . . . . . . . . . . . . . . . . . . . . . . . . . . . . . 9
Open the print cartridge door. . . . . . . . . . . . . . . . . . . . . . . . . . . . . . . . . . . . . . . . . . . . . . . . . 10
Remove the left cover . . . . . . . . . . . . . . . . . . . . . . . . . . . . . . . . . . . . . . . . . . . . . . . . . . . . . . 10
Connect the printer cable . . . . . . . . . . . . . . . . . . . . . . . . . . . . . . . . . . . . . . . . . . . . . . . . . . . 10
Prepare the print cartridge. . . . . . . . . . . . . . . . . . . . . . . . . . . . . . . . . . . . . . . . . . . . . . . . . . . 11
Install the print cartridge . . . . . . . . . . . . . . . . . . . . . . . . . . . . . . . . . . . . . . . . . . . . . . . . . . . . 11
Load the paper input tray. . . . . . . . . . . . . . . . . . . . . . . . . . . . . . . . . . . . . . . . . . . . . . . . . . . . 12
Connect the power cord . . . . . . . . . . . . . . . . . . . . . . . . . . . . . . . . . . . . . . . . . . . . . . . . . . . . 12
Troubleshooting the printer . . . . . . . . . . . . . . . . . . . . . . . . . . . . . . . . . . . . . . . . . . . . . . . . . . 13
Installation is complete . . . . . . . . . . . . . . . . . . . . . . . . . . . . . . . . . . . . . . . . . . . . . . . . . . . . . 13
2 Getting to know the printer
Identifying the printer’s components . . . . . . . . . . . . . . . . . . . . . . . . . . . . . . . . . . . . . . . . . . . 16
Status lights . . . . . . . . . . . . . . . . . . . . . . . . . . . . . . . . . . . . . . . . . . . . . . . . . . . . . . . . . . 17
Printer paper input tray . . . . . . . . . . . . . . . . . . . . . . . . . . . . . . . . . . . . . . . . . . . . . . . . . . 17
Printer media guides. . . . . . . . . . . . . . . . . . . . . . . . . . . . . . . . . . . . . . . . . . . . . . . . . . . . 18
Printer output paths. . . . . . . . . . . . . . . . . . . . . . . . . . . . . . . . . . . . . . . . . . . . . . . . . . . . . 18
Print cartridge door . . . . . . . . . . . . . . . . . . . . . . . . . . . . . . . . . . . . . . . . . . . . . . . . . . . . . 19
Turning the power off. . . . . . . . . . . . . . . . . . . . . . . . . . . . . . . . . . . . . . . . . . . . . . . . . . . . . . . 20
Understanding voltage conversions . . . . . . . . . . . . . . . . . . . . . . . . . . . . . . . . . . . . . . . . . . . 20
3 Media
Choosing paper and other media . . . . . . . . . . . . . . . . . . . . . . . . . . . . . . . . . . . . . . . . . . . . . 22
Optimizing print quality for media types. . . . . . . . . . . . . . . . . . . . . . . . . . . . . . . . . . . . . . . . . 22
Loading media into the paper input tray . . . . . . . . . . . . . . . . . . . . . . . . . . . . . . . . . . . . . . . . 23
Specific types of media. . . . . . . . . . . . . . . . . . . . . . . . . . . . . . . . . . . . . . . . . . . . . . . . . . 23
Printing transparencies and labels . . . . . . . . . . . . . . . . . . . . . . . . . . . . . . . . . . . . . . . . . . . . 24
Printing envelopes. . . . . . . . . . . . . . . . . . . . . . . . . . . . . . . . . . . . . . . . . . . . . . . . . . . . . . . . . 25
Printing letterhead and preprinted forms. . . . . . . . . . . . . . . . . . . . . . . . . . . . . . . . . . . . . . . . 26
Printing custom-sized media and card stock. . . . . . . . . . . . . . . . . . . . . . . . . . . . . . . . . . . . . 27
4 Printing tasks
Accessing the printer properties (driver) and help. . . . . . . . . . . . . . . . . . . . . . . . . . . . . . . . . 30
Printer properties (driver) . . . . . . . . . . . . . . . . . . . . . . . . . . . . . . . . . . . . . . . . . . . . . . . . 30
Printer properties online help . . . . . . . . . . . . . . . . . . . . . . . . . . . . . . . . . . . . . . . . . . . . . 30
Printing watermarks. . . . . . . . . . . . . . . . . . . . . . . . . . . . . . . . . . . . . . . . . . . . . . . . . . . . . . . . 31
Printing multiple pages on a single sheet of media (N-up printing) . . . . . . . . . . . . . . . . . . . . 31
Canceling a print job . . . . . . . . . . . . . . . . . . . . . . . . . . . . . . . . . . . . . . . . . . . . . . . . . . . . . . . 32
Understanding print quality settings . . . . . . . . . . . . . . . . . . . . . . . . . . . . . . . . . . . . . . . . . . . 32
Using EconoMode (Save Toner). . . . . . . . . . . . . . . . . . . . . . . . . . . . . . . . . . . . . . . . . . . . . . 32

4 Content ENWW
5 Managing the print cartridge
Using HP print cartridges. . . . . . . . . . . . . . . . . . . . . . . . . . . . . . . . . . . . . . . . . . . . . . . . . . . . 34
HP policy on non-HP print cartridges . . . . . . . . . . . . . . . . . . . . . . . . . . . . . . . . . . . . . . . 34
Storing print cartridges . . . . . . . . . . . . . . . . . . . . . . . . . . . . . . . . . . . . . . . . . . . . . . . . . . . . . 34
Print cartridge life expectancy . . . . . . . . . . . . . . . . . . . . . . . . . . . . . . . . . . . . . . . . . . . . . . . . 34
Recycling print cartridges . . . . . . . . . . . . . . . . . . . . . . . . . . . . . . . . . . . . . . . . . . . . . . . . . . . 34
Saving toner . . . . . . . . . . . . . . . . . . . . . . . . . . . . . . . . . . . . . . . . . . . . . . . . . . . . . . . . . . . . . 34
Redistributing toner . . . . . . . . . . . . . . . . . . . . . . . . . . . . . . . . . . . . . . . . . . . . . . . . . . . . . . . . 35
Changing the print cartridge . . . . . . . . . . . . . . . . . . . . . . . . . . . . . . . . . . . . . . . . . . . . . . . . . 36
6 Troubleshooting the printer
Finding the solution . . . . . . . . . . . . . . . . . . . . . . . . . . . . . . . . . . . . . . . . . . . . . . . . . . . . . . . . 38
Pages did not print . . . . . . . . . . . . . . . . . . . . . . . . . . . . . . . . . . . . . . . . . . . . . . . . . . . . . 38
Pages printed, but there was a problem . . . . . . . . . . . . . . . . . . . . . . . . . . . . . . . . . . . . . 38
Software is installed, but pages did not print. . . . . . . . . . . . . . . . . . . . . . . . . . . . . . . . . . 38
Status light patterns . . . . . . . . . . . . . . . . . . . . . . . . . . . . . . . . . . . . . . . . . . . . . . . . . . . . 39
Error messages on the screen . . . . . . . . . . . . . . . . . . . . . . . . . . . . . . . . . . . . . . . . . . . . 41
Media handling problems . . . . . . . . . . . . . . . . . . . . . . . . . . . . . . . . . . . . . . . . . . . . . . . . 42
Printed page is different than what appeared on screen. . . . . . . . . . . . . . . . . . . . . . . . . 43
Printer software problems. . . . . . . . . . . . . . . . . . . . . . . . . . . . . . . . . . . . . . . . . . . . . . . . 44
Improving print quality . . . . . . . . . . . . . . . . . . . . . . . . . . . . . . . . . . . . . . . . . . . . . . . . . . . . . . 45
Cleaning the printer. . . . . . . . . . . . . . . . . . . . . . . . . . . . . . . . . . . . . . . . . . . . . . . . . . . . . . . . 48
Cleaning the printer media path . . . . . . . . . . . . . . . . . . . . . . . . . . . . . . . . . . . . . . . . . . . 50
Clearing printer media jams. . . . . . . . . . . . . . . . . . . . . . . . . . . . . . . . . . . . . . . . . . . . . . . . . . 51
Changing the pickup roller. . . . . . . . . . . . . . . . . . . . . . . . . . . . . . . . . . . . . . . . . . . . . . . . . . . 53
Cleaning the pickup roller . . . . . . . . . . . . . . . . . . . . . . . . . . . . . . . . . . . . . . . . . . . . . . . . . . . 55
Changing the printer separation pad. . . . . . . . . . . . . . . . . . . . . . . . . . . . . . . . . . . . . . . . . . . 56
7 Service and support
Availability . . . . . . . . . . . . . . . . . . . . . . . . . . . . . . . . . . . . . . . . . . . . . . . . . . . . . . . . . . . . . . . 60
Hardware service. . . . . . . . . . . . . . . . . . . . . . . . . . . . . . . . . . . . . . . . . . . . . . . . . . . . . . . . . . 60
Extended warranty. . . . . . . . . . . . . . . . . . . . . . . . . . . . . . . . . . . . . . . . . . . . . . . . . . . . . . . . . 60
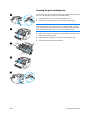
Guidelines for repacking the printer. . . . . . . . . . . . . . . . . . . . . . . . . . . . . . . . . . . . . . . . . . . . 60
Service information form . . . . . . . . . . . . . . . . . . . . . . . . . . . . . . . . . . . . . . . . . . . . . . . . . . . . 61
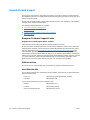
Hewlett-Packard Support. . . . . . . . . . . . . . . . . . . . . . . . . . . . . . . . . . . . . . . . . . . . . . . . . . . . 62
European Customer Support Center. . . . . . . . . . . . . . . . . . . . . . . . . . . . . . . . . . . . . . . . 62
Online services . . . . . . . . . . . . . . . . . . . . . . . . . . . . . . . . . . . . . . . . . . . . . . . . . . . . . . . . 62
Obtaining software utilities and electronic information . . . . . . . . . . . . . . . . . . . . . . . . . . 63
HP SupportPack . . . . . . . . . . . . . . . . . . . . . . . . . . . . . . . . . . . . . . . . . . . . . . . . . . . . . . . 63
Worldwide sales and service offices . . . . . . . . . . . . . . . . . . . . . . . . . . . . . . . . . . . . . . . . . . . 64
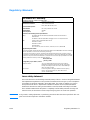
Appendix A Printer specifications
Specifications . . . . . . . . . . . . . . . . . . . . . . . . . . . . . . . . . . . . . . . . . . . . . . . . . . . . . . . . . . . . 66
FCC compliance . . . . . . . . . . . . . . . . . . . . . . . . . . . . . . . . . . . . . . . . . . . . . . . . . . . . . . . . . . 68
Environmental Product Stewardship Program. . . . . . . . . . . . . . . . . . . . . . . . . . . . . . . . . . . . 69
Protecting the environment. . . . . . . . . . . . . . . . . . . . . . . . . . . . . . . . . . . . . . . . . . . . . . . 69
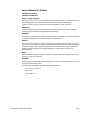
Material Safety Data Sheet . . . . . . . . . . . . . . . . . . . . . . . . . . . . . . . . . . . . . . . . . . . . . . . . . . 70
Regulatory statements. . . . . . . . . . . . . . . . . . . . . . . . . . . . . . . . . . . . . . . . . . . . . . . . . . . . . . 71
Laser safety statement . . . . . . . . . . . . . . . . . . . . . . . . . . . . . . . . . . . . . . . . . . . . . . . . . . 71
Declaration of Conformity . . . . . . . . . . . . . . . . . . . . . . . . . . . . . . . . . . . . . . . . . . . . . . . . 71
Laser statement for Finland . . . . . . . . . . . . . . . . . . . . . . . . . . . . . . . . . . . . . . . . . . . . . . 72

ENWW Content 5
Appendix B Media specifications
Printer media specifications. . . . . . . . . . . . . . . . . . . . . . . . . . . . . . . . . . . . . . . . . . . . . . . . . . 74
Supported media sizes (printer) . . . . . . . . . . . . . . . . . . . . . . . . . . . . . . . . . . . . . . . . . . . . . . 74
Guidelines for using media . . . . . . . . . . . . . . . . . . . . . . . . . . . . . . . . . . . . . . . . . . . . . . . . . . 75
Paper. . . . . . . . . . . . . . . . . . . . . . . . . . . . . . . . . . . . . . . . . . . . . . . . . . . . . . . . . . . . . . . . 75
Labels . . . . . . . . . . . . . . . . . . . . . . . . . . . . . . . . . . . . . . . . . . . . . . . . . . . . . . . . . . . . . . . 76
Transparencies . . . . . . . . . . . . . . . . . . . . . . . . . . . . . . . . . . . . . . . . . . . . . . . . . . . . . . . . 76
Envelopes . . . . . . . . . . . . . . . . . . . . . . . . . . . . . . . . . . . . . . . . . . . . . . . . . . . . . . . . . . . . 76
Card stock and heavy media. . . . . . . . . . . . . . . . . . . . . . . . . . . . . . . . . . . . . . . . . . . . . . 77
Appendix C Warranty and licensing
Hewlett-Packard software license agreement . . . . . . . . . . . . . . . . . . . . . . . . . . . . . . . . . . . . 80
Hewlett-Packard limited warranty statement . . . . . . . . . . . . . . . . . . . . . . . . . . . . . . . . . . . . . 81
Limited warranty for print cartridge life . . . . . . . . . . . . . . . . . . . . . . . . . . . . . . . . . . . . . . . . . 83
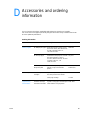
Appendix D Accessories and ordering information
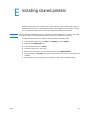
Appendix E Installing shared printers
Index

6 Content ENWW

ENWW 7
1
Getting started
This chapter provides the following instructions for installing the software and setting up
the printer:
● Review the package contents
● Prepare the location
● Regulate the environment
● Install the printer software
● Open the print cartridge door
● Remove the left cover
● Connect the printer cable
● Prepare the print cartridge
● Install the print cartridge
● Load the paper input tray
● Connect the power cord
● Troubleshooting the printer
● Installation is complete

8 Chapter 1 Getting started ENWW
Review the package contents
Make sure that all of the parts are included.
1 Printer
2 Print cartridge (in protective bag)
3 Getting Started Guide
4 Software and electronic user guide (on one CD-ROM)
5 Power cord
6 Paper input tray
Prepare the location
Place the printer on a sturdy, level surface. Allow space for ventilation. Allow space behind the
printer for output from the straight-through output door.
1
4
2
3
6
5
486 mm (19.1 in.)
253 mm (10.0 in.)

ENWW Regulate the environment 9
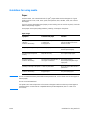
Regulate the environment
Do not place the printer in direct sunlight. Make sure that the environment is free from abrupt
temperature or humidity changes.
● Temperature – 50° to 91° F (10° to 32.5° C)
● Relative humidity – 20% to 80%
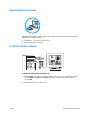
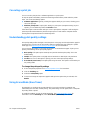
Install the printer software
To install the printer software from the CD
1 Select Install from the autorun screen. If autorun does not occur, in the Windows system
tray, click Start, click Run, type x:\setup (where x is the letter of the CD-ROM drive),
and click OK.
2 Follow the instructions on the screen.

10 Chapter 1 Getting started ENWW
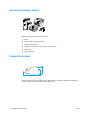
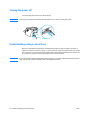
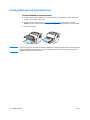
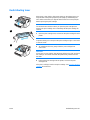
Open the print cartridge door
Firmly grasp the left and right sides, and pull the print cartridge door toward you.
Remove the left cover
Pull out on the rear of the cover, and rotate it away from the printer.
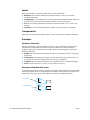
Connect the printer cable
Plug the printer cable into the printer (A). Plug the printer cable into the PC (B).

ENWW Install the print cartridge 11
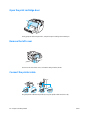
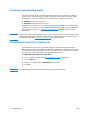
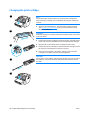
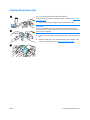
Prepare the print cartridge
Remove the print cartridge from the plastic bag. To remove the mylar tape, break the tab on the
left, and pull the tape completely out.
Install the print cartridge
Insert the print cartridge into the printer, making sure that the print cartridge is in position.

12 Chapter 1 Getting started ENWW
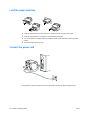
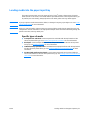
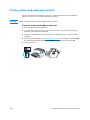
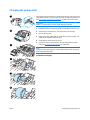
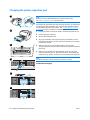
Load the paper input tray
1 Slide the paper input tray in and down at an angle until it fits securely in the printer.
2 Slide the media guides out and back to accommodate the media.
3 Place the media in the paper input tray. Slide the media guides until they are flush with the
media.
4 Install the paper input tray cover.
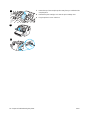
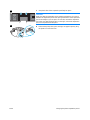
Connect the power cord
Plug the power cord into the printer (A). Plug the power cord into the power receptacle (B).
1
2
3
4
3

ENWW Troubleshooting the printer 13
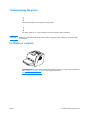
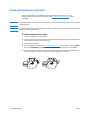
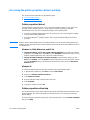
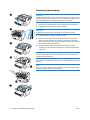
Troubleshooting the printer
If the top status light is on, the printer is ready to print.
If no status lights are on, check the power cord and the printer cable connections.
CAUTION Before you connect the cable to the printer, always unplug the printer. Otherwise, the printer might
be damaged.
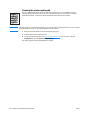
Installation is complete
Congratulations! Your HP LaserJet 1005 Series Printer is ready to use. If you had any problems,
see Troubleshooting the printer
or go to HP’s support Web site at
http://www.hp.com/support/lj100
5.

14 Chapter 1 Getting started ENWW


16 Chapter 2 Getting to know the printer ENWW
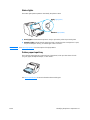
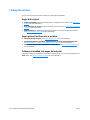
Identifying the printer’s components
1. Status lights
2. Paper input tray
3. Long media support for the paper input tray
4. Side media guides for the paper input tray
5. Print cartridge door
6. Output bin
7. Long media extension (output bin)
1
2
4
3
5
6
7
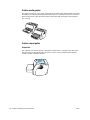
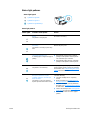
8. Media jam release levers
9. Straight-through output door
10. Power switch
11. Power receptacle
12. USB port
13. Parallel port
14. Left cover
11
12
10
8
9
13
14

ENWW Identifying the printer’s components 17
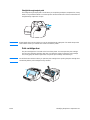
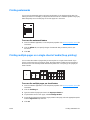
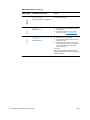
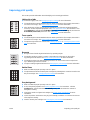
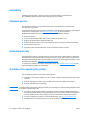
Status lights
The status lights produce patterns that identify the printer’s status.
● Ready light: Indicates that the printer is ready to print or the printer is processing data.
● Attention light: Indicates that the paper input tray is empty, the print cartridge door is open,
the print cartridge is missing, or another type of error occurred.
Note See Status light patterns for a description of the light patterns.
Printer paper input tray
The enclosed paper input tray, located in front of the printer, holds up to 250 sheets of 20 lb
(75 g/m
2
) paper, multiple envelopes, or other media.
See Media specifications
for more information about media types.
Ready light (green)
Attention light (amber)

18 Chapter 2 Getting to know the printer ENWW
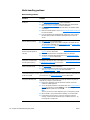
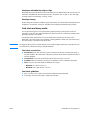
Printer media guides
The paper input tray has a long media support and side media guides. Media guides ensure that
the media is correctly fed into the printer and that the print is not skewed (crooked on the media).
When loading media, adjust the media guides to match the width and length of the media that
you are using.
Printer output paths
Output bin
The output bin is located on the top of the printer. Printed media is collected here in the correct
sequence when the straight-through output door is closed. Use the output bin when printing
normal and large, collated documents.
Page is loading ...
Page is loading ...
Page is loading ...
Page is loading ...
Page is loading ...
Page is loading ...
Page is loading ...
Page is loading ...
Page is loading ...
Page is loading ...
Page is loading ...
Page is loading ...
Page is loading ...
Page is loading ...
Page is loading ...
Page is loading ...
Page is loading ...
Page is loading ...
Page is loading ...
Page is loading ...
Page is loading ...
Page is loading ...
Page is loading ...
Page is loading ...
Page is loading ...
Page is loading ...
Page is loading ...
Page is loading ...
Page is loading ...
Page is loading ...
Page is loading ...
Page is loading ...
Page is loading ...
Page is loading ...
Page is loading ...
Page is loading ...
Page is loading ...
Page is loading ...
Page is loading ...
Page is loading ...
Page is loading ...
Page is loading ...
Page is loading ...
Page is loading ...
Page is loading ...
Page is loading ...
Page is loading ...
Page is loading ...
Page is loading ...
Page is loading ...
Page is loading ...
Page is loading ...
Page is loading ...
Page is loading ...
Page is loading ...
Page is loading ...
Page is loading ...
Page is loading ...
Page is loading ...
Page is loading ...
Page is loading ...
Page is loading ...
Page is loading ...
Page is loading ...
Page is loading ...
Page is loading ...
Page is loading ...
Page is loading ...
Page is loading ...
Page is loading ...
Page is loading ...
Page is loading ...
Page is loading ...
Page is loading ...
Page is loading ...
Page is loading ...
-
 1
1
-
 2
2
-
 3
3
-
 4
4
-
 5
5
-
 6
6
-
 7
7
-
 8
8
-
 9
9
-
 10
10
-
 11
11
-
 12
12
-
 13
13
-
 14
14
-
 15
15
-
 16
16
-
 17
17
-
 18
18
-
 19
19
-
 20
20
-
 21
21
-
 22
22
-
 23
23
-
 24
24
-
 25
25
-
 26
26
-
 27
27
-
 28
28
-
 29
29
-
 30
30
-
 31
31
-
 32
32
-
 33
33
-
 34
34
-
 35
35
-
 36
36
-
 37
37
-
 38
38
-
 39
39
-
 40
40
-
 41
41
-
 42
42
-
 43
43
-
 44
44
-
 45
45
-
 46
46
-
 47
47
-
 48
48
-
 49
49
-
 50
50
-
 51
51
-
 52
52
-
 53
53
-
 54
54
-
 55
55
-
 56
56
-
 57
57
-
 58
58
-
 59
59
-
 60
60
-
 61
61
-
 62
62
-
 63
63
-
 64
64
-
 65
65
-
 66
66
-
 67
67
-
 68
68
-
 69
69
-
 70
70
-
 71
71
-
 72
72
-
 73
73
-
 74
74
-
 75
75
-
 76
76
-
 77
77
-
 78
78
-
 79
79
-
 80
80
-
 81
81
-
 82
82
-
 83
83
-
 84
84
-
 85
85
-
 86
86
-
 87
87
-
 88
88
-
 89
89
-
 90
90
-
 91
91
-
 92
92
-
 93
93
-
 94
94
-
 95
95
-
 96
96


HP LASERJET 1005 PRINTER User manual
- Category
- Laser/LED printers
- Type
- User manual
- This manual is also suitable for
Ask a question and I''ll find the answer in the document
Finding information in a document is now easier with AI
Related papers
-
HP LASERJET1012 User manual
-
Xerox 1150 User manual
-
-
HP Compaq d530 Small Form Factor Desktop PC Installation guide
-
HP LaserJet 2200 Printer series Owner's manual
-
HP Printer 1018 User manual
-
-
-
HP LaserJet 1020 Owner's manual
-
