Page is loading ...

IOG 2875.00
1
Dear Customer Estimado Cliente
Thank you for selecting our product. We are confident we can fully satisfy Muchas gracias por elegir nuestro producto. Estamos seguros que podemos
your expectations by offering you a wide range of technologically advanced satisfacer completamente sus expectativas ofreciéndole una amplia variedad
products which directly result from our many years of experience in faucet de productos tecnológicamente avanzados que resultan direct
amente de
and fitting production. muchos años de experiencia en grifos y su producción apropiada.
ENGLISH
~
ESPANOL
Installation Instructions Instrucciones de Instalación
ACCESORIES
ACCESORIOS
For care, use soft towel with soap and water only! Under no
circumstances should you use any chemicals.
ATTENTION!
ATENCIÓN!
Para el cuidado, utilice solamente una toalla suave con jabón
y aqua! Bajo ninguna circunstancia no use productos químicos.
~
ESPANOL
For easy installation of your
GRAFF faucet you will need:
To complete the project, you
should:
gather the tools and all the parts
you will need,
prepare the mounting area,
connect the supply lines,
finally test.
You should have the following
tools:
Ø1/4" (6mm) carbide drill bit,
electric drill,
Phillips screwdriver,
level,
hex key (included in the box),
®
Teflon tape.
Para terminar el proyecto, usted
debe:
r
prepare el área para el montaje,
conecte las líneas de fuente,
finalmente pruebe,
Usted debe tener las herramientas
siguientes:
broca de carburo de Ø1/4" (6mm),
toladro electico,
desarmador Phillips,
nivel,
llave hexagonal (incluido en la caja),
®
cinta adhesiva de Teflon .
ENGLISH
to READ ALL the instructions completely before beginning,
to READ ALL the warnings, care and maintenance information.
Para la instalación fácil de su grifo de la GRAFF usted
necesitará:
LEER TODAS las instrucciones completamente antes de comenzar,
LEER TODA la información sobre las advertencias, cuidado y mantenimiento.
recolectar las herramientas y todas las piezas que usted necesitará,
G-9501 G-8652
G-9503 G-9502
Ø
G-9504
G-9601
G-8662
G-9604
G-9603 G-9602
5-15/16”
3-3/4”
Ø
4-5/16”
2-3/8”
Ø
2-11/16”
2-1/2”
2-3/8”
2-1/16”
1-11/16”
2-1/2”
2-3/8”
3-3/4”
6-5/8”
3-5/8”
2-3/8”
3-5/16”
3-3/4”
Ø
3-5/16”
2-3/8”
3-5/8”
4-1/2”
3-5/8”
4-1/2”
Ø
3-5/16”
Ø
4-5/16”
Ø
3-5/16”
3-5/8”
6-5/8”
5-5/8”
3-7/16”
1-15/16”
1-15/16”
1-15/16”
1-15/16”
1-15/16”
2-1/4”
2-3/16”
1-3/4”
1-3/8”
2-3/16”
3-7/16”
3-7/16”
(151mm)
(96mm)
(
Ø
110mm)
(61mm)
(
Ø
68mm)
(63mm)
(61mm)
(53mm)
(43mm)
(63mm)
(61mm)
(
96
mm)
(61mm)
(
Ø84
mm)
(
96
mm)
(
Ø84
mm)
(61mm)
(92mm)
(
Ø
110mm)
(
Ø84
mm)
(168mm)
(168mm)
(92mm)
(92mm)
(
Ø84
mm)
(115mm)
(115mm)
(92mm)
(57mm)
(88mm)
(68mm)
(143mm)
(55mm)
(45mm)
(35mm)
(88mm)
(57mm)
(50mm)
(55mm)
(88mm)
(50mm)
Rev. 3 June 2017

Installation Instructions Instrucciones de Instalación
ACCESORIES
ACCESORIOS
IOG 2875.00
2
G-9505
G-9507
G-9506
G-9605
G-9606
2-3/8”
Ø
2-11/16”
3-1/4”
7-13/16”
2-3/8”
Ø
2-11/16”
4-1/8”
2-3/4”
5-11/16”
3-5/16”
2-11/16”
3-5/16”
Ø
1/2”
5-11/16”
MIN 18-1/4”
MAX 18-9/16”
Ø
2-1/4”
1-15/16”
3”
7-5/8”
1-15/16”
Ø
2-1/4”
2-3/4”
3-7/8”
3”
(61mm)
(82mm)
(198mm)
(Ø13mm)
(464mm)
(471mm)
(68mm)
(Ø68mm)
(61mm)
(70mm)
(104mm)
(84mm)
(Ø57mm
(50mm)
(76mm)
(193mm)
(Ø57mm)
(128mm)
(70mm)
(99mm)
(Ø68mm)
(50mm)
(76mm)
(128mm)
(84mm)
Rev. 3 June 2017

Installation Instructions Instrucciones de Instalación
ACCESORIES
ACCESORIOS
IOG 2875.00
3
G-9508
G-9509
G-9607
G-9608
G-9609
MIN 23-13/16”
MAX 24-1/8”
MIN 30-1/4”
MAX 30-1/2”
Ø
2-11/16”
Ø
1/2”
3-5/16”
Ø
2-11/16”
3-5/16”
Ø
1/2”
Ø
1/2”
Ø
1/2”
Ø
1/2”
MIN 30-1/4”
MAX 30-1/2”
MIN 18-1/4”
MAX 18-9/16”
MIN 23-13/16”
MAX 24-1/8”
Ø
2-1/4”
Ø
2-1/4”
Ø
2-1/4”
3”
3”
3”
(605mm)
(612mm)
(84mm)
(768mm)
(774mm)
(464mm)
(471mm)
(57mm)
(Ø13mm)
(57mm)
(57mm)
(68mm)
(68mm)
(68mm)
(76mm)
(76mm)
(76mm)
(84mm)
(Ø13mm)
(Ø13mm)
(Ø13mm)
(Ø13mm)
(605mm)
(612mm)
(768mm)
(774mm)
Rev. 3 June 2017

Installation Instructions Instrucciones de Instalación
ACCESORIES
ACCESORIOS
IOG 2875.00
4
G-9510
1/2-14 NPT
MIN 5/16”
MAX 11/16”
2-3/8”
6-15/16”
4-3/16”
3-5/8”
~15-13/16”
2-1/2”
1-15/16”
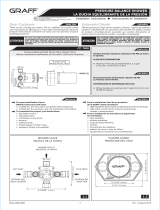
ENGLISH
1
2
3
4
5
6
7
8
9
10
11
12
WALL PLUG
MOUNTING SCREW
SHIM
MOUNTING PLATE
BASE PLATE
SET SCREW
KEY HEX 2mm
TOWEL HOOK
TOWEL BAR
WALL SUPPLY ELBOW
O-RING SEAL
STUB PIPE
ú
ESPANOL
1
2
3
4
5
6
7
8
9
10
11
12
ENCHUFE DE PARED
TORNILLO DE MONTAJE
CALCE
PLACA DE MONTAJE
PLACA DE BASE
TORNILLO DE FIJACIÓN
LLAVE ALLEN 2mm
GANCHO TOALLERO
TOALLERO
CODO DE SUMINISTRO
JUNTA TÓRICA
RACOR
1-3/16”
G-9501
G-9502
G-9503
G-9504
G-9505
G-9506
G-9510
G-8652
1
2
3
4
5
6
7
8
6
7
5
10
11
12
WATER SUPPLY
SUMINISTRO DE AGUA
1
2
1/4”
G-8643
G-8643
G1/2
G1/2
G-8653
G-9610
2-3/16”
1-5/8”
MIN 5/16”
MAX 11/16”
1/2-14 NPT
UNO DUE
FINEZZA
G-8643
UNO DUE
FINEZZA
G-9601
G-9602
G-9603
G-9604
G-9605
G-9606
G-9610
G-8662
(FINEZZA UNO)
(FINEZZA UNO)
(FINEZZA UNO)
(FINEZZA UNO)
(FINEZZA UNO)
(FINEZZA UNO)
(FINEZZA UNO)
1-15/16”
~15-13/16”
6-15/16”
3-5/8”
3-7/8”
(106mm)
(~402mm)
(176mm)
(92mm)
(61mm)
(50mm)
(63mm)
(98mm)
(50mm)
(42mm)
(55mm)
(8mm)
(18mm)
(8mm)
(18mm)
(176mm)
(~402mm)
(92mm)
(30mm)
(6mm)
KEY HEX 3mm13
LLAVE ALLEN 3mm12
Rev. 3 June 2017

Installation Instructions Instrucciones de Instalación
ACCESORIES
ACCESORIOS
4
1
INSTALLATION INSTRUCTION (fig. 1)
ENGLISH
1.
2.
3.
4.
5.
6.
INSTRUCCIONES DE INSTALACIÓN (dis. 1)
1.
2.
3.
4.
5.
6.
ESPANOL
~
Locate the product at a suitable position on the wall.
Loose the mounting screws to remove the mounting plate (4), and
mark the mounting plate (4) outline on the wall at the installation
location on the wall.
Mark the holes for the mounting screws (2). If the wall is finished
with ceramic tiles, try to mark the holes on the tile joints, if possible.
Drill the holes on the screw marks with a Ø1/4” (6mm) concrete bit.
Drill the Ø1/4” (6mm) mm holes, then install the wall plugs (1) flush
with the wall surface.
Fasten the mounting plate (4) with the shim (3) in the wall plugs.
Install the remaining components of the mounting plate (4)
according to the drawing: first, mount the base plate (5), followed
by the towel hook (8) so that the locating pins engage the respective
holes. Tighten the mounting screws (6).
Ponga el producto en una posición adecuada en la pared.
Quite los tornillos de montaje para extraer la placa de montaje (4)
y marque el contorno de la placa de montaje en la pared, en el lugar
previsto para la instalación.
Marque los agujeros para los tornillos de montaje (2). Si la pared
esta revestida de azulejos de cerámica intente marcar los agujeros
en las juntas de los azulejos en el caso de que sea posible.
Haga los agujeros en las marcas de los tornillos con una broca para
hormigón de Ø1/4” (6mm) . Haga los agujeros de Ø1/4” (6mm) , a contin-
ación instale los enchufes empotrados (1) en la superficie de la pared.
Apriete la placa de montaje (4) con el calce (3) en los enchufes de pared.
Instale los restantes componentes de la placa de montaje (4) de
acuerdo con el dibujo: en primer lugar monte la placa base (5) y a
continuación el gancho para la toalla (8) de forma que los pernos de
sujeción encajen en los respectivos agujeros. Apriete los tornillos de
montaje (6).
~
ESPANOL
2
1.
SUPPLY ELBOW INSTALLATION (fig. 2)
ENGLISH
1.
2.
TOMA DE AGUA DE PARED PARA DUCHA
DE MANO DE INSTALACIÓN (DIS. 1)
2.
ESPANOL
~
Wrap the R1/2” stub pipe (12) thread of the water supply elbow
with PTFE (Teflon) sealing tape, then screw the sealed thread into
the flush-mounted water inlet elbow with the 5/16” (8 mm) Allen
wrench.
Install the remaining components of the mounting plate (4)
according to the drawing: first, mount the base plate (5), followed
by the towel hook (8) on the stub pipe (12) so that the locating pins
engage the respective holes. Do not damage the o-rings (11).
Tighten the mounting screws (6).
Envuelva el hilo del tubo corto R1/2” (12) del codo de suministro
de agua con cinta de sellado PTFE (Teflón) , a continuación atornille
el hilo sellado al codo de entrada de agua empotrado con una llave
Allen de 5/16” (8 mm).
Instale los restantes componentes de la placa de montaje (4) de
acuerdo con el dibujo: en primer lugar monte la placa base (5) y a
continuación el gancho para la toalla (8) en el tubo corto (12) de
forma que los pernos de sujeción encajen en los respectivos
agujeros. No dañe las juntas tóricas (11). Apriete los tornillos de
montaje (6).
IOG 2875.00
5
1
2
3
4
5
6
7
9
1-3/16”
1/4”
G-9507
G-9508
G-9509
3
FINEZZA
UNO DUE
G-9607
G-9608
G-9609
(FINEZZA UNO)
(FINEZZA UNO)
(30mm)
(6mm)
C
A
D
B
13
Rev. 3 June 2017

Installation Instructions Instrucciones de Instalación
ACCESORIES
ACCESORIOS
3
TOWEL BAR INSTALLATION
INSTRUCTIONS (fig. 3)
ENGLISH
1.
2.
3.
4.
5.
6.
Locate the product at a suitable position on the wall.
Loose the mounting screws to remove the mounting plate (4), and
mark the mounting plate (4) outline on the wall at the installation
location on the wall.
Mark the holes for the mounting screws (2). If the wall is finished
with ceramic tiles, try to mark the holes on the tile joints, if possible.
Drill the holes on the screw marks with a Ø1/4” (6mm) concrete bit.
Drill the Ø1/4” (6mm) mm holes, then install the wall plugs (1) flush
with the wall surface.
Fasten the mounting plate (4) with the shim (3) in the wall plugs.
Install the remaining parts of the mounting plate (4) according to
the drawing: first, mount the base plate (5), followed by the towel
bar (9) so that the locating pins engage the respective holes.
Tighten the mounting screws (6).
If the installation proves to be difficult, you can adjust the towel bar
length (Fig. 4). First remove the screws (C) and remove the towel
hook (A). Loosen the screw (D) and adjust the towel bar (B)
length. Once adjusted, reassemble by following the disassembly in
the oppsite order, then mount the towel bar as shown in Item 6.
INSTRUCCIONES PARA LA INSTALACIÓN
DEL TOALLERO (Fig. 3)
1.
2.
3.
4.
5.
6.
ESPANOL
~
Ponga el producto en una posición adecuada en la pared.
Quite los tornillos de montaje para extraer la placa de montaje (4)
y marque el contorno de la placa de montaje en la pared, en el lugar
previsto para la instalación.
Marque los agujeros para los tornillos de montaje (2). Si la pared
esta revestida de azulejos de cerámica intente marcar los agujeros
en las juntas de los azulejos en el caso de que sea posible.
Haga los agujeros en las marcas de los tornillos con una broca para
hormigón de Ø1/4” (6mm) . Haga los agujeros de Ø1/4” (6mm) , a contin-
ación instale los enchufes empotrados (1) en la superficie de la pared.
Apriete la placa de montaje (4) con el calce (3) en los enchufes de pared.
Instale los restantes componentes de la placa de montaje (4) de acuerdo
con el dibujo: en primer lugar monte la placa base (5) y a c
ontinuación el
toallero (9) de forma que los pernos de sujeción encajen en los respectivos
agujeros. Apriete los tornillos de montaje (6).
Si la instalación resulta difícil puede ajustar la longitud del toallero (Fig.4).
Para empezar, extraiga los tornillos (C) y a continuación el gancho para la
toalla (A). Afloje el tornillo (D) y ajuste la extensión del toallero (B). Una
vez ajustada, vuelva a montar siguiendo el orden de desmontaje en sentido
contrario, a continuación monte el toallero como se muestra en el punto 6.
7.
7.
ENGLISH
~
ESPANOL
CARE AND MAINTENANCE
CUIDADO Y MANTENIMIENTO
Your Graff product is designed and engineered in accordance with the
highest quality and performance standards. Be sure not to damage the
finish during installation. Care should be given to the cleaning of this
product. Although its finish is extremely durable, it can be damaged by
harsh abrasives or polish. Never use abrasive cleaners, acids,
solvents, etc. to clean any Graff product. To clean, simply wipe
gently with a damp cloth and blot dry with a soft towel.
Su producto de la Graff esta diseńado y dirigido acuerdo con los
estándares de funcionamiento y calidad más altos. Este seguro no
dańar las terminaciones del grifo durante la instalación. Cuide el
producto manteniendolo siempre limpio. Aunque su acabado es
extremadamente durable, puede ser dańado por los abrasivos o
pulientes ásperos. Nunca utilice limpiadores abrasivos, ácidos,
solventes, el etc. para limpiar cualquier producto de la Graff.
Para limpiar, simplemente use un pańo húmedo y seque con una
toalla suave.
~
ESPANOL
ENGLISH
WARRANTY
GARANTÍA
Warranty conditions and warranty registration card are outlined on a
separate sheet.
Las condiciones de la garantía y la tarjeta del registro de la garantía se
encuentran en una pagina separada.
All dimensions and drawings are for reference only. For details, please refer to actual products.
Todas las dimensiones y dibujos sirven únicamente de referencia. Para consultar detalles, ver los productos.
IOG 2875.00
6
Rev. 3 June 2017
/