Page is loading ...

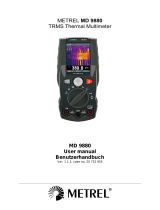
METREL MD 9910
Thermal camera
MD 9910
User manual
Ver. 1.0, code no. 20 752 957

2
Distributor:
METREL d.d.
Ljubljanska cesta 77
1354 Horjul
Slovenia
e-mail: [email protected]
web site: http://www.metrel.si/
Metrel GmbH
Mess und Prüftechnik
Orchideenstrasse 24
90542 Eckental -Brand
Germany
E-mail: [email protected]
Internet: http://www.metrel.de/
Metrel UK Ltd.
Test & Measurement
Unit 16, 1st Qtr Business Park
Blenheim Road
Epsom
Surrey
KT19 9QN,
Great Britain
E-mail: [email protected]
Internet: http://www.metrel.co.uk
© 2019 METREL
Mark on your equipment certifies that this equipment meets the requirements of the EC
(European Community) regulations concerning safety and electromagnetic compatibility.
No part of this publication may be reproduced or utilized in any form or by any
means without permission in writing from METREL

METREL MD 9910 Table of contents
3
Table of contents
1. Introduction ....................................................................................................... 4
2. Safety ............................................................................................................... 5
3. Quick Start Guide ............................................................................................. 6
4. Product Description .......................................................................................... 8
5. Operation .......................................................................................................... 9
6. Settings Menu ................................................................................................. 12
7. Image Browser ................................................................................................ 16
8. Technical specifications .................................................................................. 17

METREL MD 9910 Introduction
4
1. Introduction
The thermal camera is handheld imaging camera used for predictive maintenance,
equipment troubleshooting, and verification. Thermal images are displayed on the
LCD and can be saved to internal memories. With Bluetooth instant share function,
thermal images can be transferred to smart phone for analyse, share and report
quickly.
Key features:
80x80 pixel thermal imaging system.
Real temperature measurements in 6400 points.
Hot, Cold, Centre temperature tracking with crosshairs.
Large, easy-to-read, bright graphical TFT display.
50Hz thermal image frame rate.
Bluetooth image instant share and save with Android smart device.
Scene temperature range lock function.
With LED flashlight function.
Up to 8 hours work with rechargeable battery.
Smart, compact and rugged industrial design.

METREL MD 9910 Safety
5
2. Safety
Terms in this manual
WARNING identifies conditions and actions that could result in serious injury or
even death to the user.
CAUTION identifies conditions and actions that could cause damage or
malfunction in the instrument.
This symbol adjacent to another symbol, terminal or operating device indicates
that the operator must refer to an explanation in the Operating Instructions to avoid
personal injury or damage to the meter.
CAUTION
Improper use can damage the meter. Please read and understand all of the
information provided in this User Guide and other included documentation before
use.
Refer to the CAUTION statement label (shown below) for critical safety
information.

METREL MD 9910 Quick Start Guide
6
3. Quick Start Guide
First steps
The thermal camera is intuitive and easy to use. Here are the first steps (covered in
more detail later in this Guide):
Press and hold the Power button for >2 seconds to power ON. The startup
screen with logo will appear, followed by the thermal camera display. If the
battery requires recharging, refer to Section 3.2 below.
Point the lens toward the area or object of interest to view the thermal image.
Relative temperature is represented by colours: hot to cold (light to dark,
respectively). The IR Temperature reading represents the temperature of the
spot targeted by the crosshairs on screen. At the same time, the hot and cold
temperature points will displayed.
Short-press trigger to freeze/capture the image. Press “OK” to save image or
press “SHARE” to share the image with smart devices. Trigger again to discard
the image.
Press “LOCK” to lock current scene’s temperature range. Press “LOCK” again to
discard.
Powering and charging the thermal camera
Press and hold the power button for >2 seconds to switch the unit on.
A start-up screen (a thermal image with logo) will appear. The unit is now ready to
use. To switch off, press and hold power button for > 2 seconds.
Note that the Auto Power Off function switches the unit off automatically after a
programmed period of time.
With the power on, the battery status icon is located at the top left of the display.
When battery power is low, connect to an AC source or a computer USB port using
the supplied USB cable. USB port is located at top of the unit. See Figure 1.
When powered off, the battery charging is indicated with red LED. If the red LED is
off, it indicates the battery is full.
The unit can also be powered up and in use while charging in which case the
battery symbol is animated in the upper left.
Figure 1: USB port

METREL MD 9910 Quick Start Guide
7
The IR thermal Imaging Display
1. Current Emissivity setting
2. Battery indicator
3. Hot temperature point reading
4. Cold temperature point reading
5. Centre crosshair
6. Lowest temperature crosshair
7. Highest temperature crosshair
8. Image freeze/hold icon
9. Centre temperature point reading
10. “OK” button
11. “LOCK” button
12. Current temperature unit
13. Scene Low Temperature
14. Palette scale
15. Scene High Temperature
16. Time clock
Control Buttons and Trigger
Became familiar with the operation of the control buttons and the trigger as
described below.
POWER / BACK / LOCK button
Press and hold >2 seconds to cycle the meter power ON or OFF. Short press to exit
a menu screen. Also used to lock the current scene temperature range. Icon “ ” will
appear on the display above the button when this option is available.
OK / MENU button
Short press to access the Settings Menu, to confirm an edit, or to save an image
when prompted. An “OK” icon appears on the display above the button when this
option is available.
UP and DOWN navigation arrow buttons
Scroll the Settings Menu or select a menu item setting.
TRIGGER / LED flashlight
Short press will take a snapshot of the current image. Short press again to discard
image and return to live image mode. Long press will turn the LED flashlight on,
repeated long press will turn it off.
Measure, Save, Delete, and Review IR Images
Point the thermal camera toward the object or area of interest.
Pull the trigger to capture the image. Press OK / MENU button to save image.
Press POWER / BACK / LOCK button to share the image. “Save” and “share”
options are indicated on screen.
To review an image see the chapter Settings Menu..
To delete images from the internal memory, access the Settings Menu and
delete the stored images as described in the chapter Settings Menu..
WARNING: All images are deleted when the internal memory is erased.

METREL MD 9910 Product Description
8
4. Product Description
Front descriptions:
1. TFT Colour Display
2. MENU-OK button
3. UP-Down arrow buttons
4. Lanyard slot
5. POWER / BACK button
Back descriptions:
1. LED flashlight
2. IR Imaging lens
3. Trigger
Top descriptions
1. Battery Charging LED indicator
2. USB Battery charging interface
Display Icon and Indicator Description
Temperature units
Centre crosshair
Max temperature reading
Hot crosshair
Minimum temperature reading
Cold crosshair
Freeze image icon
Unlock icon
12h time format
Lock icon
IRON Color palette
Bluetooth icon
Battery empty Battery Full Battery charging

METREL MD 9910 Operation
9
5. Operation
Switch on the thermal camera
Press and hold for > 2 seconds to switch the unit ON. If the unit is sufficiently
charged, the meter will display the splash screen as shown below. The initial image
be displayed until the shutter resets the image. After the start-up delay, the unit will
show a real-time IR thermal image along with an IR temperature reading. If the
meter does not switch on, please refer to chapter Powering and charging the
thermal camera for information regarding battery charging. Lock/Unlock scene
temperature span
In default setting operation, the unit automatically adjusts image based on the
highest and the lowest temperature detected. This means the colour of an object
with the same temperature can vary depending on the environment. It can be
beneficial for image comparison to keep one temperature a single colour. The unit
can lock the current scene temperature range to make this possible.
If a new measured temperature will be higher than the locked range, it will appear
as white. If it will be lower, it will appear as black.
1. Point the unit at an object or an area of interest.
2. Short press the soft button “ ” to lock the scene temperature range; the
highlight colour of the temperature readings .will turn grey.
3. Short press the “ ” button again, it will unlock the scene temperature range.
Capture/Save images to the internal memory
The unit can store up to 20 images in the internal memory. The saved images can
be transferred to iOS, Android or PC device through Bluetooth.
1. Point the unit at an object or an area of interest.
2. Short press the trigger to capture the image; the image will freeze. Ikon
“Hold” will appear on screen.
3. If don’t want to save the current image, Short press the trigger again, the
image will unfreeze.
4. Press “SAVE” soft button to save the image.
Figure 2: Splash screen
Figure 4: Lock mode
Figure 3: Unlock mode

METREL MD 9910 Operation
10
5. If the image is stored successfully in the internal memory, the image will
unfreeze.
6. To erase/format internal memory please refer to chapter Settings details.
Share images using Bluetooth
Instant share
The unit has Bluetooth instant share function for quick analysis and for reporting the
thermal images. It works with corresponding Metrel Thermal Image Viewer software
for Android.
1. Enable the Bluetooth on the thermal camera.
2. Run Metrel Thermal Image Viewer software and connect unit with smart
device. Detailed reference can be found in chapter Bluetooth Connect.
3. Point the unit at an object or an area of interest.
4. Short press the trigger to capture the image; the image will freeze and the
“Hold” icon will appear. Short press the trigger again to unfreeze without
sharing.
5. Press SHARE soft button to transfer the image. If the image is transferred
successfully to the smart device, the image will unfreeze.
6. Save, analyse, share or report the thermal images on smart devices.
Transfer the saved images
1. Enable the Bluetooth on the unit.
2. Run Metrel Thermal Image Viewer software and connect unit with smart
device. Detailed reference can be found in chapter Bluetooth Connect.
3. To access the Image Review mode, open the Settings Menu (Chapter
Settings Men). Images are available to review or delete.
4. Press Trigger to share the current picture.
5. Press “SHARE” soft button to transfer the image
6. Save, analyse, share or report the thermal images on smart devices.
Figure 5: Hold image
Figure 6: Transferring image to Android or iOS device

METREL MD 9910 Operation
11
Review/Delete Images
Use the Review Mode to view or delete stored images.
1. To access the Settings Men to review and delete images.
2. Press the ESC button to exit the image review mode
3. To delete all images, please access the Settings Menu as described in
Section 6 and reformat the SD card.
Lens and camera field of view
This table lists the horizontal Filed of view (FOV), vertical FOV and IFOV for lens.
Focal Length
Horizontal FOV
Vertical FOV
IFOV
7.5mm
21°
21°
4.53mrad
IFOV (Instantaneous Field of View) is the size of the object caught in the single pixel
on the detector. It is given as spatial angle with unit mrad. It depends on the lens
and detector size.
DTS
theoretical
is distance to spot. It is the distance at which the given size spot can be
measured. At unity distance, the IFOV can be then directly translated to spot size.
For accurate temperature measurement, the spot has to be about three times the
size of DTS
theoretical
.
EXAMPLE:
The FOV of the camera is 21° x 21°, which is about 0.36x 0.36 rad. The detector
resolution is 80x80 pixel. Each pixel then covers about 4.53 mrad, which is IFOV.
This means that at 1m distance, each pixel is covering 4.53mm
2
actual space.
Temperature can be accurately measured on about 13.6mm
2
at 1m distance. If
turned the other way, DTS can be the calculated distance at which each pixel will
cover 1m
2
space, which is about 220m. Thermal camera uses 7,5mm lens, so
knowing the IFOV gives the pixel size of the detector as 34um.
Spot size 1m x 1m
80m
80m
220m
21°

METREL MD 9910 Settings Menu
12
6. Settings Menu
Using Settings Menu
Press OK button to open the Settings Menu, as show below.
Press UP / DOWN button to select menu item or change the value of currently
focused item.
Press OK button to enter the submenu or set focus on the current selected item.
Press ESC button to return to the previous menu.
If want to exit settings menu press ESC button in root menu.
Settings details
Palette mode
Thermal camera has five palettes, such as:
Press OK button to select one of the display colour palettes.
Temp Unit
To change, press OK button with this option in focus. The colour of set value will
change to black: . Use up and down arrows to change to °F and K, use either
ESC or OK button to exit focus state. The colour of set value will change back to
white: .
Measure
Press OK button to enter measure menu. Two selections are available: Temp.Max
and Temp. Min. Press OK button to set currently selected item on or off.
Temp.Max: This option enables thermal camera to automatically detect the
highest temperature point.
Temp.Min: This option enables thermal camera to automatically detect the
lowest temperature point.
Emissivity
Figure 7: Settings menu
Figure 8: Measure menu

METREL MD 9910 Settings Menu
13
Press OK button to set focus on this option. In focus state, use UP /DOWN button to
increase or decrease emissivity's value, use ESC or OK button to exit focus state.
The available range is 0.01 to 0.99 in 0.01 steps.
Language
Press OK button to enter language menu. Three options are available: Simplified
Chinese, Traditional Chinese and English. Use UP /DOWN button to select
language and use OK button to set.
Setup
Press OK button to enter setup menu. Three options are available: Bluetooth,
Brightness and Auto Off.
Bluetooth: Use OK button to set Bluetooth connectivity on or off.
Brightness: Press OK button to set focus on this option. In focus state, use
UP/DOWN button to change LCD's brightness, use ESC orOK button to exit
focus state. The available brightness's range is 100% to 10% in 10% steps.
Auto Off: Press OK button to set focus on this option. In focus state, use
UP/DOWN button to choose the time period after which the meter enters the
sleep mode.
Time/Date
Press OK button to enter time menu.
In this menu, year, month, day, hour, minute and time format can be set by focusing
them and using UP/DOWN arrow keys. The changes take effect after exiting
settings menus.
Figure 9: Language menu
Figure 10: Setup menu
Figure 11: Time/date menu

METREL MD 9910 Settings Menu
14
Memory
Press OK button to enter photo menu.
Two options are available:
Photo Review: Press OK button to enter image browser and exit settings
menu.
Delete Photo: Select to erase all the images. A dialog box will be displayed
as shown above.
WARNING: Selecting 'YES' will delete all the photos in 'RECORD' folder of the
memory card.
Information
Press OK button to enter system information menu. This menu contains software
version, hardware version and thermal camera version.
Factory Set
When Factory Set option is selected, the dialog box will be displayed as shown
above. Select 'YES' button to reset system parameters.
Bluetooth Connectivity
1. Turn on the Bluetooth function on the instrument.
Figure 12: Memory menu
Figure 15: Turn on Bluetooth
Figure 13: Information menu
Figure 14: Factory settings

METREL MD 9910 Settings Menu
15
2. Turn on the Bluetooth in the smart device, start the “Metrel Thermal Image
Viewer” application and enter into the home interface.
3. Press Connect Device icon on the Home interface. Bluetooth device list will
appear.
4. Touch the device name in the listed in Bluetooth devices list to connect the
device.
For detailed information about Metrel Thermal Image Viewer, please refer to Metrel
Thermal Image Viewer application help file. The application can be found on Google
Play store.
Figure 16: Edit the image

METREL MD 9910 Image Browser
16
7. Image Browser
In Image Browser mode, user can browse the pictures in the 'RECORD' folder of
the memory card. Press UP / DOWN button to select previous or next picture.
Press any other key to exit Image Browser mode.
1. Currently displayed picture's filename.
2. Current picture's index and total number of pictures.
3. Temperature of centre point.
4. Picture display area.
Screen capture
When in thermal imaging mode, use HOLD button to enter hold mode, as shown
below. Then press OK button to capture screen. After saving to memory is
completed, screen will exit hold mode.
Figure 17: Captured screen

MD 9910 Thermal camera Technical specifications
17
8. Technical specifications
Technical characteristics
Field of view (FOV)
21° x 21°
Minimum focus
distance
0.5m
Spatial resolution
(IFOV)
4.53mrad
Thermal
sensitivity/NETD
< 0.1°C @ +30°C (+86°F) / 100 mK
Image frequency
50Hz
Focus
Fixed focus
Focal length
7.5mm
Focal Plane Array /
FPA
Spectral range
Uncooled microbolometer / 8–14 µm
Object temperature
range
–20°C to +380°C
Accuracy
±2°C (±3.6°F) or ±2% of reading
(valid at environment temperature 10°C–35°C, object
temperature >0°C)
Display
2” color TFT LCD screen
Display resolution
240x320 pixels resolution
Battery
Rechargeable 3.7V 1300mA lithium ion battery (not user-
replaceable)
Battery life
6 hours typical
Battery Charger
5V 1A USB charger (not included)
Drop test
2 m
Connectivity
Bluetooth BLE4.0, thermal image transfer and data
logging
Save image format
Bitmap (.bmp) with 6400 points with temperature
analysis and emissivity
Operating Temperature
-10 to 45°C
Storage Temperature
-30 to 55°C
Allowable relative
humidity
< 80%HR
Storage temperature
-20° ÷ 60°C
Storage humidity
< 80%HR
/