
Welch Allyn Masted Scales with USB
Connection
Service Manual
Model 5002 Mobile Stand-On Scale
Model 5122 Stand-On Scale
Model 5702 Mobile Bariatric Scale
Model 6002 Wheelchair Scales
Model 6702/SP/W Mobile Bariatric Scale

© 2019 Welch Allyn. All rights are reserved. To support the intended use of the product described in this publication, the
purchaser of the product is permitted to copy this publication, for internal distribution only, from the media provided by
Welch Allyn. No other use, reproduction, or distribution of this publication, or any part of it, is permitted without written
permission from Welch Allyn. Welch Allyn assumes no responsibility for any injury to anyone, or for any illegal or improper
use of the product, that may result from failure to use this product in accordance with the instructions, cautions, warnings,
or statement of intended use published in this manual.
So
ftware in this product is Copyright 2019 Welch Allyn or its vendors. All rights are reserved. The
software is protected by United States of America copyright laws and international treaty provisions
applicable worldwide. Under such laws, the licensee is entitled to use the copy of the software incorporated with this
instrument as intended in the operation of the product in which it is embedded. The software may not be copied,
decompiled, reverse-engineered, disassembled, or otherwise reduced to human-perceivable form. This is not a sale of the
software or any copy of the software; all right, title, and ownership of the software remain with Welch Allyn or its vendors.
Fo
r information about any Welch Allyn product, contact your local Welch Allyn representative:
http://www.welchallyn.com/en/other/contact-us.html
DIR 80022692 Ver. B
Revision date: 2019-10
Welch Allyn, Inc.
4341 State Street Road
Skaneateles Falls, NY 13153 USA
www.welchallyn.com
Customer Support
Placing orders, checking on pricing, billing, or repairs
1.800.535.6663, Option 2, 1, 5
9am - 5pm EST
Mon - Fri

CONTENTS
Introduction .................................................................................................................................................. 5
Intended use ............................................................................................................................................. 5
Indications for use ..................................................................................................................................... 5
Intended clinical care environments......................................................................................................... 5
Symbols ..................................................................................................................................................... 5
Safety ............................................................................................................................................................ 8
General warnings and cautions ................................................................................................................ 8
Electrostatic discharge (ESD) .................................................................................................................. 10
Overview ..................................................................................................................................................... 10
Purpose and scope .................................................................................................................................. 10
Technical support services ...................................................................................................................... 11
Warranty Service ..................................................................................................................................... 11
Non-warranty service .............................................................................................................................. 12
Returning products ................................................................................................................................. 12
Recommended service intervals ................................................................................................................. 13
Battery replacement ............................................................................................................................... 14
Change the printer paper ........................................................................................................................ 14
Firmware Upgrade ...................................................................................................................................... 14
Firmware Upgrade Process ..................................................................................................................... 15
Firmware Verification ............................................................................................................................. 17
Scale setup .................................................................................................................................................. 18
Setup Mode ............................................................................................................................................. 18
Service Mode .......................................................................................................................................... 20
Factory Mode .......................................................................................................................................... 21
Calibration of Scale ................................................................................................................................. 24
USB Details ..............................................................................................................................................
25
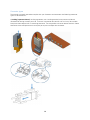
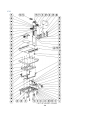
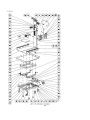
Disassembly and repair
......................................................................................................................... 26
Required tools: ........................................................................................................................................ 27
Connector types ...................................................................................................................................... 28

4
Mast Disassembly overview .................................................................................................................... 29
Base Disassembly overview .................................................................................................................... 51
5122 Disassembly.................................................................................................................................... 85
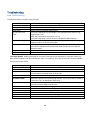
Troubleshooting ........................................................................................................................................ 105
Scale Troubleshooting ........................................................................................................................... 105
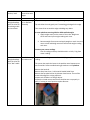
Symptoms and solutions ....................................................................................................................... 107
Appendix ................................................................................................................................................... 110
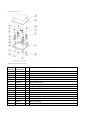
Shipping Packing Materials ................................................................................................................... 110
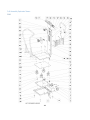
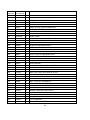
Full Assembly Exploded Views .............................................................................................................. 112
Fastener Reference (NOT TO SCALE) .................................................................................................... 133

5
Introduction
Intended use
The Welch Allyn Masted Scales are intended to be used by clinicians for weighing
patients up to 660 pounds (300 kg) for model 5122, up to 880 pounds (400 kg) for
models 5002 and 6002, and up to 1000 pounds (454 kg) for models 5702, 6702, 6702SP, and 6702W.
Indications for use
The Welch Allyn Masted Scales are used by clinicians to weigh patients. An optional
height gauge is available on some models.
Masted scales can make contact with a patient’s hands and feet. Contact duration is
intended to be limited to less than 30 seconds.
Intended clinical care environments
The Welch Allyn Masted Scales are intended to be used in the following clinical care environments:
• Hospitals
• Ambulatory care centers
• Physicians' offices
• Other professional medical facilities
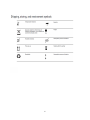
Symbols

6

7

8
Safety
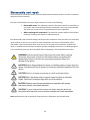
About warnings and cautions
Caution statements can appear on the Welch Allyn Masted Scales, the packaging, the
shipping container, or in this service manual.
The Welch Allyn Masted Scales are safe for patients and clinicians when used in
accordance with the instructions and caution statements presented in this service manual.
Before using the device, you must familiarize yourself with all cautions, with the steps to
power up the device, and with the sections of this service manual that pertain to your
use of the device. In addition to reviewing the general cautions presented in the next
section, you must also review the more specific cautions that appear throughout the
manual in conjunction with setup/startup, operation, and maintenance tasks. No additional
training is required.
o Failure to understand and observe any warning statement in this manual could lead
to patient injury or illness.
o Failure to understand and observe any caution statement in this manual could lead to
damage to the equipment or other property, or loss of patient data.
General warnings and cautions

9

10
Electrostatic discharge (ESD)
Electrostatic discharge is a sudden current flowing from a charged object to another
object or to ground. Electrostatic charges can accumulate on common items such as
foam drinking cups, cellophane tape, synthetic clothing, untreated foam packaging
material, and untreated plastic bags and work folders, to name only a few.
Electronic components and assemblies, if not properly protected against ESD, can be
permanently damaged or destroyed when near or in contact with electrostatically
charged objects. When you handle components or assemblies that are not in protective
bags and you are not sure whether they are static-sensitive, assume that they are static sensitive
and handle them accordingly.
o Perform all service procedures in a static-protected environment. Always use
techniques and equipment designed to protect personnel and equipment from
electrostatic discharge.
o Remove static-sensitive components and assemblies from their static-shielding bags
only at static-safe workstations------a properly grounded table and grounded floor mat------
and only when you are wearing a grounded wrist strap (with a resistor of at least 1
megaohm in series) or other grounding device.
o Use only grounded tools when inserting, adjusting, or removing static-sensitive
components and assemblies.
o Remove or insert static-sensitive components and assemblies only with scale
power turned off.
o Insert and seal static-sensitive components and assemblies into their original static shielding
bags before removing them from static-protected areas.
o Always test your ground strap, bench mat, conductive work surface, and ground
cord before removing components and assemblies from their protective bags and
before beginning any disassembly or assembly procedures.
Overview
Purpose and scope
This service manual is a reference for periodic preventive maintenance and corrective service procedures
for the Welch Allyn Masted Scales. It is intended for use only by trained and qualified service personnel.

11
Corrective service is supported to the level of field-replaceable units. These include circuit-board
assemblies and some subassemblies, and other parts.
Find instructions for functional testing and performance verification in the Calibration section below in
this manual.
This manual applies only to this device. For servicing of any other product, see the service manual for the
specific device.
Service work not described in this manual must be performed by qualified service
personnel at the factory or at an authorized Welch Allyn service center.
Technical support services
If you have a problem with the device that you cannot resolve, call the Welch Allyn Technical Support
Center nearest you for assistance. A representative will assist you in troubleshooting the problem and
will make every effort to solve the problem over the phone, potentially avoiding an unnecessary return.
Technical support is available 9am-5pm EST.
Welch Allyn offers the following technical support services:
o Telephone support
o Replacement service parts
o Product service
For information on any of these services, go to this site:
http://www.welchallyn.com/en/service-
support.html
Warranty Service
Welch Allyn will warranty the weight scale to be free of defects in material and workmanship and to
perform in accordance with manufacturer specifications for the period of one year from the date of retail
purchase.
The warranty period shall start on the date of purchase. The date of purchase is:
• The invoiced ship date if the device was purchased directly from Welch Allyn
• The date specified during product registration
• The date of purchase of the product from a Welch Allyn authorized distributor as documented
from a receipt from said distributor.
This warranty does NOT cover damages caused by misuse or abuse, including but not limited to:

12
o Failure caused by unauthorized repairs or modifications
o Damage caused by shock or dropping during transportation
o Damage caused by improper use of the power supply
o Failure caused by improper operation not consistent with the instructions stated in
this service manual.
Should this device require maintenance (or replacement at our option) under warranty, contact your local
Welch Allyn representative: http://www.welchallyn.com/en/other/contact-us.html
Non-warranty service
Welch Allyn Product Service Centers and Authorized Service Providers support non-warranty
repairs. Contact any Welch Allyn regional service center for pricing and service options.
Welch Allyn offers modular repair parts for sale to support non-warranty service. This
service must be performed only by qualified end-user biomedical/clinical engineers using
this service manual.
Returning products
When returning a product to Welch Allyn for service, ensure that you have the following information:
o Product name, model number, and serial number. This information may be found on
the product and serial number labels.
o A complete return shipping address.
o A contact name and phone number.
o Any special shipping instructions.
o A purchase-order number or credit-card number if the product is not covered by a
warranty.
o A full description of the problem or service request.
1. Contact Welch Allyn and request an RMA number.
Note: Welch Allyn does not accept returned products without an RMA.
2. Ship the device to Welch Allyn, observing these packing guidelines:
o Packaging - If you are returning a scale to a Welch Allyn Repair facility please ensure you use
proper packing materials. Contact Welch Allyn for details and part numbers for materials if
needed.
o Remove from the device the battery, power cords, and other ancillary products and
equipment, except those items that might be associated with the problem.
o Dispose of damaged or leaking batteries in an environmentally safe manner consistent with
local regulations.
3. Clean the device.
Note: To ensure safe receipt of your device by the service center and to expedite processing and
return of the device to you, thoroughly clean all residue from the device before you ship it to Welch Allyn.
For cleaning requirements, see the Cleaning instruction in the Directions for Use.
Welch Allyn thoroughly cleans all returned devices on receipt, but any device that cannot be adequately
cleaned cannot be repaired.

13
4. Write the Welch Allyn RMA number with the Welch Allyn address on the outside of the shipping
carton.
Recommended service intervals
To confirm that the device is functioning within the design specifications, perform periodic service as
indicated below. Customers can perform the basic functional verification and calibration procedures
referenced below by following the instructions in this manual.
Routinely perform the following preventive maintenance to keep your scale in working
order.
1. Check the calibration annually or as required.
2. Inspect the cradle for cracks or loose or missing hardware. Replace or repair if necessary
3. Inspect the scale’s enclosure for damage or loose or missing hardware. Replace or repair if
necessary.
4. Inspect the power adapter cable for abrasions or other sign of wear.
5. Do not expose the scale to excessive water or moisture.
6. Do not store the scale where heavy objects can be placed on it.
7. Replace the batteries annually or as required.
8. Do not service or perform any maintenance while the scale is in use with a patient.
9. When storing the scale, remove the batteries from the battery area. Batteries can corrode over a
period of time. Make sure to check the batteries before putting the scale back into use.

14
Battery replacement
Change the printer paper
Firmware Upgrade
While rarely performed, Welch Allyn may release a new version of firmware to support your
device. Updating your device firmware ensures you have access to the latest features,
fixes, and security updates.

15
NOTE: THIS FIRMWARE UPDATE PROCEDURE REQUIRES A LAPTOP/PC WITH WINDOWS 10 AND A USB
TYPE A TO B CABLE.
Firmware Upgrade Process
1. Obtain the required firmware file (exe file) from Welch Allyn.
2. Record the serial number of the Scale.
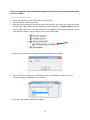
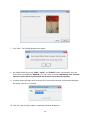
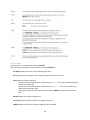
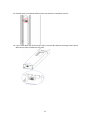
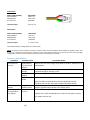
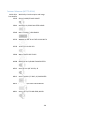
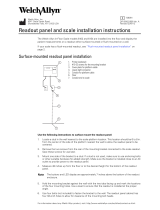
3. With the Scale powered OFF, connect the scale to the laptop/PC with a USB Type A to B cable. Check
that the Scale is being detected by the laptop/PC in Device Manager as “USB Serial Device” (Refer to
below image). (Note: If this is the first time the Scale is plugged into the laptop/PC, the driver will be
automatically installed.). The port number may or may not be COM9.
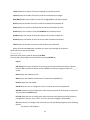
4. Double click on the exe file. A dialog box will appear (Refer to below image)
5. Click on the “Start” button shown in dialog box. Select the COM PORT to which the Scale is
connected. (Refer to image below as an example).
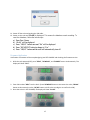
6. Click “Ok”. The following dialog box will appear.

16
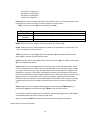
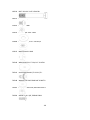
7. Click “Next”. The following dialog box will appear.
8. Go to BOOT MODE by pressing “ZERO”, “LB/KG”, and “POWER” button simultaneously. Once the
Scale powers up and displays “88.88.88”, click “OK” within 2 seconds. (IMPORTANT. If the 2 seconds
lapsed, the scale needs to be powered off and the above steps need to be repeated.)
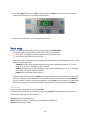
9. Firmware update will begin when the above step is successfully executed, and the below dialog box
will appear. Wait for it to complete.
10. Click “OK” when firmware update is completed (see below dialog box).

17
11. Power off the scale and unplug the USB cable.
12. Power on the scale and "Err db" is displayed. This means the database needs resetting. To
reset the database, follow the below steps.
a.) Press Zero 5 times
b.) “db rSt” will be displayed.
c.) Press “LB/KG” button once and “No” will be displayed
d.) Press “RE WEIGH” button to change to “Yes”.
e.) Press “LB/KG” button and the scale will automatically turn off.
Firmware Verification
Verification of firmware will be completed going into SETUP MODE and checking the firmware version.
1. With the scale powered OFF, press “ZERO”, “RE WEIGH”, and “POWER” button simultaneously. The
display will show “0000”.
2. Enter PIN number “9821” into the Scale. (Press ‘RE WEIGH’ button to increment the value, ‘RECALL’
button to decrement the value, ‘LB/KG’ button to shift to the next digit or to confirm the PIN).
3. Once the scale is in SETUP MODE, the display will show “Set-UP”.

18
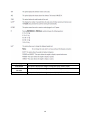
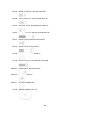
4. Press the “LB/KG” button until “SOFt” is displayed. Press “LB/KG” one more time; the firmware
version will be shown (U X.X.X). (See below reference.)
5. Record the firmware version in section 4, Device Record.
Scale setup
You can customize the scale to best suit your needs using the Custom Modes.
The custom modes on the scale are Setup, Service, Factory, Calibration.
1. Press ‘Zero’, ‘Reweigh’ and ‘Power’ together to enter Custom mode.
2. Key in the correct PIN to access the mode.
Some menu items include editors. These can be interacted with using the following keys: (e.g. Show
‘0000’ as initial 4 digits PIN):
REWEIGH: Increment the selected character. If the current selected character is “9”, it shall
wrap to “0” when the “Reweigh” button is pressed.
RECALL: Decrement the selected character. If the current selected character is “0”, it shall wrap
to “9” when the “Recall” button is pressed.
LB/KG: Move to the next character/enter.
Keying through the menu with the LB/KG key will show the option, then the current setting for that
option. To change a setting select the current setting for the desired option and use the REWEIGH
key to increment or move to the next setting option, or the
RECALL key to decrement or move to the
previous setting option. Set the selected option and move to the next setting with the LB/KG key.
Setup Mode
Device will enter setup mode by entering PIN 9821.
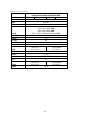
The scale will cycle through these parameters by pressing LB/KG key. Some of these options may be
turned off or on through the Factory Mode.
SOFt displays the software version.
dAtE displays the software release date in US date format (MM.DD.YY).
SCALE displays the scale model.

19
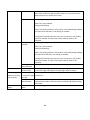
UI Display Light ON
KILOGRAMS
This option displays the weight in kilograms (0.0). Default is On
KILOGRAMS and
POUNDS
This option displays the weight in pounds and kilograms. Default is On
POUNDS
This option displays the weight in pounds (0.0). Default is OFF

20
Power off the scale to exit Set-up Mode
Service Mode
Device will enter service mode by entering PIN 4351.
The scale will cycle through these parameters by pressing LB/KG key.
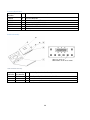
n¯vv (Mvv) displays the current mV/V reading on the scale.
A-d displays the current weight. ‘Zero’ may be pressed to perform a user zero.
tESt displays an LED test sequence.
Displays an LED test sequence for numbers from 0, 1, 2, ----, 9 for one cycle with long beep
and all annunciators On
Displays an LED test sequence for numbers from 0., 1., 2., ----., 9. for one cycle with long
beep and all annunciators OFF
Sequences continue one after other until user presses LB/KG to move to the next menu
item.
PR-OnS displays the number of power ons.
PC-rC displays the number of power ons using the recall key.
COUntS displays the number of times a weight has been acquired.
Page is loading ...
Page is loading ...
Page is loading ...
Page is loading ...
Page is loading ...
Page is loading ...
Page is loading ...
Page is loading ...
Page is loading ...
Page is loading ...
Page is loading ...
Page is loading ...
Page is loading ...
Page is loading ...
Page is loading ...
Page is loading ...
Page is loading ...
Page is loading ...
Page is loading ...
Page is loading ...
Page is loading ...
Page is loading ...
Page is loading ...
Page is loading ...
Page is loading ...
Page is loading ...
Page is loading ...
Page is loading ...
Page is loading ...
Page is loading ...
Page is loading ...
Page is loading ...
Page is loading ...
Page is loading ...
Page is loading ...
Page is loading ...
Page is loading ...
Page is loading ...
Page is loading ...
Page is loading ...
Page is loading ...
Page is loading ...
Page is loading ...
Page is loading ...
Page is loading ...
Page is loading ...
Page is loading ...
Page is loading ...
Page is loading ...
Page is loading ...
Page is loading ...
Page is loading ...
Page is loading ...
Page is loading ...
Page is loading ...
Page is loading ...
Page is loading ...
Page is loading ...
Page is loading ...
Page is loading ...
Page is loading ...
Page is loading ...
Page is loading ...
Page is loading ...
Page is loading ...
Page is loading ...
Page is loading ...
Page is loading ...
Page is loading ...
Page is loading ...
Page is loading ...
Page is loading ...
Page is loading ...
Page is loading ...
Page is loading ...
Page is loading ...
Page is loading ...
Page is loading ...
Page is loading ...
Page is loading ...
Page is loading ...
Page is loading ...
Page is loading ...
Page is loading ...
Page is loading ...
Page is loading ...
Page is loading ...
Page is loading ...
Page is loading ...
Page is loading ...
Page is loading ...
Page is loading ...
Page is loading ...
Page is loading ...
Page is loading ...
Page is loading ...
Page is loading ...
Page is loading ...
Page is loading ...
Page is loading ...
Page is loading ...
Page is loading ...
Page is loading ...
Page is loading ...
Page is loading ...
Page is loading ...
Page is loading ...
Page is loading ...
Page is loading ...
Page is loading ...
Page is loading ...
Page is loading ...
Page is loading ...
Page is loading ...
Page is loading ...
Page is loading ...
-
 1
1
-
 2
2
-
 3
3
-
 4
4
-
 5
5
-
 6
6
-
 7
7
-
 8
8
-
 9
9
-
 10
10
-
 11
11
-
 12
12
-
 13
13
-
 14
14
-
 15
15
-
 16
16
-
 17
17
-
 18
18
-
 19
19
-
 20
20
-
 21
21
-
 22
22
-
 23
23
-
 24
24
-
 25
25
-
 26
26
-
 27
27
-
 28
28
-
 29
29
-
 30
30
-
 31
31
-
 32
32
-
 33
33
-
 34
34
-
 35
35
-
 36
36
-
 37
37
-
 38
38
-
 39
39
-
 40
40
-
 41
41
-
 42
42
-
 43
43
-
 44
44
-
 45
45
-
 46
46
-
 47
47
-
 48
48
-
 49
49
-
 50
50
-
 51
51
-
 52
52
-
 53
53
-
 54
54
-
 55
55
-
 56
56
-
 57
57
-
 58
58
-
 59
59
-
 60
60
-
 61
61
-
 62
62
-
 63
63
-
 64
64
-
 65
65
-
 66
66
-
 67
67
-
 68
68
-
 69
69
-
 70
70
-
 71
71
-
 72
72
-
 73
73
-
 74
74
-
 75
75
-
 76
76
-
 77
77
-
 78
78
-
 79
79
-
 80
80
-
 81
81
-
 82
82
-
 83
83
-
 84
84
-
 85
85
-
 86
86
-
 87
87
-
 88
88
-
 89
89
-
 90
90
-
 91
91
-
 92
92
-
 93
93
-
 94
94
-
 95
95
-
 96
96
-
 97
97
-
 98
98
-
 99
99
-
 100
100
-
 101
101
-
 102
102
-
 103
103
-
 104
104
-
 105
105
-
 106
106
-
 107
107
-
 108
108
-
 109
109
-
 110
110
-
 111
111
-
 112
112
-
 113
113
-
 114
114
-
 115
115
-
 116
116
-
 117
117
-
 118
118
-
 119
119
-
 120
120
-
 121
121
-
 122
122
-
 123
123
-
 124
124
-
 125
125
-
 126
126
-
 127
127
-
 128
128
-
 129
129
-
 130
130
-
 131
131
-
 132
132
-
 133
133
-
 134
134
-
 135
135
-
 136
136


Welch Allyn 6702W Series User manual
- Type
- User manual
- This manual is also suitable for
Ask a question and I''ll find the answer in the document
Finding information in a document is now easier with AI
Related papers
-
Welch Allyn 6702W Series User manual
-
-
 Welch Allyn 4802D User manual
-
-
-
 Welch Allyn 5125 User manual
-
 Welch Allyn 4802D User manual
-
 Welch Allyn 6102 Directions For Use Manual
-
 Welch Allyn CONNEX User manual
-
 Welch Allyn 6102 Installation guide


Other documents
-
Hill-Rom Scale-Tronix Portable Scales Installation guide
-
 ANKO Glass Electronic Personal Scale Operating instructions
-
CableWholesale 30CV-41100 Datasheet
-
-
Hill-Rom Green Series 777 Wall Transformer User manual
-
-
Mellerware Munich 20502 User manual
-
Spectrum Industries 55266B Assembly Instructions
-
Alpha Battery Heater Mats Owner's manual
-
 Welch Allyn Medical Diagnostic Equipment Medical Alarms 6000 User manual

