Boss Audio Systems 758DBI User manual
- Category
- Car media receivers
- Type
- User manual
This manual is also suitable for


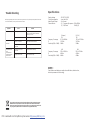
Specifications
NOTE:
Specifications and designaresubject to modification,withoutnotice,
due to improvements in technology.
Supply voltage : 12V DC(11V-15V)
Current consumption : Lessthan 10A
Audio Signal Output : 2chline out
Characteristics : (1) FrequencyResponse: 20Hz-20KHz
S/N Ratio: 50 dB(JIS)(2)
(Europe) (U.S.A.)
FM FM
Frequency Coverage:
IF 10.7Mhz 10.7Mhz
Sensitivity (S/N = 30dB) : 20dBu 20dBu
AM AM
Frequency Coverage:
IF 450 450
Sensitivity(S/N = 20dB) : 45dBu 45dBu
87.5 to 108Mhz 87.5 to 107.9Mhz
522 to 1620Khz 530 to1710Khz
Khz Khz
TroubleShooting
Beforegoingthrough thechecklist,check wiringconnection.Ifany of theproblems persistafter check
list has been made, consult your nearest service dealer.
Ifatanytimeinthefutureyoushouldneedtodisposeofthisproductpleasenote
tha t Wast e elec tric al pro du cts s hou ld n ot b e dispo sed of with house hol d waste.
Ple ase recyc le where facili ties exist. C heck w ith yo ur Lo cal Au thorit y or retaile r for
rec y cling advi ce. (Waste El ectri c al a nd Elect ron ic Equ ip ment D irect i ve)
Symptom
No power
Cause
The fuse is blown.
Volume is in minimum.
No sound
The antenna cable is not
connected.
The signal are too weak.
Insert the antenna cable firmly.
Select a station manually.
The radio does not
work.
Theradiostation
automatic selection
does not work.
Wiring is not properly
connected.
Adjust volume to a desired level.
Check wiring connection.
Replace the fuse.
The car ignition is not on.
If the power supply is properly connected
to the car accessory terminal, switch the
ignition key to " ACC "
Solution
PDF created with FinePrint pdfFactory trial version http://www.pdffactory.com

Page 1
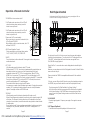
1. VOLUME UP/DOWN K NOB (turn)&AUDIO MODE SELE CTOE (push)
In normal mode,use this knobto increaseor decreasethe volumelevel.
To access the varioussound parameterspush the knob (like a button) to cycle
through thefollowingadjustable settings:
Push and holdthe knob(likea button) for more than 2 seconds to turn on
TAON/TAOFF, then push it and repeatedly to select TASEEK/TAALARM,
PISOUND/PI MUTE, RETUNE S/RETUNEL,MASK DPI/MASKALL, BEEPON
/BEEPOFF, USER SET(FLAT,CLASSIC, ROCK, POP), VOLLAST/ VOLDEFA,
STEREO/MONO ,LOUND ON/LOUND OFF,
DX/LOCAL , CLKON/CLK OFF,CLK12/CLK 24mode.
VOLUME -> BASS ->TREBLE -> BALANCE -> FADER
Use theknob to increaseor decrease the settingsfor Volume, Bass, Treble,
Balanceand Fader.
In each mode, the waiting time is about 5seconds, andthe timewaitingtime
is over, it returns to the last display mode.
The control mode of E.VOLis operated with following numeric display.
- VOL:(MIN)00, 01,......46, 47(MAX).
- BASS/TRE: -07, -06,...,00,...+06,+07
- BAL: 0LR9, 1LR9, ..., 9LR9,..., 9LR1, 9LR0
- FAD: 0FR9,1FR9, ..., 9FR9,...,9FR1, 9FR0
(inRADIO mode)
(inRADIO mode)
Use theknob to increaseor decreasethe settingsfor thesefunctions.
Press POWER to turn unit on. Press the button to MUTE the audio. Press and
hold POWERto turnit off.
Press this button repeatedly to cycle through the audio inputsources:
BLUETOOTH >AUX >TUNER > USB > CARD > IPOD
2. POWER/MUT E
3. MODE (Input Select)
Please note:
iPod Mode canonly beselected if an iPod is present inthe dock.
General and Radio Controls
1911
2
573
10 1268 4
Page 10
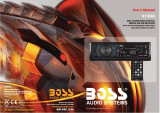
Setting Mode
You can make changes to the system setting in the following area:
Radio FrequencyRange + Enable/DisableAUX In+ Clock Format
- Radio Settings
The unit can operate on several different frequency ranges.Please see
the followingfor these ranges.
-AUX Input Enable/Disable
Press DOWNARROW to move between Enable and Disable modes.
When the selectionhas been made, press ENTER tosave it andmove to
next setting area.
- Clock Format (12-hour or 24-hour)
Press DOWNARROW to move between
press ENTER to save it and turn off this unit.
12-houror 24-hour format,
To enter settingmode, input the following command by pressing remote
keys 8, DOWN DIRECTION KEY, 9, ENTER""
To change the range to suit your location,press DOWNARROWunit
the desired frequency range is hight lighted. The press ENTER
to saveit and move to next setting area.
The display will show TESTMOD breiflyto indicate youare in
system setting area and thenautomatically change to Radio Frequency
selection mode.At anytime, youcan pressthe to stepthrough
the above areas. When you are ready to leave the System Setting area,
press ENTER.The unitwill reboot to initialize with the newsetting.
""
DOWNARROW
BANDNAME FREQUENCYRANGE
AMERICA 1 FM:87.5-107.9MHz AM:530-1710kHz
AMERICA 2 FM:87.5-108MHz AM:520-1620kHz
AMERICA 3 FM:87.5-107.9MHz AM:530-1620kHz
EUROPE FM:87.5-108MHz AM:522-1620kHz
MIDEAST FM:87.5-108MHz AM:531-1602kHz
AUST(AUSTRALIA) FM:87.5-108MHz AM:522-1710kHz
RUSSIA FM:65.0-108MHz AM:522-1620kHz
IfAUX Input is disable in System Settings, any input connected will not
be played.
AUX IN
1
MODE
2
RPT
3
RDM
4
5
-10
ENTER
TA
AF
6
+10
PDF created with FinePrint pdfFactory trial version http://www.pdffactory.com

Page 11Page 2
This jack is a convenient wayto play music from an MP3music playersuch
as an ipod through yourcar audio.
Simplyconnect the headphone output of theMP3 playerto this input jack, and
press MODE button to selectAUX as input source and begin playingmusic on
the MP3 player.
Thesebuttons are used to store the presets for radio stations.Toseta preset,
tune to the desiredradio station.Thenpress and hold the preset towhich you
wishto assign that station for more than one secondand release.To replace it
with adifferent station, repeat the process and the newsetting will override
the previous one.
In BTmode, when receive a call,the LCD will show the receive phone number,
press the8 button toaccept the call and press the 7 buttonto rejectthe call.
Press briefly, repeatedly to cycle between the five radiobands:
FM1>FM2>FM3>AM1>AM2
Press these buttons briefly to stepup or downthe radio dialin singlestep
increments. Pressand hold formore than one-haft second and the tuner will
enter the SEEK mode. In this modethe tuner will stop at the next strong
stationavailable.
Press to display or adjust the clock. Pressand hold this button until the time
flashing then use the volumeknobto adjust the time.
AUXIN Mode can only be selectedif itis enabled in the system Settings.
If you are having problems withAUX IN mode,pleasecheck the setting.
Plea se note (i n BT connect mo de):
When your phoneis connect to t he head unit, theLCD will show BT-READY.
When dialling a call in connection status ,the L CD will show CALL OUT.
4.AUX IN JACK
5&6. RA DIO PRESETS 1-6
7&8. REJ ECT AND ACC EPTA CAL L
9.BAND
10&11. TUNE/SEEK UP/DOWN BUTTONS
12.DISPLAY
Please note:
To pair the unit, turn on the Bluetoothmode of themobile phone, then select the item
offinding the BluetoothDevice and enter it.Afterfinishing the finding, it willshow
the name ofthe Bluetooth Device if finding a Bluetooth Device. Select it andenter it,
thenitwillshow a interfacethataskyoutoinputapassword.Input the password
0000 and enter it.
Thenit willtell you that pairOKandthenconnection OK,andthe LCDofthecar audio
system willshow CONNECT and then show the name of the Bluetooth Device of the
mobile phone.
5x15mm
support screw
5mm nut
supportscrew
supportstrap
dashboardattachment
surface
headunit
supportscrew
mountingcase
Installation
Figure 1 Bendingthe support tabs Figure 2 Forming thesupport bracket
Figure 3 Insert levers unit click occurs,
thenuse levelstopull out headunit.
“”
PDF created with FinePrint pdfFactory trial version http://www.pdffactory.com

Page 10 Page 3
USB/SD Card (MP3 Playback) Controls
182
3457 6
10
9
To play tracks from aUSB drive orSD card, insert the drive into the appropriate
port/slot onthe faceplate. The display will show USB or CARD
indicating that the drive is beingread.
The unit will display tracks when ready by file name (or, if created with ID3-tag
information,with SongTitle,Artist andAlbum information) and will begin playing
the first track in thedirectory.
Fileswill begin playback automatically upon insertion. Topause playback,
pressthis button. Press again toresume playback.
Press this button to repeat the playback of all the filesin the currentfolder
automatically.
““”,
1.PLAY/PAUSE
2.RPT(Repeat Play Mo de)
”
“”RPTON/OFF willbe displayed.Press againto cancel.
Pressing STOPwill stop playback.To restart playback, press PLAY/PAUSE.
Playback will begin with the first song ofthe current folder directory (NOT the
track thatwas last playing).
To skip back or ahead 10tracks in the currentfolder, press this button.
Press thesebuttons to skip back or ahead one track.
3. STOP
4&5 . -10 BUTTON
+10 BUT TON
6&7. I<< a nd>>I (Skip back/skip forward, Fast rewind/fast forward)
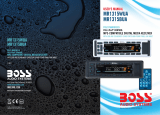
Wiring connection diagram
+
+
+
+
WHITE
RCA LINE OUT
WHITE L
RED R
WHITE/BLACK
GREEN/BLACK VIOLET/BLACK
GRAY/BLACK
GRAY
VIOLET
GREEN
LEFT FRONT
SPEAKER
RIGHT FRONT
SPEAKER
LEFT REAR
SPEAKER
RIGHT REAR
SPEAKER
4OHM 4OHM
4OHM 4OHM
-
-
-
-
YELLOW (CONSTANT 1 2 volts)
BLACK (GROUND)
RED (ACC.12 vo lts)
BLUE (ANT)
10AF USE
0.5A FUSE
AUX IN
1
MODE
2
RPT
3
RDM
45
-10
ENTER
TA
AF
6
+10
PDF created with FinePrint pdfFactory trial version http://www.pdffactory.com

Page 9Page 4
Press this button for playback of all the files in the current folderin a random
order. RDM ON/OFF
8.RDM (Random PlayMode)
“”will bedisplayed. Press againto cancel.
Insert SD card in this slot for playback. Pleasenote icon on panel which
shows youhow to orientcard (angled cornergoes toleft side of slot).
InsertUSB drive in this slot for playback.
9.SD CA RD slo t
10. USB port
Because the mutetime ofAF switching or checkingtime is very short, it is almost
inaudiblein case of normalprogram.
During FM mode, whenAF is on, SEEK, (SCAN),AUTO-MEMORY function can
only receive and save RDS program.
8.AMS
In Radio mode, press this button to play each preset number for several
seconds; press and hold this buttonto searches from the current frequency
andchecksthe signal strength level until 6 station are found.Andthen the 6
station frequency are preset to the corresponding preset memory numbered
bank.The auto-storage operation is implemented in each selected band.
When the auto-storage operation is finished, the radio execute the Preset scan.
9.TA
In Radio mode, press this button to activated as TAmode on or off.
WhenTAmode is on(TAis displayed on LCD), itwill begin to seekTAstation
andTASEEK will be displayed on LCD for a while.
When traffic announcement is transmitted:
1).If the unit is inMMC/SD, USB mode, it will switch to radio mode temporarily.
2). If volume level is below 20, volumelevel is raised to 20, and returns to its
previousmode and volume levelwhen the traffic announcement is over.
If volumeis adjusted during traffic announcement, only the traffic
announcementvolumeis valid.
* TAinterruption function:
The current trafficannouncementis cancelled by pressingthis key.But the
TAmode will not be off.
* WhenTAis on, SEEK, (SCAN),AUTO MEMORYfunction canbe received or
saved only when traffic program identificationcode has been received.
When TAisON, trafficprogram identification code is not received during
specifiedtime.
10.TUNE/SEEK & I<< and >>I (Skip back/skip forward,fast back/fast forward)
In radiomode, Press this button brieflyto step up or down the radio dail in
single step increments.Pressand hold for half second to enter SEEK mode.
In this mode the tuner will stop at the next strong stationavailable.
In MP3/SD/MMCmode, press those buttons to skipback or ahead one track.
Press and hold for fast back or fast forward.
11.VOLUME-/VOLUME+
Useto increaseor decreasevolumelevel.
12.SOURCE (Input select,same as MODE on head unit)
Press the button repeatedly tocycle through the 5 audio input sources
in orderto selecteither USBor SD modes.
PDF created with FinePrint pdfFactory trial version http://www.pdffactory.com

Page 8 Page 5
iPod Playback Controls
12 3
54
To play tracks from aiPod, first be sure you havethe proper dock adaptor
inserted inthe dockingdrawer .Then insert the iPod. The display willshow
iPod indicatingthat the iPod unit has been recognized. Press
PLAY/PAUSE to begin playback.
Most of the iPod s
iPod playback from the iPod itselfif that is
moreconvenientfor you.
Please notethat the is compatible with almostall ofthe available
iPod units.
If itis not, you canstill use theAUXinput to connect the headphone output to
the , but you will not be able to control the iPod playback this way.
Pleaseto begin playback. Topause, press again.Press again to resume
playback.
Press this button to repeatthe playbackof the current track.
“ RMT”,
menu functions canbe displayedand controlledbythe
758DBI.
However, you can always control the
758DBI
758DBI
IPod not recognized? Is iPod Enabled in the System Setting?
An iPod in the dock will only be recognized if the iPod function is enabled
in the System Settings. If the 758DBI does not recognize that an iPod is
present, c heckthe System Settings to ma kesure that theiPod function
is enabled.
1.PLAY/PAUSE
2.RPT (Repeat Play Mode)
Before removi ng thei Podfromthedock, be sure to pause playb ack ORuse
theMODEswitch to changeto another mode.
Operation of Remote Controller
1.
2.In BT mode, when receive a call, the LCD will
show the receive phone number, press this
buttonto accept the call.
3.
4.EQ(PresetEqualizer Curves)
Pressrepeatedly to cyclethrough these modes:
FLAT,CLASSIC, ROCK, POP, USER SET.
5.MUTE
Press this button to silence the audio. Press again to restore the previous
audio volume level.
6.PTY/LOC
7.RDM/AF
Ple ase not e (i n B T connec tm ode):
When yourphone is connect to the head unit,the
LCD willsh owBT-READY.
Whendialling a call inconnectionstatus, the LCD
will s how CALLOUT.
POWER Use to turnreceiver on/off
In BTmode, when receive a call, the LCD will
showthe receivephone number, press this
button to reject the call.
In Radio mode,pressthis button toselect PTY mode:
While selectingPTYTYPE,its selectionis implementedby preset buttons as
describedin preset key. (press one of the 6 presetbuttons brieflyand
repeatedlyto selectthe PTYTYPE in the preset button) When POPM or
NEWS is on, the previous PTY program and PTYword isdisplayed on LCD.
Ifthere are no keys entered for 2 seconds, previously selectedPTYis searched.
During1 loop, if desiredPTY is not found, NO PTY is flashed, then return to
previousnormal radioand PTYword disappear.
Press and hold this button to select Local/DX mode:
In some areas, reception of anAM station may be weak. Changing thereception
mode to LOC by pressing thisbutton allows the receiver to skip the weaker
signals.Press again to return to DISTANT mode.
In Radio mode, press this button to activated asAF mode on or off.
WhenAF switching mode is selected,the radiochecksthe signalstrength ofAF
all thetime. The interval of checkingtime of eachAFs dependson the signal
strength ofcurrent station,from afew minute forstrong stationto a few seconds
forweak station.
Every time that newAF is stronger than current station,it switches over to that
frequencyfor veryshort time, and NEW FREQUENCYis displayed for 1-2
second.
12
6
7
8
4
1
5
2
3
9
10
11
AUXIN
1
MODE
2
RPT
3
RDM
45
-10
ENTER
TA
AF
6
+10
PDF created with FinePrint pdfFactory trial version http://www.pdffactory.com

Page 6
3.RDM (Shuffle Mode)
4&5.I<< an d>>I (Skip back/skip forward, Fast rewind/fast forward)
Press this button for shuffleplayback of all the files in your iPod playlist.
Press thesebuttons to skip backor ahead one track. Press and holdfor fast
rewind or fast forward.
iPod Dock adaptors
The comeswith a set of special iPod adaptors which fit a wide range of
iPod models. These are speciallydesigned for use withthe , and hold
the iPod firmly to the dock connector when the vehicle is in motion.
Please install the appropriate dock adaptor as described below.
758DBI
758DBI
1.Push on the face of the LCD to release
and openthe iPod docking drawer.
2.Select theappropriate size dock adaptor
foryour iPod. Lower it into the recess in
the drawer, aligningthe notches/tabson
the FRONT edge first.
3.As you lower the dockinto the resess,
be sureto align thetabs on theREAR
edge ofthe dock adaptor with the slots
on the top edge of the faceplate,and
slide it down securely into place.
4.Insert youriPod into the dock adaptor.
Press PLAY/PAUSE to begin playback.
PLEASE NOTE:
Official Apple Univer salDockAdaptors can not be used in the .
Do not att empt t o connec tyou iP od t othe d ock without the app ropriat e,
specially-designed adaptorprovided withthe .
BossAudio Systems can not accept any responsibility for any damageor date
loss thatmay result from using youriPod in the and the specially-desiged
dock adaptors.
“” 758DBI
758DBI
758DBI
Dock adaptor
Slots on top edgeof faceplate
Page 7
iPod compatibility
The 758DBI and its specially-designed,included dock adaptors are compatible
with a wide range of iPod types. The compatible models are shown below:
iPodMini iPod Classic iPodNano
80GB/120GB 2GB/4GB/8GB
(2nd generation)
iPodTouch
iPod Nano
iPodNano
8GB/16GB
(5th generation)
1GB/2GB/4GB
(1st generation)
(1st generation)
iPod video
iPod Nano
iPod Nano
30GB andiphone
4GB/8GB
(5th generation)
(3rdgeneration) (4th generation)
If y our iPo d is not on e of thos e c ompatible m odel s shown above......
......you canstilluse theheadphone outjack on the iPod andconnect itto the
AUX input on the faceplate. Usethe MODE switch to selectAUX IN and use
the controls on your iPod to play music throughthe 758DBI.
PLEASE N OTE:
Official Apple Universal D ockAdaptor scon not be us ed in the 758DBI .
Do notattempt to connect your iPod to the dock without theappropriate,
specially-desingedadaptor provided withthe 758DBI.
BOSSAudio Systems can not accept any responsibility for any damage or date
lossthat may result from usingyour iPod int the 758DBI and thespecially-
designeddock adaptors.
“”
iPod charging
The 758DBIcircuitry is designed t recharge your iPod, giving you many additional
hours to enjoy listeningto your library of musicand Podcasts.
iPhone 4
PDF created with FinePrint pdfFactory trial version http://www.pdffactory.com
-
 1
1
-
 2
2
-
 3
3
-
 4
4
-
 5
5
-
 6
6
-
 7
7
-
 8
8


Boss Audio Systems 758DBI User manual
- Category
- Car media receivers
- Type
- User manual
- This manual is also suitable for
Ask a question and I''ll find the answer in the document
Finding information in a document is now easier with AI
Related papers
-
 Boss Audio Systems 615UA User manual
-
 Boss Audio Systems Marine Digital Media User manual
-
 Boss Audio Systems mr1315bua User manual
-
 Boss Audio Systems 648UA User manual
-
 Boss Audio Systems BV9982I User manual
-
 Boss Audio Systems DVD/CD AM/FM Receiver User manual
-
 Boss Audio Systems 622UA User manual
-
 Boss Audio Systems 625UAB User manual
-
 Boss Audio Systems MR360UV User manual
-
 Boss Audio Systems B V 17 FLIP User manual


