40
SHIFT + SHIFT +
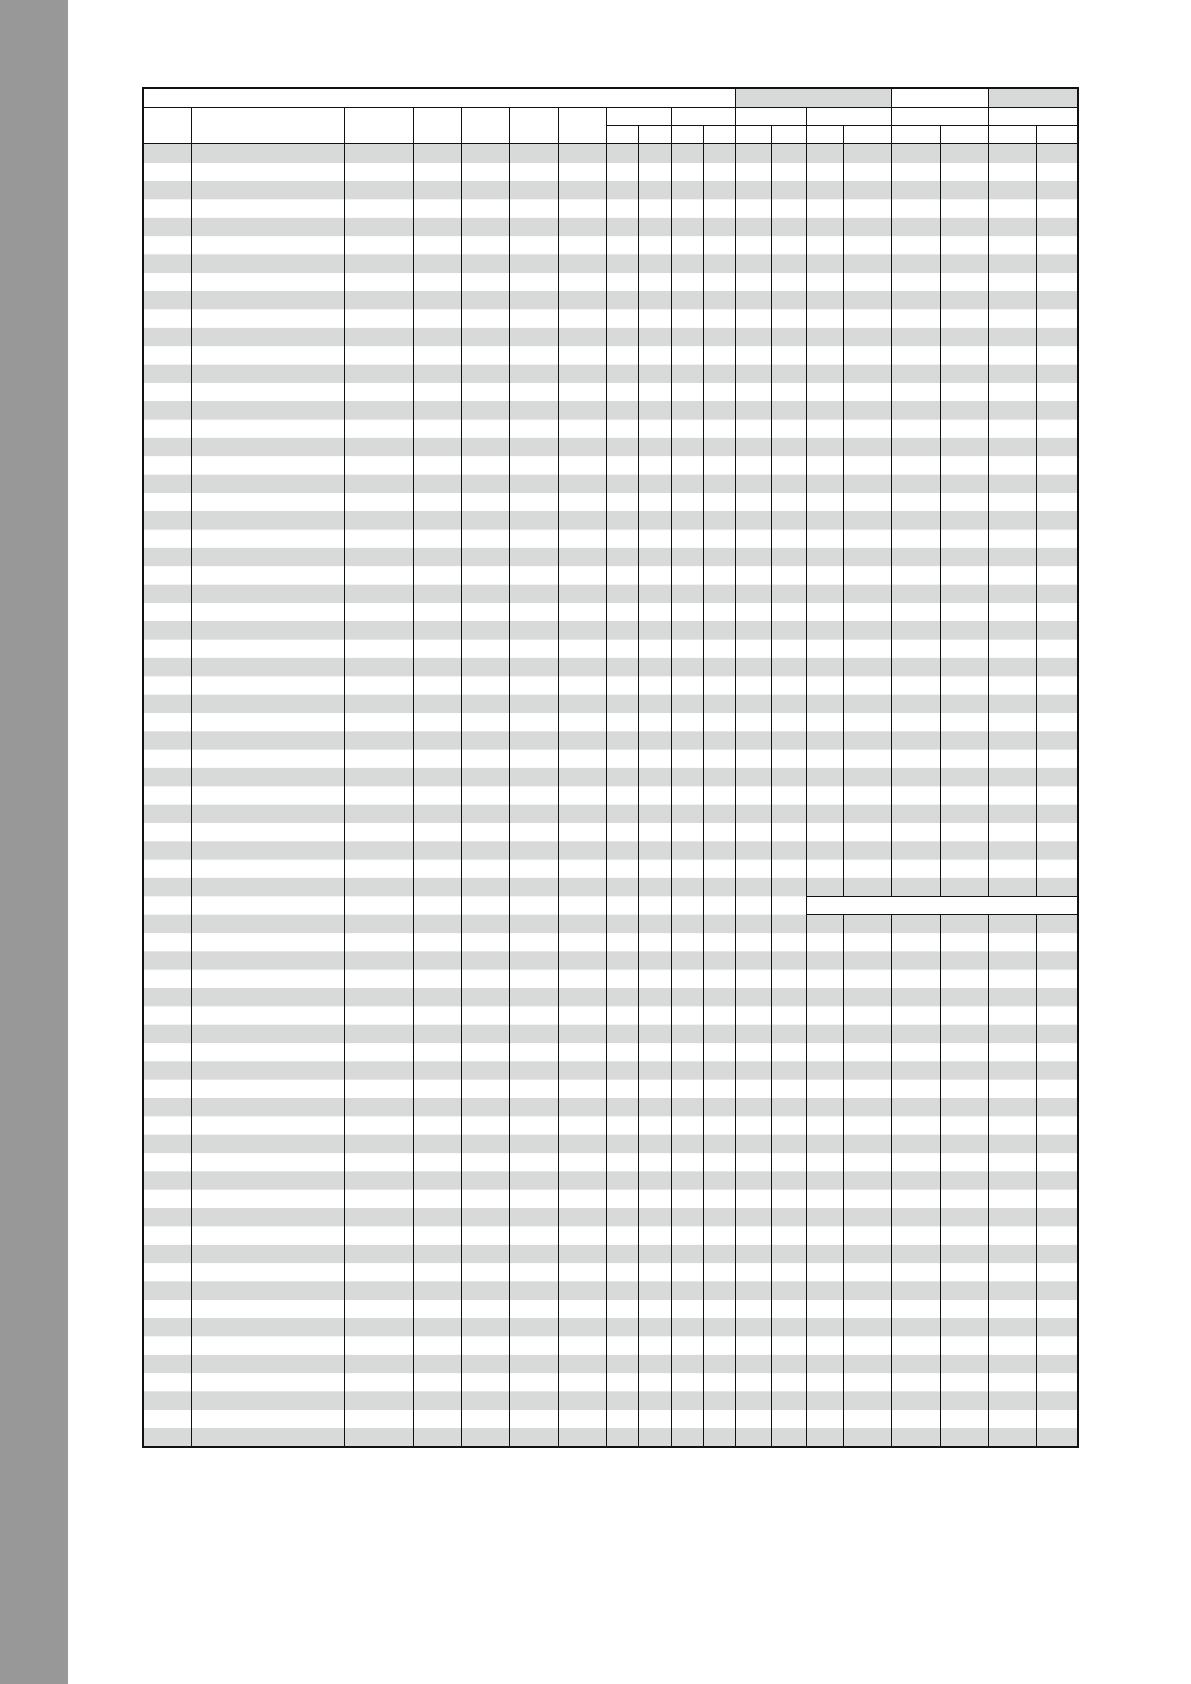
NO. ITEMS TYPE DECK A DECK B DECK C DECK D SW NOTE VR CC SW NOTE VR CC LED NOTE LED NOTE
HEX HEX HEX HEX HEX HEX
1 RANGE SW/LED CH 1 CH 2 CH3 CH 4 1 1 - - 71 47 - - 1 1 71 47
2 KEY LOCK SW/LED CH 1 CH 2 CH 3 CH 4 2 2 - - 72 48 - - 2 2 72 48
3 FX1 VR CH 1 CH 2 CH 1 CH 2 - - 3 3 - - 73 49 - - - -
4 FX2 VR CH 1 CH 2 CH 1 CH 2 - - 4 4 - - 74 4A - - - -
5 FX3 VR CH 1 CH 2 CH 1 CH 2 - - 5 5 - - 75 4B - - - -
6 BEATS SW/ENC CH 1 CH 2 CH 1 CH 2 6 6 6 6 76 4C 76 4C - - - -
7 FX_SEL1 SW/LED CH 1 CH 2 CH 1 CH 2 7 7 - - 77 4D - - 7 7 77 4D
8 FX_SEL2 SW/LED CH 1 CH 2 CH 1 CH 2 8 8 - - 78 4E - - 8 8 78 4E
9 FX_SEL3 SW/LED CH 1 CH 2 CH 1 CH 2 9 9 - - 79 4F - - 9 9 79 4F
10 TAP SW/LED CH 1 CH 2 CH 1 CH 2 10 A - - 80 50 - - 10 A 80 50
11 LOOP LENGTH SW/ENC CH 1 CH 2 CH 3 CH 4 11 B 11 B 81 51 81 51 - - - -
12 LOOP IN SW/LED CH 1 CH 2 CH 3 CH 4 12 C - - 82 52 - - 12 C 82 52
13 LOOP OUT SW/LED CH 1 CH 2 CH 3 CH 4 13 D - - 83 53 - - 13 D 83 53
14 LOOP MOVE SW/ENC CH 1 CH 2 CH 3 CH 4 14 E 14 E 84 54 84 54 - - - -
15 DELETE SW/LED CH 1 CH 2 CH 3 CH 4 15 F - - 85 55 - - - - - -
16 HOT CUE1(DELETE OFF) SW/LED CH 1 CH 2 CH 3 CH 4 16 10 - - 86 56 - - 16 10 86 56
17 HOT CUE2(DELETE OFF) SW/LED CH 1 CH 2 CH 3 CH 4 17 11 - - 87 57 - - 17 11 87 57
18 HOT CUE3(DELETE OFF) SW/LED CH 1 CH 2 CH 3 CH 4 18 12 - - 88 58 - - 18 12 88 58
19 HOT CUE4(DELETE OFF) SW/LED CH 1 CH 2 CH 3 CH 4 19 13 - - 89 59 - - 19 13 89 59
20 SAMPLE1(DELETE OFF) SW/LED CH 1 CH 2 CH 3 CH 4 20 14 - - 90 5A - - 20 14 90
5A
21 SAMPLE2(DELETE OFF) SW/LED CH 1 CH 2 CH 3 CH 4 21 15 - - 91 5B - - 21 15 91 5B
22 SAMPLE3(DELETE OFF) SW/LED CH 1 CH 2 CH 3 CH 4 22 16 - - 92 5C - - 22 16 92 5C
23 SAMPLE4(DELETE OFF) SW/LED CH 1 CH 2 CH 3 CH 4 23 17 - - 93 5D - - 23 17 93 5D
24 HOT CUE1(DELETE ON) SW/LED CH 1 CH 2 CH 3 CH 4 24 18 - - 94 5E - - 24 18 94 5E
25 HOT CUE2(DELETE ON) SW/LED CH 1 CH 2 CH 3 CH 4 25 19 - - 95 5F - - 25 19 95 5F
26 HOT CUE3(DELETE ON) SW/LED CH 1 CH 2 CH 3 CH 4 26 1A - - 96 60 - - 26 1A 96 60
27 HOT CUE4(DELETE ON) SW/LED CH 1 CH 2 CH 3 CH 4 27 1B - - 97 61 - - 27 1B 97 61
28 SAMPLE1(DELETE ON) SW/LED CH 1 CH 2 CH 3 CH 4 28 1C - - 98 62 - - 28 1C 98 62
29 SAMPLE2(DELETE ON) SW/LED CH 1 CH 2 CH 3 CH 4 29 1D - - 99 63 - - 29 1D 99 63
30 SAMPLE3(DELETE ON) SW/LED CH 1 CH 2 CH 3 CH 4 30 1E - - 100 64 - - 30 1E 100 64
31 SAMPLE4(DELETE ON) SW/LED CH 1 CH 2 CH 3 CH 4 31 1F - - 101 65 - - 31 1F 101 65
32 HOLD SW/LED CH 1 CH 2 CH 3 CH 4 32 20 - - 102 66 - - - - - -
33 SHIFT SW/LED CH 1 CH 2 CH 1 CH 2 33 21 - - - - - - - - - -
34 SYNC SW/LED CH 1 CH 2 CH 1 CH 2 34 22 - - 104 68 - - 34 22 104 68
35 CUP SW/LED CH 1 CH 2 CH 3 CH 4 35 23 - - 105 69 - - 35 23 105 69
36 CUE SW/LED CH 1 CH 2 CH 3 CH 4 36 24 - - 106 6A - - 36 24 106 6A
37 PLAY/PAUSE SW/LED CH 1 CH 2 CH 3 CH 4 37 25 - - 107 6B - - 37 25 107 6B
38 DECK SW/LED CH 1 CH 2 CH 3 CH 4 38 26 - - - - - - - - - -
39 JOG WHEEL(HOLD Off) SW/ENC CH 1 CH 2 CH 3 CH 4 39 27 39 27 109 6D - - - - - -
40 JOG WHEEL(HOLD On) SW/ENC CH 1 CH 2 CH 3 CH 4 40 28 40 28 110 6E - - - - - -
41 JOG WHEEL(HOLD) SW/ENC CH 1 CH 2 CH 3 CH 4 41 29 41 29 111 6F - - - - - -
42 PITCH BEND(middle) VR CH 1 CH 2 CH 3 CH 4 42 2A - - - - En,0xll(LSB),0xmm(MSB)
43 GAIN VR CH 1 CH 2 CH 3 CH 4 - - 43 2B - - 113 71 - - - -
44 HIGH(minimum) VR CH 1 CH 2 CH 3 CH 4 44 2C 44 2C 114 72 114 72 - - - -
45 MID(minimum) VR CH 1 CH 2 CH 3 CH 4 45 2D 45 2D 115 73 115 73 - - - -
46 LOW(minimum) VR CH 1 CH 2 CH 3 CH 4 46 2E 46 2E 116 74 116 74 - - - -
47 FILTER(middle) VR CH 1 CH 2 CH 3 CH 4 47 2F 47 2F 117 75 117 75 - - - -
48 CH CUE SW/LED CH 1 CH 2 CH 3 CH 4 48 30 - - 118 76 - - 48 30 118 76
49 CH FADER VR CH 1 CH 2 CH 3 CH 4 - - 49 31 - - 119 77 - - - -
50 FADER START SW/LED CH 1 CH 2 CH 3 CH 4 50 32 - - 120 78 - - 50 32 120 78
51 CUE MIX VR CH 1 CH 1 CH 1 CH 1 - - 51 33 - - - - - - - -
52 SAMPLER VOL VR CH 1 CH 1 CH 1 CH 1 - - 52 34 - - - - - - - -
53 CREATES SW/LED CH 1 CH 1 CH 1 CH 1 53 35 - - - - - - 53 35 - -
54 VIEW SW/LED CH 1 CH 1 CH 1 CH 1 54 36 - - - - - - 54 36 - -
55 BACK SW/LED CH 1 CH 1 CH 1 CH 1 55 37 - - - - - - 55 37 - -
56 PREP SW/LED CH 1 CH 1 CH 1 CH 1 56 38 - - - - - - 56 38 - -
57 TRAX SW/ENC CH 1 CH 1 CH 1 CH 1 57 39 57 39 - - - - - - - -
58 CROSS FADER VR CH 1 CH 1 CH 1 CH 1 - - 58 3A - - - - - - - -
59 CF A A SW CH 1 CH 1 CH 1 CH 1 59 3B - - - - - - - - - -
60 CF A THRU SW CH 1 CH 1 CH 1 CH 1 60 3C - - - - - - - - - -
61 CF A B SW CH 1 CH 1 CH 1 CH 1 61 3D - - - - - - - - - -
62 CF B A SW CH 1 CH 1 CH 1 CH 1 62 3E - - - - - - - - - -
63 CF B THRU SW CH 1 CH 1 CH 1
CH 1 63 3F - - - - - - - - - -
64 CF BB SW CH 1 CH 1 CH 1 CH 1 64 40 - - - - - - - - - -
65 CF C A SW CH 1 CH 1 CH 1 CH 1 65 41 - - - - - - - - - -
66 CF C THRU SW CH 1 CH 1 CH 1 CH 1 66 42 - - - - - - - - - -
67 CF C B SW CH 1 CH 1 CH 1 CH 1 67 43 - - - - - - - - - -
68 CF D A SW CH 1 CH 1 CH 1 CH 1 68 44 - - - - - - - - - -
69 CF D THRU SW CH 1 CH 1 CH 1 CH 1 69 45 - - - - - - - - - -
70 CF D B SW CH 1 CH 1 CH 1 CH 1 70 46 - - - - - - - - - -
71 CF CURVE VR CH 1 CH 1 CH 1 CH 1 - - 70 46 - - - - - - - -


