Package Contents
1
3
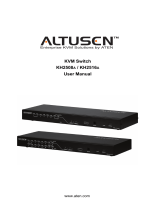
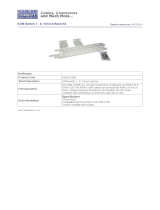
Hardware Review (Front View)
1 KL1508A or KL1516A Cat 5 High-Density Dual Rail LCD KVM Switch
with Standard Rack Mount Kit
1 Firmware Upgrade Cable
1 Power Cord
1 Grounding Wire
1 User Manual
1 Quick Start Guide
Hardware Installation
5
4
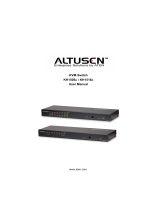
Hardware Review (Rear View)
1, Upper Handle
2. LCD Module
3. Keyboard Module
4. Lower Handle
5. Power LED
6. Keyboard Release Catch
7. LCD Release Catch
8. Rack Mounting Tabs
Optional Equipment
Depending on any optional equipment that you may have purchased, one of the following
may be included in your package:
• Standard Rack Mount Kit - Long
• Easy Installation Rack Mount Kit - Short
• Easy Installation Rack Mount Kit - Long
Note: The front and rear panel views are similar for the KL1508
A, the difference being that
the KL1508
A has only 8 buttons on the control pad and 8 ports in the real panel.
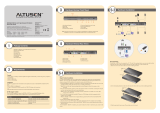
Rack Mounting
A standard rack mounting kit is provided
with your KL1508
A / KL1516A. The kit
enables the switch to be mounted in rack
with a depth of 42–77 cm.
To rack mount the switch, do the following:
1. While one person positions the switch in
the rack and holds it in place, the second
person—using the screws provided with
the rack mounting kit— loosely screws
the front brackets to the rack.
2. While the first person still holds the
switch in place, the second person slides
the L brackets into the switch's side
mounting brackets, from the rear until the
bracket flanges contact the rack, then –
using the screws provided with the rack
mounting kit – screws the L brackets to
the rack
3. After the L brackets have been secured,
tighten the front bracket screws.
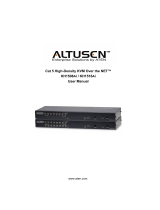
Single Station Installation
In a single stage installation, there are no additional KVM switches daisy chained down from the
KL1508
A / KL1516A. To set up a single stage installation, refer to the installation diagrams (the
numbers in the diagram correspond with the numbers of the instruction steps), and do the following:
1. Ground the KL1508
A / KL1516A by connecting one end of the grounding wire provided with your
switch to the grounding terminal, and the other end of the wire to a suitable grounded object.
Note: Do not omit this step. Proper grounding helps to prevent damage to the unit from surges or
static electricity
2. Plug the console keyboard, monitor, and mouse into the unit’s console ports. The ports are color
coded and marked with icons for easy identification.
Note: You can use any combination of keyboard and mouse connections. For example, you can use a
PS/2 keyboard with a USB mouse.
3. Use Cat 5e/6 cable to connect any available KVM port to a KVM adapter cable that is appropriate
for the computer you are installing.
Note: To support a resolution of 1280x1024, the recommended maximum distance between the unit
and the KVM adapter cable is 50 meters.
4. Connect the KVM adapter cable to the computer.
Plug the connectors on the KVM adapter cable into the appropriate ports of the computer you are
installing.
5. Plug the female end of the power cord into the KL1508
A / KL1516A's power socket; plug the male
end into an AC power source.
After the KL1508
A / KL1516A is cabled up, you can turn on the power. After it is powered up, you
can turn on the servers
External Console
• A VGA, SVGA, or multisync monitor capable of the highest resolution that you will be using on
any computer in the installation
• A PS/2 or USB mouse
• A PS/2 or USB keyboard
Computers
The following equipment must be installed on the computers that connect to the KL1508A or
KL1516
A KVM ports:
• A VGA, SVGA or multisync port
• A Type A USB port and USB host controller (for USB KVM adapter cable connection, see
following section)
- or -
• 6-pin Mini-DIN keyboard and mouse ports (for PS/2 KVM adapter cable connection, see
following section)
KVM Adapter Cables
• Cat 5e/6 cable is required to connect the KL1508A / KL1516A to one of the KVM adapter cables.
• The following KVM adapter cables are required for use with the KL1508
A / KL1516A:
Requirements
2
Function Module
Connect to devices with PS/2 ports KA7920 / KA7520 / KA7120 / KA9520 / KA9120
Connect to devices with USB ports KA7970 / KA7570 / KA7170 / KA9570 / KA9170
Connect to Sun Legacy systems (with 13W3 port) KA9130 / KA7130
Connect to Sun USB systems KA9170 / KA7170
Connect to serial based devices KA9140
2
4
1
3
Keyboard Module
1 Keyboard
2 Touchpad
3 Port Selection Area
4 Station Selection Area
5. Lock LEDs & Reset Switch
6. External Mouse Port
7. Port LEDs
LCD Module
1. LCD Display
2. LCD Controls
3. LCD On/Off Button
4. Firmware Upgrade Section
1 5 6
42 3
4. Daisy Chain Ports
5. Console Ports Section
6. KVM Port Section
1. Grounding Terminal
2. Power Socket
3. Power Switch
L Brackets
Side Mounting
Bracket (Typ.)
7
6
8
1
5
4
2
3
1
6
7
3
4
5
2
5
4
3
1
2
3
2
KL1508A/KL1516A 8/16-Port Cat 5 High-Density
Dual Rail LCD KVM Switch Quick Start Guide
© Copyright 2011 ATEN
®
International Co., Ltd. www.aten.com
Altusen and the Altusen logo are trademarks of ATEN International Co., Ltd.
All rights reserved. All other trademarks are the property of their respective owners.
This product is RoHS compliant PAPE-1214-U30G Printing Date: 05/2011
Patent No.
CN ZL 98252015.8
CN ZL 02122202.9
CN ZL 200410031689.0
CN ZL 200410042771.3
CN ZL 200520012462.1
CN ZL 200610007185.4
CN ZL 200610145931.6
CN 200610079265.0
CN ZL 200610081929.7
DE 102004019107
DE 29903667.7
US 6160543
US 7386584
US 7640289
US 7613854
US 7584309
US 7405926
US 7258568
US 7414853
US 7675742
US 7505255
TW 194030
TW 183765
TW I237762
TW I273372
TW I288595
TW I325748
TW I327054
TW I340311
TW I269992
GB 2412456
GB 2425661
FR 0500514
JP 4456936
Online Registration
International:
• http://support.aten.com
North America:
• http://www.aten-usa.com/product_registration
Technical Phone Support
International:
• 886-2-8692-6959
China:
• 86-10-5255-0110
Japan:
• 81-3-5615-5811
Korea:
• 82-2-467-6789
North America:
• 1-888-999-ATEN Ext: 4988
United Kingdom:
• 44-8-4481-58923
All information, documentation, and specifications contained in this media are subject to change without prior notification by the manufacturer.
Please visit our website to find the most up to date version.