Trendnet TPE-5240WS User guide
- Category
- Network switches
- Type
- User guide

TRENDnet User’s Guide
Cover Page

© Copyright 2021 TRENDnet. All Rights Reserved.
TRENDnet User’s Guide
Table of Contents
i
Contents
TRENDnet Hive Overview ................................................................ 1
What is TRENDnet Hive? ................................................................................................ 1
Features ......................................................................................................................... 1
Hive Pro Features........................................................................................................... 2
Adding devices to Hive .................................................................... 3
Hive Compatible Devices ............................................................................................... 3
Configure your device for Internet access ..................................................................... 3
Register your device with your Hive account ................................................................ 5
Hive Management Portal ................................................................ 6
Login to your Hive account ............................................................................................ 6
Hive Dashboard ............................................................................................................. 7
Create a new tenant........................................................................................................... 8
Manage devices in your Hive account ........................................................................... 9
Configure devices in your Hive account ...................................................................... 12
Provision devices in your Hive account ....................................................................... 15
Configuration Provisioning ............................................................................................... 15
Firmware Provisioning ..................................................................................................... 22
Assigning device licenses ............................................................................................. 27
Monitoring devices ...................................................................................................... 30
Event Monitoring ............................................................................................................. 30
Device Utilization ............................................................................................................. 32
Diagnostic Tools ........................................................................................................... 33
Ping IPv4 Host .................................................................................................................. 33
Device Reboot .................................................................................................................. 35
Cable Diagnostics ............................................................................................................. 36
Account Settings .......................................................................................................... 38
View Hive System Messages ............................................................................................ 45
View Device Logging ........................................................................................................ 46
View System Logging ....................................................................................................... 47
Configure alert notifications ............................................................................................ 48
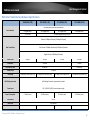
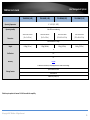
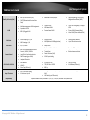
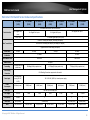
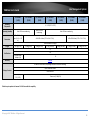
Web Smart Switch Series Hardware Specifications ........................ 49
Web Smart Switch Series Software Specifications .......................... 51
Web Smart PoE Switch Series Hardware Specifications .................. 53
Web Smart PoE Switch Series Software Specifications ................... 55

© Copyright 2018 TRENDnet. All Rights Reserved.
TRENDnet User’s Guide
TRENDnet Hive
1
TRENDnet Hive Overview
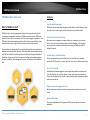
What is TRENDnet Hive?
TRENDnet Hive is a cloud management platform that provides a centralized
cloud-based management solution for TRENDnet network devices. TRENDnet
network devices can be connected to the Hive cloud management platform. The
TRENDnet Hive cloud networking solution offers better overall visibility of your
network devices from a single intuitive and easy-to-use cloud interface.
Advanced features supported with cloud networking include event and device
hardware monitoring, traffic statistics, notification alerts, and troubleshooting
tools. Network device provisioning can be accomplished through scheduled or
immediate deployment of batch firmware and configuration updates. Reduce
the time, complexity, and management costs of your network with TRENDnet
Hive.
Features
Cloud-Based Management
TRENDnet Hive network cloud manager provides better overall visibility of your
network devices from a single intuitive and easy-to-use cloud interface
Hassle-Free Remote Monitoring
Remote network management support allows you to monitor your network
devices from the cloud with device uptime, detailed logging, traffic statistics,
event snapshots, and device health (processor/memory hardware and PoE
budget utilization)
Intuitive Alerts and Notifications
Choose customized alerts and notifications to be sent based on exceeded
thresholds (CPU/memory) or events (port link status, device offline, switch loop)
Ease of Provisioning
Schedule batch firmware upgrades and configuration updates for deployment
from the cloud for your network devices. Create and customize configuration
files in the cloud and review records of when firmware and configuration update
tasks were carried out
Reduce time and management costs
Reduce maintenance time and costs by moving network device access to the
cloud
Minimal Downtime
Service-Level Agreement (SLA) guaranteed 99.9 percent uptime and service
availability

© Copyright 2021 TRENDnet. All Rights Reserved.
2
TRENDnet User’s Guide
TRENDnet Hive
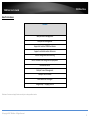
Hive Pro Features
Features
Multiple Device Management
Multiple Site Management
Supports all selected TRENDnet devices
Supports unlimited number of devices
Device Configuration & Monitoring
Batch Firmware and Configuration Deployment
Notification Alerts
Multiple Tenant Management
Multiple User Accounts
Role-based User Privileges
Google Maps™ mapping service
Disclaimer: Features and specifications are subject to change without notice.

© Copyright 2021 TRENDnet. All Rights Reserved.
TRENDnet User’s Guide
TRENDnet Hive
3
Adding devices to Hive
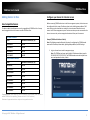
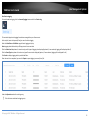
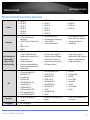
Hive Compatible Devices
The device models listed below are currently compatible with TRENDnet Hive. You may
need to upgrade the device firmware to enable TRENDnet Hive.
Web Smart Switches
Model
Hardware Version (H/W)
TEG-082WS*
v2.XR
TEG-204WS*
v1.XR
TEG-284WS*
v1.XR
TEG-524WS*
v1.XR
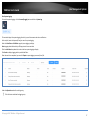
PoE Web Smart Switches
Model
Hardware Version (H/W)
TPE-082WS*
v1.XR
TPE-1620WS*
v2.XR
TPE-1620WSF*
v1.XR
TPE-204US*
v1.XR
TPE-2840WS*
v2.XR
TPE-5028WS*
v1.XR
TPE-5048WS*
v1.XR
TPE-5240WS*
v1.XR
*Important Note: Please make sure you have updated TRENDnet Web Smart Switches to
enable TRENDnet Hive capability (firmware version 3.01.XXX or above).
Disclaimer: Supported models are subject to change without notice.
Configure your device for Internet access
Before connecting TRENDnet devices to the Hive management system, the devices must
be configured with the proper IP address, subnet mask, default gateway address, DNS
server settings, and connected to a network for Internet access before devices can
connect to the Hive management system. Devices must always remain connected to the
Internet to ensure they can be managed and monitored from your Hive account.
Example (TRENDnet Web Smart Switch):
Note: The following example will provide the steps for configuring the TRENDnet web
smart switch IP address, subnet mask, default gateway address, and DNS settings.
1. Login to the web smart switch management page.
Note: The TRENDnet web smart switch default IP address and subnet mask is
192.168.10.200 / 255.255.255.0. The TRENDnet web smart switch default user
name and password is admin / admin.

© Copyright 2021 TRENDnet. All Rights Reserved.
TRENDnet User’s Guide
TRENDnet Hive
4
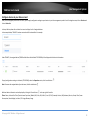
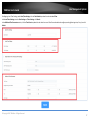
2. Click on System > L3 Feature > IPv4 Interface.
3. Enter the IP Address and Subnet Mask settings and click Apply.
Note: You may need to login to the switch with the new IP address settings.
4. Click on System > L3 Feature > IPv4 Static/Default Route.
5. Make sure Default Route is checked, enter the default gateway IP address in
the Next Hop IP Address field, select Primary for the Backup Up Status, and
click Apply.
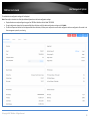
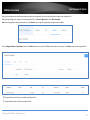
6. Click on System > DNS.
7. Enter the DNS server IP address in the DNS IPv4 Server field and click Apply.
8. In the top right menu, click on the save disk icon to save to NV-RAM.
Note: You can also click on Save in the left navigation menu and click on Save
Settings to Flash.
9. After your switch has been configured with the proper IP address and DNS
server settings, connect your switch to your network with Internet access.
Note: After you have connected your switch to your network, you can verify
Internet access by conducting a ping test from the switch in the left navigation
menu Tools > Ping and for the Destination IP Address, enter an Internet IP
address such as 8.8.8.8, click Start. After a few seconds, click Show Ping Result
button when it becomes available to check the result. The pass result should
have a value higher than 0% to indicate that the switch can access the Internet.

© Copyright 2021 TRENDnet. All Rights Reserved.
TRENDnet User’s Guide
TRENDnet Hive
5
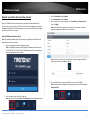
Register your device with your Hive account
After your TRENDnet device has been properly configured and and connected for
Internet access, register your device with your Hive account by logging into your device
management page and in the cloud settings, enter your Hive user credentials to register
your device with your Hive account.
Example (TRENDnet Web Smart Switch):
Note: The following example will provide the steps for registering the TRENDnet web
smart switch to your Hive account.
1. Login to the web smart switch management page.
Note: The TRENDnet web smart switch default IP address and subnet mask is
192.168.10.200 / 255.255.255.0. The TRENDnet web smart switch default user
name and password is admin / admin.
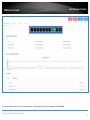
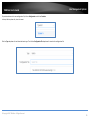
2. In the top right menu, click on the Hive icon.
Note: You can also click on System > Cloud Settings in the left navigation menu.
3. For the Cloud Mode, select Enabled.
4. For the Registration, select Enabled
5. Enter in your Hive account credentials in the User Name and Password fields,
then click Apply.
Note: Once the device is assigned to a specific Hive user account, the device
cannot be assigned to a different Hive user account.
Note: The Hive icon will turn green along with a status message update after
the switch has been successfully registered.
6. In the top right menu, click on the save disk icon to save to NV-RAM.
Note: You can also click on Save in the left navigation menu and click on Save
Settings to Flash.

© Copyright 2021 TRENDnet. All Rights Reserved.
TRENDnet User’s Guide
Hive Management System
6
Hive Management Portal
This section will explain how to navigate, functionality and usage of the Hive management portal .
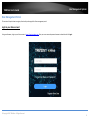
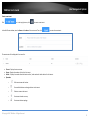
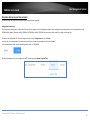
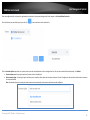
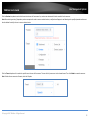
Login to your Hive account
Using a web browser, login to your Hive account at https://cloud.trendnet.com. Enter your user name and password account credentials and click Login.

© Copyright 2021 TRENDnet. All Rights Reserved.
TRENDnet User’s Guide
Hive Management System
7
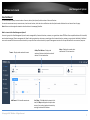
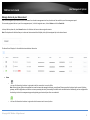
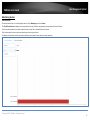
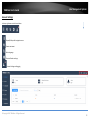
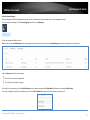
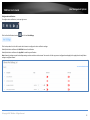
Hive Dashboard
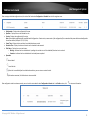
The Hive dashboard displays the total number of tenants, devices (online/total) and the number of alarm notifications.
You can also create new tenants, remove tenants, check tenant location, check the alarm notifications and online/total number of devices for each tenant from this page.
Note: Devices must be assigned to tenant in order the devices to be managed from Hive.
What is a tenant in the Hive Management System?
A tenant is group in the Hive Management System for easier manageability of network locations, customers, or organizations where TRENDnet Hive compatible devices will be installed,
monitored and managed. Tenant management will allow for better organization, maintenance, monitoring of each network location, customer, or organization individually. Additional
users can be created for Hive access and restricted only to a specific tenant and restricted only to specific management sections for the specified tenant for access control purposes.
Tenant – Displays total number of tenants
Online/Total Devices – Displays the
number of devices online/total number of
devices. Click to view devices.
Alarm – Displays the number alert
notifications. Click to view alerts.
Add Tenant – Click to add a new tenant.
List | Map – Click List to display tenants in list
view, click Map to display tenants by location
on map. You can also view device location by
entering the device MAC address.

© Copyright 2021 TRENDnet. All Rights Reserved.
TRENDnet User’s Guide
Hive Management System
8
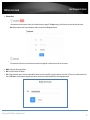
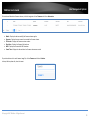
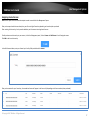
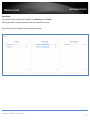
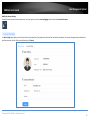
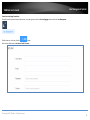
Create a new tenant
Click or in the top right menu, click to create a new tenant.
In the Add Tenant window, enter the Name and Location of the new tenant.Then click to create the new tenant.
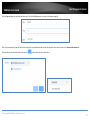
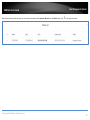
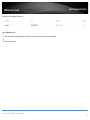
The new tenant will be displayed in the tenant list.
• Tenant – Displays the tenant name.
• Alarm – Displays the number of alerts for this tenant.
• Switch – Displays the number of switch devices online / total number of switch devices for this tenant.
• Operation
o Edit tenant name and location.
o View available devices and assign devices to the tenant.
o Delete or remove the tenant.
o View tenant location on map.
o View tenant device topology.

© Copyright 2021 TRENDnet. All Rights Reserved.
TRENDnet User’s Guide
Hive Management System
9
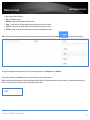
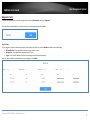
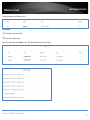
Manage devices in your Hive account
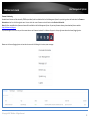
After you have registered your device with your Hive account from the device management interface, the device will be available in your Hive management portal.
To view newly registered devices in your Hive management portal, in the left navigation menu, click on Devices and click on Device List.
In the top left drop-down list, select Unused to view a list of devices that have not been assigned to tenants.
Note: The drop-down list will also allow you to select and view tenants which will display a list of devices assigned only to the selected tenant.
The Unused list will display a list of available devices and device information.
• Status
o
This icon will indicate that the device is registered to the Hive account but is currently offline.
Note: Devices that are offline can be assigned to a tenant but cannot be managed, monitoring, or configured. Please ensure that the device has the correct IP address,
gateway, and DNS configuration, and there are no issues preventing the device from reaching the Internet at the installed location. Additionally, you have configured the
cloud settings in the device management page and registering your device with your Hive user credentials.
o This icon will indicate that the device is registerd to the Hive account and is currently online.

© Copyright 2021 TRENDnet. All Rights Reserved.
TRENDnet User’s Guide
Hive Management System
10
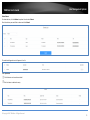
• Authorize Status
o
This indicates that the device does not have an active license subscription assigned. Click Assign to assign a valid license key to activate the device subscription.
Note: Devices require an active license subscription in order to use with the Hive Management System.
o
This indicates that the device has a valid active license subscription assigned and is authorized for use with your Hive account.
• Model – Displays the device model number.
• MAC – Displays the device MAC address.
• Alias – Displays the device name or label and is customizable. By default, the serial number (SN) is assigned to all devices as the Alias. Click the entry to modify the device alias,
then click OK. Note: It is recommended to change the device alias so that the device is easily identifiable in the Hive management system.

© Copyright 2021 TRENDnet. All Rights Reserved.
TRENDnet User’s Guide
Hive Management System
11
• SN – Displays the device serial number.
• FW Version – Displays the device firmware version.
• Operation – Click the drop-down list to select which tenant you would like to assign the device.
Note: You can also assign a device to tenant under Dashboard and under Operation, click the edit button to select which devices to assign to the tenant.
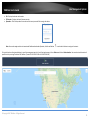
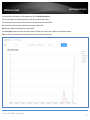
To view the locations of registered devices in your Hive management portal, in the left navigation menu, click on Devices and click on Device Location. You can also view the location of
specific device by entering the device MAC address. (Format: XX-XX-XX-XX-XX-XX or XX:XX:XX:XX:XX:XX)

© Copyright 2021 TRENDnet. All Rights Reserved.
TRENDnet User’s Guide
Hive Management System
12
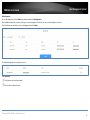
Configure devices in your Hive account
After you have assigned your devices to a tenant, you can apply configuration settings to your devices in your Hive management portal in the left navigation menu, click on Devices and
click on Device List.
In the top left drop-down list and select the tenant to display the list of assigned devices.
In the example below, TENANT1 has been created and will be selected for this example.
Under TENANT1, the assigned device (TRENDnet Web Smart Switch Model TEG-082WS) will be displayed with the device information.
To apply configuration settings to the device (TEG-082WS), under the Operation section, click the edit button
Note: To remove the assigned deivce from the tenant, click the trash button .
Additional device information can be displayed by clicking the filter table icon at the top right of the table.
Filters: Status, Authorize End Time (Device License Expiration), Model, MAC, Alias, SN, Public IP, Local IP, FW (Firmware) Version, HW (Hardware) Version, Startup Time, Power
Consumption, Power Budget, Last Seen, CPU Usage, Memory Usage.

© Copyright 2021 TRENDnet. All Rights Reserved.
TRENDnet User’s Guide
Hive Management System
13
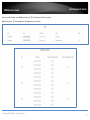
The available device configuration settings will be displayed.
Note: Please refer to the device User Guide for additional information on the device configuration settings.
• Displayed below are example configuration pages from TRENDnet Web Smart Switch Model TEG-082WS
• To apply configuration changes for Hive supported Web Smart Switches, modify the device configuration settings and click Submit.
• The Version Comparison function for Hive supported Web Smart Switches, will allow you to compare the current switch configuration with new configuration file created in the
Hive management system for provisioning.

© Copyright 2021 TRENDnet. All Rights Reserved.
TRENDnet User’s Guide
Hive Management System
14
To view newly registered devices in your Hive management portal, in the left navigation menu, click on Devices and click on Device List.

© Copyright 2021 TRENDnet. All Rights Reserved.
TRENDnet User’s Guide
Hive Management System
15
Provision devices in your Hive account
Devices in Hive can be provisioned through configuration and firmware upgrades.
Configuration Provisioning
To provision device configuration, configuration files must first be created in the Hive Management System. Batch configuration provisioning tasks can only be deployed for single
TRENDnet device model. (Example: Multiple TRENDnet TEG-082WS or multiple TPE-082WS switches but not both models for a single provisioning task.)
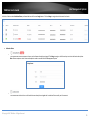
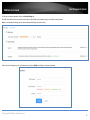
To create a new configuration file, in the left navigation menu, click on Configuration and click on Create.
In the top left, click the drop-down list to select the type of device to create a new configuration file and click Add.
In the example below, we will create a new configuration file for the TEG-082WS.
For the new configuration file, first configure the SNTP/Time Settings under System > System Time.

© Copyright 2021 TRENDnet. All Rights Reserved.
TRENDnet User’s Guide
Hive Management System
16
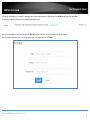
If configuring SNTP, under Date/Time Settings, click the Clock Mode drop-down list and select SNTP.
In the Simple Network Time Protocol (SNTP) Settings, enter the SNTP Primary Server, SNTP Secondary Server as an IPv4 address, IPv6 address, or Domain Name and in top right. In the
Additional Time Parameters section, click the Time Zone drop-down list and select the correct Time Zone and enable and configure your daylight savings time, if any, then click Submit.

© Copyright 2021 TRENDnet. All Rights Reserved.
TRENDnet User’s Guide
Hive Management System
17
If configuring Local Time Settings, under Date/Time Settings, click the Clock Mode drop-down list and select Local Time.
In the Local Time Settings, enter the Date Settings and Time Settings. click Submit.
In the Additional Time Parameters section, click the Time Zone drop-down list and select the correct Time Zone and enable and configure your daylight savings time, if any, then click
Submit.

© Copyright 2021 TRENDnet. All Rights Reserved.
TRENDnet User’s Guide
Hive Management System
18
After you have configured and saved the time and date settings for the configuration file, you can more configuration changes to the configuration file.
After applying all configuration changes for the new configuration file, in the Basic Configuration tab, select Basic Information.
Note: For each configuration change, please make sure to click Submit in the top right after configuration settings have been modified.
Enter a Configuration Name, a System Name, and click the Model drop-down list to select the TRENDnet device model. In the top right, click Submit to save the new configuration file..
Clicking the edit button will allow you to modify the configuration file.
Clicking the delete button will delete the configuration file.
Page is loading ...
Page is loading ...
Page is loading ...
Page is loading ...
Page is loading ...
Page is loading ...
Page is loading ...
Page is loading ...
Page is loading ...
Page is loading ...
Page is loading ...
Page is loading ...
Page is loading ...
Page is loading ...
Page is loading ...
Page is loading ...
Page is loading ...
Page is loading ...
Page is loading ...
Page is loading ...
Page is loading ...
Page is loading ...
Page is loading ...
Page is loading ...
Page is loading ...
Page is loading ...
Page is loading ...
Page is loading ...
Page is loading ...
Page is loading ...
Page is loading ...
Page is loading ...
Page is loading ...
Page is loading ...
Page is loading ...
Page is loading ...
Page is loading ...
Page is loading ...
Page is loading ...
Page is loading ...
Page is loading ...
-
 1
1
-
 2
2
-
 3
3
-
 4
4
-
 5
5
-
 6
6
-
 7
7
-
 8
8
-
 9
9
-
 10
10
-
 11
11
-
 12
12
-
 13
13
-
 14
14
-
 15
15
-
 16
16
-
 17
17
-
 18
18
-
 19
19
-
 20
20
-
 21
21
-
 22
22
-
 23
23
-
 24
24
-
 25
25
-
 26
26
-
 27
27
-
 28
28
-
 29
29
-
 30
30
-
 31
31
-
 32
32
-
 33
33
-
 34
34
-
 35
35
-
 36
36
-
 37
37
-
 38
38
-
 39
39
-
 40
40
-
 41
41
-
 42
42
-
 43
43
-
 44
44
-
 45
45
-
 46
46
-
 47
47
-
 48
48
-
 49
49
-
 50
50
-
 51
51
-
 52
52
-
 53
53
-
 54
54
-
 55
55
-
 56
56
-
 57
57
-
 58
58
-
 59
59
-
 60
60
-
 61
61


Trendnet TPE-5240WS User guide
- Category
- Network switches
- Type
- User guide
Ask a question and I''ll find the answer in the document
Finding information in a document is now easier with AI
Related papers
-
Trendnet TPE-2840WS User guide
-
Trendnet RB-TPE-1620WS User guide
-
Trendnet TEG-082WS User guide
-
Trendnet RB-TPE-4840WS User guide
-
Trendnet RB-TPE-5240WS User guide
-
Trendnet TPE-224WS User guide
-
Trendnet RB-TPE-3012LS User guide
-
Trendnet TPE-S80 Quick Installation Guide
-
-
Other documents
-
Maytag MHWE301 Series User manual
-
Panasonic CZCSWWC2 Operating instructions
-
KitSound HIVE 2 User manual
-
Netgear SS110P-8X2F Owner's manual
-
Sharp CLOUDPORTALOFFICE User guide
-
-
-
 BeeSmart BSHTH User guide
-
Hive TRV User guide
-
Aerohive HiveAP 20 Deployment Manual
