Gigabyte GV-3D1 User manual

Category
Graphics cards
Type
User manual

Gigabyte GV-3D1 is a high-performance graphics card featuring dual NVIDIA GeForce 6600 GT GPUs, integrated with 256MB DDRIII memory, and supporting DirectX 9.0. Its capabilities include stunning visual gaming performance, 256-bit memory bandwidth, and support for AV/S-Video, HDTV output, D-Sub and DVI-I connectors. Unleash the power of dual GPUs for an exceptional gaming experience and enjoy immersive visuals with this top-of-the-line graphics solution.

Gigabyte GV-3D1 is a high-performance graphics card featuring dual NVIDIA GeForce 6600 GT GPUs, integrated with 256MB DDRIII memory, and supporting DirectX 9.0. Its capabilities include stunning visual gaming performance, 256-bit memory bandwidth, and support for AV/S-Video, HDTV output, D-Sub and DVI-I connectors. Unleash the power of dual GPUs for an exceptional gaming experience and enjoy immersive visuals with this top-of-the-line graphics solution.

Copyright
© 2005 GIGABYTE TECHNOLOGY CO., LTD
Copyright by GIGA-BYTE TECHNOLOGY CO., LTD. ("GBT"). No part of this manual may be reproduced or transmitted in any from
without the expressed, written permission of GBT.
Trademarks
Third-party brands and names are the property of their respective owners.
Notice
Please do not remove any labels on VGA card, this may void the warranty of this VGA card.
Due to rapid change in technology, some of the specifications might be out of date before publication of this booklet.
The author assumes no responsibility for any errors or omissions that may appear in this document nor does the author make a
commitment to update the information contained herein.
GV-3D1
User's Manual
Dual GeForce
6600 GT Graphics Accelerator
Rev. 101
12MD-3D1-101
GV-3D1 Graphics Accelerator - 2 -
English
Table of Contents
1. Introduction ......................................................................................... 3
1.1. Features ..................................................................................................... 3
1.2. Minimum system requirements ..................................................................... 3
2. Hardware Installation ........................................................................... 4
2.1. Board layout ............................................................................................... 4
2.2. Hardware installation ................................................................................... 6
3. Software Installation ............................................................................ 8
3.1. Win
®
XP driver and utilities installation .......................................................... 8
3.1.1. Operating system requirement ..................................................................................... 8
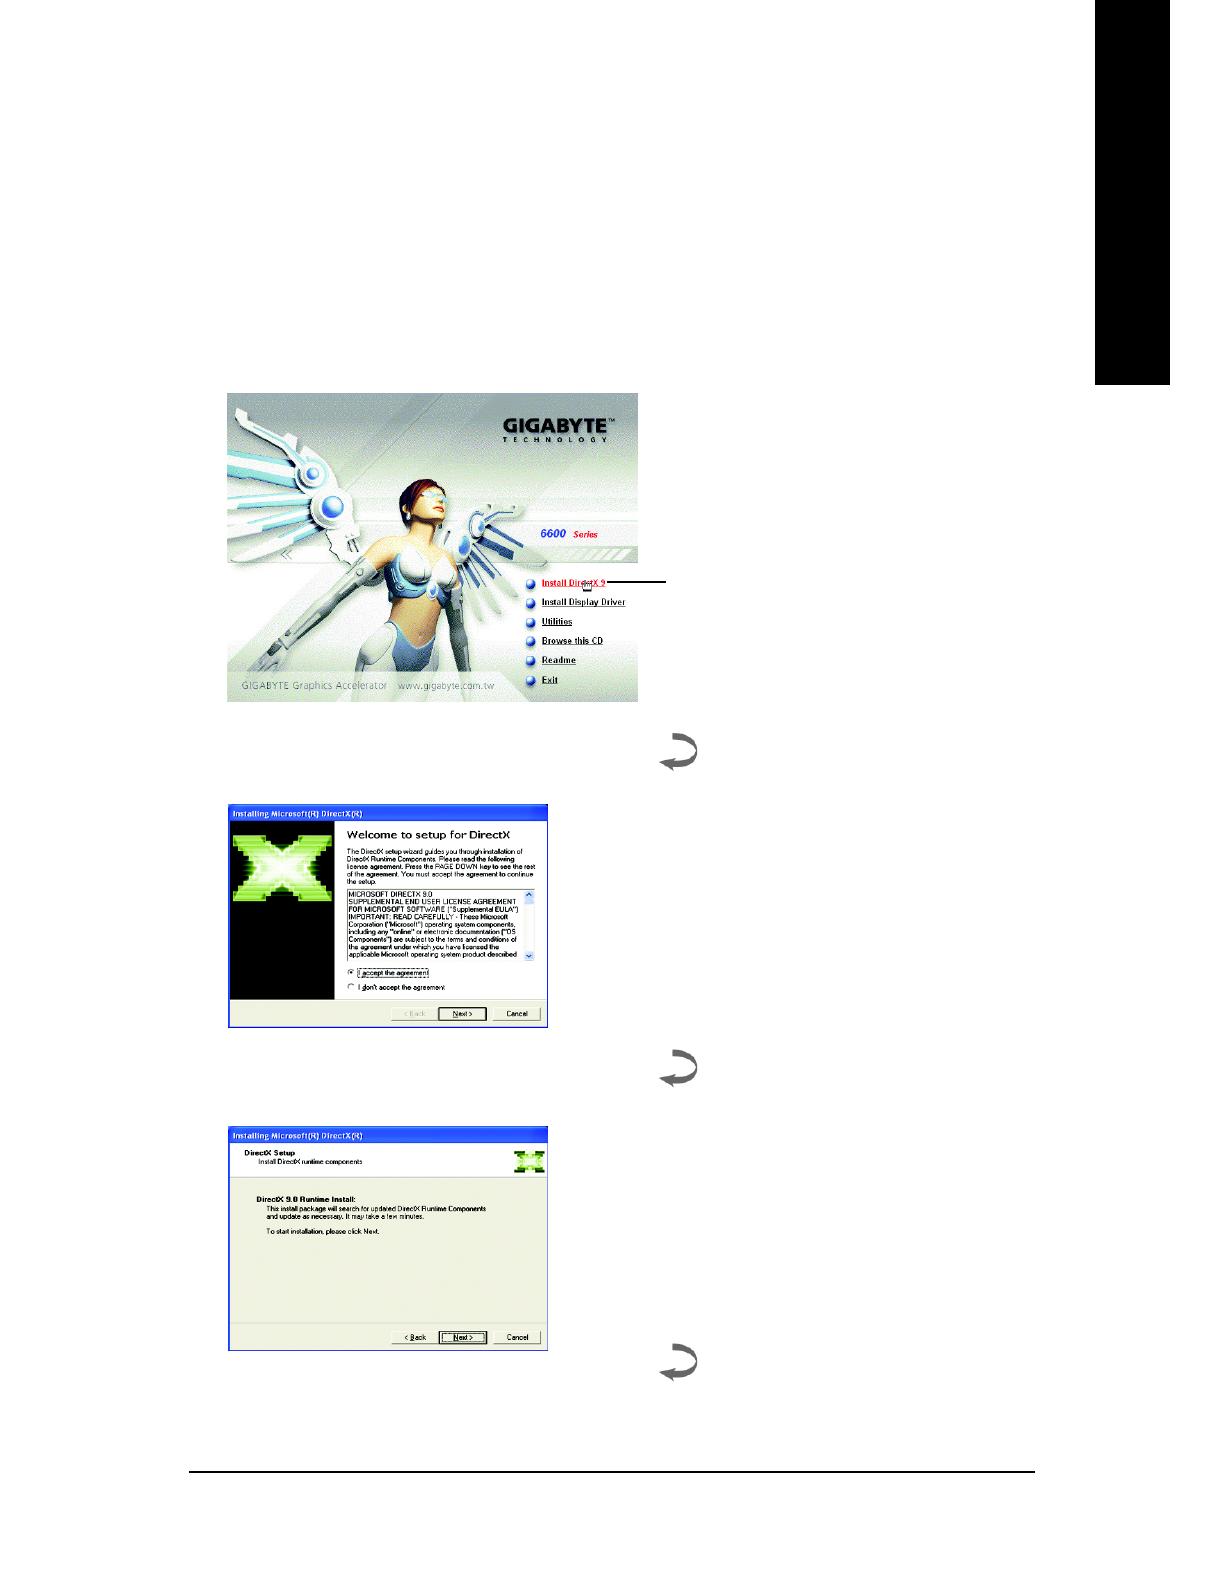
3.1.2. DirectX installation .......................................................................................................... 9
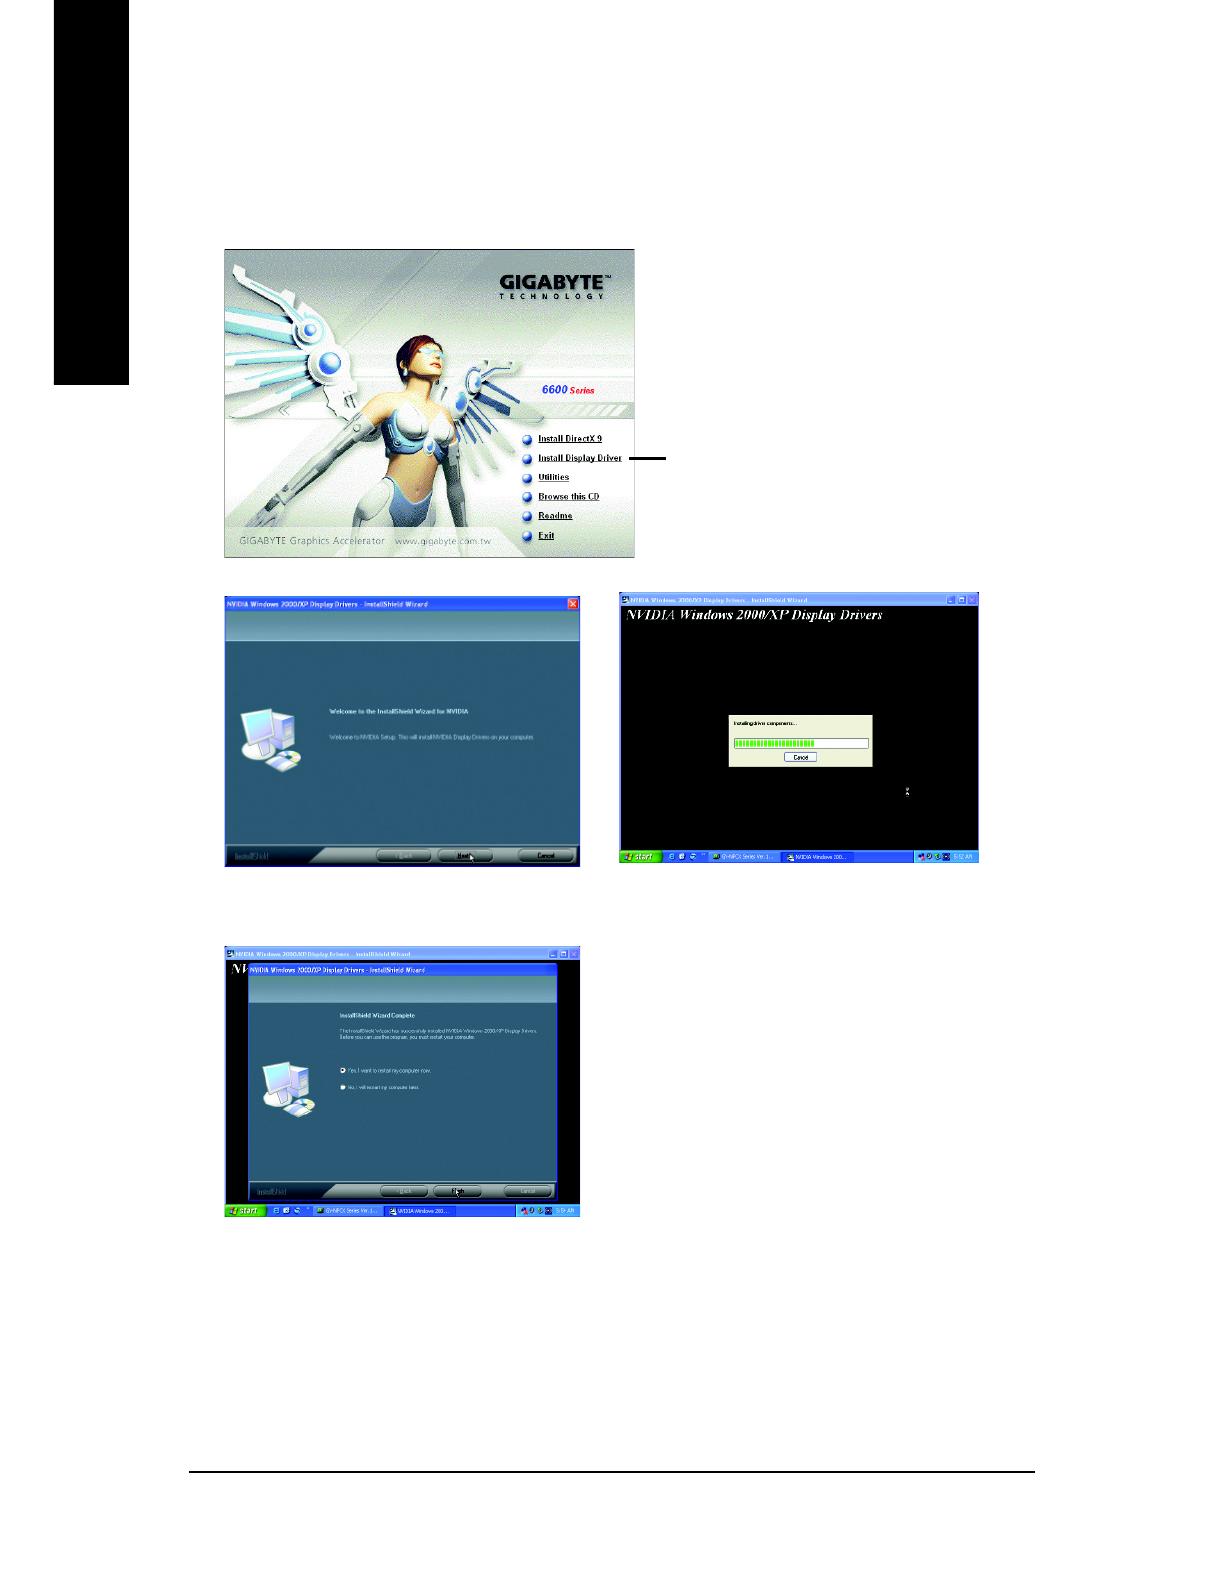
3.1.3. Driver installation ........................................................................................................... 11
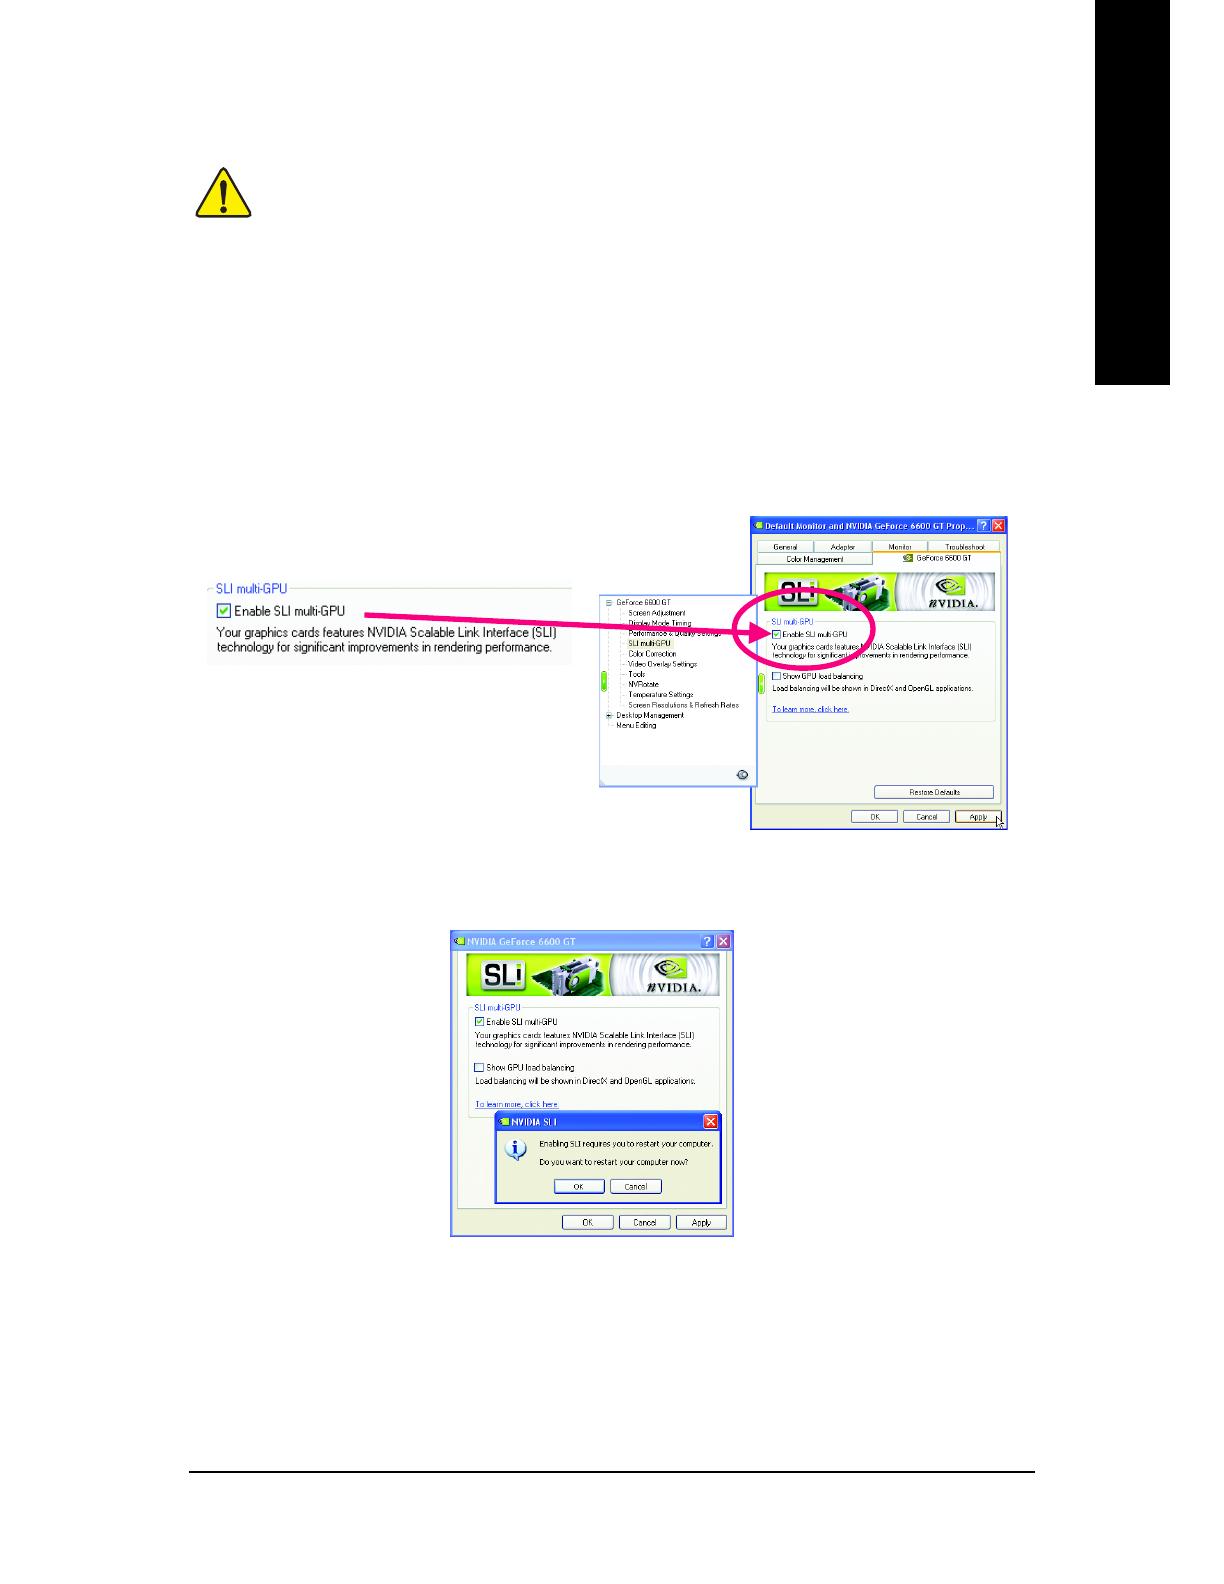
3.1.4. Enabling the dual GeForce 6600 GT GPUs .............................................................. 13
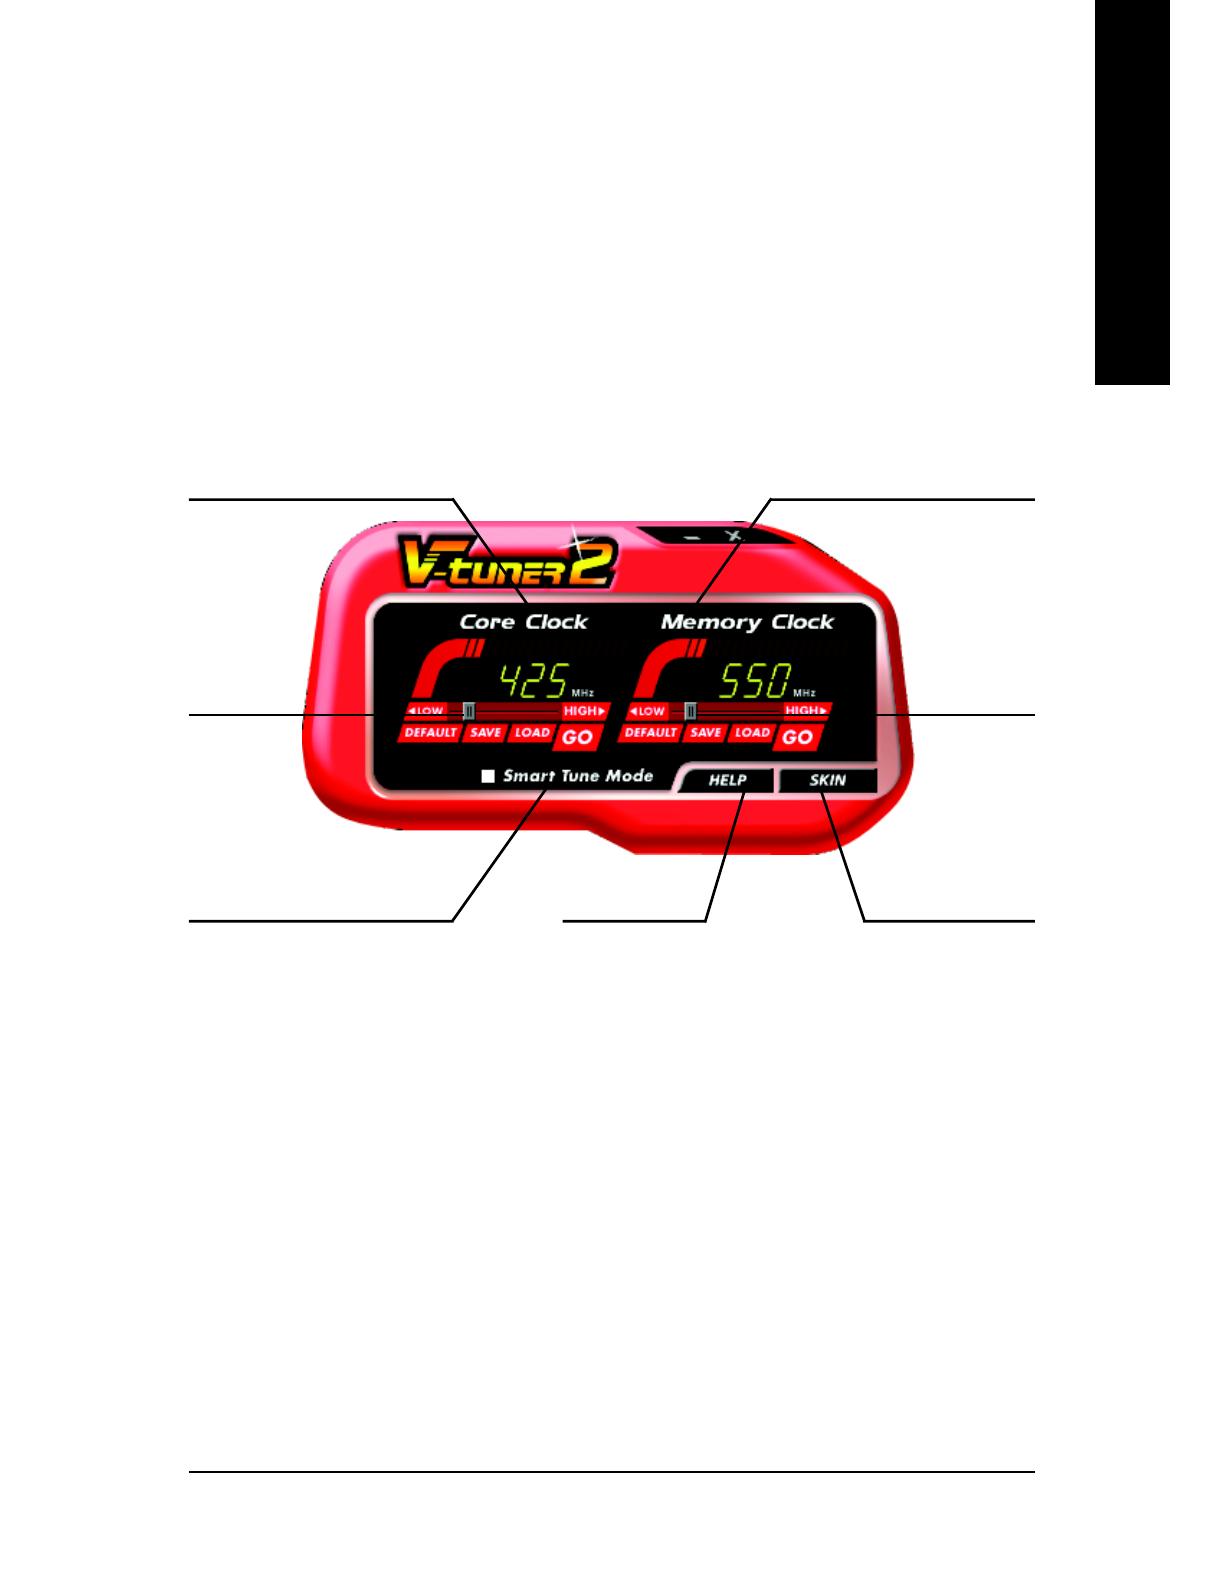
3.1.5. Utilities on driver CD .................................................................................................... 14
3.1.6. Taskbar icon ................................................................................................................. 16
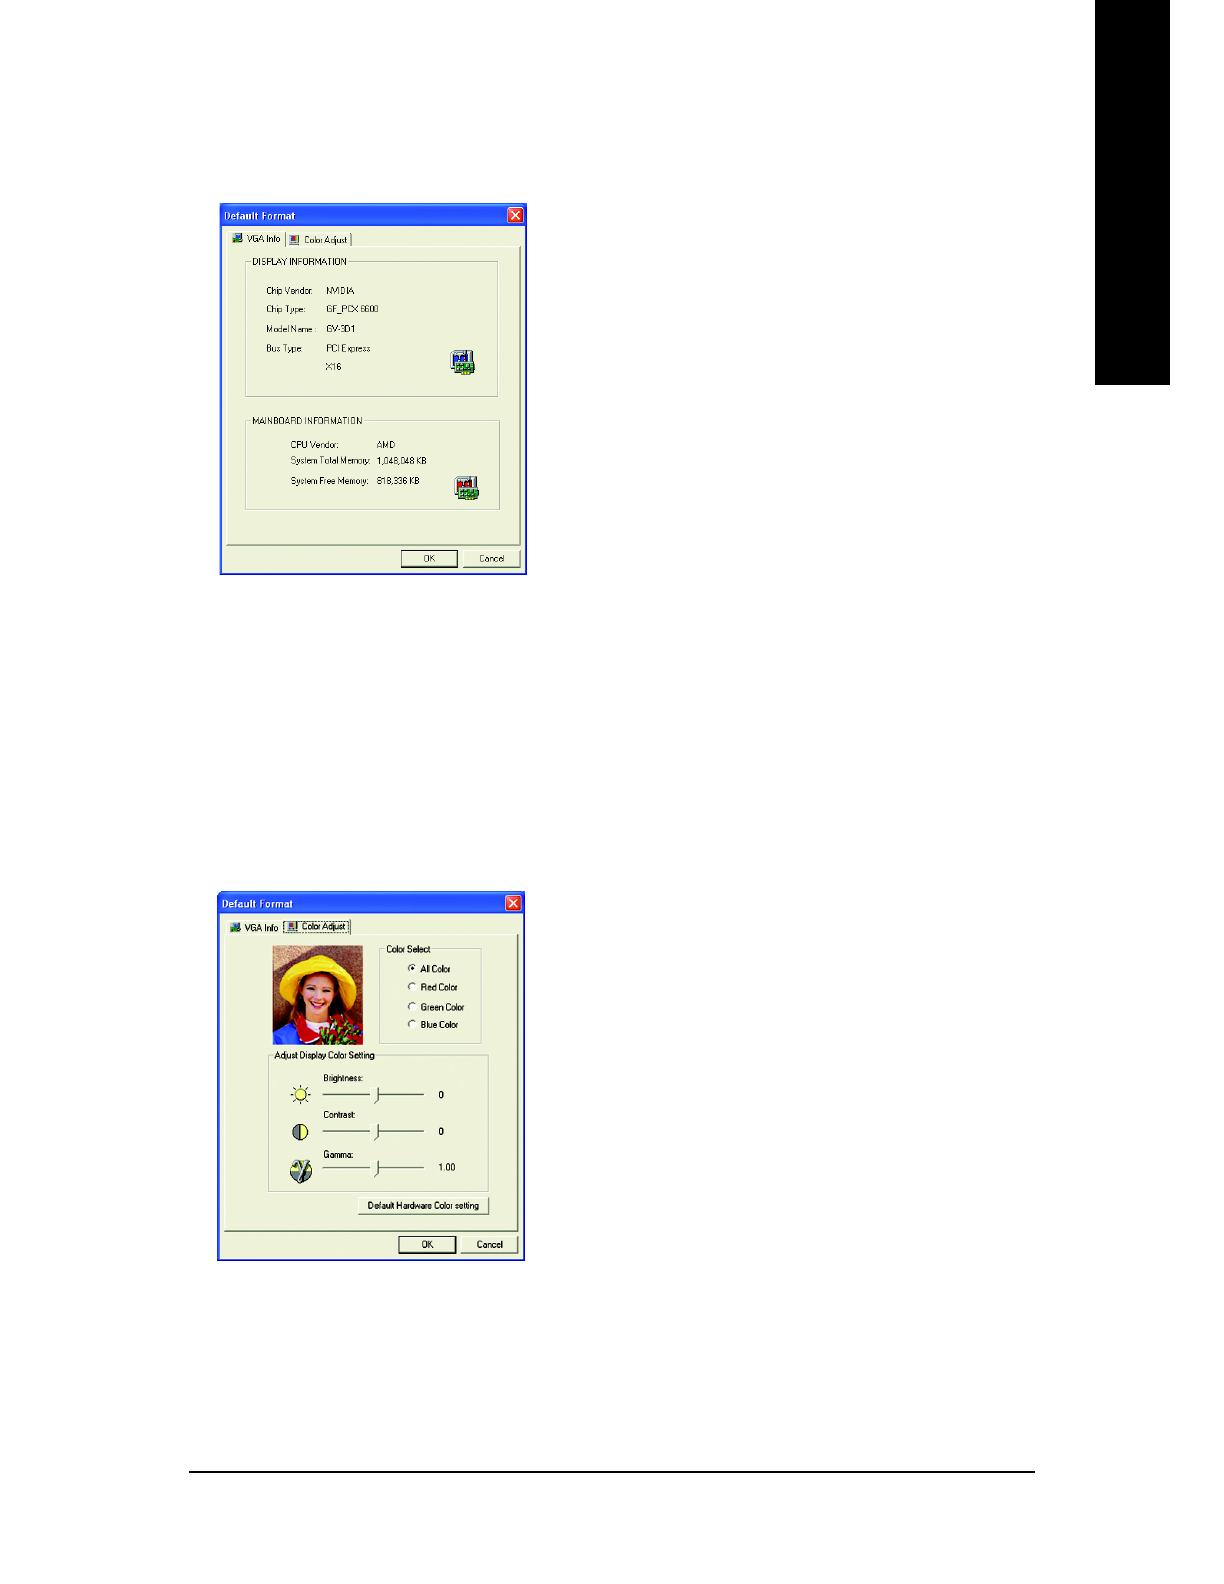
3.1.7. Display properties pages............................................................................................. 19
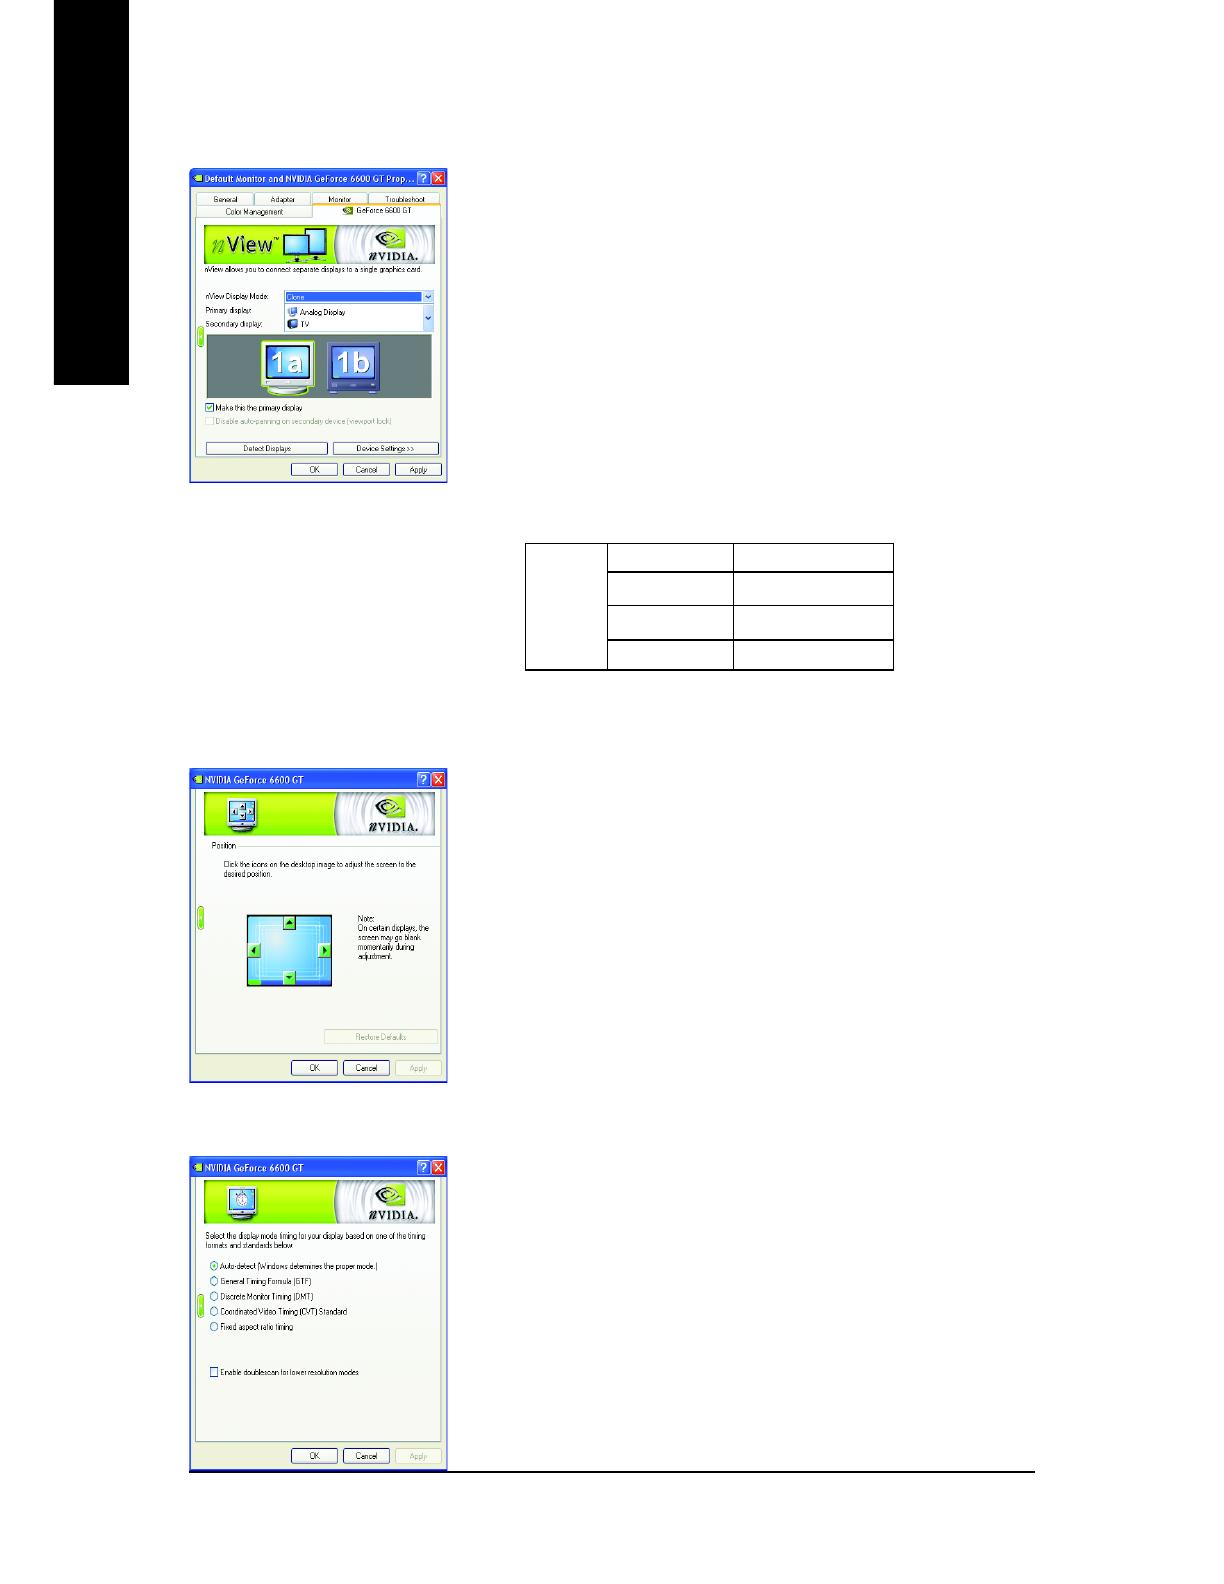
3.1.8. nView properties pages ............................................................................................... 24
3.2. Win
®
2000 driver installation ...................................................................... 29
4. Troubleshooting Tips ........................................................................ 30
5. Appendix .......................................................................................... 31
5.1. How to Reflash the BIOS ........................................................................... 31
5.1.1. Reflash BIOS in MS-DOS mode ................................................................................. 31
5.1.2. Reflash BIOS in Windows mode ................................................................................ 31
5.2. Resolutions and color depth table (In Windows
®
XP) .................................. 32
Introduction- 3 -
English
1. Introduction
1.1. Features
Powered by dual NVIDIA
®
GeForce
6600 GT Graphics Processing Units
(GPUs) (To enable the dual 6600 GT GPUs, please check Page 6~7 for hardware
settings and Page 13 for software settings. )
Supports the newest PCI Express x 16
Integrated with 256MB DDRIII memory
Supports DirectX 9.0
Supports AV / S-Video and HDTV output
Provides D-Sub and DVI-I connectors
1.2. Minimum system requirements
IBM
®
or 100% PC compatible with Pentium
®
III 650MHz or AMD Athlon 650MHz
class processor or higher
One PCI Express x 16 slot
Operating System Win
®
XP
64MB system memory
50MB of available disk space for full installation
CD-ROM or DVD-ROM drive
Important The GV-3D1 graphics card can only work with GIGABYTE’s SLI motherboards
that are based on NVIDIA's chipset.
The GIGABYTE's GV-3D1 is the world's first dual GPU graphics card to feature two high
performance NVIDIA GeForce 6600 GT graphics processors on a single PCI Express
board. The 3D1 is also the world's first NVIDIA GeForce 6600 GT graphics card with
256MB DDRIII memory supporting 256-bit memory bandwidth, further helping to achieve
unprecedented visual gaming performance and distinguishing it above competing products.
GV-3D1 Graphics Accelerator - 4 -
English
TV-out
VGA Monitor
Connector
(15-pin)
DVI-I Connector
2.1. Board layout
2. Hardware Installation
TV-Out
VGA Monitor
Connector
(15-pin)
DVI-I Connector
Analog LCD Monitor
Analog Monitor
OR
VGA Output
NTSC / PAL TV
Projector
Y
S-Video Output
DVI-I to D-Sub Connector
Digital LCD Monitor
DVI Output
Analog LCD Monitor
VGA Output
Pr
Pb/AV Output
HDTV
Hardware Installation- 5 -
English
Expansion cards contain very delicate Integrated Circuit (IC) chips. To
protect them against damage from static electricity, you should follow some
precautions whenever you work on your computer.
1. Turn off your computer and unplug power supply.
2. Use a grounded wrist strap before handling computer components. If you do not have
one, touch both of your hands to a safely grounded object or to a metal object, such as
the power supply case.
3. Place components on a grounded antistatic pad or on the bag that came with the
components whenever the components are separated from the system.
The card contains sensitive electric components, which can be easily damaged by static
electricity, so the card should be left in its original packing until it is installed.
Unpacking and installation should be done on a grounded anti-static mat. The operator
should be wearing an anti-static wristband, grounded at the same point as the anti-static
mat.
Inspect the card carton for obvious damage. Shipping and handling may cause damage
to your card. Be sure there are no shipping and handling damages on the card before
proceeding.
DO NOT APPLY POWER TO YOUR SYSTEM IF IT HAS BEEN DAMAGED ON
THE CARD.
In order to ensure your graphics card working correctly, please use official
Gigabyte BIOS only. Use none official Gigabyte BIOS might cause problem
on the graphics card.
GV-3D1 Graphics Accelerator - 6 -
English
2.2. Hardware installation
Installing Your graphics card.
Now that you have prepared your computer, you are ready to install your graphics accelerator
card.
To install your graphics accelerator card:
1. Power off the computer and monitor, then
disconnect the display cable from the back
of your computer.
2. Remove the computer cover. If necessary,
consult your computer's manual for help in
removing the cover.
3. Remove any existing graphics card from
your computer. Or, if your computer has
any on-board graphics capability, you may
need to disable it on the motherboard. For
more information, please see you computer
documentation.
4. On your GIGABYTE K8 SLI motherboard,
you can find an SLI switch module socket
inserted with an SLI switch module between
the first and second PCIE x 16 slots. Make
sure the SLI switch module is installed in
Normal Mode direction.
Important You must install the SLI switch module in Normal Mode direction.
System will NOT boot if you install it in SLI Mode direction.
Hardware Installation- 7 -
English
5. When Normal Mode is enabled, only the
first PCI Express x 16 slot (PCIE_16_1) is
available (please refer to the motherboard
user's manual). Locate the PCIE_16_1 slot.
If necessary, remove the metal cover from
this slot; then align your graphics card with
the PCI Express x 16 slot, and press it in
firmly until the card is fully seated.
6. Replace the screw to fasten the card in place,
and replace the computer cover.
7. Plug the display cable into your card; then
turn on the computer and monitor. If your
graphics card came with a DVI-I connector,
you can connect a flat panel display to the
appropriate connector, as shown below...
You are now ready to proceed with the installation of the graphics card driver. Please
refer to next chapter for detailed instructions.
To TV/VCR
To VGA Monitor
To Flat Panel Display
After installation, you must connect
the power cable to your GV-3D1
graphics card (connect the black power
connector to the graphics card and both of
the two white power connectors to the
power supply), or system will not boot.
GV-3D1 Graphics Accelerator - 8 -
English
3. Software Installation
In this manual, we assume that your CD-ROM Drive to be Drive D:
The installation of Win
®
2000 / Win
®
XP drivers is very simple. When you insert the driver CD
into your CD-ROM drive, you can see the AUTORUN window (if it does not show up, run
"D:\setup.exe"). Then you can follow the guides to setup your graphics card driver. (Please
follow the subsection 3.1.3 "Driver installation" to install the driver for your graphics
accelerator.)
3.1. Win
®
XP driver and utilities installation
3.1.1. Operating system requirement
When loading the graphics card drivers for the system, please make sure you have
installed DirectX 9 or later version to your system.
If you install the graphics card drivers for the motherboard built on SIS or VIA chipsets,
please install the appropriate driver program for that motherboard. Or please contact
your motherboard nearest dealer for motherboard driver.
Software Installation- 9 -
English
3.1.2. DirectX installation
Install Microsoft DirectX to enable 3D hardware acceleration support for Windows
®
2000 or
Windows
®
XP to achieve better 3D performance.
0 Note: For software MPEG support in Windows
®
2000 or Windows
®
XP, you must
install DirectX first.
Click the "Install DirectX 9" item.
Step 1. When the autorun window showes
up, click the "Install DirectX 9" item.
Step 2. Select the I accept the agreement
check box and click the "Next" button.
Step 3. Click the "Next" button again to begin
DirectX 9 installation.
GV-3D1 Graphics Accelerator - 10 -
English
Step 4. Click "Finish" to restart computer.
Then the DirectX 9 installation is completed.
Installing the components.
Software Installation- 11 -
English
3.1.3. Driver installation
A. New hardware found
After the graphics card is inserted into your computer at the first time, the windows will
automatically detect a new hardware in the system and pop out a "New Hardware Found"
message. The following is the step-by-step installation guide.
Step 1: Found new hardware wizard: Video controller (VGA Compatible)
Click the "Next" button to install the driver. (There
is a driver CD disk that came with your graphics
accelerator, please insert it now.)
Or click the "Cancel" button to install the driver
from AUTORUN window.
Step 2: Found new hardware wizard: Searching and installing
The wizard will search for the driver and install it automatically.
Step 3: Found new hardware wizard: Finish
Click the "Finish" button to finish the installation.
GV-3D1 Graphics Accelerator - 12 -
English
B. Driver installation (Autorun Window)
Insert the driver CD disk into your CD-ROM, and then you can see the AUTORUN window.
If it does not show up, please run "D:\setup.exe".
Step 1. When autorun window show up,
click Install Display Driver item.
Click the "Install Display Driver" item.
Step 2. Click the "Next" button.
Step 3. Click the "Finish" button and restart
computer. Then the driver installation is
completed.
Windows installs the driver components.
Software Installation- 13 -
English
3.1.4. Enabling the dual GeForce 6600 GT GPUs
Step 1: Right-click on Desktop and select Properties. When Display Properties dialog
box appears, select the Settings tab. In Settings, click the Advanced button.
Step 2: Click the Geforce 6600 GT tab when advanced properties dialog box appears.
Select SLI multi-GPU from the side menu and select the Enable SLI multi-GPU check box
and click Apply.
Step 3: Restart your system when prompted.
"*" Only Windows XP operating system supports the dual GPUs mode. Please do not
enable SLI multi-GPU in Windows 2000.
Select the Enable SLI multi-GPU check
box
Important After installation of the GV-3D1 graphics driver, assure that the dual
6600 GT GPUs are enabled* by following the steps below.
GV-3D1 Graphics Accelerator - 14 -
English
3.1.5. Utilities on driver CD
Insert the driver CD disk into your CD-ROM, and then you can see the AUTORUN window.
If it does not show up, please run "D:\setup.exe".
Install V-Tuner 2:
Step 1.Click the "Utilities" item.
Step 4. Enter your name and company.
Step 5. Click the "Finish" button and restart computer.
Then the V-Tuner2 installation is completed.
Step 3. Click the "Next" button.
Step 2.Click the "GIGABYTE Utility" item.
Software Installation- 15 -
English
V-Tuner 2
V-Tuner 2 lets you adjust the working frequency of the graphic engine and video memory
(Core Clock and Memory Clock). V-Tuner2 allows easy tweaking and overclocking of both
GPUs of the GV-3D1 graphics accelerator!
Enables auto adjustment of core/
memory clock settings set by user when
running 3D applications.
Adjust core
speed
Displays core clock status of the dual GPUs Displays memory clock status
Adjust memory
speed
Select choice of skinOpens Help page
GV-3D1 Graphics Accelerator - 16 -
English
3.1.6. Taskbar icon
After installation of the display drivers, you will find a GBT icon on the taskbar's status
area. Right-click this icon to open the GBT control panel, showing a menu composed of
shortcut of the graphics card's enhanced and other functions.
You may click the "Display Properties" item, and then click Settings. Click "Advanced" after
clicking Settings. Click the appropriate tab to change your display settings.
Right click the icon.
You can link to GBT website for updated information about the graph-
ics accelerator, latest drivers, and other information.
Click "VGA Information" item
into the "VGA Info" and "Color
Adjust" tabs.
Software Installation- 17 -
English
VGA Information
VGA Info lists the relevant information about your card.
Color Adjust
Color Adjust allows you to make color adjustments, such as brightness, contrast and
gamma values for each or all of RGB colors.
GV-3D1 Graphics Accelerator - 18 -
English
After installation of the display drivers, you will find a NVIDIA icon on the taskbar's status
area. Click this icon to open the control panel.
You can adjust the properties of
the graphics accelerator from
here.
Right click the icon.
Software Installation- 19 -
English
3.1.7. Display properties pages
To access Display Properties pages, right-click the GBT icon on the taskbar and select
Display Properties or right-click on Desktop and then select Properties. The Display
Properties dialog box shows the information of display adapter, color, the range of display
area, and the refresh rate.
Settings (Resolutions and Color depth for Windows)
You may adjust the screen resolution and color quality settings in this dialog box.
The GV-3D1 GeForce 6600 GT properties
You can click the item to change the
color depth.
You can move the slider to change
the resolution.
This page shows the Adapter, System and
Driver version information.
Click the "Advanced" button for adapter and setting.
To access more advanced options, click the "Advanced" button.
You can select other properties from the pop-out menu.
After pressing the "Advanced" button in Settings, you'll see the Default Monitor and NVIDIA
GeForce 6600 GT Properties dialog box. Click the GeForce 6600 GT tab. (You can also click
the Nvidia icon on the taskbar and select Nvidia Display to access the GeForce 6600 GT
properties page.)
GV-3D1 Graphics Accelerator - 20 -
English
nView allows you to connect separate displays to single
graphics card.
nView modes: select your preferred nView display modes
here. Options: Single display/ Clone/ Horizontal Span/
Vertical Span/ Dualview
Display pair: select a single display or display pair. The
selected display combination will appear in the graphical
representation below.
If TV is chosen as the display, you will need to select the
proper TV format. To do this, click "Device Setting" followed
by "Select TV format". Select the format for your television
and then click "Apply" followed by "OK".
nView Display Settings properties
Display Model GV-3D1
Matrix CRT+TV Yes
CRT+DVI Yes
DVI+TV Yes
"Note" This feature will not be available when SLI multi-GPU is enabled.
Screen Adjustment properties
Click the icons on the desk top image to adjust the screen to the
desire position.
Display Mode Timing
Click to select your display’s timing mode:
Auto-Detect is the default setting; it allows Windows to receive
the proper timing information directly from the display itselt.
Note: Some older monitors may not support this feature.
General Timing Formula (GTF) is a standard used by most
new displays.
Discrete Monitor Timing (DMT) is an older standard still in
use on some displays. Enable this option if your display
requires DMT.
Note
1 / 1

Gigabyte GV-3D1 User manual

Category
Graphics cards
Type
User manual

Gigabyte GV-3D1 is a high-performance graphics card featuring dual NVIDIA GeForce 6600 GT GPUs, integrated with 256MB DDRIII memory, and supporting DirectX 9.0. Its capabilities include stunning visual gaming performance, 256-bit memory bandwidth, and support for AV/S-Video, HDTV output, D-Sub and DVI-I connectors. Unleash the power of dual GPUs for an exceptional gaming experience and enjoy immersive visuals with this top-of-the-line graphics solution.

Ask a question and I''ll find the answer in the document

Finding information in a document is now easier with AI

Ask the document