Page is loading ...

401665 V1.01 9/98
Owner’s Manual
Model 401665
Non-Contact Voltage/Metal Detector
Congratulations on your purchase of Extech's Non-contact Metal/Voltage
Detector which locates metal studs, conduit, nails/screws, and pipes
through walls. The Detector will also check fuses, lamps, and bulbs,
verify component/battery polarity, determine HOT/LIVE/NEUTRAL wiring
configurations, check AC power, DC voltages, diodes, continuity, LEDs,
and appliance grounds. Microwave oven leakage radiation can also be
determined as well as safe viewing distances from TV, PC, or Video
terminals.
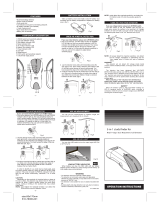
Controls (see diagram above)
1. Metal Detector (adjusts 90
o
) 6. Continuity test plate
2. Battery compartment 7. LED status indicator
3. Pocket Clip 8. Select switch
4. AC voltage and microwave sensor 9. Sensitivity adjust knob
5. Continuity test pin
Specifications:
Continuity 0 to 50 ohms
DC Voltage/Polarity 2 to 36VDC
AC Voltage (non-contact) 70 to 600VAC
Microwave leakage > 5mW/sq.cm
Metal Detection
a. Set the function switch (figure 1) to the "I" position.
b. To find the maximum sensitivity, turn the sensitivity knob (figure 1)
forward - where the knob's gradations are larger - until the LED and
audible tone turn off.
c. Position the metal sensor arm (fig. 1) at a convenient angle for use.
The sensor extends 90
o
.
d. Point the metal sensor arm toward the area where metal is to be
detected. Move the sensor arm slowly and smoothly across a surface
area, approaching from different directions.
e. An audible tone and the LED will alert the user as to the presence of
metal.
f. To narrow the sensitivity, turn the sensitivity knob backwards (to where
the knob gradations are smaller).
Hints about Metal Detection
1. It is not suitable to detect metal in walls or ceilings insulated with
metallic foil.
2. The depth to which metal can be detected is dependent upon the
object's size. The greater the object size, the greater the depth of
metal detection.
AC Voltage Detection
a. Set the function switch (figure 1) to the "II" position.
b. To find the maximum sensitivity, turn the sensitivity knob (figure 1)
forward - where the knob's gradations are larger - until the LED and
audible tone turn off.
c. Point the meter toward the area where an AC signal is to be detected.
Move the meter near the surface under test (switch, socket, plug, wire,
conduit, etc.).
e. An audible tone and the LED will alert the user as to the presence of
an AC signal.
f. To narrow the sensitivity, turn the sensitivity knob backwards (to where
the knob gradations are smaller).
AC Measurement Notes
1. Static electricity may cause false indications. Avoid meter contact with
static generating materials such as rugs, sweaters, etc.
2. The meter's sensitivity may be reduced in high humidity areas.
3. The sensitivity increases when the continuity test plate (figure 1) is
touched.
AC Wire "Break Point" Detection
a. Setup and position the meter to detect AC voltage as in the above
section "AC Voltage Detection".
b. Turn the sensitivity knob to where the knob's gradations are larger
(Max sensitivity).
c. Move the meter along the wire until the break point is located.
c. The break point is found when the audible and LED alert ceases,
indicating that AC voltage is no longer present.
Earth Ground Detection on Appliances and other Devices
a. Setup and position the meter to detect AC voltage as in the above
section "AC Voltage Detection".
b. Move the meter along the surface of the device under test with the
device's power off.
c. The audible and LED alerts will appear if the appliance or other device
is not connected to earth ground.
Verifying AC power connection in Appliances
a. Setup and position the meter to detect AC voltage as in the above
section "AC Voltage Detection".
b. Move the meter close the device under test.
c. The audible and LED alerts will appear if the power plug is inserted
incorrectly into a wall socket.
Determine suggested viewing distance from TV, Computer
Monitors, and Video Terminals
a. Setup and position the meter to detect AC voltage as in the above
section "AC Voltage Detection".
b. The suggested distance is determined by moving the meter from a
close distance to a further distance away from a TV (with TV power
ON) and listening for the audible alert tone to extinguish (the LED also
provides status indication).
c. At close proximity to the TV or other device, the meter will sound a
tone. As the meter moves away from the device it will eventually
cease the alert signal. This will be at a suggested viewing distance.
Continuity / Low Resistance Checks
Caution: Remove power to devices before checking continuity.
Any voltage present will be present at the continuity test plate!
Serious injury or death can result.
Always discharge components before performing continuity tests.
Devices such as lamps, bulbs, fuses, heating elements, coils,
transformers, inductors, etc. can be tested for continuity. The following
steps provide general instructions for testing continuity. Thereafter,
special instructions are provided for capacitors, diodes, transistors, home
appliances, etc.

401665 V1.01 9/98
General Continuity / Low Resistance Instructions for Testing
Lamps, Bulbs, and Fuses
a. Set the function select switch (figure 1) to the "0" position.
b. Set the sensitivity knob (figure 1) to the highest sensitivity setting
(where the audible tone is the loudest).
c. With one finger on continuity test plate, press the continuity test pin
(figure 1) to one side of the device under test.
d. Place other hand on opposite side of device under test. When audible
alert and LED appear, continuity is good (low resistance).
Special Continuity / Low Resistance Testing Instructions
Capacitance Low Resistance Testing
CAUTION!!
Discharge Capacitor by shorting its leads before testing!!
This procedure is basically the same as the procedure outlined in the
section "General Continuity Testing" described above except that the
audible tone and LED will appear intermittently (tone ON then OFF
periodically) when low resistance is measured.
Diode Low Resistance Testing
a. This procedure is basically the same as the procedure outlined in the
section "General Continuity Testing" described above except that the
diode should be checked in both directions (forward and reverse).
b. Audible tone and LED will appear in one direction but not in another
when a good diode is measured.
Coils, Transformers, Inductors Low Resistance Testing
a. This procedure is basically the same as the procedure outlined in the
section "General Continuity Testing" described above.
b. Audible tone and LED will appear when resistance measured is less
than 50 ohms indicating good continuity.
Transistor Low Resistance Testing
a. This procedure is basically the same as the procedure outlined in the
section "General Continuity Testing" described above.
b. For NPN transistors, the audible tone and LED appear when the
Collector (C) and Emitter (E) are measured with user's finger touching
the Base (B).
c. For PNP transistors, the audible tone and LED will appear when the
meter is touching the Base (B) and the user's finger alternately
touching the Collector (C) and Emitter (E).
d. Since a transistor's junction is the same as a diode. The audible tone
and LED status is read just as for a diode check.
Appliance plug and wiring Low Resistance Testing
a. This procedure is basically the same as the procedure outlined in the
section "General Continuity Testing" described above.
b. Refer to Fig. 3.
c. Audible tone and LED indicates low resistance (less than 50 ohms).
Battery
and DC Polarity Checks
CAUTION!! Maximum DC Voltage Testing = 36 VDC.
Do not test higher voltages,
damage to the meter and/or personal injury may result.
Polarity Check
a. Set Function Select Switch (Figure 1) to the "O" position.
b. Select highest sensitivity by turning the sensitivity knob backwards
(where the knob gradations are smaller).
c. Touch one side of battery or adaptor to continuity test pin (Figure 1).
Touch finger of one hand to other side of battery or adaptor. Touch
Continuity Test Plate with finger of other hand.
d. Audible tone and LED appear for Positive side of battery or adaptor
only.
Battery Check
a. Set Function Select Switch to the "O" position.
b. Select highest sensitivity by turning the sensitivity knob backwards
(where the knob gradations are smaller).
c. Touch one side of battery or adaptor to continuity test pin. Touch
finger of one hand to other side of battery or adaptor. Touch Continuity
Test Plate with finger of other hand.
d. If the Audible tone and LED appear for Positive side of battery, the
battery is charge. If the tone and LED appear for negative side, the
battery is weak.
Microwave Leakage (Radiation) Detect
a. Set Function Select Switch (Figure 1) to the "II" position.
b. Place a cup of water or food inside the oven
c. Set the oven to run for 1 minute on HIGH setting.
d. Move the meter slowly over and around the oven door edge and front
glass.
e. Audible tone and LED will appear (intermittently, ON and OFF) if
radiation leakage is detected.
Battery replacement
a. Slide and lift off the battery compartment cover
b. Remove old batteries, observing their polarity.
c. Install new batteries with proper polarity.
d. Replace battery compartment cover.
Battery Compartment
Slide Cover for Access
Batteries L1154 (4)
Service and Repair
Extech offers complete repair and calibration services for all of the
products we sell. For periodic calibration, NIST certification or repair of
any Extech product, call customer service for details on services
available. Extech recommends that calibration be performed on an
annual basis to insure calibration integrity.
WARRANTY
EXTECH INSTRUMENTS CORPORATION warrants this instrument to
be free of defects in parts and workmanship for one year from date of
shipment. If it should become necessary to return the instrument for
service during or beyond the warranty period, then contact the Customer
Service Department at (781) 890-7440 for authorization. A Return
Authorization (RA) number must be issued before any product is
returned to Extech. The sender is responsible for shipping charges,
freight, insurance and proper packaging to prevent damage in transit.
This warranty does not apply to defects resulting from action of the user
such as misuse, improper wiring, operation outside of specification,
improper maintenance or repair, or unauthorized modification. Extech
specifically disclaims any implied warranties or merchantability or fitness
for a specific purpose and will not be liable for any direct, indirect,
incidental or consequential damages. Extech's total liability is limited to
repair or replacement of the product.
The warranty set forth above is inclusive and no other warranty, whether
written or oral, is expressed or implied.
/