Page is loading ...

MANUAL TIRE CHANGER
Model 34542
ASSEMBLY AND OPERATING INSTRUCTIONS
3491 Mission Oaks Blvd., Camarillo, CA 93011
Visit our Web site at: http://www.harborfreight.com
®
©
TO PREVENT SERIOUS INJURY,
READ AND UNDERSTAND ALL WARNINGS
AND INSTRUCTIONS BEFORE USE.
Do to continuing improvements,
actual product may differ slighlty
from the product described herein.
Copyright 2006 by Harbor Freight Tools®. All rights reserved. No portion of this
manual or any artwork contained herein may be reproduced in any shape or form
without the express written consent of Harbor Freight Tools.
For technical questions, please call 1-800-444-3353.
REV: 10/06
Tire not included.

PRODUCT SPECIFICATIONS
SAVE THIS MANUAL
You will need this manual for the safety warnings and precautions, assembly, operating,
inspection, maintenance and cleaning procedures, parts list and assembly diagram.
Keep your invoice with this manual. Write the invoice number on the inside of the front
cover. Keep this manual and invoice in a safe and dry place for future reference.
GENERAL SAFETY RULES AND PRECAUTIONS
WARNING!
READ AND UNDERSTAND ALL INSTRUCTIONS
Failure to follow all instructions listed below may result in
serious injury.
SAVE THESE INSTRUCTIONS
WORK AREA
1. Keep your work area clean and well lit. Cluttered benches and dark areas
invite accidents.
2. Do not operate tools and equipment in explosive atmospheres, such
as in the presence of flammable liquids, gases, or dust. Tools and
equipment can create sparks which may ignite the dust or fumes.
SKU 34542 For technical questions, please call 1-800-444-3353 PAGE 2
Item Description
Product Applications Will handle all tires from 8” to light trucks
such as 7.5” x 16” and flotation tires up
to sizes 12.5”L x 16”.
Base Dimensions 15” x 18”
Base Mounting Holes 7/16” Diameter (Qty. 4)
Mounting/Dismounting Bar
Dimensions
37” Long x 1-15/16” Diameter
Wheel Rest Plate Dimensions 7-1/2” Diameter x 3/16” Thick
Leg Dimensions 1-1/2” x 3” x .15 (Wall Channel)
Main Column Dimensions 2-7/8” Diameter
Construction All Steel
Additional Features No Air or Electrical Connections Required.
Designed to Protect Tube From Damage.
Approximate Weight 42 Pounds

PERSONAL SAFETY
1. Stay alert. Watch what you are doing, and use common sense when oper-
ating tools and equipment. Do not use a tool or equipment while tired or
under the influence of drugs, alcohol, or medication. A moment of inatten-
tion while operating tools and equipment may result in serious personal injury.
2. Dress properly. Do not wear loose clothing or jewelry. Contain long hair.
Keep your hair, clothing, and gloves away from moving parts. Loose
clothes, jewelry, or long hair can be caught in moving parts.
SKU 34542 For technical questions, please call 1-800-444-3353 PAGE 3
3. Do not overreach. Keep proper footing and balance at all times. Proper
footing and balance enables better control of the power tool in unexpected
situations.
4. Use safety equipment. Always wear eye protection. Always wear
ANSI-approved safety impact goggles and a full face shield when using
and/or installing this product.
TOOL USE AND CARE
1. Do not force the tool. Use the correct tool for your application. The correct
tool will do the job better and safer at the rate for which it is designed.
2. Store idle tools out of reach of children and other untrained persons. Tools
are dangerous in the hands of untrained users.
3. Maintain tools with care. Properly maintained tools are less likely to malfunc-
tion and are easier to control. Do not use a damaged tool. Tag damaged tools
“Do Not Use” until repaired.
3. Keep bystanders, children, and visitors away while operating tools and
equipment. Distractions can cause you to lose control. Provide barriers or
shields as needed.
4. Check for misalignment or binding of moving parts, breakage of parts, and
any other condition that may affect the tool’s operation. If damaged, have
the tool serviced before using. Many accidents are caused by poorly main-
tained tools.
5. Use only accessories that are recommended by the manufacturer for your
model. Accessories that may be suitable for one tool may become hazardous
when used on another tool.

SKU 34542 For technical questions, please call 1-800-444-3353 PAGE 4
SERVICE
1. Tool service must be performed only by qualified repair personnel. Service
or maintenance performed by unqualified personnel could result in a risk of injury.
2. When servicing a tool, use only identical replacement parts. Follow
instructions in the
“Inspection, Maintenance, And Cleaning”
section of this
manual. Use of unauthorized parts or failure to follow maintenance instructions
may create a risk of electric shock or injury.
SPECIFIC SAFETY RULES AND PRECAUTIONS
1. Maintain labels and nameplates on the Tire Changer. These carry impor-
tant information. If unreadable or missing, contact Harbor Freight Tools for a
replacement.
2. Make sure the Tire Changer is located on a flat, level, sturdy surface ca-
pable of supporting the weight of the Tire Changer, tires, and any additional
tools and equipment.
3. Industrial applications must follow OSHA guidelines.
4. Never stand on the Tire Changer. Serious injury could result if the Tire
Changer is tipped.
5. Do not allow children and other unauthorized people to handle or play with
the Tire Changer.
6. Do not force the Tire Changer. This tool will do the work better and safer at
the speed and capacity for which it was designed.
7. Prior to using the Tire Changer, always read and follow the instructions and
safety precautions as outlined in the tire manufacturer and vehicle
manufacturer’s owners manuals.
8. Never leave a vehicle running when changing/repairing tires. When
running an Engine in an enclosed area, the Engine produces carbon
monoxide, a colorless, odorless, toxic gas that, when inhaled, can
cause serious personal injury or death. Whenever possible, use a
carbon monoxide detector (not included) to detect excessive carbon
monoxide fumes in the work area and in the surrounding area.
9. Do not use this product if under the influence of alcohol or drugs. Read
warning labels on prescriptions to determine if your judgement or reflexes are

SKU 34542 For technical questions, please call 1-800-444-3353 PAGE 5
13. WARNING! The warnings and precautions discussed in this manual cannot
cover all possible conditions and situations that may occur. It must be under
stood by the operator that common sense and caution are factors which cannot
be built into this product, but must be supplied by the operator.
SAVE THESE INSTRUCTIONS
impaired while taking drugs. If there is any doubt, do not attempt to use this
product.
10. Use the right tool for the job. Do not attempt to force a small tool to do the
work of a larger industrial tool. There are certain applications for which this
product was designed. It will do the job better and more safely at the rate for
which it was intended. Do not modify this product, and do not use this product
for a purpose for which it was not intended.
11. EXPLOSION DANGER! Never overinflate tires or other inflatable items.
When inflating a tire with compressed air, make sure to inflate the tire to
the exact PSI as recommended by the tire manufacturer. Always use a
pressure gauge (not included) to check the actual pressure in tires.
12. Always dispose of old tires in accordance with local, state, and federal
laws.
UNPACKING
When unpacking, check to make sure all the parts shown on the Parts Lists on page 10
are included. If any parts are missing or broken, please call Harbor Freight Tools at the
number shown on the cover of this manual as soon as possible.
ASSEMBLY INSTRUCTIONS
1. Locate the Hex Bolts (6), Lock Washers (11), Hex Head Nuts (12), Center Post
(1), and the Pedestal Base (13). (See Assy. Diagram.)
2. Bolt the Pedestal Base (13) to the Center Post (1), using the Hex Bolts (6), Lock
Washers (11), and Hex Head Nuts (12). NOTE: The end of the Pedestal Base
with the triangular stop should be directly in front of the Bead Breaker Handle (7)
and Bead Breaker Shoe (10). (See Assy. Diagram.)
3. Bolt the two Side Base Channels (9) into place. (See Assy. Diagram.)

4. Temporarily set the Tire Changer aside. Then drill four holes in the concrete floor
surface equal to the
length
of four 7/16” diameter cement anchors (not included)
you will use to secure the Tire Changer to the floor surface. (See Figure A.)
5. Once the four 7/16” diameter holes are drilled, blow out the concrete dust from
each of the holes. (See Figure A.)
6. Set the Tire Changer back on the concrete floor surface, and align its four
mounting holes at its base with the four pre-drilled holes in the floor surface.
7. If necessary, level the Tire Changer on the concrete floor surface using a
carpenter’s level and steel shims (neither included).
8. Use a hammer (not included) to tap the four cement anchors through the four
mounting holes in the base of the Tire Changer and into the concrete floor sur-
face. Continue tapping the cement anchors until their washer rests against the
base of the Tire Changer. (See Figure A.)
9. Firmly tighten the nuts of the four cement anchors to secure the Tire Changer to
the concrete floor surface. (See Figure A.)
SKU 34542 For technical questions, please call 1-800-444-3353 PAGE 6
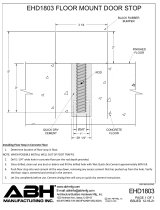
DRILL HOLES
TO DEPTH EQUAL
TO LENGTH OF
CEMENT ANCHOR.
INSERT
CEMENT ANCHOR
SO THAT WASHER
RESTS AGAINST
BASE OF
TIRE CHANGER.
FIRMLY
TIGHTEN
CEMENT
ANCHOR
NUT.
FIGURE A
1. Choose a concrete floor surface location for the Tire Changer that is well lighted,
offers adequate workspace, and is away from high pedestrian traffic areas.
2. The concrete floor surface should be at least 4” in depth. (See Figure A.)
3. With assistance, move the Tire Changer to the location. Use the Tire Changer’s
four 7/16” mounting holes at its base as a template for which four 7/16” holes will
be drilled in the concrete surface. Do not use a concrete drill bit larger in
diameter than 7/16”. (See Figure A.)
SECURING THE TIRE CHANGER TO A FLOOR SURFACE

SKU 34542 For technical questions, please call 1-800-444-3353 PAGE 7
OPERATING INSTRUCTIONS
Bead Breaking:
1. Before starting, use a rubber lubricant (not included) to help make bead break-
ing, mounting, and demounting easier.
2. Deflate the tire completely.
3. To break the bead from the rim of the tire, lay the tire flat on the Pedestal Base
(13). The triangular stop is used to keep the tire from sliding.
4. Insert the flat end of the Mount/Demount Bar (14) into the Bead Breaker Handle
(7).
5. Set the Bead Breaker Shoe (10) on the tire against the edge of the rim. As you
work, you may need to adjust the Bead Breaker Shoe height by removing the
Clevis Pegs (5) and moving the Shoe to the appropriate height. Then, reinsert
the Clevis Pegs.
6. Push down on the Mount/Demount Bar (14) to force the bead off the rim. If the
bead does not come off all at once, turn the tire and try again in several loca-
tions.
7. Turn the tire over, and repeat Steps #1 through #6 above.
Demounting And Mounting Tires:
1. After the bead is broken, place the tire up on the machine with the valve stem
facing up and the Wheel Lug Peg (3) sticking up through the lug hole of the rim.
2. Place the Spider Pedestal (4) over the Center Post (1) with the tapered side
going into the wheel hub.
3. Screw the Pedestal Cap (2) onto the Center Post (1). Lock the Spider Pedestal
(4) into place by tightening snugly by hand. Hand tightening should be adequate.
However, if you want more pressure place the flat end of the Mount/Demount
Bar (14) through the top of the Pedestal Cap and use extra leverage to tighten
the Pedestal Cap further.
4. Once the tire is held securely in place, force the flat end of the Mount/Demount
Bar (14) in between the tire and the rim. This should be done with the flat end of
the Mount/Demount Bar against the rim. Pull the Mount/Demount Bar toward
you and across the tire to force the edge of the bead over the rim.

SKU 34542 For technical questions, please call 1-800-444-3353 PAGE 8
5. Work the Mount/Demount Bar (14) all the way around the Center Post (1) to
demount the bead completely.
6. Pull the tire up toward the top of the bead. Place the flat end of the
Mount/Demount Bar (14) between the tire and the rim as before. Then, repeat
the process to remove the tire from the rim completely.
7. Repair the tire. Then, mount the tire back on the rim and set the tire on top of
the rim.
8. Hook the end of the Mount/Demount Bar (14) over the edge of the rim.
9. Push the tire forward over the edge of the rim at the place the Mount/Demount
Bar (14) is.
10. Position the bead so it will slide across the flat portion of the hook end of the
Mount/Demount Bar (14).
11. Press down on the tire with one hand against the rim. With the other hand, pull
the Mount/Demount Bar (14) clockwise around the Center Post (1) until the bead
starts to mount on the rim. It should only have to move a few inches before you
can let go of the tire and use both hands on the Mount/Demount Bar.
12. Continue around the rim until the tire mounts over the edge of the bead. Repeat
this procedure on the second bead to completely mount the tire.
13. IMPORTANT: If the tire bead starts to seat while you are mounting the tire, the
tire will need to stretch more and will be more difficult to mount. To prevent this,
push down on the tire so it doesn’t seat on the upper edge of the rim during
mounting.
14. NOTE: The bead running across the top of the Mount/Demount Bar (14) keeps
the Bar hooked on the edge of the rim. The tire bead will run across the top (flat
part of the mounting end of the Bar) and against the curved Wheel Lug Peg (3)
when mounting the tire on the rim.
ATV Tires:
1. NOTE: ATV tires are difficult to demount and mount because of their small
diameter. Additionally, the tires are soft and bend easily when breaking the bead.
2. If the Bead Breaker Shoe (10) slides off the tire, hold the Shoe in place and work
around the rim breaking the bead a little at a time.
3. Place lubricant between the tire and rim to make it slide off easier.

SKU 34542 For technical questions, please call 1-800-444-3353 PAGE 9
4. If the wheel has a tall rim with a small inside diameter so that the rim does not go
over the round plate on the Center Post (1) and will not accept the Spider Pedes-
tal (4), or let the Wheel Lug Peg (3) through its hole, you should still be able to
use this Tire Changer to demount and mount the tire. Most rims are held in
place adequately by tightening the Center Post Cap down snugly. With the Cap
in place, you should still be able to hold the rim in place to mount and demount
the tire as discussed previously.
INSPECTION, MAINTENANCE, AND CLEANING
1. Before each use, inspect the general condition of the Tire Changer. Check for
loose screws, misalignment or binding of moving parts, cracked or broken parts,
and any other condition that may affect the safe operation of the Tire Changer. If
abnormal noise or vibration occurs, have the problem corrected before further
use. Do not use damaged equipment.
2. To clean the Tire Changer, use a mild detergent or mild solvent. Then, dry.
3. CAUTION! All maintenance, service, or repairs not mentioned in this
manual must only be performed by a qualified service technician.
PLEASE READ THE FOLLOWING CAREFULLY
THE MANUFACTURER AND/OR DISTRIBUTOR HAS PROVIDED THE PARTS LIST
AND ASSEMBLY DIAGRAM IN THIS MANUAL AS A REFERENCE TOOL ONLY. NEI-
THER THE MANUFACTURER OR DISTRIBUTOR MAKES ANY REPRESENTATION OR
WARRANTY OF ANY KIND TO THE BUYER THAT HE OR SHE IS QUALIFIED TO
REPLACE ANY PARTS OF THE PRODUCT. IN FACT, THE MANUFACTURER AND/OR
DISTRIBUTOR EXPRESSLY STATES THAT ALL REPAIRS AND PARTS REPLACE-
MENTS SHOULD BE UNDERTAKEN BY CERTIFIED AND LICENSED TECHNICIANS,
AND NOT BY THE BUYER. THE BUYER ASSUMES ALL RISKS AND LIABILITY ARIS-
ING OUT OF HIS OR HER REPAIRS TO THE ORIGINAL PRODUCT OR REPLACE-
MENT PARTS THERETO, OR ARISING OUT OF HIS OR HER INSTALLATION OF
REPLACEMENT PARTS THERETO.

NOTE:
Some parts are listed and shown for illustration purposes only,
and are not available individually as replacement parts.
PARTS LIST AND ASSEMBLY DIAGRAM
SKU 34542 For technical questions, please call 1-800-444-3353 PAGE 10
2
4
14
3
5
1
5
66
7
6
6
8
8
10
13
9
11
12
11
12 11
11
12
12
9
Part # Description Qty. Part # Description Qty.
1 Center Post 1 8 Hump Pin & Rings 2
2 Pedestal Cap 1 9 Side Base Channel 2
3 Wheel Lug Peg 1 10 Bead Breaker Shoe 1
4 Spider Pedestal 1 11 Lock Washer (3/8”) 4
5 Clevis Pegs (7/16”) 2 12 Hex Head Nut (3/8” x 16) 4
6 Large Hex Bolt (3/8” x 16 x 1”) 4 13 Pedestal Base 1
7 Bead Breaker Handle 1 14 Mount/Demount Bar 1

SKU 34542 For technical questions, please call 1-800-444-3353 PAGE 11
WARRANTY
Harbor Freight Tools Co. makes every effort to assure that its products meet high quality and durability standards,
and warrants to the original purchaser that this product is free from defects in materials and workmanship for
the period of ninety days from the date of purchase. This warranty does not apply to damage due directly or
indirectly, to misuse, abuse, negligence or accidents, repairs or alterations outside our facilities, or to lack of
maintenance. We shall in no event be liable for death, injuries to persons or property, or for incidental, contingent,
special or consequential damages arising from the use of our product. Some states do not allow the exclusion or
limitation of incidental or consequential damages, so the above limitation of exclusion may not apply to you. THIS
WARRANTY IS EXPRESSLY IN LIEU OF ALL OTHER WARRANTIES, EXPRESS OR IMPLIED, INCLUDING
THE WARRANTIES OF MERCHANTABILITY AND FITNESS.
To take advantage of this warranty, the product or part must be returned to us with transportation charges prepaid.
Proof of purchase date and an explanation of the complaint must accompany the merchandise. If our inspection
verifies the defect, we will either repair or replace the product at our election or we may elect to refund the purchase
price if we cannot readily and quickly provide you with a replacement. We will return repaired products at our
expense, but if we determine there is no defect, or that the defect resulted from causes not within the scope of
our warranty, then you must bear the cost of returning the product.
This warranty gives you specific legal rights and you may also have other rights which vary from state to state.
3491 Mission Oaks Blvd. • PO Box 6009 • Camarillo, CA 93011 • (800) 444-3353
LIMITED 90 DAY WARRANTY
/