Sharp DX-C311 User manual

Category
Multifunctionals
Type
User manual

This manual is also suitable for

Printing
Using the printer function.
Faxing
Using the fax function.
Quick Start GuideQuick Start GuideQuick Start Guide
DIGITAL FULL COLOR MULTIFUNCTIONAL SYSTEM
Before using the machine
Functions of the machine and
procedures for placing originals and
loading paper.
Copying
Using the copy function.
Scanning
Using the scan function.
Document filing
Storing jobs as files on the hard
drive.
System settings
Configuring settings to make
the machine easier to use.
Troubleshooting
Frequently asked questions and
how to clear paper misfeeds.
Keep this manual close at hand for
reference whenever needed.
DX-C311
DX-C401
MODEL: MX-C311
MX-C401
IN CHINA
K KS1
E4178FCZ1
MX-C311/MX-C401/DX-C311/DX-C401 Quick Start Guide
mxc401_us_qck.book 0 ページ 2008年10月16日 木曜日 午前10時51分
OPERATION MANUALS AND HOW
TO USE THEM
Three printed manuals and a manual in PDF format are provided with the machine.
Printed manuals
Quick Start Guide
(this manual)
Software Setup Guide
To learn the parts of the machine and how to use them
To load paper
Before using the machine (page 9)
To make a copy
Copying (page 29)
What is document filing?
What is it used for?
Document filing (page 121)
To print a file
Printing (page 61)
To send a fax
Faxing (page 75)
What are the system settings?
System settings (page 131)
Frequently asked questions and how to
clear paper misfeeds
Troubleshooting (page 135)
This manual provides easy-to-
understand explanations of the
functions of the machine in a
single manual.
The explanations in this manual
focus on frequently used
functions. For special functions,
troubleshooting, and detailed
procedures for using the
machine, see the manual in
PDF format.
Explains the procedures for installing
the printer driver and scanner driver.
For users of the MX-C311/MX-C401
For users of the DX-C311/DX-C401
Please read before
using the machine.
Maintenance &
Safety Guide
Contains important cautionary
information, procedures for cleaning
the machine and replacing supplies,
and machine specifications.
Installation Guide
Explains the procedures for installing the
machine, and the procedures for installing
the printer driver and scanner driver.
To send a scanned image
To use Internet fax
Scanning (page 99)
mxc401_us_qck.book 0 ページ 2008年10月16日 木曜日 午前10時51分
1
Manuals in PDF format
Convenient methods for using the Operation Guide
The first page contains a regular table of contents as well as an "I want to..." table of
contents.
"I want to..." lets you jump to an explanation based on what you want to do. For
example, "I use the copier function often, so I'd like to save paper".
Use either table of contents as appropriate based on what you want to know.
BEFORE USING THE MACHINE
COPIER
PRINTER
FACSIMILE
SCANNER / INTERNET FAX
DOCUMENT FILING
SYSTEM SETTINGS
TROUBLESHOOTING
For detailed
information
* To view the Operation Guide in PDF format, Adobe
®
Reader
TM
or Acrobat
®
Reader of Adobe Systems
Incorporated is required. If neither program is installed on your computer, the programs can be
downloaded from the following URL:
http://www.adobe.com/
Detailed explanations of the functions that can be used on the machine are provided in the Operation Guide
in PDF format. The Operation Guide can be downloaded from the Web pages in the machine.
Download the Operation Guide from
the Web pages in the machine.
For the downloading procedure,
see "Downloading the Operation
Guide" (page 4).
The contents of the Operation Guide are as follows:
Operation Guide
mxc401_us_qck.book 1 ページ 2008年10月16日 木曜日 午前10時51分
2
CHECKING THE IP ADDRESS
To check the IP address of the machine, print out the all custom setting list
in the system settings.
1
Press the [SYSTEM
SETTINGS] key.
2
Select the all custom
setting list in the touch
panel.
(1) Touch the [List Print
(User)] key.
(2) Touch the [Print] key to the
right of "All Custom Setting
List".
The IP address is shown in the list
that is printed.
SYSTEM
SETTINGS
Print
Print
Print
Print
System Settings
List Print (User)
All Custom Setting List:
Sending Address List:
Printer Test Page:
Document Filling Folder List:
PCL Symbol Set List
Individual List
Back
System Settings
Admin Password
Exit
Total Count
Paper Tray
Settings
Printer Condition
Settings
Document Filing
Control
Address Control
Fax Data
Receive/Forward
USB-Device Check
Default Settings
List Print
(User)
(1)
(2)
mxc401_us_qck.book 2 ページ 2008年10月16日 木曜日 午前10時51分
3
ACCESSING THE WEB SERVER IN
THE MACHINE
When the machine is connected to a network, the machine's built-in Web
server can be accessed from a Web browser on your computer.
Opening the Web pages
Recommended Web browsers
• Internet Explorer: 6.0 or higher (Windows
®
)
• Netscape Navigator: 9 (Windows
®
)
• Firefox: 2.0 or higher (Windows
®
)
• Safari: 1.5 or higher (Macintosh)
The Web page will appear.
The machine settings may require that user authentication be performed in
order to open the Web page. Please ask the administrator of the machine
for the password that is required for user authentication.
Access the Web server in the
machine to open the Web
pages.
Start a Web browser on a
computer that is connected to
the same network as the
machine and enter the IP
address of the machine.
mxc401_us_qck.book 3 ページ 2008年10月16日 木曜日 午前10時51分
4
Downloading the Operation Guide
The Operation Guide, which is a more detailed manual, can be downloaded
from the machine's Web pages.
Downloading the Operation
Guide.
(1) Click [Operation Manual
Download] in the menu of the
Web page.
(2) Select the desired language.
(3) Click the [Download] button.
The Operation Guide is downloaded.
(1)
(2)
(3)
mxc401_us_qck.book 4 ページ 2008年10月16日 木曜日 午前10時51分
5
TABLE OF CONTENTS
CHECKING THE IP ADDRESS. . . . . . . . . . . . . . . . . . . . . . . . . . . . . . . . . . 2
ACCESSING THE WEB SERVER IN THE MACHINE . . . . . . . . . . . . . . . . 3
PART NAMES AND FUNCTIONS. . . . . . . . . . . . . . . . . . . . . . . . . . . . . . . 10
SUPPLIES . . . . . . . . . . . . . . . . . . . . . . . . . . . . . . . . . . . . . . . . . . . . . . . . . 11
OPERATION PANEL. . . . . . . . . . . . . . . . . . . . . . . . . . . . . . . . . . . . . . . . . 12
USING THE TOUCH PANEL. . . . . . . . . . . . . . . . . . . . . . . . . . . . . . . . . . . 14
USER AUTHENTICATION . . . . . . . . . . . . . . . . . . . . . . . . . . . . . . . . . . . . 17
HOME SCREEN . . . . . . . . . . . . . . . . . . . . . . . . . . . . . . . . . . . . . . . . . . . . 19
IMAGE CHECK FUNCTION (PREVIEW) . . . . . . . . . . . . . . . . . . . . . . . . . 20
PLACING ORIGINALS . . . . . . . . . . . . . . . . . . . . . . . . . . . . . . . . . . . . . . . 22
CHANGING PAPER IN A TRAY . . . . . . . . . . . . . . . . . . . . . . . . . . . . . . . . 24
BASE SCREEN OF COPY MODE . . . . . . . . . . . . . . . . . . . . . . . . . . . . . . 30
MAKING COPIES . . . . . . . . . . . . . . . . . . . . . . . . . . . . . . . . . . . . . . . . . . . 32
2-SIDED COPYING (Automatic Document Feeder) . . . . . . . . . . . . . . . . 34
COPYING ON SPECIAL PAPER (Bypass Copy) . . . . . . . . . . . . . . . . . . 36
MAKING COLOR COPIES (Color Mode). . . . . . . . . . . . . . . . . . . . . . . . . 39
SELECTING THE EXPOSURE AND IMAGE TYPE . . . . . . . . . . . . . . . . . 41
FITTING THE COPY IMAGE TO THE PAPER (Automatic Ratio
Selection) . . . . . . . . . . . . . . . . . . . . . . . . . . . . . . . . . . . . . . . . . . . . . . . . . 43
ENLARGEMENT/REDUCTION (Preset Ratios / Zoom) . . . . . . . . . . . . . 45
INTERRUPTING A COPY RUN (Interrupt Copy) . . . . . . . . . . . . . . . . . . 47
STORING COPY OPERATIONS (Job Programs) . . . . . . . . . . . . . . . . . . 48
SPECIAL MODES . . . . . . . . . . . . . . . . . . . . . . . . . . . . . . . . . . . . . . . . . . . 51
SELECTING A SPECIAL MODE. . . . . . . . . . . . . . . . . . . . . . . . . . . . . . . . 52
CONVENIENT COPY FUNCTIONS . . . . . . . . . . . . . . . . . . . . . . . . . . . . . 54
Before using the machine
Copying
mxc401_us_qck.book 5 ページ 2008年10月16日 木曜日 午前10時51分
6
PRINTING . . . . . . . . . . . . . . . . . . . . . . . . . . . . . . . . . . . . . . . . . . . . . . . . . 62
CANCELING PRINTING (AT THE MACHINE) . . . . . . . . . . . . . . . . . . . . . 68
SELECTING PRINT SETTINGS . . . . . . . . . . . . . . . . . . . . . . . . . . . . . . . . 69
CONVENIENT PRINTER FUNCTIONS. . . . . . . . . . . . . . . . . . . . . . . . . . . 71
BASE SCREEN OF FAX MODE . . . . . . . . . . . . . . . . . . . . . . . . . . . . . . . . 76
SENDING A FAX . . . . . . . . . . . . . . . . . . . . . . . . . . . . . . . . . . . . . . . . . . . . 78
CHANGING THE SIZE OF A FAX. . . . . . . . . . . . . . . . . . . . . . . . . . . . . . . 79
CHANGING THE EXPOSURE . . . . . . . . . . . . . . . . . . . . . . . . . . . . . . . . . 81
CHANGING THE RESOLUTION. . . . . . . . . . . . . . . . . . . . . . . . . . . . . . . . 82
STORING A FAX NUMBER . . . . . . . . . . . . . . . . . . . . . . . . . . . . . . . . . . . 83
FORWARDING RECEIVED FAXES (Fax Data Forward) . . . . . . . . . . . . 85
CONVENIENT DIALING METHODS. . . . . . . . . . . . . . . . . . . . . . . . . . . . . 87
SENDING THE SAME FAX TO MULTIPLE DESTINATIONS (Broadcast
Transmission). . . . . . . . . . . . . . . . . . . . . . . . . . . . . . . . . . . . . . . . . . . . . . 91
SPECIAL FAX MODES . . . . . . . . . . . . . . . . . . . . . . . . . . . . . . . . . . . . . . . 93
SELECTING A SPECIAL MODE. . . . . . . . . . . . . . . . . . . . . . . . . . . . . . . . 94
CONVENIENT FAX FUNCTIONS . . . . . . . . . . . . . . . . . . . . . . . . . . . . . . . 96
Printing
Faxing
mxc401_us_qck.book 6 ページ 2008年10月16日 木曜日 午前10時51分
7
NETWORK SCANNER FUNCTION . . . . . . . . . . . . . . . . . . . . . . . . . . . . 100
BASE SCREEN OF SCAN MODE . . . . . . . . . . . . . . . . . . . . . . . . . . . . . 101
SCANNING AN ORIGINAL . . . . . . . . . . . . . . . . . . . . . . . . . . . . . . . . . . . 102
CHANGING THE EXPOSURE AND ORIGINAL IMAGE TYPE . . . . . . . 104
CHANGING THE RESOLUTION. . . . . . . . . . . . . . . . . . . . . . . . . . . . . . . 106
CHANGING THE FILE FORMAT . . . . . . . . . . . . . . . . . . . . . . . . . . . . . . 107
STORING A DESTINATION . . . . . . . . . . . . . . . . . . . . . . . . . . . . . . . . . . 109
CONVENIENT TRANSMISSION METHODS . . . . . . . . . . . . . . . . . . . . . 111
SENDING THE SAME IMAGE TO MULTIPLE DESTINATIONS
(Broadcast Transmission). . . . . . . . . . . . . . . . . . . . . . . . . . . . . . . . . . . 114
SPECIAL SCAN MODES . . . . . . . . . . . . . . . . . . . . . . . . . . . . . . . . . . . . 116
SELECTING A SPECIAL MODE. . . . . . . . . . . . . . . . . . . . . . . . . . . . . . . 117
CONVENIENT SCANNER FUNCTIONS. . . . . . . . . . . . . . . . . . . . . . . . . 119
DOCUMENT FILING . . . . . . . . . . . . . . . . . . . . . . . . . . . . . . . . . . . . . . . . 122
QUICKLY SAVING A JOB (Quick File) . . . . . . . . . . . . . . . . . . . . . . . . . 124
APPENDING INFORMATION WHEN STORING A FILE (File) . . . . . . . 125
SAVING A DOCUMENT ONLY (Scan to HDD) . . . . . . . . . . . . . . . . . . . 128
PRINTING A SAVED FILE . . . . . . . . . . . . . . . . . . . . . . . . . . . . . . . . . . . 130
SYSTEM SETTINGS . . . . . . . . . . . . . . . . . . . . . . . . . . . . . . . . . . . . . . . . 132
FREQUENTLY ASKED QUESTIONS . . . . . . . . . . . . . . . . . . . . . . . . . . . 136
REMOVING MISFEEDS . . . . . . . . . . . . . . . . . . . . . . . . . . . . . . . . . . . . . 142
Scanning
Document filing
System settings
Troubleshooting
mxc401_us_qck.book 7 ページ 2008年10月16日 木曜日 午前10時51分
mxc401_us_qck.book 8 ページ 2008年10月16日 木曜日 午前10時51分
Before using the machine
9
This section provides general information about the
machine, including the names and functions of the parts of
the machine and its peripheral devices, and the procedures
for placing originals and loading paper.
XPART NAMES AND FUNCTIONS . . . . . . . . . . . . . . . . . . . 10
XSUPPLIES . . . . . . . . . . . . . . . . . . . . . . . . . . . . . . . . . . . . . 11
XOPERATION PANEL . . . . . . . . . . . . . . . . . . . . . . . . . . . . . 12
XUSING THE TOUCH PANEL . . . . . . . . . . . . . . . . . . . . . . . 14
XUSER AUTHENTICATION . . . . . . . . . . . . . . . . . . . . . . . . . 17
XHOME SCREEN . . . . . . . . . . . . . . . . . . . . . . . . . . . . . . . . . 19
XIMAGE CHECK FUNCTION (PREVIEW) . . . . . . . . . . . . . . 20
XPLACING ORIGINALS . . . . . . . . . . . . . . . . . . . . . . . . . . . . 22
XCHANGING PAPER IN A TRAY . . . . . . . . . . . . . . . . . . . . 24
mxc401_us_qck.book 9 ページ 2008年10月16日 木曜日 午前10時51分
10
PART NAMES AND FUNCTIONS
(1) Automatic document feeder
This automatically feeds and scans
multiple originals. Both sides of
2-sided originals can be scanned at
once.
(2) Document feeder tray
Place the originals in this tray when
using the automatic document feeder.
(3) Operation panel
(4) Document glass
This is used to scan books and
other originals that cannot be
scanned using the automatic
document feeder.
(5) Finisher*
This can be used to staple output.
(6) Main power switch
This is used to power on the machine.
When using the fax or Internet fax
functions, keep this switch in the
"on" position.
(7) Output tray (center tray)
Copy jobs and print jobs are
delivered to this tray.
(When a finisher is installed, the
output tray (center tray) cannot be
used.)
(8) Tray 1
Up to 500 sheets of paper (21 lbs.
(80
g
/m
2
)) can be loaded in each tray.
(9) Tray 2/Tray 3/Tray 4 (500 sheet
paper feed unit is installed)*
This holds paper. Up to 500 sheets
(21 lbs. (80 g/m
2
)) of paper can be
loaded.
(10) USB connector (type A)
Supports USB 2.0 (Hi-Speed).
This is used to connect a USB
memory or other USB device to the
machine.
* Peripheral device. For more information, see "PERIPHERAL DEVICES" in
"Chapter 1 - BEFORE USING THE MACHINE" in the Operation Guide.
(1) (2)
(3) (4)
(8)(5) (9)(6)
(7)
(10)
mxc401_us_qck.book 10 ページ 2008年10月16日 木曜日 午前10時51分
11
(11) Front cover
Open to replace a toner cartridge.
(12) Bypass tray
Special types of paper and
envelopes can be fed from the
bypass tray.
(13) USB connector (B type)
Supports USB 2.0 (Hi-Speed).
A computer can be connected to
this connector to use the machine
as a printer.
(14) LAN connector
Connect the LAN cable to this
connector when the machine is
used on a network.
SUPPLIES
(1) Drum cartridges
This contains the photosensitive
drum that is used to create images
for copying and printing.
(2) Developer cartridges
This contains the developer that is
necessary to transfer the toner to
the paper.
(3) Toner collection container
This collects excess toner that
remains after printing.
(4) Toner cartridges
These contain toner for printing.
When the toner runs out in a
cartridge, the cartridge of the color
that ran out must be replaced.
(11) (12) (13)
(14)
(2)(1) (3) (4)
mxc401_us_qck.book 11 ページ 2008年10月16日 木曜日 午前10時51分
12
OPERATION PANEL
IMAGE SEND
HOME
PRINT
DATA
LINE
DATA
READY
SYSTEM
SETTINGS
JOB STATUS
Job Status
MFP Status
020/015
005/000
010/000
010/000
Copying
Waiting
Waiting
Waiting
Color Mode
Special Modes
Plain
2-Sided Copy
Output
File
Quick File
Copy Ratio
Tray1
100%
1.
8½x11
2.
5½x8½
3.
8½x14
4.
8½x11
Original
Paper Select
Auto
8½x11
Plain
Full Color
Exposure
Auto
8½x11
IMAGE SEND
DOCUMENT
FILING
COPY
Ready to scan for copy.
0
Touch panel
Messages and keys
appear in the LCD
display.
Operations are
performed by
touching the keys with
your finger.
[HOME] key
Touch this key to display the home
screen.
The base screen of each mode is
opened from the home screen.
Print mode indicators
READY indicator
Print data can be received when
this indicator is lit.
DATA indicator
This blinks while print data is
being received and lights steadily
while printing is taking place.
[SYSTEM SETTINGS] key
Press this key to display the system settings screen. The
system settings can be adjusted to make the machine
easier to use, such as configuring paper tray settings and
storing addresses.
Image send indicators
LINE indicator
This lights up during transmission or reception in fax mode. The indicator also lights up during
transmission in scan mode.
DATA indicator
When a received fax cannot be printed because of a problem such as out of paper, the indicator
blinks. The indicator lights steadily when there is data that is waiting to be transmitted.
[JOB STATUS] key
Press this key to view the job
status screen. You can check
the status of jobs and cancel
jobs in the job status screen.
mxc401_us_qck.book 12 ページ 2008年10月16日 木曜日 午前10時51分
13
LOGOUT
Numeric keys
Main power indicator
[CLEAR ALL] key
Press this key to redo an operation
from the beginning.
All settings will be cleared and
operation will return to the initial state.
[STOP] key
Press this key to stop a copy job or scanning
of an original.
Numeric keys
These are used to enter the number
of copies, fax numbers, and other
numbers.
[LOGOUT] key ( )
When user authentication is enabled,
press this key to log out after using
the machine. When using the fax
function, this key can be pressed to
send tone signals on a pulse dial line.
[#/P] key ( )
Press this key to use a job program
when using the copier function. When
using the fax function, this key can be
used when dialing.
Use this key to copy or scan
an original in color.
Use this key to activate power save mode.
The [POWER SAVE] key blinks when the
machine is in power save mode. This key is
also used to deactivate power save mode.
[COLOR START] key
This indicator lights when the
main power is switched on.
The main power switch is on
the left side of the machine.
[POWER SAVE] key
[CLEAR] key
Press this key to return
settings such as the
number of copies to "0".
[POWER] key
Use this key to turn
the machine power
on and off.
[BLACK & WHITE START] key
Use this key to copy or scan an original in black
and white. This key is also used to send a fax in
fax mode.
mxc401_us_qck.book 13 ページ 2008年10月16日 木曜日 午前10時51分
14
USING THE TOUCH PANEL
The touch keys that appear in the touch panel are grouped for easy
operation. The layout and functions of the touch keys are explained below.
Color Mode
Special Modes
Plain
2-Sided Copy
Output
File
Quick File
Copy Ratio
Tray1
100%
1.
8½x11
2.
5½x8½
3.
8½x14
4.
8½x11
Original
Paper Select
Auto
8½x11
Plain
Full Color
Exposure
Auto
8½x11
IMAGE SEND
DOCUMENT
FILING
COPY
Ready to scan for copy.
0
MFP Status
Copying
Waiting
Waiting
Waiting
Job Status
020/015
005/000
010/000
010/000
Touch this key to adjust the brightness of
the touch panel.
When the mode of the machine is
changed, the base screen of the newly
selected mode appears.
Functions can be selected and settings
checked in the base screen.
[COPY] key
To use the copy function, touch this key to switch to copy mode.
Keep your finger on the [COPY] key to view the machine's total
page use count and amount of toner remaining.
[IMAGE SEND] key
To use the scan or fax function, touch this key to switch to image
send mode.
[DOCUMENT FILING] key
When you wish to print or send a file stored on the hard drive,
touch this key to switch to document filing mode.
Mode select keys
Brightness adjustment key
mxc401_us_qck.book 14 ページ 2008年10月16日 木曜日 午前10時51分
15
Using general keys
(1) When the displayed screen is one of two or more screens, use the
keys to switch through the screens.
(2) When a checkbox is touched, a checkmark will appear to
indicate that the setting is enabled.
(3) The keys can be used to increase or decrease a value. To make
a value change quickly, keep your finger on the key. You can also
directly touch a numeric value display key to change a number with the
numeric keys.
Special Modes
1
2
OK
Erase
Job
Build
Margin Shift
Pamphlet Copy
2in1
Transparency
Inserts
Card Shot
Stamp
File
Color
Adjustments
Image Edit
Quick File
(1)
Output
2-Sided
Special Modes
Paper Select
Auto
file-01 Name 1 8½x11 F. Color
Job Settings / Print
Cancel
B/W Print
Number of Prints
1
(1~999)
Print and Delete the Data
Print and Save the Data
(3)
(2)
mxc401_us_qck.book 15 ページ 2008年10月16日 木曜日 午前10時51分
16
Checking the status of the machine
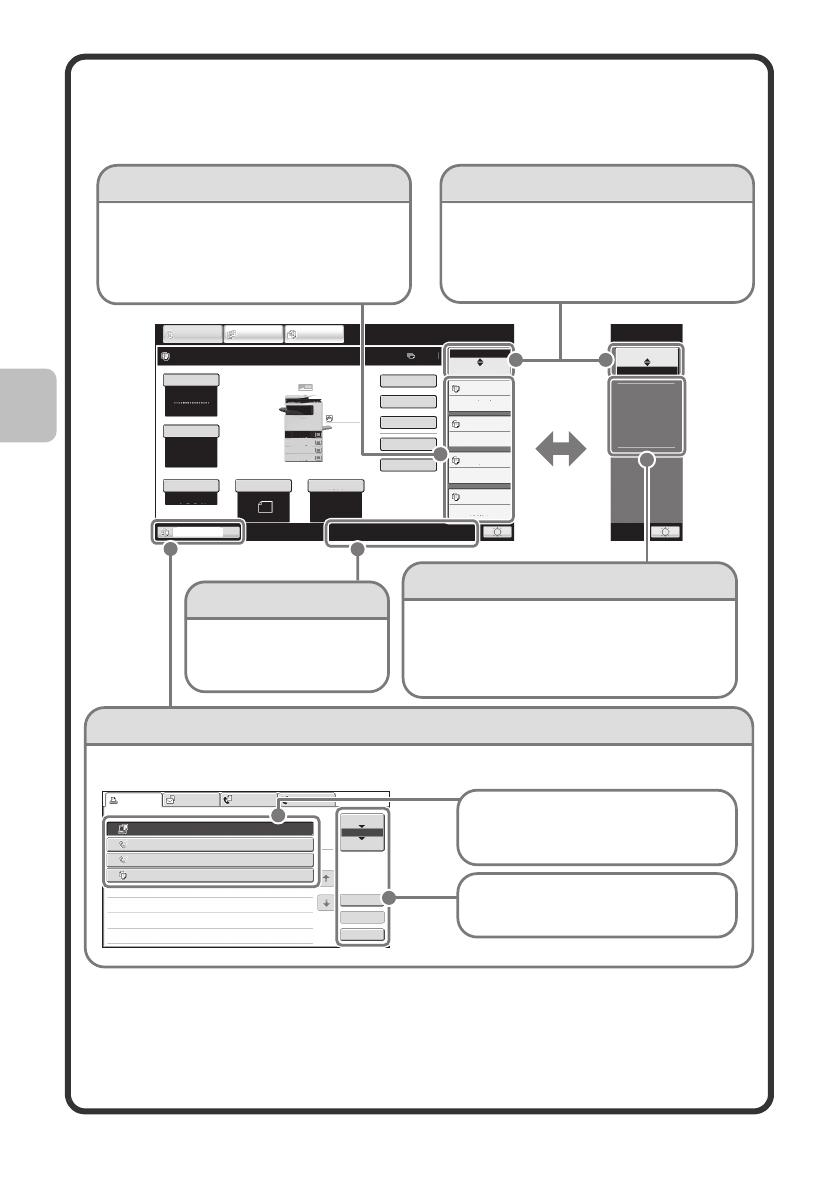
The touch panel has a key for checking the status of the machine.
Color Mode
Special Modes
Plain
2-Sided Copy
Output
File
Quick File
Copy Ratio
Tray1
100%
1.
8½x11
2.
5½x8½
3.
8½x14
4.
8½x11
Original
Paper Select
Auto
8½x11
Plain
Full Color
Exposure
Auto
8½x11
IMAGE SEND
DOCUMENT
FILING
COPY
Ready to scan for copy.
0
MFP Status
Copying
Waiting
Waiting
Waiting
Job Status
020/015
005/000
010/000
010/000
MFP Status
Job Status
Maintenance
Information
DC
DC DC DC
DC DC DC
DC DC
Job status display
"MFP Status" display
Display selection key"Job Status" display
Print Job Scan to Fax Job Internet Fax
Computer01 002/001 Printing
0312345678 002/000 Waiting
Copy 002/000 Waiting
Spool
Job Queue
Complete
1
1
Detail
Stop/Delete
Priority
1
2
3
4
This shows machine system information.
"Maintenance Information"
This shows m
achine maintenance information
by means of codes.
The status display can be switched
between "Job Status" and "MFP Status".
If the job status screen is displayed, the
status display automatically changes to the
"MFP Status".
This shows the first 4 print jobs in the print
queue (the job in progress and jobs waiting to
be printed). The type of job, the set number of
copies, the number of copies completed, and
the job status appear.
The mode icon of the reserved job or job in progress, the tray being used to feed paper, and the
job status appear. This can be touched to show the job status screen.
A selected job can be given priority
and run ahead of other jobs, or a job
waiting in the queue can be canceled.
Jobs are displayed as a list of touch
keys. The job keys appear in the order
that they will be run. A job key can be
touched to select it.
System display
The USB device connection
status and communication
status are shown as icons.
mxc401_us_qck.book 16 ページ 2008年10月16日 木曜日 午前10時51分
17
USER AUTHENTICATION
When user authentication is enabled in the system settings, you must log in
before using the machine. User authentication is initially disabled.
When you have finished using the machine, log out.
User authentication methods
There are two methods for performing user authentication: login by user
number and login by login name and password. Ask the administrator of the
machine for the information that is required to log in.
For details on user authentication, see "USER AUTHENTICATION" in
"Chapter 1 - BEFORE USING THE MACHINE" in the Operation Guide.
Login by user number
Login by login name and password
This method requires that you log
in by entering your user number (5
to 8 digits), which is stored in the
system settings of the machine.
This method requires that you log
in by entering your login name,
password, and the login
destination, which are stored in the
system settings of the machine.
Depending on how the machine
administrator has configured the
system settings, an e-mail address
may also be used for
authentication.
User Authentication
OK
Admin Login
User Authentication
OK
Login Name
User Name
Password
Auth to:
Login Locally
mxc401_us_qck.book 17 ページ 2008年10月16日 木曜日 午前10時51分
18
Logging out
When you have finished using the machine, log out. Logging out prevents
unauthorized use of the machine.
How to log out
You can log out from any mode of the machine by pressing the [LOGOUT]
key ( ). However, note that the [LOGOUT] key ( ) cannot be used to log
out when a fax number is being entered in fax mode, as the [LOGOUT] key
( ) functions as a numeric key at this time.
If a preset duration of time elapses after the machine is last used, the auto
clear function will activate. When auto clear activates, logout automatically
takes place.
mxc401_us_qck.book 18 ページ 2008年10月16日 木曜日 午前10時51分
1 / 1

Sharp DX-C311 User manual

Category
Multifunctionals
Type
User manual
This manual is also suitable for

Ask a question and I''ll find the answer in the document

Finding information in a document is now easier with AI

Ask the document