Page is loading ...

WARNING:
Cutting, sanding or machining wood products produces wood dust. While wood
products are not hazardous under OSHA Hazard Communication Standard (29CFR
1910.1200), the International Agency for Research on Cancer (IARC) and the State of
California has classified wood dust as a human carcinogen.
EXPECT THE NATURAL VARIATION OF WOOD:
All our wall panels are designed to highlight the natural variation of wood on structure
and in color. Each wood piece is different, but all together they create an ensure
consistency of the final product visual. Sunlight or intense artificial lighting can cause
color changes.
SURFACE REQUIREMENTS:
The surface must be clean, dry, and structurally sound. The surface must be flat to
within 1/4” over 48”
FIREPLACES & HEATERS:
NOT recommended the use of Hollywood wall panels around an open “flame” places.
The wall panels are made from wood which is flammable material.
BATHROOMS:
Wall panels may be used in bathrooms as long as they are NOT installed at high splash
areas.
CEILING APPLICATIONS:
Ceiling applications are possible as soon as you’re following the corresponding builder
codes. Use finishing nails in addition to Peel and Stick mounting for ceiling applications.
TRIMS:
Use trim in the same color range as wall panels for outlet trim, window trim, framing,
corners, etc.
We recommend square edge trim, which is commonly used when installing any wall
panels.
HOW MUCH DO YOU NEED?
Calculate the total surface area of the wall and add 10% for cutting and waste. The
coverage for each panel is approx. 2 SF. 10 panels are in the box.
WALL PREPARATION:
Installing paneling over existing true walls requires no preliminary preparation. Sanding
high spots on the wall is generally about all you have to do.
Always check your building code. Thermo-treated wood is Class B fire rated and most
panels are only allowed to be installed over a solid wall under most building codes.
Wall Panels Installation Instruction
Barn Wood wall decor panels

CHOICE OF INSTALLATION TYPE:
Use one of the following:
-
Peel and Stick (use adhesive strips on the back)
-
Wood adhesive or liquid nails
-
Finishing nails
IN CASE OF ADHESIVE APPLICATION:
Adhesive may be used to apply paneling directly to walls as long as the surface is level,
sound and clean. Once the panel is fitted, apply beads of adhesive with a caulking gun
in a continuous strip along the top, bottom and both sides of the panel.
Some supplemental nailing might be necessary to hold the panel in place until the
adhesive sets. Be sure to read the adhesive manufacturer’s instructions carefully prior
to installation, since instructions may vary.
CARE AND MAINTENANCE:
It is recommended to use a vacuum to clean wood planks if needed.
Wood is a natural organic material, which might be fading under direct sunlight and any
bright light. To protect natural wood against color degradation, use standard wood oil or
lacker with UV protection. Spray it to the surface. Wood will appear darker when it oiled.
TOOLS AND SUPPLIES FOR INSTALLATION:
Assemble all your tools and supplies before you begin the job. Here is what you will
need for most common wall paneling installations:
- Tape measure
- Level
- Pencil
- Power or table saw (12”+ cutting range) with short fine-toothed blade
-
In case of using adhesive: Adhesive and caulking gun
-
In case of using nails: Nails or screws (2D-4D),
- Eye goggles (must be worn when using any power or hand tools)
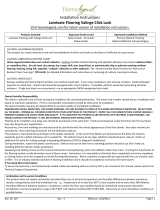
PANELS MEASUREMENTS:
!
12”
28”
23.75

Steps
Drawing
1. Select installation orientation:
horizontal or vertical
2. Using a level, draw a line for
installing the starter panel. Cut the starter
panel with a table saw.
3. Use adhesive or fastening installation:
-
Fastening: use nails, staples, or
screws to fasten planks to the wall.
-
Adhesive: lightly apply a construction
adhesive to the back of the panels and
press panel to the wall.
-
Adjustment: adjust planks to match
with the previous panel.
Installation Steps
Barn Wood wall decor panels
/