
Installation Instructions
Family: Luna | Item No. 15609
Start Here
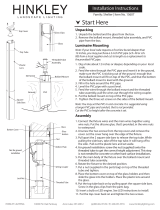
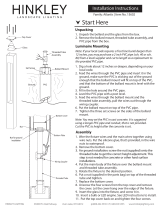
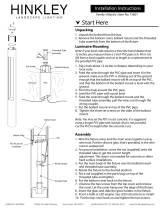
Unpacking
1. Unpack the bollard from the box.
2. Remove the bollard mount, threaded tube assembly, and
PVC pipe from the box.
HINKLEY LIGHTING 33000 Pin Oak Parkway Avon Lake, OH 44012 (p)800.442.5539 / (f) 440.653.5555 www.hinkleylighting.com
Luminaire Mounting
Note: If your local code requires a frost line burial deeper than
12 inches, you may purchase a 2 inch PVC pipe (sch. 40 or sch.
80) from a local supplier and cut to length as a replacement to
the provided PVC pipe.
Assembly
1. Dig a hole about 12 inches or deeper, depending on your
local code.
2. Feed the wires through the PVC pipe and insert it in the
ground, make sure the PVC is sticking out of the ground
enough that the bollard mount will t on top of the PVC,
and that the bottom of the bollard mount is level with the
ground.
3. Fill in the hole around the PVC pipe.
4. Level the PVC pipe with a post level.
5. Feed the wires through the bollard mount and the
threaded tube assembly, pull the wires out through the
wiring coupler.
6. Put the bollard mount on top of the PVC pipe.
7. Tighten the three set screws on the sides of the bollard
mount.
Note: You may set the PVC in cast concrete. It is suggested
using a longer PVC pipe and conduit, that is not provided.
Cut the PVC to height after the concrete is set.
1. Connect the xture wires and the main wires together
using wire nuts. Put the silicone glue, that’s provided, in
the wire nuts to waterproof.
2. For ground installation: screw the nut (supplied) onto the
threaded tube to get the correct height adjustment. This
step is not needed for concrete or other hard surface
installations.
3. Unscrew the two screws from the top cover and remove
the cover. Let the cover hang over the edge of the xture.
4. Slide the washboard plates up to access the bottom plate.
Put the main body of the xture over the bollard mount
and threaded tube assembly.
5. Rotate the xture to the desired position.
6. Put the nut (supplied in the parts bag) on top of the
threaded tube and tighten.
7. Insert the glass into the top of the xture. Slide the glass
holders in the xture.
8. Insert a bulb or LED engine. See LED instructions to install.
9. Put the top cover back on and tighten the two screws.
Glass
Holder
Top Cover
Glass
Nut
Threaded Tube
Boom Plate
Wiring Coupler
Washboard
plate
Nut for ground
installaon
Bollard Mount
PVC
Ground
Set Screw
Threaded Tube
Assembly
Page is loading ...

LED Installation Instructions
15601, 15602, 15604, 15607, 15607, 15609, 15612
Start Here (English)
HINKLEY LIGHTING 33000 Pin Oak Parkway Avon Lake, OH 44012 (p)800.442.5539 / (f) 440.653.5555 www.hinkleylighting.com
LED Installation
1. Use pliers to bend the clips on the socket. Keep bending the clips back
and forth until they break o.
2. Insert the LED into the socket. NOTE: Align the pins in the LED up to
the pin holes in the socket. Push LED straight down into socket.
3. Secure LED by tightening the set screw, using a 2mm allen key, on the
side of the cover.
Remove Clips
Set Screw
LED Engine
Instalación LED
1. Use pinzas para doblar los clips en el zócalo. Mantenga la exión de las
secuencias de un lado a otro hasta que se quiebren.
2. Inserte el LED en el zócalo. NOTA: Alinear las patas del LED hasta que
los agujeros de aller en el zócalo. El LED empuja hacia abajo en el
zócalo.
3. Fijar LED apretando el tornillo de jación, utilizando una llave Allen de
2 mm, en el lado de la cubierta.
Empieza Aqui (Spanish)
Instalación LED
1. Utilisez des pinces pour plier les clips sur le socket. Gardez plier les clips
avant et en arrière jusqu'à ce qu'ils se détachent.
2. Insérez la LED dans la prise. REMARQUE: Alignez les broches du haut
LED pour les trous d'épingle dans la prise. Poussez LED directement
vers le bas dans la prise.
3. Fixer LED en serrant la vis, en utilisant une clé allen 2mm, sur le côté du
couvercle.
Commencer Ici (French)
-
 1
1
-
 2
2
-
 3
3
Hinkley 15609BZ-LED Operating instructions
- Type
- Operating instructions
- This manual is also suitable for
Ask a question and I''ll find the answer in the document
Finding information in a document is now easier with AI
in other languages
- français: Hinkley 15609BZ-LED Mode d'emploi
- español: Hinkley 15609BZ-LED Instrucciones de operación
Related papers
-
 Hinkley 15607BK-LED Operating instructions
-
 Hinkley 15602TT Operating instructions
-
 Hinkley 1524MW Operating instructions
-
 Hinkley 15601TT-LED Operating instructions
-
 Hinkley 16801MZ-LED User manual
-
 Hinkley 16805MZ-LED Operating instructions
-
Hinkley Lighting 1549MW-LED User guide
-
Hinkley 51000BZ User manual
-
 Hinkley 1518CD-LED Installation guide
-
 Hinkley 2101 Walker 20 Inch Tall 3 Light Outdoor Post Lamp User manual
Other documents
-
 Hinkley Lighting 15601BZ-LED Installation guide
-
 OK LIGHTING OK-5119S Installation guide
-
 OK LIGHTING OK-5118S Installation guide
-
Vestil Movable Bollard Owner's manual
-
RAB Lighting BLED13/PC Operating instructions
-
Vestil BOL-OR-40-BK Owner's manual
-
 Hinkley Lighting 16701MZ Installation guide
-
 GABRIEL SCOTT Luna Installation guide
-
Vista 8229 Installation guide
-
 Hinkley Lighting 2931DZ-LL Installation guide


