Thank you for choosing Rough Country for all your vehicle needs.
Please read instructions before beginning installation. Check the kit hardware against the kit contents shown below. Be
sure you have all needed parts and know where they go.
If question exist, please call us @1-800-222-7023. We will be happy to answer any questions concerning this product.
Check all fasteners for proper torque. Check to ensure for adequate clearance between all components.
Periodically check all hardware for tightness.
KIT CONTENTS:
50” Single Row LED Light Kit x1
Driver Side Pillar Mount x1
Pass Side Pillar Mount x1
Drive Side Pillar support x1
Passenger Side Pillar support x1
TOOLS NEEDED:
T40 Torx Bit
1/4” Drill Bit
Drill Motor
Small Clamp
11mm Wrench or Socket
HARDWARE INCLUDED:
6mm-1.0 x 50mm Button Head Bolt x2
6mm Flat Washer x10
6mm-1.0 x 20mm Button Head Bolt x4
6mm-1.0 Lock Nut x4
8mm-1.25 x 25mm Button Head Bolt x4
8mm Flat Washer x4
Thick Spacers x6
Torque Specs:
Size Grade 5 Grade 8 Size Class 8.8 Class 10.9
5/16” 15 ft/lbs 20ft/lbs 6MM 5ft/lbs 9ft/lbs
3/8” 30 ft/lbs 35ft/lbs 8MM 18ft/lbs 23ft/lbs
7/16” 45 ft/lbs 60ft/lbs 10MM 32ft/lbs 45ft/lbs
1/2” 65 ft/lbs 90ft/lbs 12MM 55ft/lbs 75ft/lbs
9/16” 95 ft/lbs 130ft/lbs 14MM 85ft/lbs 120ft/lbs
5/8” 135ft/lbs 175ft/lbs 16MM 130ft/lbs 165ft/lbs
3/4” 185ft/lbs 280ft/lbs 18MM 170ft/lbs 240ft/lbs
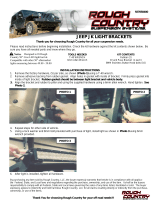
JEEP JL / JT 50” LED Upper Windshield Mount
921700630

1. Locate the (4) bolts securing the cowl end onto the vehicle. See Photo 1.
2. Using a T40 Torx bit remove the (4) bolts in the cowl end. Retain hardware for reuse. See Photo 2.
3. Remove the cowl end and set aside in a safe location. See Photo 3.
4. Install the driver side pillar support under the factory wiper cowl. See Photo 4.
5. Install the (2) retained wiper cowl bolts into the pillar support. Hand tighten the bolts to hold the pillar support into
place while drilling. See Photo 5.
6. Using a 1/4” bit and a drill motor, transfer the (2) holes into the pinch weld mount in the body of the vehicle. Use a
small clamp to secure the part while drilling. See Photo 6.
7. Clean any shavings from around the drilled area and tough up the holes with paint to prevent rust.
Photo 1 Photo 2
Photo 3 Photo 4
Photo 5 Photo 6
Locate the 4 in the cowl of the vehicle. Remove the 4 bolts from the cowl.
Remove the cowl end. Install the driver side pillar support.
Install the pillar support. Transfer the holes into the body.
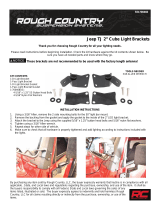
INSTALLATION INSTRUCTONS

8. Secure the pillar mount to the body using (2) of the supplied 6mm-1.0 x 20mm button head allen bolts, (4) 6mm flat
washers and (2) 6mm-1.0 nylock nuts. Tighten using a 4mm allen wrench and an 11mm wrench. See Photo 7.
9. Remove the OE bolts in the wiper cowl. See Photo 8.
10. Re-install the cowl end onto the vehicle and secure ONLY using the front OE bolt. See Photo 9.
11. Locate (3) of the supplied thick spacers to be install onto the upper and side bolt dimples in the cowl. See Photo 10.
12. Install (2) spacers in the remaining dimples of the cowl end and (1) in the top wiper cowl. See Photo 11.
13. Place the LED pillar bracket onto the three spacers placed in the dimples in the cowl. Secure the mount using (1) of
the supplied 6mm x 50mm button head bolts and (2) 6mm flat washers (2) of the supplied 8mm x 25mm button head
bolts and (2) 8mm flat washers on the side of the mount. See Photo 12.
14. Repeat steps 1-13 on the opposite side of the vehicle to install the LED pillar bracket using the supplied hardware..
Photo 7 Photo 8
Photo 9 Photo 10
Photo 11 Photo 12
Secure the pillar mount to the body. Remove the OE bolts.
Install the cowl end. Locate the (3) thick spacers.
Install the (3) thick spacers. Install the pillar bracket.

See Photo 13.
15. Install the wiring harness supplied with the LED light bar using the corresponding instruction sheet.
16. Install the 50” LED light bar in-between the pillar mounts using the bolts and lock washers provided in the LED light
bar kit. See Photo 14.
17. Adjust the light to the desired angle and tighten using a 5mm allen wrench. See Photo 15 and 16.
Photo 13 Photo 14
Photo 15 Photo 16
Install the Passengers side pillar mount. Install the LED light bar.
Adjust the light to the desired angle. Tighten the light hardware.
By purchasing any item sold by Rough Country, LLC, the buyer expressly warrants that he/she is in compliance with all
applicable, State, and Local laws and regulations regarding the purchase, ownership, and use of the item. It shall be the
buyers responsibility to comply with all Federal, State and Local laws governing the sales of any items
listed, illustrated or sold. The buyer expressly agrees to indemnify and hold harmless Rough Country,
LLC for all claims resulting directly or indirectly from the purchase, ownership, or use of the items.
/