Page is loading ...

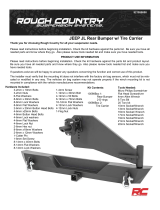
Thank you for choosing Rough Country for all your Off road needs.
Please read instructions before beginning installation. Check the kit hardware against the kit contents shown below. Be sure you
have all needed parts and know where they go.
INSTALLATION INSTRUCTIONS
1. Using a T40, remove the plastic lock from the camera. See Photos 1 & 2.
2. Remove the spare tire using a 22mm socket and the anti-theft socket included with your Jeep. See Photo 3.
3. Using a 13mm socket, loosen the 8 bolts from the spare tire carrier. See Photo 4.
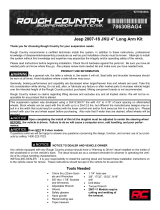
TOOLS NEEDED
T25 Wrench
T40 Wrench
13mm Socket
20mm Socket
22mm Socket
5mm Allen Wrench
Torque Wrench
PHOTO 1 PHOTO 2
PHOTO 3
KIT CONTENTS
Lug Adapters (2)
8mm x 25mm Long Button Head (2)
3rd Brake Light Relocation Bracket (1)
921700550
JEEP JL 3rd Brake Light Relocation
PHOTO 4

PHOTO 7
4. Using a T25, remove the 7 bolts from the front of the brake light mount. Retain hardware for reuse. See Photo 5.
5. Carefully separate the back half from the front. See Photo 6.
6. Carefully remove the brake light wire from the mount and unplug the brake light. See Photo 7.
7. Using a T25, remove the 4 bolts holding the brake light mount to the tire carrier. See Photo 8.
8. Remove the 3rd brake light mount from the Jeep.
9. Using a T25, remove the (2) screws that secure the 3rd brake light to the mount. Retain hardware. See Photo 9.Install the
spare using the factory lug nut in the lower position and the supplied lug nuts (70055BAG1) on the 2 top studs. Torque to
factory spec using a 20mm socket. See Photo 10.
PHOTO 6 PHOTO 5
PHOTO 8
PHOTO 9 PHOTO 10

10. Install the supplied 3rd brake light bracket using the (2) supplied 8mm x 25mm bolts (70055BAG1) onto the (2) upper sup-
plied lug nuts. See Photo 11.
11. Tighten the 8mm hardware using a 5mm Allen. See Photo 12.
12. Route the 3rd brake light wire through the spare. See Photo 13.
13. Install the factory 3rd brake light into the new relocation bracket. See Photo 14.
14. Using the factory screws, secure the 3rd brake light to the bracket and carefully tighten using a T25. See Photo 15.
15. Plug in the 3rd brake light. See Photo 16.
16. Check and make sure the brake light is operational.
PHOTO 12
PHOTO 13
PHOTO 11
PHOTO 14
PHOTO 15 PHOTO 16

By purchasing any item sold by Rough Country, LLC, the buyer expressly warrants that he/she is in compliance with all applica-
ble , State, and Local laws and regulations regarding the purchase, ownership, and use of the item. It shall be the buyers re-
sponsibility to comply with all Federal, State and Local laws governing the sales of any items listed, illustrated
or sold. The buyer expressly agrees to indemnify and hold harmless Rough Country, LLC for all claims result-
ing directly or indirectly from the purchase, ownership, or use of the items.
/