Sony CDX-GT310MP Operating instructions

Category
Car media receivers
Type
Operating instructions
4-284-509-72(1)
CDX-GT310MP
FM/AM
Compact Disc
Player
To switch the FM/AM tuning step, see page 4.
To cancel the demonstration (DEMO) display, see page 4.
FM/AM 튜닝 단위를 전환하려면 4페이지를 참조하십시오.
데모(DEMO) 표시를 취소하려면 4페이지를 참조하십시오.
Operating Instructions GB
사용 설명서
KR
2
Be sure to install this unit in the
dashboard of the car for safety.
For installation and connections,
see the supplied installation/connections
manual.
This label is located on the bottom of the
chassis.
Windows Media is either a registered
trademark or trademark of Microsoft
Corporation in the United States and/or
other countries.
This product contains technology subject
to certain intellectual property rights of
Microsoft. Use or distribution of this
technology outside of this product is
prohibited without the appropriate
license(s) from Microsoft.
MPEG Layer-3 audio coding technology
and patents licensed from Fraunhofer IIS
and Thomson.
Note on the lithium battery
Do not expose the battery to excessive heat
such as direct sunlight, fire or the like.
Warning if your car’s ignition has no
ACC position
Be sure to set the Auto Off function
(page 12). The unit will shut off
completely and automatically in the set
time after the unit is turned off, which
prevents battery drain. If you do not set
the Auto Off function, press and hold
 until the display
disappears each time you turn the
ignition off.
3
Table of contents
Getting Started . . . . . . . . . . . . . . . . . . . . . . . . . . . . . . . . . . . . . . . . . . . . . . . . . . . . . 4
Switching the FM/AM tuning step . . . . . . . . . . . . . . . . . . . . . . . . . . . . . . . . . . . . . . . . . . 4
Canceling the DEMO mode . . . . . . . . . . . . . . . . . . . . . . . . . . . . . . . . . . . . . . . . . . . . . . . . 4
Setting the clock . . . . . . . . . . . . . . . . . . . . . . . . . . . . . . . . . . . . . . . . . . . . . . . . . . . . . . . . . . 4
Detaching the front panel . . . . . . . . . . . . . . . . . . . . . . . . . . . . . . . . . . . . . . . . . . . . . . . . . . 5
Location of controls . . . . . . . . . . . . . . . . . . . . . . . . . . . . . . . . . . . . . . . . . . . . . . . . .6
Main unit . . . . . . . . . . . . . . . . . . . . . . . . . . . . . . . . . . . . . . . . . . . . . . . . . . . . . . . . . . . . . . . . 6
RM-X201 Remote commander . . . . . . . . . . . . . . . . . . . . . . . . . . . . . . . . . . . . . . . . . . . . . 6
Radio . . . . . . . . . . . . . . . . . . . . . . . . . . . . . . . . . . . . . . . . . . . . . . . . . . . . . . . . . . . . . 8
Storing and receiving stations. . . . . . . . . . . . . . . . . . . . . . . . . . . . . . . . . . . . . . . . . . . . . . . 8
RDS. . . . . . . . . . . . . . . . . . . . . . . . . . . . . . . . . . . . . . . . . . . . . . . . . . . . . . . . . . . . . . . . . . . . . 9
CD. . . . . . . . . . . . . . . . . . . . . . . . . . . . . . . . . . . . . . . . . . . . . . . . . . . . . . . . . . . . . . .10
Playing a disc. . . . . . . . . . . . . . . . . . . . . . . . . . . . . . . . . . . . . . . . . . . . . . . . . . . . . . . . . . . .10
Playing tracks in various modes . . . . . . . . . . . . . . . . . . . . . . . . . . . . . . . . . . . . . . . . . . . . 10
Sound Settings and Setup Menu. . . . . . . . . . . . . . . . . . . . . . . . . . . . . . . . . . . . . .11
Changing the sound settings. . . . . . . . . . . . . . . . . . . . . . . . . . . . . . . . . . . . . . . . . . . . . . . 11
Adjusting setup items . . . . . . . . . . . . . . . . . . . . . . . . . . . . . . . . . . . . . . . . . . . . . . . . . . . .12
Using optional equipment. . . . . . . . . . . . . . . . . . . . . . . . . . . . . . . . . . . . . . . . . . .13
Auxiliary audio equipment . . . . . . . . . . . . . . . . . . . . . . . . . . . . . . . . . . . . . . . . . . . . . . . .13
Additional Information . . . . . . . . . . . . . . . . . . . . . . . . . . . . . . . . . . . . . . . . . . . . .13
Precautions . . . . . . . . . . . . . . . . . . . . . . . . . . . . . . . . . . . . . . . . . . . . . . . . . . . . . . . . . . . . .13
Maintenance . . . . . . . . . . . . . . . . . . . . . . . . . . . . . . . . . . . . . . . . . . . . . . . . . . . . . . . . . . . .15
Specifications. . . . . . . . . . . . . . . . . . . . . . . . . . . . . . . . . . . . . . . . . . . . . . . . . . . . . . . . . . . .16
Troubleshooting . . . . . . . . . . . . . . . . . . . . . . . . . . . . . . . . . . . . . . . . . . . . . . . . . . . . . . . . .17
4
Getting Started
Switching the FM/AM
tuning step
The FM/AM tuning step is factory-set to the
50 kHz (FM)/9 kHz (AM) position. If the
frequency allocation system of your country
is based on 200 kHz (FM)/10 kHz (AM) or
100 kHz (FM)/10 kHz (AM) step, set the
tuning step before use.
This setting appears when turned off.
1 Press and hold the select button.
The setup display appears.
2 Rotate the control dial until “TUNER-
STP” appears, then press it.
3 Rotate the control dial to select from
“50K/9K,” “100K/10K” or “200K/10K,”
then press it.
Receivable frequency by selected frequency
setup:
FM 50 kHz: 87.50 MHz, 87.55 MHz, 87.60
MHz...
FM 100 kHz: 87.5 MHz, 87.6 MHz, 87.7
MHz...
FM 200 kHz: 87.5 MHz, 87.7 MHz, 87.9
MHz...
AM 9 kHz: 531 kHz, 540 kHz, 549 kHz...
AM 10 kHz: 530 kHz, 540 kHz, 550 kHz...
Canceling the DEMO
mode
You can cancel the demonstration display
which appears during turning off.
1 Press and hold the select button.
The setup display appears.
2 Rotate the control dial until “DEMO”
appears, then press it.
3 Rotate the control dial to select
“DEMO-OFF,” then press it.
The setting is complete.
4 Press (BACK).
Setting the clock
The clock uses a 12-hour digital indication.
1 Press and hold the select button.
The setup display appears.
2 Rotate the control dial until “CLOCK-
ADJ” appears, then press it.
The hour indication flashes.
3 Rotate the control dial to set the hour
and minute.
To move the digital indication, press
 –/+.
4 After setting the minute, press the
select button.
The setup is complete and the clock
starts.
To display the clock, press .
5
Detaching the front panel
You can detach the front panel of this unit
to prevent theft.
1 Press and hold  .
The unit is turned off.
2 Press the front panel release button ,
then pull it off towards you.
Caution alarm
If you turn the ignition switch to the OFF
position without detaching the front panel,
the caution alarm will sound for a few
seconds. The alarm will only sound if the
built-in amplifier is used.
Note
Do not subject the front panel to heat/high
temperature or moisture. Avoid leaving it in a
parked car or on a dashboard/rear tray.
Attaching the front panel
Engage part of the front panel with part
of the unit, as illustrated, and push the
left side into position until it clicks.
1
2
6
Location of controls
Main unit
RM-X201 Remote
commander
Remove the insulation film before use.
This section contains instructions on the
location of controls and basic operations.
(BACK) button
To return to the previous display.
SOURCE/OFF button
Press to turn on the power/change the
source (Radio/CD/AUX).
Press and hold for 1 second to turn off
the power.
Press and hold for more than 2 seconds
to turn off the power and the display
disappears.
SEEK +/– buttons
Radio:
To tune in stations automatically
(press); find a station manually (press
and hold).
CD:
To skip tracks (press); skip tracks
continuously (press, then press again
within about 1 second and hold);
reverse/fast-forward a track (press and
hold).
7
EQ3 (equalizer) button page 11
To select an equalizer type (XPLOD,
VOCAL, EDGE, CRUISE, SPACE,
GRAVITY, CUSTOM or OFF).
Control dial/select button
To adjust volume (rotate); select setup
items (press and rotate).
Disc slot
Insert the disc (label side up), playback
starts.
Display window
AUX input jack page 13
 (eject) button
To eject the disc.
MODE button page 8
To select the radio band (FM/AM).
Front panel release button page 5
PTY button page 9
To select PTY in RDS.
Number buttons
Radio:
To receive stored stations (press); store
stations (press and hold).
CD:
/: ALBUM / (during MP3/
WMA playback)
To skip albums (press); skip
albums continuously (press and
hold).
: REP* page 10
: SHUF page 10
: PAUSE
To pause playback. To cancel,
press again.
DSPL (display)/SCRL (scroll) button
page 9, 10
To change display items (press); scroll
the display item (press and hold).
Receptor for the remote
commander
OFF button
To turn off; stop the source.
SOURCE button
To turn on the power; change the
source (Radio/CD/AUX).
 ()/ () buttons
To control Radio/CD, the same as
 –/+ on the unit.
Setup, sound setting, etc., can be
operated by .
ENTER button
To apply a setting.
PTY button
VOL (volume) +*/– button
ATT (attenuate) button
To attenuate the sound. To cancel, press
again.
SOUND/MENU button
To enter sound setting (press); enter
menu (press and hold).
DSPL (display) button
 (+)/ (–) buttons
To control CD, the same as /
(ALBUM /) on the unit.
Setup, sound setting, etc., can be
operated by .
SCRL (scroll) button
Number buttons
To receive stored stations (press); store
stations (press and hold).
* This button has a tactile dot.
Note
If the unit is turned off and the display
disappears, it cannot be operated with the remote
commander unless  on the unit
is pressed, or a disc is inserted to activate the unit
first.
8
Radio
Storing and receiving
stations
Tuning step setting is required (page 4).
Notes
If the tuning step setting is changed, the stored
stations will be erased.
If replacing the car battery or changing the
connections, the tuning step setting will be
erased, and you will need to set again.
Caution
When tuning in stations while driving, use
Best Tuning Memory (BTM) to prevent an
accident.
Storing automatically — BTM
1 Press  repeatedly until
“TUNER” appears.
To change the band, press 
repeatedly. You can select from FM1,
FM2, FM3, AM1 or AM2.
2 Press and hold the select button.
The setup display appears.
3 Rotate the control dial until “BTM”
appears, then press it.
The unit stores stations in order of
frequency on the number buttons.
Storing manually
1
While receiving the station that you
want to store, press and hold a number
button ( to ) until “MEMORY”
appears.
Receiving the stored stations
1 Select the band, then press a number
button ( to ).
Tuning automatically
1 Select the band, then press  +/–
to search for the station.
Scanning stops when the unit receives a
station. Repeat this procedure until the
desired station is received.
Tip
If you know the frequency of the station you want
to listen to, press and hold  +/ to locate
the approximate frequency, then press
 +/ repeatedly to fine adjust to the
desired frequency (manual tuning).
9
RDS
FM stations with Radio Data System (RDS)
service send inaudible digital information
along with the regular radio program signal.
Notes
Depending on the country/region, not all RDS
functions may be available.
RDS will not work if the signal strength is too
weak, or if the station you are tuned to is not
transmitting RDS data.
Changing display items
Press .
Selecting PTY (Program
Types)
Displays the currently received program
type. Also searches your selected program
type.
1 Press  during FM reception.
The current program type name appears
if the station is transmitting PTY data.
2 Rotate the control dial until the desired
program type appears, then press it.
The unit starts to search for a station
broadcasting the selected program type.
Type of programs
Note
You may receive a different radio program from
the one you select.
Setting CT (Clock Time)
The CT data from the RDS transmission
sets the clock.
1 Set “CT-ON” in setup (page 12).
Note
The CT function may not work properly even
though an RDS station is being received.
NEWS (News), AFFAIRS (Current Affairs),
INFO (Information), SPORT (Sports),
EDUCATE (Education), DRAMA (Drama),
CULTURE (Culture), SCIENCE (Science),
VARIED (Varied), POP M (Pop Music),
ROCK M (Rock Music), EASY M (M.O.R.
Music), LIGHT M (Light classical),
CLASSICS (Serious classical), OTHER M
(Other Music), WEATHER (Weather),
FINANCE (Finance), CHILDREN
(Children’s program), SOCIAL A (Social
Affairs), RELIGION (Religion), PHONE IN
(Phone In), TRAVEL (Travel), LEISURE
(Leisure), JAZZ (Jazz Music), COUNTRY
(Country Music), NATION M (National
Music), OLDIES (Oldies Music), FOLK M
(Folk Music), DOCUMENT (Documentary)
10
CD
Playing a disc
This unit can play CD-DA (also containing
CD TEXT) and CD-R/CD-RW (MP3/
WMA files (page 14)).
1 Insert the disc (label side up).
Playback starts automatically.
To eject the disc, press .
Changing display items
Displayed items may differ depending on
the model, disc type, recording format and
settings.
Press .
Playing tracks in various
modes
You can listen to tracks repeatedly (repeat
play) or in random order (shuffle play).
1 During playback, press  (REP) or
 (SHUF) repeatedly until the
desired play mode appears.
Repeat play
Shuffle play
* When an MP3/WMA is played.
Select To play
TRACK track repeatedly.
ALBUM* album repeatedly.
OFF track in normal order
(Normal play).
Select To play
SHUF ALBUM* album in random
order.
SHUF DISC disc in random order.
SHUF OFF track in normal order
(Normal play).
11
Sound Settings and
Setup Menu
Changing the sound
settings
Adjusting the sound
characteristics
1 During reception/playback, press the
select button.
2 Rotate the control dial until the desired
menu item appears, then press it.
3 Rotate the control dial to select the
setting, then press it.
4 Press (BACK).
The following items can be set:
*1 When EQ3 is activated (page 11).
*2 When the audio output is set to “SUB-OUT”
(page 12).
“ATT” is displayed at the lowest setting, and
can be adjusted up to 21 steps.
*3 When AUX source is activated (page 13).
Customizing the equalizer
curve — EQ3
“CUSTOM” of EQ3 allows you to make
your own equalizer settings.
1 During reception/playback, press
 repeatedly to select
“CUSTOM,” then press (BACK).
2 Press the select button.
3 Rotate the control dial until “EQ3
LOW,” “EQ3 MID” or “EQ3 HIGH
appears, then press it.
4 Rotate the control dial to adjust the
selected item, then press it.
The volume level is adjustable in 1 dB
steps, from –10 dB to +10 dB.
Repeat steps 2 and 3 to adjust the
equalizer curve.
To restore the factory-set equalizer
curve, press and hold the select button
before the setting is complete.
5 Press (BACK).
EQ3 LOW*
1
(page 11)
EQ3 MID*
1
(page 11)
EQ3 HIGH*
1
(page 11)
BALANCE
Adjusts the sound balance: “R15” – “0” –
“L15.”
FADER
Adjusts the relative level: “F15” – “0” –
“R15.”
SW LEVEL*
2
(Subwoofer Level)
Adjusts the subwoofer volume level:
“+10 dB” – “0 dB” – “–10 dB.”
(“ATT” is displayed at the lowest
setting.)
AUX VOL*
3
(AUX Volume level)
Adjusts the volume level for each
connected auxiliary equipment: “+18
dB” – “0 dB” – “–8 dB.”
This setting negates the need to adjust
the volume level between sources.
12
Adjusting setup items
1 Press and hold the select button.
The setup display appears.
2 Rotate the control dial until the desired
item appears, then press it.
3 Rotate the control dial to select the
setting, then press it.*
4 Press (BACK).
* For CLOCK-ADJ, TUNER-STP and BTM
settings, step 4 is not necessary.
The following items can be set depending
on the source and setting:
*1 When the unit is turned off.
*2 When the audio output is set to “SUB-OUT.”
CLOCK-ADJ (Clock Adjust) (page 4)
TUNER-STP (Tuner Step) (page 4)
CT (Clock Time)
Activates the CT function: “ON,” “OFF”
(page 9).
BEEP
Activates the beep sound: “ON,” “OFF.”
CAUT ALM*
1
(Caution Alarm)
Activates the caution alarm: “ON,”
“OFF” (page 5).
AUX-A*
1
(AUX Audio)
Activates the AUX source display: “ON,”
“OFF” (page 13).
AUTO OFF
Shuts off automatically after a desired
time when the unit is turned off: “NO,”
“30S (Seconds),” “30M (Minutes),” “60M
(Minutes).”
REAR/SUB*
1
Switches the audio output: “REAR-
OUT” (power amplifier), “SUB-OUT”
(subwoofer).
BLK OUT (Black Out)
Turns off the illumination automatically
for any source (e.g., during radio
reception/CD playback, etc.) if no
operation is performed for 5 seconds:
“ON,” “OFF.
To bring the light back on, press any
button on the unit. (When activated,
remote operation is unavailable.)
DEMO
(Demonstration)
Activates the demonstration: “ON,”
“OFF.”
DIMMER
Changes the display brightness: “ON,”
“OFF.”
M.DISPLAY (Motion Display)
“ON”: to show moving patterns.
“OFF”: to deactivate the Motion Display.
AUTO SCR (Auto Scroll)
Scrolls long items automatically: “ON,”
“OFF.”
LPF*
2
(Low Pass Filter)
Selects the subwoofer cut-off frequency:
“OFF,” “80Hz,” “100Hz,” “120Hz,”
“140Hz,” “160Hz.”
SW PHASE*
2
(Subwoofer Phase)
Selects the subwoofer phase: “SUB
NORM,” “SUB REV.”
HPF (High Pass Filter)
Selects the front/rear speaker cut-off
frequency: “OFF,” “80Hz,” “100Hz,”
“120Hz,” “140Hz,” “160Hz.”
LOUDNESS
Reinforces bass and treble for clear
sound at low volume levels: “ON,
“OFF.”
BTM (page 8)
13
Using optional
equipment
Auxiliary audio
equipment
By connecting an optional portable audio
device to the AUX input jack (stereo mini
jack) on the unit and then simply selecting
the source, you can listen on your car
speakers.
Connecting the portable audio device
1 Turn off the portable audio device.
2 Turn down the volume on the unit.
3 Connect the portable audio device to the
unit with a connecting cord (not supplied)*.
* Be sure to use a straight type plug.
Adjusting the volume level
Be sure to adjust the volume for each
connected audio device before playback.
1 Turn down the volume on the unit.
2 Press  repeatedly until
“AUX” appears.
3 Start playback of the portable audio device
at a moderate volume.
4 Set your usual listening volume on the unit.
5 Adjust the input level (page 11).
Additional
Information
Precautions
Cool off the unit beforehand if your car has
been parked in direct sunlight.
Do not leave the front panel or audio devices
brought in inside the car, or it may cause
malfunction due to high temperature in
direct sunlight.
Power antenna (aerial) extends
automatically.
Moisture condensation
Should moisture condensation occur inside
the unit, remove the disc and wait for about an
hour for it to dry out; otherwise the unit will
not operate properly.
To maintain high sound quality
Do not splash liquid onto the unit or discs.
Notes on discs
Do not expose discs to direct sunlight or heat
sources such as hot air ducts, nor leave it in a
car parked in direct sunlight.
Before playing, wipe the
discs with a cleaning cloth
from the center out. Do not
use solvents such as
benzine, thinner,
commercially available
cleaners.
This unit is designed to play back discs that
conform to the Compact Disc (CD)
standard. DualDiscs and some of the music
discs encoded with copyright protection
technologies do not conform to the Compact
Disc (CD) standard, therefore, these discs
may not be playable by this unit.
14
Discs that this unit CANNOT play
Discs with labels, stickers, or sticky tape or
paper attached. Doing so may cause a
malfunction, or may ruin the disc.
Discs with non-standard shapes (e.g., heart,
square, star). Attempting to do so may
damage the unit.
–8 cm (3
1
/4 in) discs.
Notes on CD-R/CD-RW discs
The maximum number of: (CD-R/CD-RW
only)
folders (albums): 150 (including root folder)
files (tracks) and folders: 300 (may less than
300 if folder/file names contain many
characters)
displayable characters for a folder/file name:
32 (Joliet)/64 (Romeo)
If the multi-session disc begins with a CD-
DA session, it is recognized as a CD-DA disc,
and other sessions are not played back.
Discs that this unit CANNOT play
CD-R/CD-RW of poor recording quality.
–CD-R/CD-RW recorded with an
incompatible recording device.
CD-R/CD-RW which is finalized incorrectly.
CD-R/CD-RW other than those recorded in
music CD format or MP3 format conforming
to ISO9660 Level 1/Level 2, Joliet/Romeo or
multi-session.
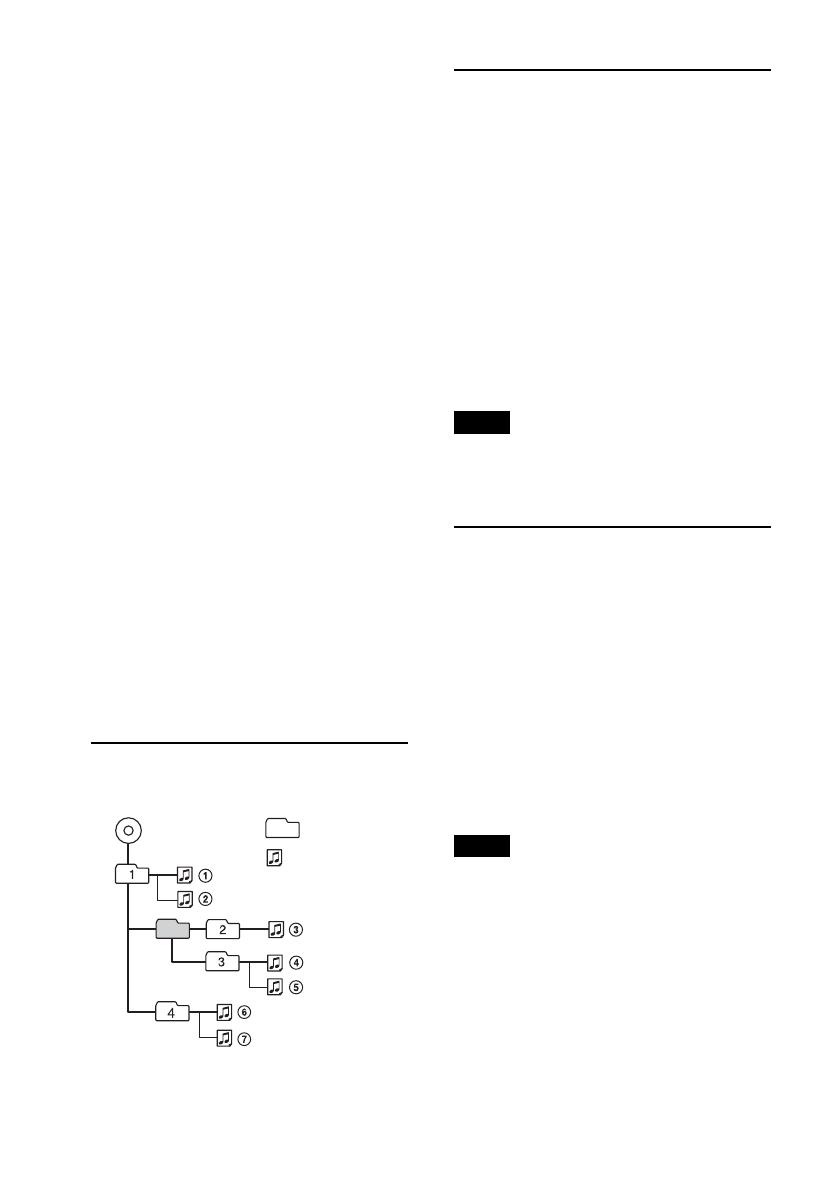
Playback order of MP3/WMA
files
About MP3 files
MP3, which stands for MPEG-1 Audio
Layer-3, is a music file compression format
standard. It compresses audio CD data to
approximately 1/10 of its original size.
ID3 tag versions 1.0, 1.1, 2.2, 2.3 and 2.4
apply to MP3 only. ID3 tag is 15/30
characters (1.0 and 1.1), or 63/126 characters
(2.2, 2.3 and 2.4).
When naming an MP3 file, be sure to add the
file extension “.mp3” to the file name.
During playback or fast-forward/reverse of a
VBR (Variable Bit Rate) MP3 file, elapsed
playing time may not display accurately.
Note
If you play a high-bit-rate MP3, such as 320 kbps,
sound may be intermittent.
About WMA files
WMA, which stands for Windows Media
Audio, is a music file compression format
standard. It compresses audio CD data to
approximately 1/22* of its original size.
WMA tag is 63 characters.
When naming a WMA file, be sure to add
the file extension “.wma” to the file name.
During playback or fast-forward/reverse of a
VBR (Variable Bit Rate) WMA file, elapsed
playing time may not display accurately.
* only for 64 kbps
Note
Playback of the following WMA files is not
supported.
lossless compression
–copyright-protected
If you have any questions or problems
concerning your unit that are not covered in
this manual, consult your nearest Sony dealer.
Folder
(album)
MP3/WMA file
(track)
MP3/WMA
15
Maintenance
Replacing the lithium battery of the
remote commander
When the battery becomes weak, the range
of the remote commander becomes shorter.
Replace the battery with a new CR2025
lithium battery. Use of any other battery
may present a risk of fire or explosion.
Notes on the lithium battery
Keep the lithium battery out of the reach of
children. Should the battery be swallowed,
immediately consult a doctor.
Wipe the battery with a dry cloth to assure a
good contact.
Be sure to observe the correct polarity when
installing the battery.
Do not hold the battery with metallic tweezers,
otherwise a short-circuit may occur.
Cleaning the connectors
The unit may not function properly if the
connectors between the unit and the front
panel are not clean. In order to prevent this,
detach the front panel (page 5) and clean the
connectors with a cotton swab. Do not apply
too much force. Otherwise, the connectors
may be damaged.
Notes
For safety, turn off the ignition before cleaning
the connectors, and remove the key from the
ignition switch.
Never touch the connectors directly with your
fingers or with any metal device.
1
2
c
+ side up
WARNING
Battery may explode if mistreated.
Do not recharge, disassemble, or dispose
of in fire.
16
Specifications
Tuner section
FM
Tuning range:
87.5 – 108.0 MHz (at 50 kHz step)
87.5 – 108.0 MHz (at 100 kHz step)
87.5 – 107.9 MHz (at 200 kHz step)
FM tuning step:
50 kHz/100 kHz/200 kHz switchable
Antenna (aerial) terminal:
External antenna (aerial) connector
Intermediate frequency: 25 kHz
Usable sensitivity: 8 dBf
Selectivity: 75 dB at 400 kHz
Signal-to-noise ratio: 80 dB (stereo)
Separation: 50 dB at 1 kHz
Frequency response: 20 – 15,000 Hz
AM
Tuning range:
531 – 1,602 kHz (at 9 kHz step)
530 – 1,710 kHz (at 10 kHz step)
AM tuning step:
9 kHz/10 kHz switchable
Antenna (aerial) terminal:
External antenna (aerial) connector
Intermediate frequency:
9,124.5 kHz or 9,115.5 kHz/4.5 kHz
(at 9 kHz step)
9,115 kHz or 9,125 kHz/5 kHz
(at 10 kHz step)
Sensitivity: 26 μV
CD Player section
Signal-to-noise ratio: 120 dB
Frequency response: 10 – 20,000 Hz
Wow and flutter: Below measurable limit
Power amplifier section
Output: Speaker outputs
Speaker impedance: 4 – 8 ohms
Maximum power output: 52 W × 4 (at 4 ohms)
General
Outputs:
Audio outputs terminal (sub/rear switchable)
Power antenna (aerial)/Power amplifier control
terminal (REM OUT)
Inputs:
Remote controller input terminal
Antenna (aerial) input terminal
AUX input jack (stereo mini jack)
Tone controls:
Low: ±10 dB at 60 Hz (XPLOD)
Mid: ±10 dB at 1 kHz (XPLOD)
High: ±10 dB at 10 kHz (XPLOD)
Power requirements: 12 V DC car battery
(negative ground (earth))
Dimensions: Approx. 178 × 50 × 179 mm
(7
1
/8 × 2 × 7
1
/8 in) (w/h/d)
Mounting dimensions: Approx. 182 × 53 × 162 mm
(7
1
/4 × 2
1
/8 × 6
1
/2 in) (w/h/d)
Mass: Approx. 1.2 kg (2 lb 11 oz)
Supplied accessories:
Remote commander: RM-X201
Parts for installation and connections (1 set)
Your dealer may not handle some of the above
listed accessories. Please ask the dealer for
detailed information.
Design and specifications are subject to change
without notice.
17
Troubleshooting
The following checklist will help you remedy
problems you may encounter with your unit.
Before going through the checklist below,
check the connection and operating
procedures.
For details on using the fuse and removing the
unit from the dashboard, refer to the
installation/connections manual supplied with
this unit.
General
No power is being supplied to the unit.
Check the connection or fuse.
If the unit is turned off and the display
disappears, it cannot be operated with the
remote commander.
–Turn on the unit.
The power antenna (aerial) does not extend.
The power antenna (aerial) does not have a
relay box.
No sound.
The ATT function is activated.
The position of the fader control “FAD” is not
set for a 2-speaker system.
No beep sound.
The beep sound is canceled (page 12).
An optional power amplifier is connected and
you are not using the built-in amplifier.
The contents of the memory have been
erased.
The power supply lead or battery has been
disconnected or it is not connected properly.
Stored stations and correct time are erased.
The fuse has blown.
Makes noise when the position of the
ignition is switched.
The leads are not matched correctly with the
car’s accessory power connector.
During playback or reception,
demonstration mode starts.
If no operation is performed for 5 minutes
with “DEMO-ON” set, demonstration mode
starts.
Set “DEMO-OFF” (page 12).
The display disappears from/does not
appear in the display window.
The dimmer is set to “DIMMER-ON”
(page 12).
The display disappears if you press and hold
.
Press  on the unit until the
display appears.
The connectors are dirty (page 15).
The Auto Off function does not operate.
The unit is turned on. The Auto Off function
activates after turning off the unit.
–Turn off the unit.
The display disappears while the unit is
operating.
The Black Out function is set to on (page 12).
Remote commander operation is not
possible.
If the Black Out function is activated (no
lighting), remote commander operation is not
possible (page 12).
18
Radio reception
The stations cannot be received.
The sound is hampered by noises.
The connection is not correct.
Connect a power antenna (aerial) control
lead (blue/white striped) or accessory power
supply lead (red) to the power supply lead of
a car’s antenna (aerial) booster (only when
your car has built-in radio antenna (aerial)
in the rear/side glass).
Check the connection of the car antenna
(aerial).
If the auto antenna (aerial) will not go up,
check the connection of the power antenna
(aerial) control lead.
The tuning step setting has been erased.
Set the tuning step again (page 4).
Preset tuning is not possible.
Store the correct frequency in the memory.
The broadcast signal is too weak.
Automatic tuning is not possible.
The broadcast signal is too weak.
Perform manual tuning.
RDS
PTY displays “- - - - - - - -.”
The current station is not an RDS station.
RDS data has not been received.
The station does not specify the program type.
CD playback
The disc cannot be loaded.
Another disc is already loaded.
The disc has been forcibly inserted upside
down or in the wrong way.
The disc does not play back.
Defective or dirty disc.
The CD-Rs/CD-RWs are not for audio use
(page 14).
MP3/WMA files cannot be played back.
The disc is incompatible with the MP3/WMA
format and version (page 14).
MP3/WMA files take longer to play back than
others.
The following discs take a longer time to start
playback.
a disc recorded with a complicated tree
structure.
a disc recorded in Multi Session.
a disc to which data can be added.
The display items do not scroll.
For discs with very many characters, those may
not scroll.
“AUTO SCR” is set to “OFF.”
Set “AUTO SCR-ON” (page 12).
–Press and hold  (SCRL).
The sound skips.
Installation is not correct.
Install the unit at an angle of less than 45° in
a sturdy part of the car.
Defective or dirty disc.
The disc will not eject.
Press (eject) (page 6).
19
Error displays/Messages
ERROR
The disc is dirty or inserted upside down.
Clean or insert the disc correctly.
A blank disc has been inserted.
The disc cannot play due to a problem.
–Insert another disc.
Press (eject) to remove the disc.
FAILURE
The connection of speakers/amplifiers is
incorrect.
See the installation/connections manual of
this model to check the connection.
NO MUSIC
The disc does not contain a music file.
Insert a music CD in this unit.
NO NAME
A disc/album/artist/track name is not written
in the track.
OFFSET
There may be an internal malfunction.
Check the connection. If the error indication
remains on in the display, consult your
nearest Sony dealer.
PUSH EJT (Push Eject)
The disc cannot be ejected.
–Press (eject) (page 6).
READ
The unit is reading all track and album
information on the disc.
Wait until reading is complete and playback
starts automatically. Depending on the disc
structure, it may take more than a minute.
“” or “”
During reverse or fast-forward, you have
reached the beginning or the end of the disc
and you cannot go any further.
“”
The character cannot be displayed with the
unit.
If these solutions do not help improve the
situation, consult your nearest Sony dealer.
If you take the unit to be repaired because of
CD playback trouble, bring the disc that was
used at the time the problem began.
2
자동차 시동키에 ACC 위치가 없을 경우
의 경고
자동 꺼짐 기능을 설정하십시오(12페이
지). 기기가 꺼지고 설정된 시간이 지나
면 자동으로 완전히 종료되므로 배터리
소모가 방지됩니다. 자동 꺼짐 기능을
설정하지 않은 경우 시동키를 때마다
디스플레이가 사라질 때까지
누르고 계십시오.
  • Page 1 1
  • Page 2 2
  • Page 3 3
  • Page 4 4
  • Page 5 5
  • Page 6 6
  • Page 7 7
  • Page 8 8
  • Page 9 9
  • Page 10 10
  • Page 11 11
  • Page 12 12
  • Page 13 13
  • Page 14 14
  • Page 15 15
  • Page 16 16
  • Page 17 17
  • Page 18 18
  • Page 19 19
  • Page 20 20
  • Page 21 21
  • Page 22 22
  • Page 23 23
  • Page 24 24
  • Page 25 25
  • Page 26 26
  • Page 27 27
  • Page 28 28
  • Page 29 29
  • Page 30 30
  • Page 31 31
  • Page 32 32
  • Page 33 33
  • Page 34 34
  • Page 35 35
  • Page 36 36
  • Page 37 37
  • Page 38 38
  • Page 39 39
  • Page 40 40

Sony CDX-GT310MP Operating instructions

Category
Car media receivers
Type
Operating instructions

Ask a question and I''ll find the answer in the document

Finding information in a document is now easier with AI