Page is loading ...

Features & Components
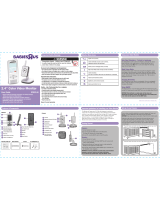
5” Color Flatscreen
Video Monitor
User Guide 5F62313
• Please read the following instructions and safety warnings
before you install the Video Monitor.
• Please retain these instructions for future reference
• Tool needed: Phillips Head Screwdriver (not included).
• Additional camera(s) (sold separately).
• For use with children from birth and up.
Important guidelines for installing your Video Monitor
Getting Started
The Monitor and Camera use a 2.4 GHz radio frequency to synchronize
to each other. The range for this frequency may be affected by environmental
conditions in your home such as; walls, floors, ceilings, Wi-Fi routers, microwave
ovens, cordless phones, Bluetooth devices, home computers, among other
electronic devices. It is recommended to keep your Monitor away from
these types of devices at least 5 feet. If the signal is weak, try moving the
Monitor and/or Camera to different positions in the rooms.
1 Connect Camera to AC outlet.
2 To turn ON, slide the ON/OFF switch to the ON position.
The Power ON Indicator will illuminate green.
3 To turn OFF, slide the ON/OFF switch to the OFF position.
Important Safety Warnings
Monitor
Camera
Set-up of your Camera
Once you have successfully established a connection between the Camera and
Monitor, it is time to determine a safe location to place the Camera.
IMPORTANT: Never place Camera or cords within 3 feet (0.9 m) of children’s reach.
Determine a safe location for the Camera that will provide the best view of
your baby. Place the Camera on a flat surface, such as a dresser, bureau,
or shelf or wall mount it using the supplies provided. If you choose to wall
mount the Camera, ALWAYS use the security clips provided to secure the
cord to the wall.
Important Safety Warnings
To prevent cord entanglement and strangulations:
• Do not place the Camera or AC adaptor cord within reach
of children.
• Do not place the Camera or AC adaptor cord in, or attach it to,
a crib or playpen.
• Always fasten the AC adaptor cord of the Camera on the wall
with the security clips provided.
• Never use extension cords with AC adaptors.
Use only AC adaptors provided.
Important Safety Instructions:
• Adult assembly is required. Keep small parts away from
child’s reach.
• This product is not a toy. Do not allow children to play with it.
• This Video Monitor is not a substitute for responsible
adult supervision.
• Test the Video Monitor and all its functions so that you are familiar
with it prior to actual use.
• When the power adaptor is plugged into an electrical outlet,
do not touch the exposed end.
Camera:
1 Battery Installation: Install the rechargeable battery included.
2 Connect Monitor to AC outlet.
3 To turn ON, press and hold the Power ON/OFF button for 3 seconds until
“Hello” screen disappears.
4 Now that the Monitor and Camera are turned on, video captured by
the Camera will appear on the video screen.
5 To turn OFF, press and hold the Power ON/OFF button for 3 seconds until
the “Goodbye” screen disappears.
IMPORTANT: The Camera and Monitor are already paired; in the event that the
connection is lost you will need to pair the Camera to the Monitor.
To pair, follow the steps provided under “Using Video Monitor” section.
Monitor:
Instructions continued on reverse side.
Battery Installation & Use
Strangulation Hazard - Children have STRANGLED
in cords. Keep this cord out of the reach of children
(more than 3 feet (0.9 m) away).
WARNING!
Security Clips (6) Wall Anchor Screw AC Adapters (2)
Monitor Menu Icons
Signal Level (5 Levels)
Camera Selected (can pair up to 4 cameras,
additional cameras sold separately)
Battery Level or Charging Status (5 Levels)
Night Vision Mode (Video changes to Black and White)
Camera Scanning
(scan up to 4 Cameras with each scan duration of 10 seconds)
Volume Level Control (8 Levels)
Brightness Level Control (8 Levels)
Zoom Level Control (1x, 2x)
Place the Camera and cords more than 3 feet (0.9m) away from your child
Place the Camera and cords more than 3 feet (0.9m) away from your child
Power ON Indicator/
Sound Level Indicator
5 inch Video Screen
Power ON/OFF & Menu Button
AC Adapter Jack
Volume +/- Buttons & Menu Up/Down
Brightness +/- Buttons
& Menu Left/Right
Zoom Control Button & Enter
Video ON/OFF Button
Antenna
Speaker
Stand
Battery
Compartment
(for rechargeable
battery)
A
B
C
D
E
F
G
H
I
J
K
L
M
A
B
C
E
F
G
D
H
I
J
K
L
Antenna
Nighttime Infrared LED Lights
Camera Lens
Microphone
Power ON Indicator
Pair Button
Power ON/OFF Switch
AC Adapter Jack
Wall Mount Notch
Room Darkening
Automatic Sensor
N
O
P
Q
R
S
T
U
V
Rechargeable
Battery
BATTERY WARNING!
• ONLY use the rechargeable battery* provided.
• ALWAYS keep battery away from children.
• Clean battery and product contact prior to battery installation.
• Do not short-circuit supply terminals.
• ALWAYS remove battery if you do not intend to use the
product for an extended period of time. Battery left in the
unit may leak and cause damage.
• Risk of explosion if battery is replaced by an incorrect type.
Discard leaky batteries immediately to avoid skin burns
or other personal injury. Discard batteries properly according
to local regulations.
• Change battery when unit no longer functions properly.
• Recharge battery only under adult supervision.
CAUTION:
• Risk of explosion if battery is replaced by incorrect type.
* To order a new rechargeable battery pack, visit WWW.BABIESRUS.COM.
M
Q
S
R
T
N
O
P
U
V

FCC and IC Regulations
FCC Part 15: This device complies with part 15 of the FCC Rules. Operation is subject to the following two conditions: (1) this
device may not cause harmful interference, and (2) this device must accept any interference received, including interference that
may cause undesired operation.
Warning: Changes or modifications to this unit not expressly approved by the party responsible for compliance could void the
user’s authority to operate the equipment.
NOTE: This equipment has been tested and found to comply with the limits for a Class B digital device, pursuant to part 15 of
the FCC Rules. These limits are designed to provide reasonable protection against harmful interference in a residential installation.
This equipment generates, uses and can radiate radio frequency energy and, if not installed and used in accordance with the
instructions, may cause harmful interference to radio communications. However, there is no guarantee that interference will not
occur in a particular installation. If this equipment does cause harmful interference to radio or television reception, which can be
determined by turning the equipment off and on, the user is encouraged to try to correct the interference by one or more of the
following measures:
• Reorient or relocate the receiving antenna.
• Increase the separation between the equipment and receiver.
• Connect the equipment into an outlet on a circuit different from that to which the receiver is connected.
• Consult the dealer or an experienced radio/TV technician for help.
To ensure safety of users, the FCC has established criteria for the amount of radio frequency energy that can be safely absorbed
by a user or bystander according to the intended usage of the product. This product has been tested and found to comply with the
FCC criteria. The baby unit shall be installed and used such that parts of the user’s body other than the hands are maintained at a
distance of approximately 20 cm (8 inches) or more.
Radiation Exposure Statement:
This equipment complies with FCC radiation exposure limits set forth for an uncontrolled environment. This equipment should be
installed and operated with minimum distance 20 cm (8 in.) between the radiator & your body.
Industry Canada
This Class B digital apparatus complies with Canadian ICES-003.
IC WARNING:
This device complies with Industry Canada license-exempt RSS standard(s). Operation is subject to the following two conditions:
(1) this device may not cause interference, and (2) this device must accept any interference, including interference that may cause
undesired operation of the device.
Under Industry Canada regulations, this radio transmitter may only operate using an antenna of a type and maximum (or lesser)
gain approved for the transmitter by Industry Canada. To reduce potential radio interference to other users, the antenna type and
its gain should be so chosen that , the equivalent isotropically radiated power (e.i.r.p.) is not more than that necessary for
successful communication.
RF Radiation Exposure & Hazard Statement:
To ensure compliance with RSS-102 RF exposure requirements, this device must be installed in a location such that the antenna
of the device will be greater than 20 cm (8 in.) away from all persons.
Colors and styles may vary.
Please retain for future reference.
Using your Video Monitor Troubleshooting
Night Vision Mode
The Camera features eight Infrared LEDs around the lens designed to capture
clear images in dark environments or at night. When the Light Sensor detects
low light levels, the Night Vision Mode will automatically activate and the video
shown in the Monitor will display in black and white. The “ ” icon will be
displayed on the screen.
Charging the Battery
Your Video Monitor includes a rechargeable lithium-ion battery. Charge the battery
by connecting the Monitor to a power outlet using the power cord provided.
Video ON/OFF
This feature allows you to turn the video screen OFF while maintaining the audio
monitor ON. Simply press the Video ON/OFF key to turn the video screen ON or OFF.
IMPORTANT: When the Monitor is on battery mode, the Video Screen will
automatically turn OFF after 3 minutes. This sleep mode helps conserve battery power.
To turn video back ON, simply press the Video ON/OFF button.
Volume
To adjust volume, press up (+) or down (-). Volume bar will display on screen.
No bars means Parent Unit is on mute.
Brightness
To adjust the brightness, press up (+) or down (-).
Brightness bar will display on screen.
Zoom
To zoom in, press the Zoom Control Button. Zoom icon will display on screen.
Press button again to return to normal viewing. Zoom icon will disappear
from screen.
Antenna
To increase signal strength pull the antenna up.
No video display on screen
• Are the Monitor and Camera plugged in to a working electrical outlet?
– Make certain any light switches that control power to the wall outlet are ON.
– Check for pinched power cords.
• Are the Monitor and Camera turned ON?
– To turn Monitor ON, press and hold the Power ON/OFF key for 3 seconds until “Hello” screen disappears.
– To turn Camera ON, slide the ON/OFF switch to the ON position.
• Is the Monitor in sleep mode?
– Press the Video ON/OFF key to turn the display ON.
Monitor lost signal, “No Signal”
• If there is no connection, the words “No Signal” will be shown on the video display and the Monitor will beep.
• Make certain that the Camera is turned ON, the green LED Power On indicator should be lit.
• The Monitor may be too far away from the Camera, bring the Monitor closer to the Camera.
• The Camera could have lost its connection to the Monitor. Pair the units together by following the “Pair” a Camera instructions.
Ensure that the Monitor and Camera are away from obstacles that may interfere with the signal such as; walls, floors, ceilings, Wi-Fi routers,
microwave ovens, cordless phones, Bluetooth devices, home computers, among other electronic devices. It is recommended to keep your Video
Monitor away from these types of devices at least 5 feet. If the signal is weak, try moving the Monitor and/or Camera to different positions
in the rooms.
Video on screen is in black and white
• If the “ ” icon is displayed on the screen, it means that the Camera is in a dark environment and Night Vision Mode has been activated.
Ensure that the Camera is in a well-lit environment to de-activate Night Vision Mode.
Audio Feedback
• The units may be too close, move the Monitor further away from the Camera.
• Look for any noise source in baby’s room. Remove noise source or move Camera away from the source.
Monitor not responding (frozen or unresponsive)
• Remove the battery and re-install.
Consumer Support
Baby’s Journey stands behind all of its products. If you are not completely satisfied
or have questions, please contact our Consumer Care Team at 1-855-422-2975 or
email us at wecare@babysjourney.com.
For replacement parts information or questions, please visit www.babysjourney.com.
Cleaning and Care
To clean your Video Monitor, disconnect all cables and turn OFF.
Use a soft, lint-free cloth. Avoid getting moisture in openings.
Do not use cleaning solutions or compressed air.
Maintain your Video Monitor away from direct sunlight, hot or humid areas.
Do not let product get wet.
Menu Options
Pair a Camera
1 Have both Monitor and Camera within arm’s reach.
2 Press the Menu button to access the main menu.
3 Press the Volume +/- buttons to navigate the
main menu and select “Pair”.
4 will appear, Press the Brightness
+/- buttons to navigate Left/Right to select the next
available Camera (highlighted in red), and press the
Enter button to start searching for the camera. The
green Power ON Indicator will flash rapidly while searching.
5 Within 30 seconds, press for one second the Pair button located on the back
of the Camera. The green Power ON Indicator will flash for a few seconds and
the picture from the camera appears on the video screen.
Note: Available cameras are highlighted in blue. A Camera can only be
synchronized to one Monitor at any one time.
Unpair a Camera
1 Press the Menu button to access the main menu.
2 Press the Volume +/- buttons to navigate the main menu and select “Unpair”.
3 will appear, Press the Brightness +/- buttons to navigate
Left/Right to select the desired Camera, and press the Enter button to delete
that synchronization.
Select a Camera (when multiple Cameras are paired)
1 Press the Menu button to access the main menu.
2 Press the Volume +/- buttons to navigate the main menu and select “Select”.
3 will appear, Press the Brightness +/- buttons to navigate
Left/Right to select the desired Camera, and press the Enter button to view
the picture from that Camera.
Note: Your Monitor accepts up to 4 Cameras (additional Cameras sold separately).
Scan Cameras
1 Press the Menu button to access the main menu.
2 Press the Volume +/- buttons to navigate the main menu and select “Scan”,
and then press the Enter button to confirm.
Note: The scan feature allows you to scan up to 4 Cameras with each scan
duration of 10 seconds.
Language
1 Press the Menu button to access the main menu.
2 Press the Volume +/- buttons to navigate the main menu and select “English”,
and then press the Enter button to confirm.
Pair
Unpair
Select
Scan
English
BABIES“R”US IS A MARK OF (EST UNE MARQUE DE/ES UNA MARCA DE) GEOFFREY, LLC, A SUBSIDIARY OF
(UNE FILIALE DE/UNA SUBSIDIARIA DE) TOYS“R”US, INC. © 2013 GEOFFREY, LLC. MADE IN CHINA
(FABRIQUÉE EN CHINE/FABRICADO EN CHINA). DISTRIBUTED IN THE UNITED STATES BY (DISTRIBUÉE AUX
ÉTATS-UNIS PAR/DISTRIBUIDO EN LOS ESTADOS UNIDOS POR) TOYS“R”US, INC., WAYNE, NJ 07470.
IMPORTED BY (IMPORTÉ PAR/IMPORTADO EM) TOYS“R”US (CANADA) LTD. (LTÉE), 2777 LANGSTAFF ROAD,
CONCORD, ON L4K 4M5. DISTRIBUTED IN AUSTRALIA BY (DISTRIBUÉE EN AUSTRALIE PAR/DISTRIBUIDO EN
AUSTRALIA POR) TOYS“R”US (AUSTRALIA (AUSTRALIE)) PTY LTD.(LTÉE), REGENTS PARK NSW 2143.
WWW.BABIESRUS.COM
WWW.BABIESRUS.CA
1/13/14
/