Uniden UBR223 User manual

Category
Baby video monitors
Type
User manual

Uniden UBR223 is a portable digital wireless baby monitor that provides excellent image quality and clarity with a secure and private signal. With a range of up to 500 ft., it features exceptional sound clarity, out-of-range notification, four lullabies, and two-way audio communication. The camera has a night vision mode for low light viewing, and the monitor has a temperature display with an alert range. The system is expandable up to 4 cameras, and both the monitor and camera have night light control.

Uniden UBR223 is a portable digital wireless baby monitor that provides excellent image quality and clarity with a secure and private signal. With a range of up to 500 ft., it features exceptional sound clarity, out-of-range notification, four lullabies, and two-way audio communication. The camera has a night vision mode for low light viewing, and the monitor has a temperature display with an alert range. The system is expandable up to 4 cameras, and both the monitor and camera have night light control.

Portable Digital Wireless
Baby Monitor
UBR223 Users Guide
CUSTOMER CARE
At Uniden®, we care about you!
If you need assistance, please do NOT return this product to your place of purchase. Our customer
care specialists are available to serve you.
Quickly find answers to your questions by:
1. Reading this owner’s manual.
2. Visiting our customer support website at www.uniden.com.
3. Calling our customer care specialists at 1-800-297-1023.
IMPORTANT SAFETY PRECAUTIONS
This manual contains important information about this product’s operation. If you are
installing this product for others, you must leave this manual or a copy with the end user.
When using your equipment, always follow basic safety precautions to reduce the risk of fire,
electric shock and injury to persons, including the following:
The camera is NOT weatherproof. It is an indoor camera
To avoid any risk of electric shock from lightning, avoid handling any electronic devices (except battery-powered ones) during an
electrical storm.
Use only the power cord indicated in this manual.
Never tug or pull on any power cord; be sure to leave some slack in the cord when placing your equipment, and always use the
plug to unplug cord from the wall outlet.
Never leave power cords where they can become crushed, cut, or frayed; when running power cords, avoid letting them rub
against any sharp edges or lie across any high trac areas where people might trip over them.
Do not use the device if the adapter cords or plugs have been damaged, the monitor has been exposed to liquids, or the monitor/
camera has been dropped or is damaged.
WARNING TO PARENTS AND OTHER USERS
Failure to follow these warnings and the assembly instructions could result in serious injury or
death. This product is not designed or intended for use as a medical monitor, nor should this
product be used as a substitution for medical or parental supervision. Always be sure that both the
transmitter and receiver are working properly, and are within range of each other.
STRANGULATION HAZARD. Keep the adapter cords out of the reach of children.
WARNING: KEEP OUT OF THE REACH OF CHILDREN. This product is not a toy and is not intended for use by any children under
the age of 13. If you are between the ages of 13 and 18, review these terms, conditions and safety warnings with your parents or
guardian to make sure that you and your parent or guardian understand these terms, conditions, and safety warnings.
Allow for proper ventilation when units are in use. Do not cover the camera or receiver with any object such as a blanket. Do not
place it in a drawer or in any location which would mue the sound or interfere with the normal ow of air.
SAVE THESE INSTRUCTIONS!
FOR BEST RESULTS
To avoid damage to your equipment, follow these simple precautions:
Do not drop, puncture or disassemble any part of the equipment. There are no user-serviceable parts inside.
Do not expose the equipment to high temperatures, and avoid leaving the equipment in direct sunlight for more than a few
minutes. Heat can damage the case or electrical parts.
Do not place heavy items on top of the equipment or expose the equipment to heavy pressure.
Remove the power adapter during long periods between usages.
Clean only with a dry cloth.
Failure to follow the instructions in this operating manual will void the warranty. Uniden assumes
no liability for damages to property or injury to persons caused by improper handling or failure to
comply with these safety instructions.
Uniden surveillance products are not manufactured and/or sold with the intent to be used for illegal purposes. Uniden expects
consumer’s use of these products to be in compliance with all local, state and federal law. For further information on video
surveillance and audio recording legal requirements, please consult your local, state and federal law enforcement agency.
© 2013. All rights allowed by law are hereby reserved.
CONTENTS
OVERVIEW .......................................................5
FEATURES ............................................................................. 5
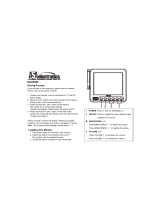
Camera .........................................................................................5
Monitor ........................................................................................6
USING THE MANUAL ........................................................ 6
GETTING STARTED ..........................................8
WHAT’S INCLUDED ........................................................... 8
MONITOR INSTALLATION ............................................... 8
CAMERA INSTALLATION ................................................. 9
Placement Considerations ....................................................9
Wall Mount ...............................................................................10
Suction Mount .........................................................................10
Clip-Mount ................................................................................10
Connect Power ........................................................................10
BASIC OPERATION ....................................... 12
WIRELESS CAMERA .........................................................12
WIRELESS MONITOR .......................................................14
LCD DISPLAY .....................................................................16
USING THE UBR223 .........................................................18
Viewing Modes .......................................................................18
Common Operations ............................................................19
SYSTEM MENU DESCRIPTIONS ................... 20
SYSTEM ...............................................................................20
Date/Time .................................................................................21
Brightness .................................................................................22
Factory Reset ...........................................................................22
Language ..................................................................................23
Temperature Display Unit ...................................................23
Temperature Alert Range ....................................................24
ALERT ...................................................................................25
VOX .......................................................................................26
CAMERA ..............................................................................27
Pair ...............................................................................................27
On/O .........................................................................................28
POWER SAVE .....................................................................29
SPECIAL FEATURES ...................................... 31
ZOOM ..................................................................................31
NIGHT LIGHT .....................................................................31
LULLABIES ..........................................................................31
USING THE INTERCOM ...................................................32
CAMERA PAIRING ............................................................32
MAINTAINING YOUR SYSTEM ..................... 33
MONITOR ............................................................................33
CAMERA ..............................................................................33
SOLVING PROBLEMS ................................... 34
SPECIFICATIONS .......................................... 35
GENERAL .............................................................................35
CAMERA ..............................................................................35
MONITOR ............................................................................36
FCC Notices .................................................. 36
FCC Compliance Information .....................................36
RF Exposure Information ..............................................37
IC Compliance Information ......................... 37
Radio Equipment Notice ..............................................37
Three-Year Limited Warranty ..................... 37
5
OVERVIEW
FEATURES
Digital wireless technology provides excellent image quality and clarity
Interference free, secure, and private signal
Up to 500 ft. transmission range
Maximum open space transmission range. The actual range varies depending on building
materials and other obstructions in wireless signal path.
Exceptional sound clarity
Out of range notification
Four lullaby selections
Monitor/Camera-controlled night light
System expandable up to 4 cameras (one camera included; additional cameras sold separately)
Two-way audio communication
Camera room temperature display on monitor; temperature range alert
Camera
VGA resolution camera
Built-in microphone
Night light control
Lullaby control
Built-in battery for true portable wireless operation
Night vision allows for low light viewing up to 15 feet / 4.5 meters
6
IR illumination range of 15ft./4.5m under ideal conditions. Objects at or beyond this range
may be partially or completely obscured, depending on the camera application.
Monitor
2.3” color LCD monitor with superior image quality
Rechargeable lithium polymer battery for true portability
Audio level indicator
Intercom
Room temperature display
Remote night light control
Remote lullaby control
If any items are missing or damaged, contact our Customer Care Line immediately.
Never use damaged products!
USING THE MANUAL
This manual is set up in eight sections:
Overview. This general section lists the system’s features. It also tells you how to use this
manual.
Getting Started. This section lists the hardware you should have in your box and how to set it up.
Basic Operations. This section describes your equipment’s function keys in detail. It also provides
a list of basic operations in an abbreviated format, referencing screen details in the next section.
Uniden UBR223 Screen Descriptions. Here you will find detailed descriptions of each screen and
how it is used.
Special Features. This section tells you about the UBR223 special features.
7
Maintaining Your System. This section provides tips on how to keep your UBR223 hardware
clean and in excellent working condition.
Solving Problems. Troubleshooting tips are located here.
Specification. This last section contains hardware and software specifications.
8
GETTING STARTED
WHAT’S INCLUDED
The system comes with the following components:
Digital Wireless Monitor (1) Digital Wireless Camera (1) Suction Cup Adapter Bar (1)
AC Power Adapter (2) Screws and Anchors Owner’s Manual
If any items are missing or damaged, contact our Customer Care Line immediately.
Never use damaged products!
MONITOR INSTALLATION
1. Place the monitor in a location with clear reception from your camera(s). Place it a minimum of
3 feet from the crib.
2. Plug the AC adapter power plug into the monitor’s DC adapter input jack.
9
3. Plug the power plug into a 120 volt AC (standard indoor) power outlet or surge protector.
4. Press and hold
POWER
to turn the unit on or off. Let the monitor charge for 6 hours prior to
first time use so the built-in rechargeable monitor battery is fully charged. DO NOT remove
the power cable from the monitor during the initial charge process. After the initial charge,
recharge the monitor as needed.
5.
Out of range
displays until you turn on the camera, .
CAMERA INSTALLATION
The UBR223 camera and mounting clip are a complete unit. The UBR223 does come with a separate
suction cup bar. With it installed, you can mount the camera on glass or smooth metallic surfaces.
Placement Considerations
The camera included with your monitor is NOT weatherproof; it is an indoor camera.
The clearest line-of-sight between the camera and monitor is best. Walls, especially brick and
concrete, can affect reception quality.
Avoid having a direct light source in view of the camera (ceiling or floor lamps).
Carefully plan where and how the camera will be positioned, and where you will route the cable
that connects the camera to the power adapter. Place it a minimum of 3 feet from the crib.
When you are positioning the camera, bring the monitor along; it’s much easier to get the
camera into the right position when you have the display handy. Check the image on the
monitor before you install the camera.
Out of range
displays when the camera is out of range, turned off, or unsuccessfully paired to the
monitor. It also displays when the monitor is out of range.
You can install additional cameras (maximum of 4 cameras). When adding cameras that
were not included in the original box, you will need to pair the cameras with the monitor.
Refer to page 29.
10
Wall Mount
The UBR223 camera mounting clip has two slots that fit over screws to mount the unit on the wall.
1. Mark the position of the screw holes on the wall.
2. Drill holes and insert the anchors and screws provided.
Be sure to leave room for the mounting to fit over the screw heads.
3. Place the mounting over the installed screws and push it
downwards, locking it into place.
4. Adjust the camera as needed.
Suction Mount
1. Insert the suction base into the mounting clip as shown.
2. Firmly press the camera with the suction base attached onto glass or
metallic surfaces.
3. Adjust the camera as needed.
Clip-Mount
Clip the UBR223 on ledges and shelves.
1. Press the mounting clip as shown.
2. Place the unit over the mounting surface and release.
3. Adjust the camera as needed.
Connect Power
1. Insert the AC adapter power plug into the camera’s DC adapter input jack.
2. Plug the other end into a 120 volt AC (standard indoor) power outlet or surge protector. The
charging LED
turns on. If the battery is not fully charged, the LED is red. If it is fully charged, the
LED is green.
3. Press
Power
. The green power LED turns on and the monitor now displays camera video. If it
doesn’t, try reconnecting the AC adapter, making sure the power outlet isn’t controlled by a
wall switch.
WALL
11
BASIC OPERATION
WIRELESS CAMERA
Item What it is
1
Camera Antenna: Sends and receives signals to or from the monitor.
2
Temperature sensor: Detects temperature at camera side and displays it on the
monitor LCD.
3
PAIR
: Pairs the camera to the monitor.
4
Mounting Clip: This fastener can attach the camera to shelves or ledges.
5
Suction base: Attach to mount the camera on glass or metallic surfaces.
6
Vol
: Increase speaker volume.
7
Vol
: Decrease speaker volume.
8
LULLABY PLAY/STOP
: Press this button to play lullabies. See page 28 for details.
9
LULLABY SKIP
: Press to play next lullaby. See page 28 for details.
10
LED night light bars.
11
IR LEDs (Covered): Infrared LEDs provide viewing in no/low light conditions.
Left side
Right side
Front
16
10
11
1
2
3
4
5
9
8
7
6
12
13
14
15
17
20
18
19
NOTE: The RESET button
is on the back.
12
Item What it is
12
Light sensor: Measures light intensity on the camera side.
13
Lens: Camera lens.
14
Microphone: Receives sounds for the area near the camera, and transmits sound from
the camera to the monitor.
15
Speaker: Produces the sound transmitted from the monitor.
16
POWER
: Turns the camera ON or OFF.
17
NIGHT LIGHT
: Press to turn the night light ON or OFF.
18
Charging LED:
Red = Charging
Green = Fully charged
Off = Camera and power adapter are disconnected or power adapter is disconnected
from power source.
19
Power LED:
Green = Camera is turned on.
Green (Blinking) = Battery is low.
20
DC 5V Power: Connects the DC 5V power adapter to the camera.
13
WIRELESS MONITOR
Item What it is
1
Monitor Antenna: Sends & receives signals to or from the camera.
2
LED light bar. The left LED indicates power and the remaining LEDS indicate sound.
3
POWER
: Turns the camera on and off.
4
2.3 inch LCD screen.
5
Vol:
•Increasespeakervolume.
•InMenus:Scrollup.
•InLullaby:Increasevolume.
•InZoom:Scrollup.
6
ZOOM
: Displays the camera image in double size (see page 28).
7
LULLABY PLAY/STOP
: Press this button to remotely play lullabies. See page 28 for details.
1
3
2
4
5
6
7
8
10
11
12
13
14
15
16
17
18
9
NOTE: The RESET button is on
the back behind the kickstand.
14
Item What it is
8
CH
:
•InMenus:Scrollleft.
•InZoom:Scrollleft.
•InLiveview:Switchbetweenavailablecameras.
9
Microphone.
10
Vol:
•Decreasespeakervolume.
•InMenus:Scrolldown.
•InLullaby:decreasevolume.
•InZoom:Scrolldown.
11
MENU/OK
: Select a menu option or accept a setting.
12
TALK
: Activate Intercom function (see page 29).
13
BACK
: InMenus:Backonelevel.
14
CH:
•InMenus:Scrollright.
•InZoom:Scrollright.
•InLiveview:Switchbetweenavailablecameras.
15
NIGHT LIGHT
: Remotely turn the camera night light ON or OFF.
The monitor’s night light function is only available when the camera is paired to
the monitor.
16
LULLABY SKIP
: Skips to the next lullaby in the series. See page 28 for details.
17
Charge LED
RED = Charging
Green = Charging complete
If the monitor becomes unplugged from the adapter, this LED turns off.
18
DC 5V Power: Connects the DC 5V power adapter to the monitor.
15
LCD DISPLAY
Item Icon What it is
1
Signal Indicator (displays in full screen mode only). The number of bars in the
signal indicator shows the strength of the signal received from the camera.
One or no bars indicates the signal is poor, and 4 bars indicate a very strong
signal.
Signal Strength Indicator Warning
Strong
None
Good
None
Fair
None
Low
None
NoSignal
OutofRange
CAM1 77°F
1
01.02.2013 12:26:00
x 2
1
5
4
3
22
6
9
8
7
10
16
Item Icon What it is
2
CAM1
Camera Indicator. indicates which camera is displaying. Press
CH
or
CH◄
on
the monitor to switch between available cameras. It will cycle in the following
order:
CH
: CAM1—CAM2—CAM3—CAM4—QUAD—AUTO SCAN — CAM1
CH◄
: CAM1—Auto SCAN—QUAD—CAM4—CAM3—CAM2—CAM1
3
77°F
Temperature indicator (displays in full screen mode only). Displays the
temperature on the camera side.
4
Night light indicator (displays in full screen mode only). Displays when the
night light is turned on. (See page 28)
5
Intercom (Talk). Displays in full screen mode only when you press and hold
TALK
on the monitor (see page 29).
6
Batterylevel.Indicatestheamountofpowerleftinthebattery.The icon
displayswhenthebatteryischarging.
7
Volume indicator. Displays when
Vol
or
Vol
is pressed on the monitor. If
the volume is muted,
X
displays.
8
1
Lullaby. Displays in full screen mode only when a lullaby is playing. The
number indicates which melody is playing (see page 28).
9
Date and Time (displays in full screen mode only). Displays the time as set
through the monitor.
01.02.2013 12:26:00 = month.day.year hour:minute:second
10
x 2
ZOOMindicator.Ifyoupress
ZOOM
,
X2
displaysaftertheLullabyindicator(item
8).Thezoomedimagedisplaysasthebackgroundimage.
USING THE UBR223
Viewing Modes
Live view displays live images from the cameras in the following modes:
17
Quad mode: Monitor displays video from all cameras on a single screen in 4 quadrants. Any
channel that does not have a camera is blank.
Single mode: Monitor displays video from one camera at a time.
Scan mode: Monitor displays video from one camera at a time, but cycles through all cameras
one by one.
Use
CH or CH◄
to cycle through these modes.
Your system comes with a single camera; therefore, it only displays in Single mode in Live
view or a single quadrant in Quad view.
Common Operations
To... Do This...
Changebetweenquad
view,singleview,andscan
forLiveview
Press
CH►
tocyclethroughtheLivemodesinthefollowingorder:
CAM1—CAM2—CAM3—CAM4—QUAD—AUTO Scan — CAM1
Checkthetemperature Thetemperaturedisplaysonthemonitorscreenwhenthecamerais
infullscreenmode.Seepage21.
Turnonthenightlight Press
NIGHT LIGHT
onthesideofthecamera(page11)oronthe
monitor(page13).Seepage28fordetails.
Setthedateandtime Seepage19.
Settheroomtemperature
rangeforthetemperature
alert
Seepage22.
UsetheLullabyfunction Seepage28.
AdjustUBR223volume
Press▲
Vol
(increasevolume)or▼
Vol
(decreasevolume)oneither
thecameraorthemonitor.
UsetheIntercom 1. Pressandhold
TALK
onthemonitor.
2. Speakintothemicrophone.
3. Releasetohearreply.
18
SYSTEM MENU DESCRIPTIONS
Press
MENU/OK
to access system menus. Use the navigating buttons to navigate up (
Vol
)
,
down
(
Vol
)
,
left (
CH
), and right (
CH
) in the menus, then press
MENU /OK
to confirm a setting. Use
CH
or
CH◄
to focus on the 5 different system menu selections on the clothesline.
System
Power Save
Camera
VOX
Alert
SYSTEM
Move the focus to the System option and press
MENU/OK
to access the six System options:
Date/Time
Brightness
Factory Reset
Language
Temp. display unit
19
Temp. alert range
Date/Time
This option allows you to set the system date and time. The display format is Month.Day.Year
Hour:Minute (Default = 01.02.2013 12:26)
1. From the
System
menu, select
Date/Time
and press
MENU/OK
. The
Date/Time
screen displays.
2. Press
Vol
or
Vol
to increase/decrease the number for that setting.
3. Press
CH
or
CH
to save the current setting and move to the next setting.
4. Press
MENU/OK
to save the completed date and time setting and return to the main System
options. Press the BACK button to step backwards one level until you are out of the menu
system.
20
Brightness
This option allows you to adjust the brightness level for each camera. (Default = 3)
1. From the
System
menu, select
Brightness
and press
MENU/OK
. The
Brightness
screen displays.
2. Press
CH
or
CH
to increase or decrease the brightness level (6 levels).
3. Press
MENU/OK
to save the setting and return to the main System options. The new brightness
level displays the next time you are in Live view.
Factory Reset
This option allows you to restore your system to factory settings. (Default = No)
1. From the
System
menu, select
Factory Reset
and press
MENU/OK
. The
Factory Reset
screen
displays.
2. Press
Vol
or
Vol
to select or cancel a reset to factory defaults.
  • Page 1 1
  • Page 2 2
  • Page 3 3
  • Page 4 4
  • Page 5 5
  • Page 6 6
  • Page 7 7
  • Page 8 8
  • Page 9 9
  • Page 10 10
  • Page 11 11
  • Page 12 12
  • Page 13 13
  • Page 14 14
  • Page 15 15
  • Page 16 16
  • Page 17 17
  • Page 18 18
  • Page 19 19
  • Page 20 20
  • Page 21 21
  • Page 22 22
  • Page 23 23
  • Page 24 24
  • Page 25 25
  • Page 26 26
  • Page 27 27
  • Page 28 28
  • Page 29 29
  • Page 30 30
  • Page 31 31
  • Page 32 32
  • Page 33 33
  • Page 34 34
  • Page 35 35
  • Page 36 36

Uniden UBR223 User manual

Category
Baby video monitors
Type
User manual

Uniden UBR223 is a portable digital wireless baby monitor that provides excellent image quality and clarity with a secure and private signal. With a range of up to 500 ft., it features exceptional sound clarity, out-of-range notification, four lullabies, and two-way audio communication. The camera has a night vision mode for low light viewing, and the monitor has a temperature display with an alert range. The system is expandable up to 4 cameras, and both the monitor and camera have night light control.

Ask a question and I''ll find the answer in the document

Finding information in a document is now easier with AI