Page is loading ...

INSTALLATION DATA
J10-808 AND J10-821
HUMIDISTAT
Applicaon
The J10 Series humidistat will control the automac operaon of a low
voltage (24V) humidier placed in a warm-air duct of a forced-air furnace.
Installaon Instrucons
Disconnect the electrical power. Determine the humidistat locaon.
The control can be wall mounted in the living area beside the furnace
thermostat or it can be mounted directly in the cold air return duct of
the furnace. Wall mounng provides extra convenience; however duct
mounng allows the control to sense the air returning from all living areas
and provides beer overall humidity control.
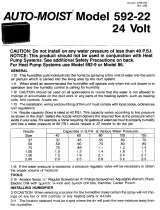
Wall Mounng (Figure 1)
1. Turn the electrical power o.
2. Determine the humidistat locaon. This control should be mounted on
an inside wall where normal air circulaon is present. For most
residenal applicaons, locate the control adjacent to the exisng wall
thermostat for easy installaon and wiring.
3. Remove the cover from the back plate and punch the wiring knockout
on back plate.
4. Place the back plate on a at mounng surface. Mark two mounng
hole locaons, and the wire knockout hole.
5. Drill 3/16” diameter holes for drywall anchors (if needed) and insert
dry wall anchors.
6. Drill ½” diameter hole for low voltage wires. Pull the wiring through the
access hole and through the back plate.
7. Mount the back plate securely to the wall with screws provided in the
parts package. NOTE: Make sure the back plate is at without any
undue stress.
8. Connect wires to Terminals #2 and #3. Wires should not be taut aer
connecon. NOTE: All wiring should conform to NEC
recommendaons and any local codes.
9. Re-install the front cover.
10. Turn the electrical power back on.
Operaon Test
1. Cycle the humidistat at least three mes to assure proper funcon.
2. Check ambient humidity level with a sling psychrometer. Too high
humidity levels may cause damage to the building.
CAUTION: The furnace blower must be operang before the humidier
is acvated.

Customer Service Telephone 1.800.304.6563
Customer Service Facsimile 1.800.426.0804
Robertshaw® and Ranco® are trademarks of Robertshaw, its
subsidiaries and/or affiliated companies. All other brands mentioned
may be the trademarks of their respective owners.
For Technical Service
Telephone 1.800.445.8299
www.robertshaw.com
©2018 Robertshaw
11/18 – 352-00275-001
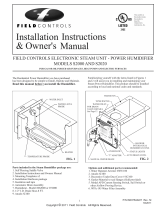
Duct Mounng (Figure 2)
1. Turn the electrical power o.
2. Remove the knob and cover from the back plate (knob pulls o).
3. Remove the control module from the front of the back plate and
mount on the reverse side.
4. Connect the sha extension to the control module (through back plate).
5. Place the template on a vercal at surface of the return air plenum.
6. Mark and drill mounng holes.
7. Cut out the secon of the plenum to allow the control module to
pass through.
8. Break o the wiring tab on back plate.
9. Aach 24V wires to Terminals #2 and #3. NOTE: All wiring should
conform to NEC recommendaons and any local codes.
10. Secure the back plate to the plenum (screws provided). Direct all wires
through the wiring slot, but do not pull wires too ghtly. Make sure
the back plate is at and is not under any undue stress.
11. Re-install the front cover and knob.
12. Turn the electrical power back on.
Operaon Test
1. Cycle the humidistat at least three mes to assure proper funcon.
2. Check ambient humidity level with a sling psychrometer. Too high
humidity levels may cause damage to the building.
CAUTION: The furnace blower must be operang before the
humidier is acvated.
INSTALLATION DATA
J10-808 AND J10-821
HUMIDISTAT
/