Page is loading ...

Color Screen Weather Station User Manual
1. Introduction
Thank you for purchasing the color screen weather station with temperature, humidity,
barometric, moon phase and advanced forecasting. The following use guide provides step by step
instructions for installation, operation and troubleshooting.
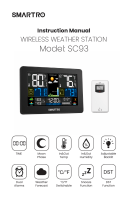
2. Product Features:
Figure 1
1) Wireless outdoor and indoor humidity (%RH)
2) Wireless outdoor and indoor temperature (°F or °C)
3) Records min. and max. humidity
4) Records min. and max. temperature
5) Barometric pressure (inHg, mmHg or hPa)
6) Weather forecast
7) Time and date by manual setting (WH2800)
8) DCF Radio controlled time and date (WH2801)
9) 12 or 24-hour time display
10) Perpetual calendar
11) Time alarm with snooze
12) Moon phase
13) Can receive one sensor
14) LED backlight
15) Wall hanging or free standing

Color Screen Weather Station User Manual
16) Included transmitter (Outdoor sensor)
17) Synchronized instant reception
3. Getting started
Note: The power up sequence must be performed in the order shown in this section (remote
transmitter first, display console second) to avoid the console synchronization time out.
This weather station consists of a console (receiver), a thermo-hygrometer (remote transmitter),
and a power adapter.
3.1 Parts list
QTY
ITEM
1
Display console
Frame Dimensions (LxWxH): 161.5*86*21.5mm
1
Thermo-hygrometer transmitter
Dimensions (LxWxH): 122*40*18mm
1
Power adapter
Console
Figure 2
Remote sensor

Color Screen Weather Station User Manual
Figure 3
3.2 Thermo-Hygrometer Sensor Set Up
Note: To avoid permanent damage, please take note of the battery polarity before inserting the
batteries.
Remove the battery door on the back of the sensor. Insert two AA batteries.
Figure 4
We recommend lithium batteries for cold weather climates, but alkaline batteries are sufficient
for most climates. We do not recommend rechargeable batteries. They have lower voltages, do
not operate well at wide temperature ranges, and do not last as long, resulting in poorer
reception.
Replace the battery door. Note that the temperature and humidity will be displayed on the LCD
display. Looking at the back of the unit from left to right, the polarity is (-) (+) for the top battery

Color Screen Weather Station User Manual
and (+) (-) for the bottom battery.
3.3 Display Console Set Up
Place the remote thermo-hygrometer about 5 to 10 meters away from the display console (if the
sensor is too close, it may not be received by the display console).
The console can be powered up by AC adapter or batteries. Choose one way of below two to
power up the console.
1. Insert the power adapter into the power jack of the console, and plug in the adapter. The LCD
display will beep once and then light up. The brightness of console is HIGH level when plug in
the adapter. Press the LIGHT/SNOOZE key can adjust among HIGH/MIDDLE/OFF level
according to your preference.
2. Remove the battery door on the back of the display. Insert three AAA (alkaline or lithium,
avoid rechargeable) batteries in the back of the display console. Looking at the back of the
unit (left to right), the polarity is (+) (-) for the top battery, (-) (+) for the middle battery and
(+) (-) for the bottom battery.
Note: To avoid permanent damage, please take note of the battery polarity before inserting
the batteries.
The display will beep once and all of the LCD segments will light up for a few seconds to
verify all segments are operating properly.
Replace the battery door, and fold out the desk stand and place the console in the upright
position.
Note: The backlight will be on for only 10 seconds if you use alkaline batteries as power supply.
Only when you use power adapter it will be continuous light on.
The console will instantly display indoor temperature, humidity, barometer, moon phase, date
and time.
The remote search icon will turn on:
3.3.1 Radio controlled clock
The RCC is received by the wireless transmitter, and passed to the console. After the remote
sensor is powered up, the sensor will transmit weather data for 5 seconds, and then the sensor
will begin radio controlled clock (RCC) reception.
During the RCC time reception period (maximum 10 minutes), no weather data will be

Color Screen Weather Station User Manual
transmitted to avoid interference.
If the signal reception is not successful (normally during the day due to solar interference), the
sensor search will be cancelled, the outdoor temperature and humidity will update as normal,
and the RCC search will automatically resume every two hours until the signal is successfully
captured. The regular RF link will resume once RCC reception routine is finished. In some
locations, RCC reception may take a couple of days to receive the signal. The temperature and
humidity data will continue to transmit during this period.
Once the radio controlled time is RCC reception icon will turn on (reference Error!
Reference source not found.).
3.3.2 Display Console Layout
Note: The following illustration shows the full segments of the LCD for description purposes only
and will not appear like this during normal operation.
Figure 5
1. Day Light Saving time.
12. Max outdoor temperature
2. Time
13. Min outdoor temperature
3. Radio controlled clock
14. Outdoor humidity
4. Week day
15. Min Outdoor humidity

Color Screen Weather Station User Manual
5. Date
16. Max outdoor humidity
6. Moon phase
17. Indoor temperature
7. Weather forecast icon
18. Max indoor temperature
8. Absolute/relative barometric pressure selection
19. Min indoor temperature
9. Barometric pressure
20. Indoor humidity
10. Outdoor sensor signal
21. Min indoor humidity
11. Outdoor temperature
22. Max indoor humidity
23. MAX/MIN DAILY icon
3.3.3 Sensor Operation Verification
Verify the indoor and outdoor humidity match closely with the console and sensor array in the
same location (about 10’ apart). The sensors should be within 10% (the accuracy is ± 5%). Allow
about 30 minutes for both sensors to stabilize.
Verify the indoor and outdoor temperature match closely with the console and sensor array in
the same location (about 10’ apart). The sensors should be within 4°F (the accuracy is ± 2°F).
Allow about 30 minutes for both sensors to stabilize.
4. Sensor Placement
It is recommended you mount the remote sensor outside on a north facing wall, in a shaded area,
at a height at or above the receiver. If a north facing wall is not possible, choose a shaded area,
under an eve.
Direct sunlight and radiant heat sources will result in inaccurate temperature readings. Although
the sensor is weatherproof, it is best to mount in a well-protected area, such as an eve.
1. Use a screw or nail to affix the remote sensor to the wall, as shown in Figure 6
2. Hang the remote sensor up on string, as shown in Figure 7.
Figure 6 Figure 7
Note: Make sure the sensor is mounted vertically and not lying down on a flat surface. This will
insure optimum reception. Wireless signals are impacted by distance, interference (other
weather stations, wireless phones, wireless routers, TVs and computer monitors), and
transmission barriers, such as walls. In general, wireless signals will not penetrate solid metal and

Color Screen Weather Station User Manual
earth (down a hill, for example).
5. Console Operation
Note: The console has four keys for easy operation: TEMP./+ key, ALM key, BARO./- key and SET
key. There are four program modes: Set Mode, Alarm Mode, calibration mode and Min/Max
Mode.
Any program mode can be exited at any time by either pressing the SNOOZE/LIGHT key (on the
top of the display console), or waiting for the 30-second time-out to take effect.
5.1 Set Mode
5.1.1 Set Mode Quick Reference Guide
Command
Mode
Settings
SET + 2
seconds
Enter Set Mode, Beep
Press TEMP./+ or BARO./- to toggle OFF and ON
SET
RST-reset max/min at 0:00
Press TEMP./+ or BARO./- to toggle OFF and ON
SET
Time Zone (TZ)
Press TEMP./+ to increase. BARO./- to decrease
SET
12/24 Hour Format
Press TEMP./+ or BARO./- to toggle between 12
hour (12h) and 24 hour (24h) format
SET
Hour of Day
Press TEMP./+ to increase. BARO./- to decrease
SET
Minute of Day
Press TEMP./+ to increase. BARO./- to decrease
SET
D-M/M-D Format
Press TEMP./+ or BARO./- to toggle between D-M
and M-D format
SET
Year
Press TEMP./+ to increase. BARO./- to decrease
SET
Month of Year
Press TEMP./+ to increase. BARO./- to decrease
SET
Day of Month
Press TEMP./+ to increase. BARO./- to decrease
SET
Temperature Units of
Measure
Press TEMP./+ to toggle between degF and degC
SET
Barometric Pressure Units of
Measure
Press TEMP./+ to toggle between inHg, mmHg and
hPa
SET
Northern Hemisphere (NTH)
or southern Hemisphere
(STH) select
Press TEMP./+ to toggle between Northern and
southern Hemisphere
SET
Exit Set Mode
5.1.2 Set Mode Operation
While in Normal Mode, press and hold SET key 2 seconds enter setting mode. The first setting will
begin flashing. You can press the SET key again to skip any step, as defined below.

Color Screen Weather Station User Manual
1. Beep on/off. The BEEP (ON or OFF) setting will begin flashing. Press the TEMP./+ key
to toggle between BEEP ON and BEEP OFF.
2. MAX/MIN record reset ON/OFF. Press SET key again, RST (ON or OFF) will begin flashing.
This function is to switch off/on the automatically reset of MAX/MIN record at 0:00
every day, which is default turned on. Press TEMP./+ key to toggle between RST ON and
RST OFF.
3. Time Zone Settings. Press the SET key again to adjust the Time Zone (TZ) setting.
Press the TEMP./+ key or BARO./- key to adjust the time zone from -12 to 12, based on the
number of hours from Coordinated Universal Time, or Greenwich Mean Time (GMT).
4. 12/24 Hour Format. Press the SET key again to adjust the 12/24 hour format setting.
Press the TEMP./+ key to change between 12 hour and 24 hour format.
5. Change Hour. Press the SET key again to set the hour. Press the TEMP./+ key or
BARO./- key to adjust the hour up or down.
6. Change Minute. Press the SET key again to set the minute. Press the TEMP./+ key or
BARO./- key to adjust the minute.
7. D-M/M-D Format. ress the SET key again to adjust the D-M/M-D format setting. Press
the TEMP./+ key to change between D-M and M-D format.
8. Change Year. Press the SET key again to set the calendar year. Press the TEMP./+ key or
BARO./- key to adjust the calendar year.
9. Change Month. Press the SET key again to set the calendar month. Press the TEMP./+
key or BARO./- key to adjust the calendar month.
10. Change Day. Press the SET key again to set the calendar day. Press the TEMP./+ key or
BARO./- key to adjust the calendar day.
11. Temperature Units (Celsius or Fahrenheit). Press the TEMP./+ key again to toggle the
temperature units from Celsius to Fahrenheit.
12. Barometric Pressure Display Units (hPa, mmHg or inHg). Press the SET key again to
toggle the pressure units between hPa, mmHg or inHg.
13. Northern Hemisphere (NTH) or southern Hemisphere (STH) select. Press the SET key
again to toggle the pressure units between NTH or STH.

Color Screen Weather Station User Manual
Note: In the Set mode, press the TEMP./+ key or BARO./- key to change or scroll the value.
Hold the TEMP./+ key or BARO./- key for 3 seconds to increase/decrease rapidly.
Note: Press the LIGHT/SNOOZE key (or wait 30 seconds for the programming mode to timeout),
and the Set Mode will return to Normal Mode.
5.2 Check Barometric Pressure
While in normal mode, press BARO./- to check the barometric pressure. Press the BARO./-
button to switch to past 12hr/24hr/48hr/72hr average pressure, if key idle 30 seconds, will return
to normal mode.
While in normal mode, Press and hold the BARO./- button for 2 seconds you can switch
between absolute (ABS) pressure and relative (REL) pressure.
The display console displays two different pressures: absolute (measured) and relative (corrected
to sea-level).
To compare pressure conditions from one location to another, meteorologists correct pressure to
sea-level conditions. Because the air pressure decreases as you rise in altitude, the sea-level
corrected pressure (the pressure your location would be at if located at sea-level) is generally
higher than your measured pressure.
Thus, your absolute pressure may read 28.62 inHg (969 mb) at an altitude of 1000 feet (305 m),
but the relative pressure is 30.00 inHg (1016 mb).
The standard sea-level pressure is 29.92 in Hg (1013 mb). This is the average sea-level pressure
around the world. Relative pressure measurements greater than 29.92 inHg (1013 mb) are
considered high pressure and relative pressure measurements less than 29.92 inHg are
considered low pressure.
To determine the relative pressure for your location, locate an official reporting station near you
(the internet is the best source for real time barometer conditions, such as Weather.com or
Wunderground.com), and set your weather station to match the official reporting station.
5.3 Check Dew point
While in normal mode, Press the TEMP./+ button to view dew point in outdoor temperature
segment. If key idle 30 seconds, will return to normal mode.
5.4 ALARM Mode
While in normal mode, Press ALARM button to enter ALARM mode.

Color Screen Weather Station User Manual
5.4.1 Time ALARM
Press ALARM button once, you will see the ALARM time.
Press and hold the ALARM button for 2 seconds, you will enter the ALARM setting interface.
Please follow the below sequence to operate settings:
1. Press the TEMP./+ and BARO/- button to change the hour.
2. Press SET to confirm the hour and skip to minute setting. And press the TEMP./+ and BARO/-
button to change the minute.
3. Press SET to confirm the minute and skip to Alarm on/off setting. Press TEMP./+ and BARO/-
button to switch on/off the time ALARM.
4. Press SET to skip to Ice ALARM on/off setting. Press TEMP./+ and BARO/- button to switch
on/off the Ice ALARM(Refer to 5.4.2).
5. Returns to the normal display mode.
5.4.2 Ice ALARM
Ice ALARM is an ALARM happens when outdoor temperature falls into (or goes up to) -3~2 c
range. A snow icon will appear and flash on the console. If the BEEP is switched on, a
sound ALARM would be also activated when ice ALARM occurs.
5.4.3 Cancelling the ALARM
When time ALARM or ice ALARM is triggered, press any key to close the sound alarm. During
time ALARM, press LIGHT/SNOOZE key can enter snooze mode.
The ice ALARM will reset automatically once the value has fallen into the ice ALARM range.
5.5 Calibration Mode
While in normal node, press and hold the SET and BARO./- buttons 5 seconds to enter calibration
mode.
The calibration sequence would be as below:
1. Outdoor temperature calibration.
2. Outdoor humidity calibration.
3. Indoor temperature calibration.

Color Screen Weather Station User Manual
4. Indoor humidity calibration.
5. Absolute pressure calibration.
In calibration mode, press + and - buttons to adjust offset values, then press SET to confirm and
proceed to next parameter. Press the ALARM button to cancel offset values.
During calibration mode, press LIGHT/SNOOZE to exit calibration mode.
Please note Offset values range as below:
Temperature offset calibrated (range +/-9F, default: 0 degrees).
Humidity offset calibrated (range +/-9%)
Pressure offset calibrated (range +/-10hpa)
5.6 MAX/MIN Mode
The Max/Min weather data are displayed on the bottom of each parameter segment. Left one in
red color is MAX record, right one in blue or yellow is MIN record. All the MAX/MIN records are
based on since last reset time after turned on.
Max temperature Min temperature Max humidity Min humidity
All MAX/MIN records can be cleared if you press and hold the TEMP button 2 seconds.
MAX/MIN records are cleared on 0:00 every day default. And below MAX/MIN DAILY icon
would be displayed on console. You can switch off this automatically clearing function in setting
mode (Refer to 5.1.2 2.RST ON/OFF in Set Mode Quick Reference Guide), and this icon would
disappear.
5.7 Other Console Features
5.7.1 Color Weather Forecasting
This station learns. Please allow 30 days for barometric calibration. This will ensure an accurate
personal forecast for your location.
Six color forecast icons use changing atmospheric pressure to predict weather conditions for the
next 12-hours .

Color Screen Weather Station User Manual
Note: The weather forecast or pressure tendency is based on the rate of change of barometric
pressure. In general, when the pressure increases, the weather improves (sunny to partly cloudy)
and when the pressure decreases, the weather degrades (cloudy to rain).
Sunny Partly Cloudy Cloudy
Rainy Stormy Snowy
Note: Snowy icon will appear in place of rainy and stormy icons when the outdoor temperature is
below 0 °C /32°F.
5.7.2 Moon phase
The following moon phases are displayed based on the calendar date.
New
Waxing
Crescent
First
Quarter
Waxing
Gibbous
Full
Waning
Gibbous
Third
Quarter
Waning
New
Note: Above icons are for Northern Hemisphere areas. For Southern Hemisphere the icons are
as below:
New
Waxing
Crescent
First
Quarter
Waxing
Gibbous
Full
Waning
Gibbous
Third
Quarter
Waning
New

Color Screen Weather Station User Manual
5.7.3 Temperature/Humidity Trend Arrows
The temperature (2°F/1°C) and humidity (3%) trend indicators update every 30 minutes. The
trend reflects changes over the past 3 hours. E.G.: At 3:00 — compares to 12:00 data; at 3:30 —
compares to 12:30.
Temperature or Humidity
increased in past 3 hours
Temperature or Humidity did
not change in past 3 hours
Temperature or Humidity
decreased in past 3 hours
5.7.4 Pressure Tendency Arrows
The forecast trend indicators update every 30 minutes. The trend reflects changes in pressure (1
hPa) over the past 3 hours.E.G.: At 3:00 — compares to 12:00 data; at 3:30 — compares to 12:30.
Pressure is rising, weather
expected to improve
Pressure is unchanged
Pressure is falling, weather
expected to worsen
5.7.5 Restoring Lost Outdoor Temperature and Humidity Sensor
If the signal is lost between the remote sensor (or transmitter) and the display console (or the
receiver), to resynchronize, while in normal mode, Press and hold SET and TEMP button for 5
seconds, to register the outdoor transmitter.
Please wait several minutes for the remote sensor reports in. Do not touch any buttons until
synchronization is complete.
If the synchronization fails, reset the console by removing one battery from the display console,
wait 10 seconds, and reinsert the battery, as specified in the console set up part.
6. Glossary of Terms
Term
Definition
Absolute Barometric
Pressure
Relative barometric pressure, corrected to sea-level. To compare
pressure conditions from one location to another, meteorologists
correct pressure to sea-level conditions. Because the air pressure
decreases as you rise in altitude, the sea-level corrected pressure
(the pressure your location would be at if located at sea-level) is
generally higher than your measured pressure.
Accuracy
Accuracy is defined as the ability of a measurement to match the
actual value of the quantity being measured.

Color Screen Weather Station User Manual
HectoPascals (hPa)
Pressure units in SI (international system) units of measurement.
Same as millibars (1 hPa = 1 mbar)
Hygrometer
A hygrometer is a device that measures relative humidity. Relative
humidity is a term used to describe the amount or percentage of
water vapor that exists in air.
Inches of Mercury (inHg)
Pressure in Imperial units of measure.
1 inch of mercury = 33.86 millibars
Range
Range is defined as the amount or extent a value can be measured.
Relative Barometric
Pressure
Measured barometric pressure relative to your location or ambient
conditions.
7. Specifications
7.1 Wireless Specifications
• Line of sight wireless transmission (in open air): 100meter / 300 feet
• Frequency: 433 MHz/868 MHz/915 MHz
• Update Rate: 64 seconds
7.2 Measurement Specifications
The following table provides specifications for the measured parameters.
Measurement
Range
Accuracy
Resolution
Indoor Temperature
-9.9-60C
± 1 °C
0.1 °C
Outdoor Temperature
-40 to 60C
± 1 °C
0.1 °C
Indoor Humidity
1 0 to 99 %
± 5% (only guaranteed
between 20 to 90%)
1 %
Outdoor Humidity
1 0 to 99%
± 5% (only guaranteed
between 20 to 90%)
1 %
Barometric Pressure
300hpa to 1100hpa
±3 hpa(only
guaranteed between
700 to 1100hpa)
0.1hpa
7.3 Power Consumption
• Base station : 5V DC adaptor (included)
3 x AAA 1.5V Alkaline batteries (not included)
• Remote sensor : 2 x AAA 1.5V Alkaline batteries (not included)
Notes on the return of batteries according to §12 BatterieVO: Batteries do not belong in the
household waste. Please dispose of all batteries as prescribed by law, disposal in domestic waste

Color Screen Weather Station User Manual
is expressly prohibited. Batteries and rechargeable batteries can be dispensed free of charge at
municipal collection points or in the shops on the spot.
This manual may not be reproduced in any form without the written permission of the publisher,
even in excerpts.
This manual may contain errors and misprints. However, the information in this manual is
regularly reviewed and corrections made in the next issue. We assume no liability for technical
errors or printing errors, and their consequences.
All trademarks and property rights are recognized.
www.froggit.de
HS Group GmbH & Co. KG
Escherstr.31
50733 Koeln
Germany
Telefon
E-Mail
0221 / 367 48 05
Registergericht Amtsgericht Koeln HRA
26493
Komplementaer: HS Group
Verwaltungsgesellschaft mbH
Sitz Koeln
Registergericht Amtsgericht Koeln HRB
64734
Geschaeftsfuehrer: Peter Haefele, Carl
Schulte
UStId DE237971721
WEEE Reg. Nr. 66110125
Declaration of conformity
Hereby we declare, HS-Group GmbH & Co.KG, Escherstr. 31, 50733 D-Cologne, that this product is
in compliance with the essential requirements and other relevant provisions of Directive 1999/5 /
EC.
The declaration of conformity for this product can be found at: www.froggit.de or on request.
/