Page is loading ...

WIRELESS WEATHER STATION
Model 81690
USER'S INSTRUCTIONS
The multifunctional weather station is equipped with many functions providing thorough weather
information to you. The receiver unit has a clear, easy-to-read display that shows weather forecast,
indoor temperature, relative humidity, pressure, moon phase, time and date, as well as the
temperature and relative humidity measured and transmitted by the sensor. It is able to receive and
display readings from up to 3 remote sensors.
The receiver unit retains the minimum and maximum temperatures and relative humidity readings
measured at various locations. The 433 MHz technology means no wire installation is required and
you can place the sensors anywhere you like.
With radio controlled function, the current time and date are automatically synchronized with the
time signal transmitted from the atomic clock in FT. Collins, Colorado. The signal can cover a
distance of about 2,000 miles.

1. ALARM ON:
Press it to turn the alarm and snooze on or off.
In normal time mode, press and hold it for 2 seconds to enter the alarm and pre-alarm
setting mode.
2. TIME:
Press it once to view the Dew Point.
Press and hold it for 2 seconds to enter the time setting mode.
3. UP:
In normal time mode, press it to choose between channel (1),(2) and (3).
In setting mode, press it to increase the setting value.
4. SNOOZE:
Press it to stop alarm when it is sounding.
Press and hold it for up 8 seconds to stop current RC reception.

5. DOWN:
Press and hold it for 2 seconds, release, then press it to choose the Time zone.
Press it to switch between the following Time zone (if the clock you purchase is WWVB
version):
PA (Pacific) - MO (Mountain) - CE (Central) - EA (Eastern).
6. MAX / MIN:
Press it to check max./min. temperature and humidity record.
Press and hold it for 3 seconds to delete the max. and min. record.
7. HISTORY:
Check the past 24 hours pressure records.
8. WALL-MOUNTING STAND:
Use to support the main unit on wall.
9. mb/hPa . inHg:
Switch between mb/hPa or inHg.
10. °C / °F:
Switch between °C / °F
11. RESET:
Press it to set all values to factory value.
In case of mal-function, the unit may be required to reset.
12. TABLE STAND:
Use to stand on desktop.
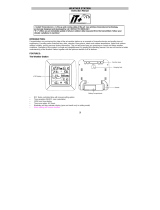
13. WEATHER FORECAST WINDOW:
Displays the weather forecast indicator.
14. OUTDOOR TEMPERATURE AND HUMIDITY WINDOW:
Shows the outdoor temperature-trend, humidity-trend, current temperature, current humidity
or the maximum or minimum recorded temperature and humidity.
15. INDOOR TEMPERATURE AND HUMIDITY WINDOW:
Shows the indoor temperature-trend, humidity-trend, current temperature, current humidity,
or the maximum or minimum recorded temperature and humidity.
16. ATMOSPHERIC PRESSURE CHART:
Shows the atmosphere pressure trend of the last 24 hours.
17. ATMOSPHERE PRESSURE WINDOW:

Displays the current atmospheric pressure data and indicates the last 24 hours pressure
history.
18. MOON PHASE WINDOW:
Display the moon phase and the tide trend.
19. CALENDAR WINDOW:
Displays the date, year, day of the week.
20. CLOCK WINDOW:
Displays the time and radio controlled signal.
TRANSMITTER:
1. LED indicator:
Flashes when the remote unit transmits a reading.
2. LCD:
Displays the current temperature and humidity monitored by the remote unit alternatively.
3. CHANNEL SLIDE SWITCH:
Assign the transmitter to Channel 1, Channel 2 or Channel 3.
4. °C / °F:
Switches between °C / °F.
5. RESET:
Return all values to default value.
6. BATTERY COMPARTMENT:

Accommodates 2 AAA size batteries.
7. BATTERY DOOR
8. WALL MOUNT HOLDER:
Supports the transmitter in wall mounting.
9. FOLDING TABLE STAND
BEFORE YOU BEGIN
TRANSMITTER:
1. Remove the transmitter from the stand and unscrew the battery door of the transmitter.
2. Insert 2 x AAA batteries into the battery compartment. Be sure to insert them according to the
polarity information +/- in the battery compartment.
3. The receiver can receive humidity and temperature data from up to 3 transmitters. Assign the
channel to each transmitter, Channel 1, 2 or 3 respectively by sliding the switch inside the battery
compartment.
4. Press the reset key of the transmitter individually by a pin to confirm the channel setting.
5. Slide the °C/°F switch inside the battery compartment for centigrade or Fahrenheit.
6. Screw the battery door back into place..
NOTE:
1. Once the channel is assigned to a transmitter, you can only change it by removing the batteries or
resetting the unit.
2. Avoid placing the transmitter in direct sunlight, rain or snow.
WEATHER STATION:
1. Remove the battery door and insert 3 x AA batteries into the battery compartment according to
the polarity information +/- in the battery compartment.
2. Replace the battery door.

3. Press reset button to re-start the clock and it will synchronize the channels of the transmitter
automatically.
NOTE:
1. If extra transmitters are added in the future, press the reset button to re-start the clock and
synchronize the channel.
2. Building material and the receiver and transmitter affect the effective range. Try various
locations to obtain the best result.
3. Place the units away from metal objects and electrical appliances to minimize location
interference. Position the receiver and the transmitter within the effective transmission range; less
than 100 feet in usual circumstances.
RECEPTION OF RADIO CONTROLLED TIME SIGNAL
The time and date are radio-controlled. The current time and date are automatically synchronized
with the time signal transmitted from Ft. Collins, Colorado provided the device is within about
2,000 miles of the transmitter. When used for the first time (after inserting the batteries or pressing
RESET), the clock starts receiving the time signals and the reception display flashes.
SIGNAL STRENGTH INDICATOR
The signal indicator displays signal strength in 3 levels. Wave segment flashing means time signals
are being received. The signal quality could be classified into three types:
NOTE:
1 The unit will automatically search for the time signal at 2:00 a.m., 8:00 a.m., 2:00 p.m., and 8:00
p.m. each day.
2. Always place the unit away from interfering sources such as TV set, computer, etc.
3. Avoid placing the unit on or next to metal plate.
4. Closed area such as airport, basement, tower block or factory are not recommended.
5. Do not start reception on a moving vehicle.

SELECT THE TIME ZONE
The default time Zone is PACIFIC. If your location is not in the Pacific time zone, set the time
zone as follows:
In normal time mode, press and release the DOWN button:
P=Pacific M=Mountain C=Central E=Eastern
MANUAL TIME SETTING
If you are out of the reach of the Radio Controlled Transmitter or if the reception is not reachable,
the time can be set manually. As soon as the transmitter is received again, the clock will
automatically synchronize with the exact time.
1. In normal time mode, press and hold TIME key for 2 seconds, hour flashing, press UP or DOWN
key to change its value.
2. Press TIME key again, minute flashing, press UP or DOWN key to change its value.
3. Repeat the above operation to set the time in this order:
Hour - Minute - Second - 12/24 hour - Year - Month - Date - Day language.
4. 5 languages weekday setting sequence is :
English-GB / French-FR / German-DE / Spanish-ES / Italian-IT.
5. After setting completed, press TIME key to exit setting mode, or let it exit automatically in 30
seconds without pressing any key.
ALARM AND SNOOZE SETTING

1. In normal time mode, press the ALARM ON key once, alarm on with the bell indicator
displayed. Press ALARM ON key again to turn on SNOOZE with Zz displayed. Press ALARM
ON key again to turn off Alarm and Snooze.
2. In normal mode, press and hold ALARM ON key for 2 seconds, hour flashing. Press UP or
DOWN key to set the value. Repeat the same operation to set the alarm minute.
3. After setting completed, press ALARM ON key to return to normal mode, or let it exit
automatically 30 second later without pressing any key.
NOTE:
1. The alarm will automatically turn on when setting the alarm time.
2. Once the snooze is turn on, the 4-step crescendo alarm will sound 4 times in 5-minute interval.
The alarm duration is 120 seconds.
Alarm OFF Alarm ON Alarm and Snooze ON
SETTING THE TEMPERATURE ALARM
Use this function to be woken up at a determined period of time earlier (1-30 minutes), if one of the
transmitter’s temperatures is below -1°C.
1. In normal time mode, press and hold ALARM ON key for 2 seconds to enter alarm setting mode.
2. In alarm setting mode, Press ALARM ON key twice to enter pre-alarm setting mode, then press
UP or DOWN key to change its value.
NOTE:
To activate pre-alarm function, ALARM must be on.
Temperature alarm ON Pre-alarm mode Pre-alarm 15 minutes
VIEWING THE CHANNEL

The default channel is channel 1. In normal time mode, press UP key to view the channel from 1 to
3.
HOW TO READ INDOOR AND OUTDOOR TEMPERATURE
& HUMIDITY RECORDS
Change the temperature reading to °C for Centigrade or °F for Fahrenheit by pressing the C/F
button on the back of the weather station.
If the readings go above or below the operating range, the receiver and transmitter will keep show
the last record within the operating range.
NOTE:
1. If no signals are received or the transmission is interfered with, “—-” appears in the display.
2. Relocate the clock or the transmitter to another position and make sure the transmission is within
the effective range of 100 feet approx.
3. After several trials but in vain, please reset the clock thoroughly. Try out where your
multifunctional alarm clock receives the signals best.
CHECKING AND DELETING MAX./MIN. TEMPERATURE & HUMIDITY RECORDS
1. Press MAX/MIN key to check Maximum temperature and humidity records. Press it twice to
check the Minimum records. Press it again to exit.
2. Press and hold MAX/MIN key for 3 seconds to delete the records.
MIN. Temperature record MAX. Temperature record

WEATHER TREND
The temperature-trend, humidity-trend and pressure-trend indicators show the trends of changes for
the last few minutes. Arrows indicate a rising, steady or falling trend.
WEATHER FORECAST
The built-in barometer can notice atmospheric pressure changes. Based on the data collected, it can
predict the weather condition in the forthcoming 12-24 hours. The effective cover area ranges from
15 to 30 miles.
NOTE:
1. The accuracy of a general pressure-based weather forecast is about 70 to 75%.
2. The weather forecast is meant for next 12 to 24 hours. It may not necessarily reflect the current
situation.
3. The “Sunny” icon, when nighttime implies clear weather.

PAST 24 HOURS PRESSURE RECORDS
The current and historical barometric pressure is shown on the atmospheric pressure window. The
atmospheric pressure can be displayed in mb/hPa or inHg by pressing the atmospheric button on
the back of the clock.
To check the pressure history for a particular hour during the past 24 hours, press the HISTORY
button. Each press on the button will go back by an hour. The recorded atmospheric changes for the
past 24 hours are displayed in a bar chart above the atmospheric pressure window.
ABOUT THE MOON PHASE:
The unit has 8 different moon phases. It will change according to the lunar calendar. The
corresponding H,M and L refer to a higher, medium, or lower tide level compared to the average
tide level.
1. New moon
2. Waxing crescent
3. First quarter
4. Waxing Gibbous
5. Full moon
6. Waning Gibbous
7. Last quarter
8. Waning crescent

LOW BATTERY INDICATOR
When the battery does not have enough power to operate the unit, the low battery indicator will
appear to remind you to replace with new batteries.
Receiver low battery indicator
NOTE:
Attention! Please dispose of used batteries in an ecologically safe manner.
USING THE TABLE STAND OR WALL MOUNTING
The receiver has both the desk top and wall mounting structure. For the receiver, place the screw
provided on the desired wall and hang the receiver by the recessed hole at the top. For the
transmitter, fix the separate wall mounting stand outside in a shady area protected from direct rain
by the screw provided. Once the stand is mounted, place the transmitter inside the stand on the
wall.

SPECIFICATIONS
MAIN UNIT
Indoor temperature measuring range: -5 °C to +50 °C
Recommended operating range: 0 °C to +45 °C
Temperature resolution: 0.1°C/1°F (above0°C)
1 °C/ °F (below 0 °C)
Indoor relative humidity measuring range: 20%RH to 90%RH
Recommended operating range: 20%RH to 90%RH
Resolution: 1%RH
REMOTE SENSOR
Temperature measuring range: -20 °C to +60 °C
Recommended operating range: -20 °C to +55 °C
Temperature resolution: 0.1°C/1°F(above0°C)
1 °C/ °F (below 0 °C)
RF transmission frequency: 433MHz
No. of remote unit: up to 3 units
RF transmission range: Maximum 100 feet
Temperature sensing cycle: around 60 ~ 64 seconds
Pressure measuring range: 800mb to 1050mb
Pressure sampling cycle: 15 minutes
Moon phase scanner range: Until year 2050
Radio controlled signal: WWVB

Power:
Main unit: 4.5V, use 3 x AA 1.5V alkaline battery
Remote sensor: 3 V, use 2 x AAA 1.5V
Weight
Main unit: 1.15 lbs.
Remote sensor: 1.87 oz.
Dimension
Main unit 6” W x 12”H x 1.18” D
Remote sensor: 2.5” W x 4” H x 1” D
Do not mix old & new batteries. Do not mix alkaline, standard (carbon standard), or rechargeable
(nickel cadmium) batteries. Remove batteries from the clock if you do not intend to use for an
extended amount of time. Please help in the preservation of the environment and return used
batteries to an authorized depot.
Two Year Warranty (U.S.A.)
Equity products are warranted for two years from the date of consumer purchase at Costco against
defects in material and workmanship. During this period such defects will be repaired, or the
product will be replaced at Equity’s option, without charge.
This model is discontinued and is not eligible for the manufacturer’s warranty. Please return any
defective units to the point of purchase.
This warranty does not cover damage caused by misuse or negligence. ALL IMPLIED
WARRANTIES, INCLUDING BUT NOT LIMITED TO IMPLIED WARRANTIES OR
FITNESS AND MERCHANTABILITY, ARE LIMITED IN DURATION TO A PERIOD
ENDING ONE YEAR FROM DATE OF PURCHASE. Some states do not allow limitations on
how long an implied warranty lasts so the above limitation may not apply to you. This warranty
gives you specific legal rights and you may also have other rights, which vary from State to State.
Return of warranty card is not a condition precedent to warranty coverage and performance.
/