Page is loading ...

i
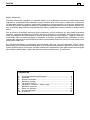
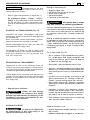
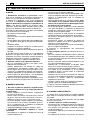
ITALIANO - Istruzioni Originali .......................................................................
ENGLISH - Translation of the original instructions (Istruzioni Originali) .........
FRANÇAIS - Traduction de la notice originale (Istruzioni Originali) ...............
DEUTSCH - Übersetzung der Originalbetriebsanleitung (Istruzioni Originali)..
ESPAÑOL - Traducción del Manual Original (Istruzioni Originali) ...................
NEDERLANDS
-
Vertaling van de oorspronkelijke gebruiksaanwijzing (Istruzioni Originali)
..
PORTUGUÊS - Tradução do manual original (Istruzioni Originali) .................
∂§§∏¡π∫∞
- ªÂÙ¿ÊÚ·ÛË ÙÔ˘ ÚˆÙÔÙ‡Ô˘ ÙˆÓ Ô‰ËÁÈÒÓ ¯Ú‹Û˘ (Istruzioni Originali)
..
TÜRKÇE - Orijinal Talimatların Tercümesi (Istruzioni Originali) ......................
POLSKI - Tłumaczenie instrukcji oryginalnej (Istruzioni Originali)....................
SLOVENŠČINA - Prevod izvirnih navodil (Istruzioni Originali) ........................
êìëëäàâ - è‚Ӊ ÓË„Ë̇θÌ˚ı ËÌÒÚÛ͈ËÈ (Istruzioni Originali) .......
HRVATSKI - Prijevod originalnih uputa (Istruzioni Originali) ............................
SVENSKA - Översättning av bruksanvisning i original (Istruzioni Originali) ....
SUOMI - Alkuperäisten ohjeiden käännös (Istruzioni Originali) .......................
DANSK - Oversættelse af den originale brugsanvisning (Istruzioni Originali)..
NORSK - Oversettelse av orginal bruksanvisning (Istruzioni Originali) ...........
ČESKY - Překlad původního návodu k používání (Istruzioni Originali) ...........
MAGYAR - Eredeti használati utasítás fordítása (Istruzioni Originali) .............
МАКЕДОНСКИ - Превод на оригиналните упатства (Istruzioni Originali) ..
LIETUVIŠKAI - Originalių instrukcijų vertimas (Istruzioni Originali) .................
LATVIEŠU - Instrukciju tulkojums no oriģinālvalodas (Istruzioni Originali) ......
ROMÂN - Traducerea manualului fabricantului (Istruzioni Originali) ..............
ÅöãÉÄêëäà - àÌÒÚÛ͈Ëfl Á‡ ÂÍÒÔÎÓ‡Ú‡ˆËfl (Istruzioni Originali) ............
EESTI - Algupärase kasutusjuhendi tõlge (Istruzioni Originali) ........................
ET
BG
RO
LV
LT
MK
HU
CS
NO
DA
FI
SV
HR
RU
SL
PL
TR
EL
PT
NL
ES
DE
FR
EN
IT
Page is loading ...
Page is loading ...
Page is loading ...
Page is loading ...
Page is loading ...
Page is loading ...
Page is loading ...
Page is loading ...
Page is loading ...
Page is loading ...
Page is loading ...
Page is loading ...
Page is loading ...
Page is loading ...
Page is loading ...
Page is loading ...
Page is loading ...
Page is loading ...
Page is loading ...

EN
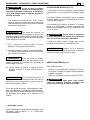
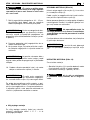
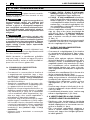
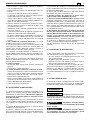
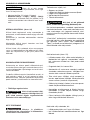
INTRODUCTION 1
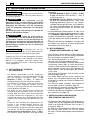
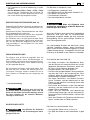
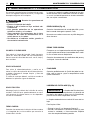
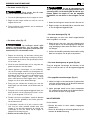
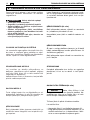
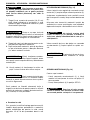
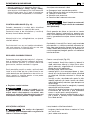
Dear Customer,
thank you for choosing one of our products. We hope that you will be completely satisfied with this
machine and that it fully meets your expectations. This manual has been compiled in order to provide
you with all the information you need to get acquainted with the machine and use it safely and ef-
ficiently. Don’t forget that it is an integral part of the machine, so keep it handy so that it can be con-
sulted when necessary, and pass it on to a further user if you resell or loan the machine.
Your new machine has been designed and manufactured in pursuance with current regulations, and is
safe and reliable if used in compliance with the instructions provided in this manual (proper use). Using
the machine in any other way, or non-compliance with the safety specifications relative to use, main-
tenance and repair is considered "improper use" which will invalidate the warranty, relieve the manu-
facturer from all liabilities, and the user will consequently be liable for all and any damage or injury to
himself or others.
Since improvements are periodically made to our products, you may find slight differences between
your machine and the descriptions contained in this manual. Certain modifications can be made to the
machine without prior warning and without the obligation to update the manual, although the essen-
tial safety and function characteristics will remain unaltered. In case of any doubts, please contact your
dealer. And now enjoy your work!
CONTENTS
1. Identification of the main components ........................................ 2
2. Symbols........................................................................................ 3
3. Safety requirements ..................................................................... 4
4. Machine assembly........................................................................ 6
5. Preparing to work......................................................................... 7
6. How to start - Use – Stop the engine .......................................... 8
7. Using the machine ..................................................................... 10
8. Maintenance and storage........................................................... 12
9. Identification of faults................................................................. 15
10. Accessories ................................................................................ 16

EN
2 IDENTIFICATION OF MAIN COMPONENTS
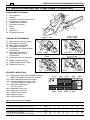
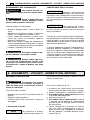
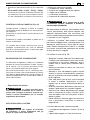
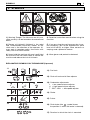
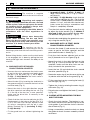
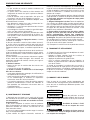
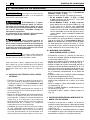
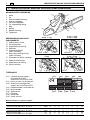
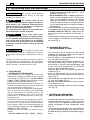
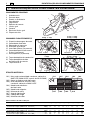
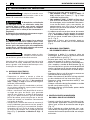
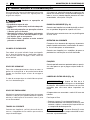
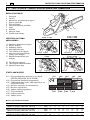
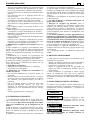
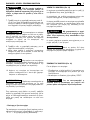
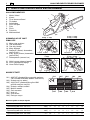
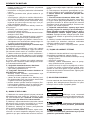
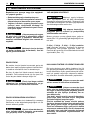
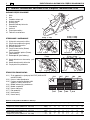
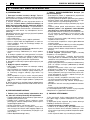
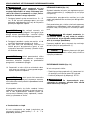
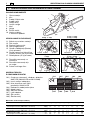
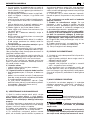
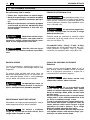
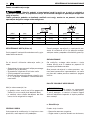
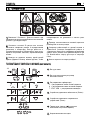
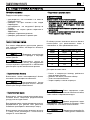
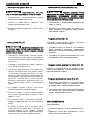
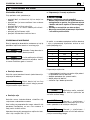
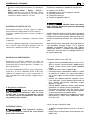
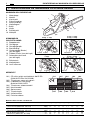
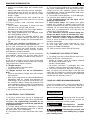
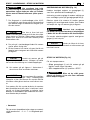
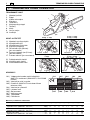
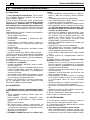
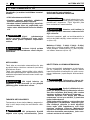
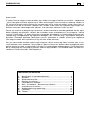
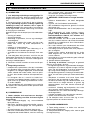
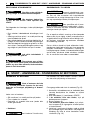
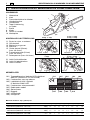
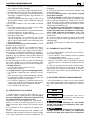
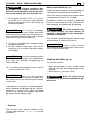
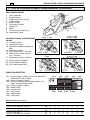
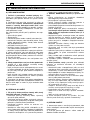
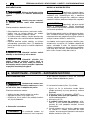
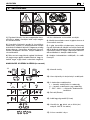
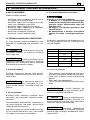
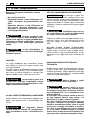
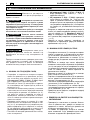
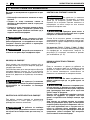
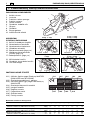
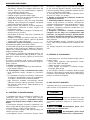
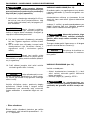
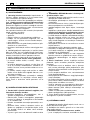
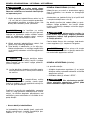
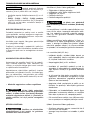
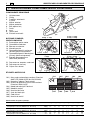
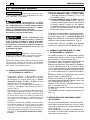
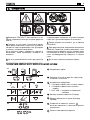
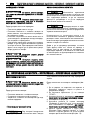
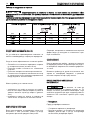
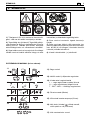
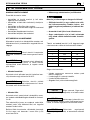
1. IDENTIFICATION OF MAIN COMPONENTS
MAIN COMPONENTS
1. Power unit
2. Spiked bumper
3. Front hand guard
4. Front handgrip
5. Rear handgrip
6. Chain catcher
7. Bar
8. Chain
9. Bar cover
10. Identification plate
CONTROLS AND REFUELLING
11. Engine stop switch
12. Throttle trigger
13. Throttle trigger lockout
14. Starter
15. Choke (if present)
16. Primer (if present)
17. Decompression valve (if present)
21. Fuel tank cap
22. Chain oil tank cap
23. Air cleaner cover
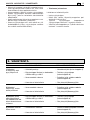
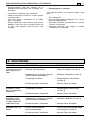
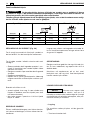
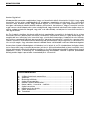
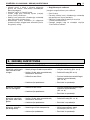
IDENTIFICATION PLATE
10.1) Conformity marking in accordance with
Directive 98/37/EC (2006/42/EC from
29/12/2009)
10.2) Name and address
of the manufacturer
10.3) Acoustic output level LWA in accordance with
directive 2000/14/EC
10.4) Manufacturer’s model of reference
10.5) Machine model
10.6) Serial number
10.7) Year of manufacture
10.8) Article Code
10.9) Emission number
10.1
L
WA
dB
10.2
10.7
10.3
10.6
10.410.5
10.810.9
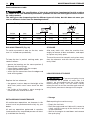
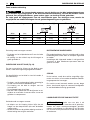
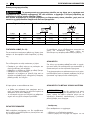
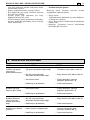
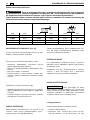
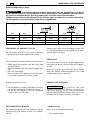
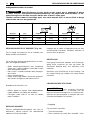
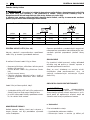
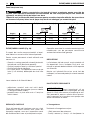
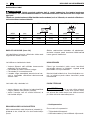
Maximum noise and vibration levels
Model .......................................................................................................
A 38(x) P 38(x) P 40(x) P 42(x) P 44(x) P 47(x) P 48(x) P 52 (x)
Operator ear noise pressure level (ISO 22868) .............................. db(A) 103 103 103 103 103 98,8 98,8 102,5
- Measurement uncertainty (2006/42/EC - EN 27574) .................. db(A) 1,5 1,2 1,1 1,1 1,1 1,2 1,2 1,5
Measured acoustic output level (ISO 22868) ................................ db(A) 114 114 112 112 112 116 116 114
- Measurement uncertainty (2006/42/EC - EN 27574) .................. db(A) 1,7 1,7 1,7 1,7 1,7 1,8 1,8 1,7
Vibration level (ISO 22867) .............................................................. m/s
2
4,2 4,2 4,7 4,7 4,7 7 7 6,6
- Measurement uncertainty (2006/42/EC - EN 12096) ................... m/s
2
0,8 1 1,1 1,1 1,1 1,2 1,2 1,1
P 36(x) - P 37(x) - P 38(x)
P 41(x) - A 38(x)
P 40(x) - P 42(x)
P 44(x)
1
2
8
34
5
6
7 9
10
5
1211222114
16 13
23 15
15 13
22 21 11 1214
16 23
P 45(x) - P 52(x)
P 43(x) - P 46(x)
P 47(x) - P 48(x)
15 13
21 22 11 1217 14
23
15 13
22 16 121114 21
23

EN
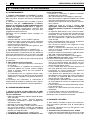
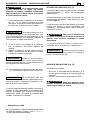
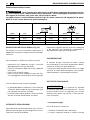
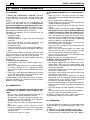
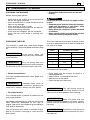
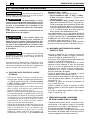
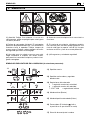
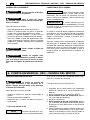
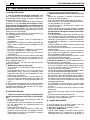
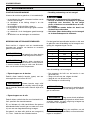
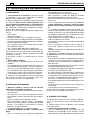
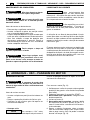
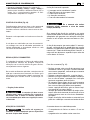
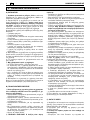
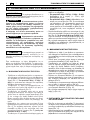
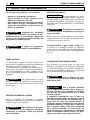
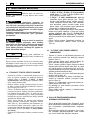
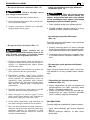
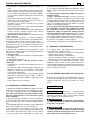
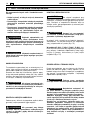
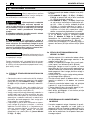
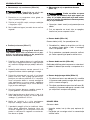
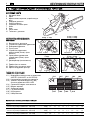
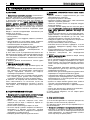
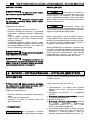
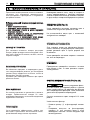
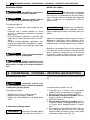
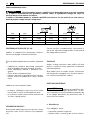
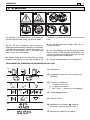
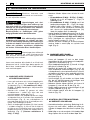
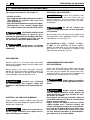
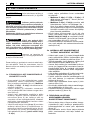
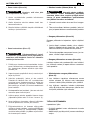
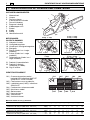
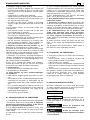
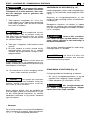
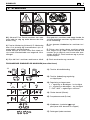
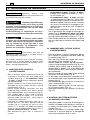
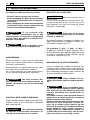
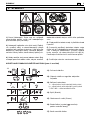
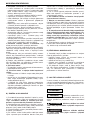
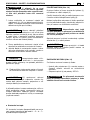
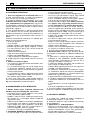
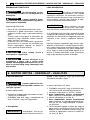
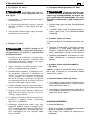
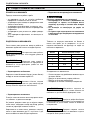
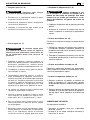
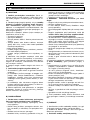
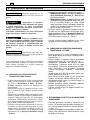
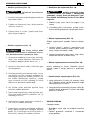
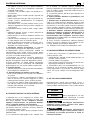
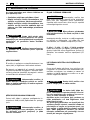
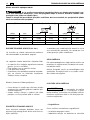
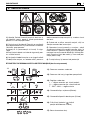
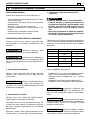
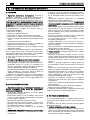
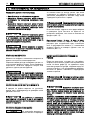
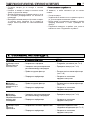
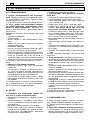
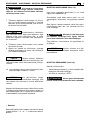
1) Warning! Danger. The failure to use this ma-
chine correctly can be hazardous for oneself and
others.
2) Beware of kickback! Kickback is the rapid
and uncontrollable backward motion of the
chain-saw in the direction of the operator. Al-
ways work in complete safety. Use chains with
safety links that limit kickback.
3) Never hold the machine with one hand! Hold
the machine fast with both hands to control the
machine and reduce the risk of kickback.
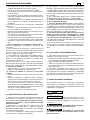
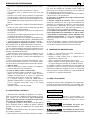
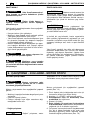
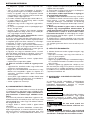
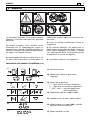
11) Fuel tank
12) Chain oil tank and oil flow adjuster
13) Carburettor adjustments
L = low speed mixture adjuster
H = high speed mixture adjuster
T - IDLE - MIN = idle speed adjuster
14) Choke
15) Primer
16) Chain brake (the symbol shows
the position in which the brake is released)
17) Direction in which the chain is mounted.
4) Read the instruction manual before using the
machine.
5) If you are using the machine every day in nor-
mal conditions, you can be exposed to a noise
level of 85 dB (A) or higher. Wear earmuffs or
earplugs and a protective helmet.
6) Wear gloves and protective footwear!
SYMBOLS 3
EXPLANATORY SYMBOLS ON THE MACHINE (if present)
2. SYMBOLS
5
1 2 3
4 6
11
12
13
14
15
16
17

EN
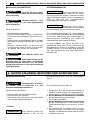
A) TRAINING
1) Read the instructions carefully. Become
acquainted with the controls and the proper use
of the machine. Learn how to stop the engine
quickly.
2) Only use the machine for the purpose for
which it was designed, that is for “felling, buck-
ing and delimbing trees with dimensions suita-
ble for the length of the bar” or wooden objects
with the same characteristics. Any other use may
be dangerous and damage the machine.
Examples of improper use may include, but are
not limited to:
– trimming hedges;
– intaglio carving;
– sectioning pallets, crates and various packing
materials;
– sectioning furniture or other materials with
nails, screws or other metal components;
– butchering meat;
– using the machine to lift, move or split objects;
– using the machine while fastened to fixed sup-
ports.
3) Never allow children or persons unfamiliar with
these instructions to use the machine. Local reg-
ulations may restrict the age of the operator.
4) The machine must never be used by more than
one person.
5) Never use the machine:
– when people, especially children or pets are in
the vicinity;
– f the user is tired or unwell, or has taken medici-
ne, drugs, alcohol or any substances which
may slow his reflexes and compromise his jud-
gement;
– if the user is not capable of holding the machine
firmly with two hands and/or remaining stand-
ing on the ground whilst working.
6) Remember that the operator or user is respon-
sible for accidents or hazards occurring to other
people or their property.
B) PREPARATION
1) Always wear adequate clothing which does
not hamper movements when using the ma-
chine.
– Always wear slim-fitting protective clothing, fit-
ted with shear-proof protection devices.
– Always wear a helmet, protective gloves, eye-
goggles, a half-mask respirator and safety anti-
shear boots with non-slip soles.
– Always wear ear and hearing protection devi-
ces.
– Never wear scarves, shirts, necklaces, or any
hanging or flapping accessory that could catch
in the machine or in any objects or materials in
the work area
– Tie your hair back if it is long.
2) WARNING: DANGER! Fuel is highly flamma-
ble:
– keep the fuel in containers which have been
specifically manufactured and homologated for
such use;
– never smoke when handling fuel;
– slowly open the fuel tank to allow the pressure
inside to decrease gradually;
– top up the tank with fuel in the open air, using a
funnel;
– add fuel before starting the engine. Never re-
move the fuel tank cap or add fuel while the
engine is running or when the engine is hot;
– if you have spilt some fuel, do not attempt to
start the engine but move the machine away
from the area of spillage and avoid creating any
source of ignition until the fuel has evaporated
and fuel vapours have dissipated;
– immediately clean up all traces of fuel spilt on
the machine or on the ground;
– never start the machine in the same place you
refilled it with fuel;
– make sure your clothing does not come into
contact with the fuel, on the contrary, change
your clothes before starting the engine;
– always put the tank and fuel container caps
back on and tighten well.
3) Replace faulty or damaged silencers.
4) Before using the machine, check its general
condition and in particular:
– the throttle trigger and the safety lever must
move freely, they must not need forcing and
should return automatically and rapidly back to
the neutral position;
– the throttle trigger must remain locked until the
safety lever is pressed;
– the engine stop switch must easily move from
one position to the other;
– the electric cables and in particular the spark
plug cable must be in perfect condition to avoid
the generation of any sparks, and the cap must
be correctly fitted on the spark plug;
– the machine handgrips and protection devices
must be clean and dry and well fastened to the
machine;
– the chain brake must be in perfect working or-
der;
– the bar and the chain must be fitted correctly;
– the chain must be tensioned correctly.
5) Before starting your work, make sure that all
the protection devices are correctly fitted.
C) OPERATION
1) Do not operate the engine in a confined space
where dangerous carbon monoxide fumes can
collect.
2) Work only in daylight or good artificial light.
3) Take on a firm and well-balanced position:
– where possible, avoid working on wet, slippery
4 SAFETY REQUIREMENTS
3. SAFETY REQUIREMENTS

ground or in any case on uneven or steep gro-
und that does not guarantee stability for the
operator;
– avoid using unstable ladders or platforms;
– do not work with the machine above your
shoulders;
– never run, but walk carefully paying attention to
the lay of the land and any eventual obstacles.
– avoid working alone or in an isolated place, in
case you have to find help after an accident.
4) Make sure the machine is securely locked
when you start the engine:
– start the motor in an area at least 3 metres from
where you refuelled;
– check that there are no persons in the vicinity of
the machine;
– do not direct the silencer and therefore the
exhaust fumes towards inflammable materials.
– watch out for flying debris caused by the move-
ment of the chain, especially when it hits obsta-
cles or foreign objects.
5) Do not change the engine tuning and do not
rev the engine excessively at maximum speed.
6) Do not strain the machine too much and do not
use a small chain-saw for heavy-duty sawing. If
you use the right machine, you will reduce the risk
of hazards and improve the quality of your work.
7) Check that when the machine is running idle,
there is no movement of the chain and, after pres-
sing the throttle trigger, the engine quickly returns
to minimum speed.
8) Take care not to hit the bar hard against foreign
objects or flying debris caused by the movement
of the chain.
9) Stop the engine:
– whenever you leave the machine unattended;
– before refuelling.
10) Stop the engine and disconnect the spark
plug cable:
– before cleaning, checking or working on the
machine;
– after striking a foreign object. Inspect the ma-
chine for any damage and make repairs before
restarting it again;
– if the machine begins to abnormally vibrate
(Immediate look for the cause of the vibrations
and take for necessary controls at a Specialised
Centre).
– when the machine is not in use.
D) MAINTENANCE AND STORAGE
1) Keep all nuts, bolts and screws tightly fastened
to be sure the equipment is in safe working con-
dition. Routine maintenance is essential for
safety and for maintaining a high performance
level.
2) Do not store the machine with fuel in the tank
in an area where the fuel vapours could reach an
open flame, a spark or a strong heat source.
3) Allow the engine to cool before storing in any
enclosure.
4) To reduce fire hazards, keep the engine, ex-
haust silencer and fuel storage area free from
sawdust, branches, leaves, or excessive grease;
never leave containers with the cut debris inside
the storage area.
5) Se il serbatoio deve essere svuotato, effettuare
questa operazione all’aperto e a motore freddo.
6) If the fuel tank has to be emptied, this
should be done outdoors once the engine has
cooled down.
7) Make sure the chain is well sharpened. Any
work on the chain and bar require specific experi-
ence and special tools. For safety purposes, we
recommend you contact your dealer to ensure
work is done correctly.
8) For safety reasons, never use the machine
with worn or damaged parts. Damaged parts
are to be replaced and never repaired. Only u-
se original spare parts. Parts that are not of the
same quality can seriously damage the equipment
and compromise safety.
9) Before putting the machine away, check you
have removed wrenches or tools used for mainte-
nance.
10) Store the machine out of the reach of chil-
dren!
E) TRANSPORTATION AND HANDLING
1) Whenever the machine is to be handled or
transported you must:
– turn off the engine, wait for the chain to stop
and disconnect the spark plug cap;
– mount the bar cover;
– only hold the machine using the handgrips and
position the bar in the opposite direction to that
used during operation.
2) When using a vehicle to transport the machine,
position it so that it can cause no danger to per-
sons and fasten it firmly in place to avoid it from
tipping over, which may cause damage or fuel
spillage.
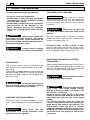
F) HOW TO READ THE MANUAL
Certain paragraphs in the manual contain particu-
larly significant information and are marked with
various levels of highlighting with the following
meaning:
or
These give details or further
information on what has already been indicated,
and aim to prevent both damage to the machine,
and the machine from causing damage.
Non-observance will re-
sult in the risk of injury to oneself or others.
Non-observance will re-
sult in the risk of serious injury or death to
oneself or others.
DANGER!
WARNING!
IMPORTANT
NOTE
SAFETY REQUIREMENTS 5
EN

The machine is supplied
with the bar and chain dismantled and the oil and
fuel tanks empty.
Unpacking and complet-
ing the assembly should be done on a flat and
stable surface, with enough space for machi-
ne handling and its packaging, always mak-
ing use of suitable equipment.
Disposal of the packaging should be done in
accordance with the local regulations in
force.
Always wear heavy-duty
gloves when handling the bar and chain.
Mount the bar and chain very carefully so as
not to impair the safety and efficiency of the
machine. If in doubt, contact your dealer.
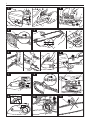
The machine can be as-
sembled in different ways, depending on the bar
fastening system and the chain tensioning mech-
anism.
Before fitting the bar, make sure the chain brake
is not engaged; this is done by pulling the front
hand guard right back towards the body of the
machine.
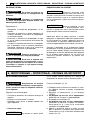
1a. MACHINES WITH STANDARD
CHAIN TENSION ADJUSTER
– Unscrew the nuts and remove the clutch cover
to get to the drive sprocket and point where
the bar is to be fitted (Fig. 1). In P 40(x) -
P 42(x) - P 44(x) Models: the clutch cover is
supplied disassembled.
– Mount the bar (2) by inserting the stud bolts in
the groove and push it towards the back of the
machine body (Fig. 2).
– Mount the chain in the right direction around
the drive sprocket and along the bar rail (Fig.
3). If the tip of the bar has a nose sprocket,
make sure the drive links fit correctly in the
sprocket rims.
– Check that the chain tension adjuster pin (3) is
fitted properly in the hole on the bar (Fig. 4); if
it isn’t, turn the chain tension adjuster screw
(4) using a screwdriver until the pin is com-
pletely inserted (Fig. 5) (excluding P 42(x) -
P 44(x) Models).
– Fit the guard back on without tightening the
nuts.
NOTE
WARNING!
WARNING!
IMPORTANT
• In models P 36(x) - P 37(x) - P 38(x) - P
41(x), check that the pin (1 - Fig.1) is insert-
ed correctly.
• In P 42(x) - P 44(x) Models: check that the
chain tension adjuster pin (3a - Fig.4) of the
clutch cover is fitted properly in the hole on
the bar; if it isn’t, turn the chain tension ad-
juster screw (4a) using a screwdriver until
the pin is completely inserted.
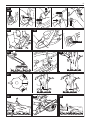
– Turn the chain tension adjuster screw (4 or 4a)
to adjust the chain tension (Fig. 5). Models P
46(x) and P 48(x) have another tension adju-
ster between the guard nuts (5 - Fig. 5).
– Raise the bar and tighten the guard nuts secu-
rely using the wrench (Fig. 6).
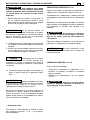
1b. MACHINES WITH “Q-TENS” QUICK
CHAIN TENSION ADJUSTER
– Unscrew the knob (1) and remove the clutch
cover to get to the drive sprocket and the
point where the bar is fitted (Fig. 7).
– Push the chain tension adjuster lock on the
bar (2) forwards as far as it goes (Fig. 8).
– Mount the chain in the right direction on the
bar (Fig. 8). If the tip of the bar has a nose
sprocket, make sure the drive links are cor-
rectly inserted in the sprocket rims.
– Insert the bar (3) and wind the chain around
the drive sprocket (Fig. 8).
– Rotate the outer ring (4) on the cover to line up
its pointer with the one on the guard (Fig. 9).
– Fit the cover back on by screwing the knob (1)
but not tight (Fig. 10).
– Tighten the chain by rotating the outer ring (4)
clockwise (Fig. 10).
– Raise the bar and tighten the knob (1) secure-
ly (Fig. 10).
2. CHECKS AFTER MOUNTING THE BAR
AND THE CHAIN
– Check the chain tension. The tension is cor-
rect when the drive links do not slip out of the
chain guides if you hold the chain in the mid-
dle of the bar (Fig. 1).
– Using a screwdriver, make the chain run along
the guides to check it moves smoothly without
resistance.
6 MACHINE ASSEMBLY
EN
4. MACHINE ASSEMBLY

PREPARING TO WORK 7
EN
CHECKING THE MACHINE
Before starting work please:
– check that all the screws on the machine and
the bar are tightly fastened;
– check that the chain is sharp and there are no
signs of any damage;
– check that the air filter is clean;
– check that the protection devices are well fas-
tened and working efficiently;
– check that the handgrips are well fastened;
– check that the chain brake is working effi-
ciently.
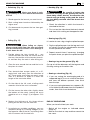
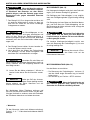
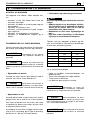
PREPARING THE FUEL
This machine is fitted with a two-stroke engine
which requires a mixture of petrol and lubricating
oil.
Using petrol alone will
damage the motor and will cause for invalidation
of the warranty.
Only use quality fuels and
oils to maintain high performance and guarantee
the duration of the mechanical parts over time.
• Petrol characteristics
Only use unleaded petrol with a fuel grade of at
least 90 N.O.
Unleaded petrol tends to
create deposits in the container if preserved for
more than 2 months. Always use fresh petrol!
• Oil characteristics
Only use top quality synthetic oil specifically for
two-stroke engines.
Your dealer can provide you with oils which have
been specifically developed for this type of
engine, and which are capable of guaranteeing a
high level of protection.
The use of these oils makes it possible to pre-
pare a 2% mixture, consisting in 1 part oil to 50
parts petrol.
IMPORTANT
IMPORTANT
IMPORTANT
• Preparation and preservation of the fuel
mixture
Petrol and the fuel mixture are highly inflam-
mable!
– Keep the petrol and fuel mixture in homolo-
gated fuel containers, in safe place, away
from any flames or heat sources.
– Never leave the containers within the reach
of children.
– Never smoke whilst preparing the mixture
and avoid inhaling the petrol fumes.
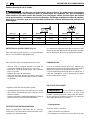
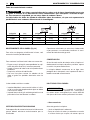
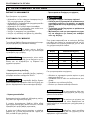
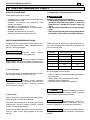
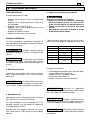
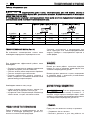
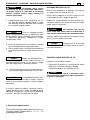
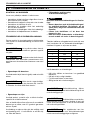
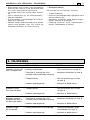
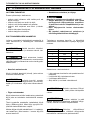
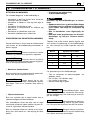
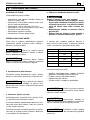
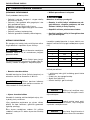
The chart indicates the amount of petrol and oil
to use to prepare the fuel mixture according to
the type of oil used.
To prepare the fuel mixture:
– Place about half the amount of petrol in a
homologated tank
– Add all the oil, according to the chart.
– Add the rest of the petrol.
– Close the top and shake well.
The fuel mixture tends to
age. Do not prepare excessive amounts of the
fuel mixture to avoid deposits from forming.
Keep the petrol and fuel
mixture containers separate and easily identifi-
able to avoid the mistake of using one in place of
the other.
Periodically clean the petrol
and fuel mixture containers to remove any even-
tual deposits.
IMPORTANT
IMPORTANT
IMPORTANT
DANGER!
5. PREPARING TO WORK
Petrol Synthetic oil 2-stroke
liters liters cm
3
1 0,02 20
2 0,04 40
3 0,06 60
5 0,10 100
10 0,20 200

EN
REFUELLING
Never smoke whilst refu-
elling and avoid inhaling the petrol fumes.
Carefully open the tank
top as pressure could have formed inside.
Before refuelling:
– Shake the fuel mixture container well.
– Place the machine on a flat stable surface,
with the fuel tank cap facing upwards.
– Clean the fuel tank cap and the surrounding
area to avoid any dirt from entering the tank
during refilling.
– Carefully open the fuel tank cap to allow the
pressure inside to decrease gradually. Use a
funnel to refill and avoid filling the tank to the
brim.
Always close the fuel
tank cap firmly.
Immediately clean all tra-
ces of fuel which may have dripped on the
machine or the ground and do not start the
engine until the petrol fumes have dissipated.
WARNING!
WARNING!
WARNING!
DANGER!
CHAIN LUBRICANT
Only use special oil for
chain saws or adhesive oil for chain saws. Do not
use oil containing impurities so as not to block
the oil filter and to prevent irreparable damage to
the oil pump.
The special oil for lubricat-
ing the chain is biodegradable. Use of a mineral
oil or engine oil causes serious damage to the
environment.
It is essential that you use good quality oil to
lubricate the cutting parts effectively. Used or
poor quality oil does not guarantee good lubri-
cation and reduces the duration of the chain and
bar.
It is always worth topping up the oil tank com-
pletely (using a funnel) every time you refuel.
Since the oil tank capacity is enough to guaran-
tee that the fuel runs out first, you will avoid the
risk of operating the machine without lubricant.
IMPORTANT
IMPORTANT
means starting it after at least 5 minutes from
when it was switched off or after refuelling.
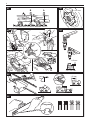
To start the engine (Fig. 12):
1. Check that the chain brake is engaged (with
the front hand guard pushed forward).
2. Set the switch (1) to «START».
3. If your machine has a decompression
valve, press it now.
4. Pull out the choke (2).
5. If your machine has a primer (3), press it 3-
4 times to aid starting.
6. Hold the machine firmly on the ground, with
your hand on the handgrip and your foot in
the rear handgrip, to avoid losing control dur-
ing starting (Fig. 13).
STARTING THE ENGINE
The engine must be start-
ed in an area at least 3 metres from where
you refilled the fuel tank.
Before starting the engine:
– Place the machine firmly on the ground.
– Take off the bar cover.
– Make sure the bar is not touching the ground
or any other object.
• Cold starting
A “cold” start of the engine
NOTE
WARNING!
8 PREPARING TO WORK / HOW TO START - USE – STOP THE ENGINE
6. HOW TO START - USE – STOP THE ENGINE

EN
HOW TO START - USE – STOP THE ENGINE 9
If the machine is not held
firmly, the force of the engine could cause the
user to lose his balance or direct the bar
towards him or an obstacle.
7. Pull the starter rope slowly for 10 - 15 cm until
you feel some resistance, then tug it hard a
few times until you hear the engine turn over.
To avoid breaking the
starter rope, do not pull the whole length of it or
let it slide along the edge of the cable guide hole.
Release the starter gradually, to avoid letting it fly
back uncontrollably.
8. Pull the starter rope again until the engine
starts as normal.
9. When the engine has started, press the throt-
tle trigger to disconnect the starter and allow
the engine to idle.
Do not let the engine run at
high power with the chain brake engaged, as this
could cause overheating and damage to the
clutch.
10. Let the engine run idle for at least 1 minute
before using the machine.
If the starter rope is pulled
repeatedly with the choke on, it may flood the
engine and make starting difficult.
If you have flooded the engine, remove the spark
plug and gently pull the handle on the starter
rope to eliminate any excess fuel; then dry the
spark plug electrodes and replace it on the
engine.
• Hot starting
When hot starting (immediately after stopping
the engine), follow the procedure indicated
above in points 1 -2 -6 - 7 -8.
IMPORTANT
IMPORTANT
IMPORTANT
WARNING!
USE OF THE ENGINE (Fig. 14)
The chain speed is regulated by the throttle trig-
ger (1) on the rear handgrip (2).
The throttle trigger only works if the lockout (3) is
pressed at the same time.
The movement is transmitted from the engine to
the chain by a centrifugal mass clutch that pre-
vents the chain from moving when the engine is
running at minimum speed.
Do not use the machine if
the chain moves when the engine is running
idle; in this case, contact your dealer.
The correct running speed will be achieved by
pressing the throttle trigger (1) as far as possible.
Avoid using the engine at
full power for the first 6-8 working hours.
STOPPING THE ENGINE (Fig. 14)
To stop the engine:
– Release the throttle trigger (1) and allow the
engine to run idle for a few seconds.
– Set the switch (4) to “STOP”.
When you have reduced
speed to a minimum, it will take a few sec-
onds for the chain to stop.
WARNING!
IMPORTANT
WARNING!

EN
To respect people and the environment:
– Try not to cause any disturbance.
– Scrupulously comply with local regulations
and provisions for the disposal of waste
materials after sawing.
– Scrupulously comply with local regulations
and provisions for the disposal of oils,
petrol, damaged parts or any elements
which have a strong impact on the environ-
ment.
Always wear suitable clo-
thing when using the machine. Your dealer
can provide you with all the information on
the most suitable accident-prevention devi-
ces to guarantee your safety.
It takes specific training
to use the machine for felling and delimbing.
CHAIN BRAKE
This machine comes with an automatic brake
that stops the chain when kickback occurs dur-
ing cutting.
This brake can be operated manually by pushing
the front guard forward. To release the brake,
pull the front guard towards the handgrip until
you hear a click.
Do not use the machine if
the chain brake does not function correctly
and have it inspected by your dealer.
CHECKING THE CHAIN TENSION
The chain tends to stretch gradually as you
work, so you need to check its tension frequent-
ly.
Never work with the
chain loose, as it can be hazardous if the
chain slips out of its guides.
WARNING!
WARNING!
WARNING!
WARNING!
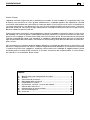
CHECKING THE OIL DELIVERY
Never use the machine
without lubrication! The oil tank may get almost
empty every time the fuel runs out. Make sure
you top up the oil tank every time you refuel the
chain-saw.
Make sure the bar and
the chain are in place when you check the oil
delivery.
Start the engine, keep it running at medium
power and check if the chain oil is delivered as
shown in the figure (Fig. 15).
In models P 42(x) - P 44(x) - P 46(x) - P 48(x),
you can adjust the chain oil flow using a screw-
driver on the adjuster screw (1) of the oiler, which
is on the bottom of the machine (Fig. 15).
DIRECTIONS FOR USE AND CUTTING
TECHNIQUES
Before felling or delimbing for the first time, prac-
tise sawing logs on the ground or on trestles, so
that you can get familiar with the machine and
the most suitable sawing techniques.
Always hold the machine
with both hands when sawing.
Stop the engine immedi-
ately if the chain stops during sawing.
Beware of kickback, which can occur if the
bar contacts an obstacle.
Kickback occurs when the tip of the chain
comes in contact with an object or when the
wood contracts and jams the chain during
sawing.
This contact with the tip of the chain can
cause a rapid backward motion, pushing the
guide bar up and towards the operator. This
also happens when the chain is jammed
along the upper part of the bar. In both cases,
kickback can cause the operator to lose con-
trol of the chain-saw, leading to serious con-
sequences.
WARNING!
WARNING!
WARNING!
IMPORTANT
10 USING THE MACHINE
7. USING THE MACHINE

• Delimbing (Fig. 16)
Make sure there is noth-
ing or nobody in the area where the branches
will fall.
1. Stand opposite the branch you want to cut.
2. Start cutting lower branches followed by the
higher ones.
3. Cut downwards to prevent the bar from get-
ting jammed.
• Felling (Fig. 17)
When felling on slopes,
always stand uphill from the tree and check
that the felled trunk cannot cause damage if
it rolls down the hill.
1. Decide where the tree should fall – you
should consider the wind, the natural lean of
the tree, the position of the heaviest branch-
es and how easy the work is after felling, etc.
2. Clear the area around the tree and find a sta-
ble place to stand.
3. Plan obstacle-free escape routes at a 45°
angle back and away from the direction of
fall. These routes must allow you reach a safe
area at a distance of about 2.5 times the
length of the tree to be felled
4. On the side of the fall, mark a felling notch
around a third of the trunk’s diameter.
5. Cut the tree on the other side, slightly above
the bottom of the notch, leaving the uncut
wood to act as a “hinge” (1) of approx. 5-10
cm.
6. Reduce the thickness of this hinge without
pulling out the bar, until the tree falls.
7. In particular or unstable conditions, you can
complete felling by inserting wedges (2) on
the opposite side of the fall, and hitting them
with a hammer until the tree falls.
WARNING!
WARNING!
• Bucking (Fig. 18)
Be careful of where the
branches are lying on the ground, the risk of
them being under tension, the direction the
branch may go during cutting and the risk of
the tree being unstable after the branch has
been cut..
1. Check the direction in which the branch is
attached to the tree
2. First cut on the side where the branch bends
and then finish cutting on the opposite side.
• Sawing logs (Fig. 19)
It is easier to saw a log using the spiked bumper.
1. Dig the spiked bumper into the log and use it
as a pivot. Cut with an arched motion to make
the bar penetrate the wood.
2. Repeat several times if necessary, changing
the point where you plant the spiked bumper.
• Sawing a log on the ground (Fig. 20)
Cut up to half the diameter, roll the log over and
finishing sawing on the other side.
• Sawing a raised log (Fig. 21)
1. If you are sawing the overhanging end of a
supported log (A), first cut a third of the diam-
eter from the bottom upwards, then finish
from the top.
2. If you are sawing between two supports (B),
cut a third of the diameter from the top down-
wards, then finish from the bottom.
END OF OPERATIONS
When you have finished your work:
– Switch off the engine as indicated above
(Chap. 6)..
– Wait for the chain to stop and then mount the
bar cover.
WARNING!
USING THE MACHINE 11
EN

Correct maintenance is essential to maintain the
original efficiency and safety of the machine over
time.
During maintenance
operations:
– Remove the spark plug cap.
– Wait until the engine is sufficiently cold.
– Use protective gloves when handling the
bar and chain.
– Keep the bar protection devices on, except
when intervening directly on the bar or the
chain.
– Never dispose of oils, fuel or other polluting
materials in unauthorised places.
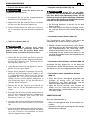
CYLINDER AND SILENCER
To reduce fire risks, periodically clean the cylin-
der flaps with compressed air and clear the
silencer area to get rid of sawdust, branches,
leaves or other debris.
STARTING SYSTEM
To avoid overheating and damage to the engine,
always keep the cooling air vents clean and free
of sawdust and debris.
The starter rope must be replaced as soon as it
shows signs of wear.
CLUTCH UNIT
Keep the clutch bell free of sawdust and debris.
Have your dealer check the greasing of the inter-
nal bearing every 30 hours (approx.).
CHAIN BRAKE
Regularly check the efficiency of the chain brake
and the condition of the metal band around the
clutch bell.
WARNING!
Replace this band when the points in contact
with the clutch bell wear down to about half the
thickness of the two ends not subject to rubbing.
CHAIN SPROCKET (Fig. 22)
Regularly check the condition of the sprocket
and replace it when wear exceeds 0.5 mm.
Do not mount a new chain with a worn sprocket
or vice-versa.
CHAIN CATCHER
This is an important safety device that restrains
the chain if it breaks or degrooves.
Regularly check the condition of the chain
catcher and replace it if it gets damaged.
NUTS AND SCREWS
Periodically check that all the nuts and screws
are securely tightened and the handgrips are
tightly fastened.
CLEANING THE AIR FILTER (Fig. 23)
Cleaning the air filter is es-
sential to guarantee the efficiency and duration
of the machine. Do not work with a damaged fil-
ter or without a filter, as this could permanently
damage the engine.
It must be cleaned after every 8-10 working
hours.
Clean the filter as follows:
– Remove the cover (1) and filter element (2).
– Gently tap the filter element (2) to remove the
dirt and, if necessary, clean it with low pres-
sure compressed air.
IMPORTANT
12 MAINTENANCE AND STORAGE
EN
8. MAINTENANCE AND STORAGE

The filter element (2) must
never be washed and must be replaced if it is too
dirty or damaged.
– Fit the filter element (2) and the cover (1) back
on.
– In models P43(x) - P46(x) - P47(x) - P48(x),
first attach the filter element (2a) to the cover
(1a) and then fit these assembled parts on the
machine.
CHECKING THE SPARK PLUG (Fig. 24)
Periodically remove and clean the spark plug
using a metal brush to get rid of any deposits.
Check and reset the correct distance between
the electrodes.
Replace the spark plug and fasten it firmly using
the supplied wrench.
The spark plug must be replaced with one with
the same characteristics whenever the elec-
trodes have burnt or the insulation has worn, and
in any case every 100 working hours.
TUNING THE CARBURETTOR
The carburettor is tuned by the manufacturer to
achieve maximum performance in all situations,
with a minimum emission of toxic gas in compli-
ance with the regulations in force.
When performance is poor, first check that the
chain runs smoothly and the bar rails are not dis-
torted, then contact your dealer to check the
carburetion and the engine.
• Tuning minimum speed
The chain must not move
when the engine is running idle. If the chain
moves when the engine is running idle, con-
tact your dealer to correctly regulate the
engine.
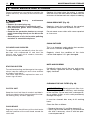
SHARPENING THE CHAIN
To ensure that the chain-
saw works safely and efficiently, it is essential
that the cutting components are well-sharp-
ened.
WARNING!
WARNING!
IMPORTANT
Sharpening is necessary when:
• The sawdust looks like dust.
• Cutting becomes more difficult.
• The cut is not straight.
• Vibrations increase.
• Fuel consumption increases.
If the chain is not suffi-
ciently sharpened, the kick-back’s risk
increases.
A specialized centre will sharpen the chain using
the right tools to ensure minimum removal of
material and even sharpness on all the cutting
edges.
If you sharpen the chain yourself, use special
round-section files with the right diameter
depending on the type of chain (see “Chain
Maintenance Table”). You need a certain amount
of skill and experience to avoid damaging the
cutting edges.
Sharpen the chain as follows (Fig. 25):
– Switch off the engine, release the chain brake
and secure the bar with the chain in a vice so
that the chain can run smoothly.
– Tighten the chain if it is loose.
– Mount the file in the guide and then insert it in
the tooth at a constant angle from the cutting
edge.
– Sharpen in a forward motion a few times and
repeat this on all the cutting edges facing the
same way (right or left).
– Turn the bar over in the vice and repeat on all
the other cutting edges.
– Check that the limiter tooth does not stick out
further than the inspection instrument and file
any projecting parts with a flat file, rounding
off the edge.
– After sharpening, remove all traces of filing
and dust and lubricate the chain in an oil bath.
Replace the chain whenever:
– The length of the cutting edges reduces to 5
mm or less;
– There is too much play between the links and
the rivets.
WARNING!
MAINTENANCE AND STORAGE 13
EN

BAR MAINTENANCE (Fig. 26)
To avoid asymmetrical wear on the bar, make
sure it is turned over periodically.
To keep the bar in perfect working order, pro-
ceed as follows:
– grease the bearings on the nose sprocket (if
present) with the syringe;
– clean the bar groove with the scraper;
– clean the lubrication holes;
– with a flat file, remove burr from the edges and
level off the guides.
Replace the bar whenever:
– the groove is not as deep as the height of the
drive links (which must never touch the bot-
tom);
– the inside of the guide is worn enough to
make the chain lean to one side.
EXTRAORDINARY MAINTENANCE
All maintenance operations not foreseen in this
manual must be performed exclusively by your
dealer.
All and any operations performed in unautho-
rised centres or by unqualified persons will total-
ly invalidate the warranty.
STORAGE
After every work stint, clean the machine thor-
oughly to remove all dust and debris, and repair
or replace any faulty parts.
The machine must be stored in a dry place away
from the elements and with the bar cover cor-
rectly fitted.
LONG PERIODS OF DISUSE
If you are not going to use
the machine for a period of more than 2-3
months, we recommend you do a few things
before putting it away. This will make it easier
when you want to use the machine again and will
also prevent permanent damage to the engine.
• Storage
Before putting the machine away:
– Empty the fuel tank.
– Start the engine and run it idle until it comes to
a halt, so that it uses up all the fuel that is left
in the carburettor.
– Wait for the engine to cool down and remove
the spark plug.
IMPORTANT
14 MAINTENANCE AND STORAGE
EN
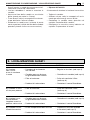
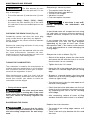
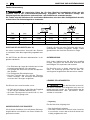
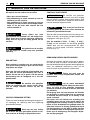
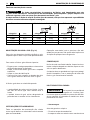
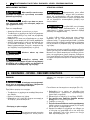
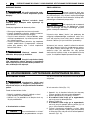
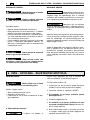
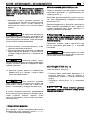
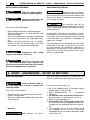
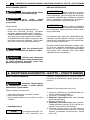
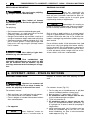
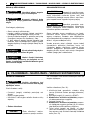
Chain maintenance table
The specifications of the chain and the bar homologated for this machine
are shown in the “EC Conformity Statement” provided. Do not use other types of chains or bars
for safety reasons.
The table gives the sharpening data for different types of chains, but this does not mean you
can use different chains from the homologated one.
WARNING!
Chain pitch Limiter tooth level (a) File diameter (d)
inches mm inches mm inches mm
3/8 Mini 9.32 0.018 0.45 5/32 4.0
0.325 8.25 0.026 0.65 3/16 4.8
3/8 9.32 0.026 0.65 13/64 5.2
0.404 10.26 0.031 0.80 7/32 5.6
a
d

– Pour a teaspoon of (new) 2-stroke engine oil
into the spark plug slot.
– Pull the starter rope several times to deliver oil
to the cylinder..
– Replace the spark plug with the piston in the
dead end upper position (visible from the
spark plug slot when the piston is at maximum
stroke).
• Restarting work
When you wish to start using the machine again:
– Remove the spark plug.
– Pull the starter rope a few times to eliminate
excess oil.
– Check the spark plug as described in chapter
“Checking the spark plug”.
– Prepare the machine as indicated in the para-
graph entitled “Preparing for work”.
MAINTENANCE AND STORAGE / TROUBLESHOOTING 15
EN
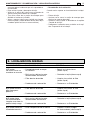
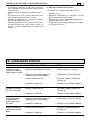
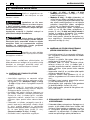
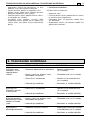
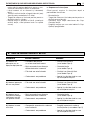
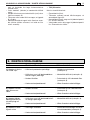
9. TROUBLESHOOTING
1) The engine will
not start or will not
keep running
2) The engine starts
but is lacking in
power
3) The engine runs
irregularly and lacks
in power when
revved
4) The engine gives
off an excessive
amount of smoke
– Incorrect starting procedure
– Dirty spark plug or incorrect distance
between the electrodes
– Air filter clogged
– Carburetion problems
– Air filter clogged
– Carburetion problems
– Dirty spark plug or incorrect distance
between the electrodes
– Carburetion problems
– Incorrect composition
of the fuel mixture
– Carburetion problems
– Follow the instructions
(see chapter 6)
– Check the spark plug
(see chapter 8)
– Clean and/or replace the filter
(see chapter 8)
– Contact your dealer
– Clean and/or replace the filter
(see chapter 8)
– Contact your dealer
– Check the spark plug
(see chapter 8)
– Contact your dealer
– Prepare the fuel mixture according
to the instructions (see chap. 5)
– Contact your dealer
PROBLEM LIKELY CAUSE SOLUTION

16 ACCESSORIES
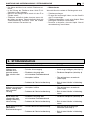
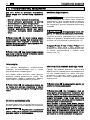
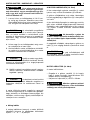
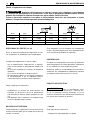
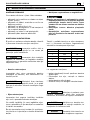
The table contains a list of all possible combina-
tions between bar and chain, indicating those
which may be used on each machine, marked
with the symbol “ ”.
In consideration that the
selection, application and usage of bar and
WARNING!
chain are actions made solely by the user, the
latter assumes responsibility for damages of
any kind due to such actions. When in doubt
or if lacking knowledge of the specificity of
each bar or chain, contact your retailer or
specialised gardening centre.
10. ACCESSORIES
Bar and chain combinations
A 38(x)
P 38(x)
P 40(x)
P 42(x)
P 44(x)
P 36(x)
P 37(x)
P 41(x)
P 43(x)
P 47(x)
P 48(x)
P 46(x)
P 45(x)
P 52(x)
BAR Model
Pitch Groove CHAIN
Length width
Inches Inches / cm Inches / mm Code Code
3/8” 14" / 35 cm 0,050"/1,3mm 23900110/0 4113702
3/8” 14" / 35 cm 0,050"/1,3mm 1519-9094-01 4113702
3/8” 16" / 40 cm 0,050"/1,3mm 23900111/0 4113705
3/8” 16" / 40 cm 0,050"/1,3mm 1519-9093-01 4113705
325" 13" / 33 cm 0,050"/1,3mm 23900109/0 4113710
325" 16" / 40 cm 0,050"/1,3mm 23900107/0 4113711
325" 13" / 33 cm 0,050"/1,3mm 23900115/0 4113710
325" 16" / 40 cm 0,050"/1,3mm 23900113/0 4113712
325" 18" / 45 cm 0,050"/1,3mm 23900112/0 4113713
325" 13" / 33 cm 0,058"/1,5mm 4112660 4113720
325" 16" / 40 cm 0,050"/1,3mm 23900100/0 4113712
325" 18" / 45 cm 0,050"/1,3mm 23900101/0 4113713
325" 16" / 40 cm 0,058"/1,5mm 4112450 4113721
325" 18" / 45 cm 0,058"/1,5mm 4112490 4113722
325" 20" / 50 cm 0,058"/1,5mm 4112640 4113723
3/8” 18" / 45 cm 0,058"/1,5mm 6995316 4113742
3/8” 20" / 50 cm 0,058"/1,5mm 6995164 4113741
Page is loading ...
Page is loading ...
Page is loading ...
Page is loading ...
Page is loading ...
Page is loading ...
Page is loading ...
Page is loading ...
Page is loading ...
Page is loading ...
Page is loading ...
Page is loading ...
Page is loading ...
Page is loading ...
Page is loading ...
Page is loading ...
Page is loading ...
Page is loading ...
Page is loading ...
Page is loading ...
Page is loading ...
Page is loading ...
Page is loading ...
Page is loading ...
Page is loading ...
Page is loading ...
Page is loading ...
Page is loading ...
Page is loading ...
Page is loading ...
Page is loading ...
Page is loading ...
Page is loading ...
Page is loading ...
Page is loading ...
Page is loading ...
Page is loading ...
Page is loading ...
Page is loading ...
Page is loading ...
Page is loading ...
Page is loading ...
Page is loading ...
Page is loading ...
Page is loading ...
Page is loading ...
Page is loading ...
Page is loading ...
Page is loading ...
Page is loading ...
Page is loading ...
Page is loading ...
Page is loading ...
Page is loading ...
Page is loading ...
Page is loading ...
Page is loading ...
Page is loading ...
Page is loading ...
Page is loading ...
Page is loading ...
Page is loading ...
Page is loading ...
Page is loading ...
Page is loading ...
Page is loading ...
Page is loading ...
Page is loading ...
Page is loading ...
Page is loading ...
Page is loading ...
Page is loading ...
Page is loading ...
Page is loading ...
Page is loading ...
Page is loading ...
Page is loading ...
Page is loading ...
Page is loading ...
Page is loading ...
Page is loading ...
Page is loading ...
Page is loading ...
Page is loading ...
Page is loading ...
Page is loading ...
Page is loading ...
Page is loading ...
Page is loading ...
Page is loading ...
Page is loading ...
Page is loading ...
Page is loading ...
Page is loading ...
Page is loading ...
Page is loading ...
Page is loading ...
Page is loading ...
Page is loading ...
Page is loading ...
Page is loading ...
Page is loading ...
Page is loading ...
Page is loading ...
Page is loading ...
Page is loading ...
Page is loading ...
Page is loading ...
Page is loading ...
Page is loading ...
Page is loading ...
Page is loading ...
Page is loading ...
Page is loading ...
Page is loading ...
Page is loading ...
Page is loading ...
Page is loading ...
Page is loading ...
Page is loading ...
Page is loading ...
Page is loading ...
Page is loading ...
Page is loading ...
Page is loading ...
Page is loading ...
Page is loading ...
Page is loading ...
Page is loading ...
Page is loading ...
Page is loading ...
Page is loading ...
Page is loading ...
Page is loading ...
Page is loading ...
Page is loading ...
Page is loading ...
Page is loading ...
Page is loading ...
Page is loading ...
Page is loading ...
Page is loading ...
Page is loading ...
Page is loading ...
Page is loading ...
Page is loading ...
Page is loading ...
Page is loading ...
Page is loading ...
Page is loading ...
Page is loading ...
Page is loading ...
Page is loading ...
Page is loading ...
Page is loading ...
Page is loading ...
Page is loading ...
Page is loading ...
Page is loading ...
Page is loading ...
Page is loading ...
Page is loading ...
Page is loading ...
Page is loading ...
Page is loading ...
Page is loading ...
Page is loading ...
Page is loading ...
Page is loading ...
Page is loading ...
Page is loading ...
Page is loading ...
Page is loading ...
Page is loading ...
Page is loading ...
Page is loading ...
Page is loading ...
Page is loading ...
Page is loading ...
Page is loading ...
Page is loading ...
Page is loading ...
Page is loading ...
Page is loading ...
Page is loading ...
Page is loading ...
Page is loading ...
Page is loading ...
Page is loading ...
Page is loading ...
Page is loading ...
Page is loading ...
Page is loading ...
Page is loading ...
Page is loading ...
Page is loading ...
Page is loading ...
Page is loading ...
Page is loading ...
Page is loading ...
Page is loading ...
Page is loading ...
Page is loading ...
Page is loading ...
Page is loading ...
Page is loading ...
Page is loading ...
Page is loading ...
Page is loading ...
Page is loading ...
Page is loading ...
Page is loading ...
Page is loading ...
Page is loading ...
Page is loading ...
Page is loading ...
Page is loading ...
Page is loading ...
Page is loading ...
Page is loading ...
Page is loading ...
Page is loading ...
Page is loading ...
Page is loading ...
Page is loading ...
Page is loading ...
Page is loading ...
Page is loading ...
Page is loading ...
Page is loading ...
Page is loading ...
Page is loading ...
Page is loading ...
Page is loading ...
Page is loading ...
Page is loading ...
Page is loading ...
Page is loading ...
Page is loading ...
Page is loading ...
Page is loading ...
Page is loading ...
Page is loading ...
Page is loading ...
Page is loading ...
Page is loading ...
Page is loading ...
Page is loading ...
Page is loading ...
Page is loading ...
Page is loading ...
Page is loading ...
Page is loading ...
Page is loading ...
Page is loading ...
Page is loading ...
Page is loading ...
Page is loading ...
Page is loading ...
Page is loading ...
Page is loading ...
Page is loading ...
Page is loading ...
Page is loading ...
Page is loading ...
Page is loading ...
Page is loading ...
Page is loading ...
Page is loading ...
Page is loading ...
Page is loading ...
Page is loading ...
Page is loading ...
Page is loading ...
Page is loading ...
Page is loading ...
Page is loading ...
Page is loading ...
Page is loading ...
Page is loading ...
Page is loading ...
Page is loading ...
Page is loading ...
Page is loading ...
Page is loading ...
Page is loading ...
Page is loading ...
Page is loading ...
Page is loading ...
Page is loading ...
Page is loading ...
Page is loading ...
Page is loading ...
Page is loading ...
Page is loading ...
Page is loading ...
Page is loading ...
Page is loading ...
Page is loading ...
Page is loading ...
Page is loading ...
Page is loading ...
Page is loading ...
Page is loading ...
Page is loading ...
Page is loading ...
Page is loading ...
Page is loading ...
Page is loading ...
Page is loading ...
Page is loading ...
Page is loading ...
Page is loading ...
Page is loading ...
Page is loading ...
Page is loading ...
Page is loading ...
Page is loading ...
Page is loading ...
Page is loading ...
Page is loading ...
Page is loading ...
Page is loading ...
Page is loading ...
Page is loading ...
Page is loading ...
Page is loading ...
Page is loading ...
Page is loading ...
Page is loading ...
Page is loading ...
Page is loading ...
Page is loading ...
Page is loading ...
Page is loading ...
Page is loading ...
Page is loading ...
Page is loading ...
Page is loading ...
Page is loading ...
Page is loading ...
Page is loading ...
Page is loading ...
Page is loading ...
Page is loading ...
Page is loading ...
Page is loading ...
Page is loading ...
Page is loading ...
Page is loading ...
Page is loading ...
Page is loading ...
Page is loading ...
Page is loading ...
Page is loading ...
Page is loading ...
Page is loading ...
Page is loading ...
Page is loading ...
Page is loading ...
Page is loading ...
Page is loading ...
Page is loading ...
Page is loading ...
Page is loading ...
Page is loading ...
Page is loading ...
Page is loading ...
Page is loading ...
-
 1
1
-
 2
2
-
 3
3
-
 4
4
-
 5
5
-
 6
6
-
 7
7
-
 8
8
-
 9
9
-
 10
10
-
 11
11
-
 12
12
-
 13
13
-
 14
14
-
 15
15
-
 16
16
-
 17
17
-
 18
18
-
 19
19
-
 20
20
-
 21
21
-
 22
22
-
 23
23
-
 24
24
-
 25
25
-
 26
26
-
 27
27
-
 28
28
-
 29
29
-
 30
30
-
 31
31
-
 32
32
-
 33
33
-
 34
34
-
 35
35
-
 36
36
-
 37
37
-
 38
38
-
 39
39
-
 40
40
-
 41
41
-
 42
42
-
 43
43
-
 44
44
-
 45
45
-
 46
46
-
 47
47
-
 48
48
-
 49
49
-
 50
50
-
 51
51
-
 52
52
-
 53
53
-
 54
54
-
 55
55
-
 56
56
-
 57
57
-
 58
58
-
 59
59
-
 60
60
-
 61
61
-
 62
62
-
 63
63
-
 64
64
-
 65
65
-
 66
66
-
 67
67
-
 68
68
-
 69
69
-
 70
70
-
 71
71
-
 72
72
-
 73
73
-
 74
74
-
 75
75
-
 76
76
-
 77
77
-
 78
78
-
 79
79
-
 80
80
-
 81
81
-
 82
82
-
 83
83
-
 84
84
-
 85
85
-
 86
86
-
 87
87
-
 88
88
-
 89
89
-
 90
90
-
 91
91
-
 92
92
-
 93
93
-
 94
94
-
 95
95
-
 96
96
-
 97
97
-
 98
98
-
 99
99
-
 100
100
-
 101
101
-
 102
102
-
 103
103
-
 104
104
-
 105
105
-
 106
106
-
 107
107
-
 108
108
-
 109
109
-
 110
110
-
 111
111
-
 112
112
-
 113
113
-
 114
114
-
 115
115
-
 116
116
-
 117
117
-
 118
118
-
 119
119
-
 120
120
-
 121
121
-
 122
122
-
 123
123
-
 124
124
-
 125
125
-
 126
126
-
 127
127
-
 128
128
-
 129
129
-
 130
130
-
 131
131
-
 132
132
-
 133
133
-
 134
134
-
 135
135
-
 136
136
-
 137
137
-
 138
138
-
 139
139
-
 140
140
-
 141
141
-
 142
142
-
 143
143
-
 144
144
-
 145
145
-
 146
146
-
 147
147
-
 148
148
-
 149
149
-
 150
150
-
 151
151
-
 152
152
-
 153
153
-
 154
154
-
 155
155
-
 156
156
-
 157
157
-
 158
158
-
 159
159
-
 160
160
-
 161
161
-
 162
162
-
 163
163
-
 164
164
-
 165
165
-
 166
166
-
 167
167
-
 168
168
-
 169
169
-
 170
170
-
 171
171
-
 172
172
-
 173
173
-
 174
174
-
 175
175
-
 176
176
-
 177
177
-
 178
178
-
 179
179
-
 180
180
-
 181
181
-
 182
182
-
 183
183
-
 184
184
-
 185
185
-
 186
186
-
 187
187
-
 188
188
-
 189
189
-
 190
190
-
 191
191
-
 192
192
-
 193
193
-
 194
194
-
 195
195
-
 196
196
-
 197
197
-
 198
198
-
 199
199
-
 200
200
-
 201
201
-
 202
202
-
 203
203
-
 204
204
-
 205
205
-
 206
206
-
 207
207
-
 208
208
-
 209
209
-
 210
210
-
 211
211
-
 212
212
-
 213
213
-
 214
214
-
 215
215
-
 216
216
-
 217
217
-
 218
218
-
 219
219
-
 220
220
-
 221
221
-
 222
222
-
 223
223
-
 224
224
-
 225
225
-
 226
226
-
 227
227
-
 228
228
-
 229
229
-
 230
230
-
 231
231
-
 232
232
-
 233
233
-
 234
234
-
 235
235
-
 236
236
-
 237
237
-
 238
238
-
 239
239
-
 240
240
-
 241
241
-
 242
242
-
 243
243
-
 244
244
-
 245
245
-
 246
246
-
 247
247
-
 248
248
-
 249
249
-
 250
250
-
 251
251
-
 252
252
-
 253
253
-
 254
254
-
 255
255
-
 256
256
-
 257
257
-
 258
258
-
 259
259
-
 260
260
-
 261
261
-
 262
262
-
 263
263
-
 264
264
-
 265
265
-
 266
266
-
 267
267
-
 268
268
-
 269
269
-
 270
270
-
 271
271
-
 272
272
-
 273
273
-
 274
274
-
 275
275
-
 276
276
-
 277
277
-
 278
278
-
 279
279
-
 280
280
-
 281
281
-
 282
282
-
 283
283
-
 284
284
-
 285
285
-
 286
286
-
 287
287
-
 288
288
-
 289
289
-
 290
290
-
 291
291
-
 292
292
-
 293
293
-
 294
294
-
 295
295
-
 296
296
-
 297
297
-
 298
298
-
 299
299
-
 300
300
-
 301
301
-
 302
302
-
 303
303
-
 304
304
-
 305
305
-
 306
306
-
 307
307
-
 308
308
-
 309
309
-
 310
310
-
 311
311
-
 312
312
-
 313
313
-
 314
314
-
 315
315
-
 316
316
-
 317
317
-
 318
318
-
 319
319
-
 320
320
-
 321
321
-
 322
322
-
 323
323
-
 324
324
-
 325
325
-
 326
326
-
 327
327
-
 328
328
-
 329
329
-
 330
330
-
 331
331
-
 332
332
-
 333
333
-
 334
334
-
 335
335
-
 336
336
-
 337
337
-
 338
338
-
 339
339
-
 340
340
-
 341
341
-
 342
342
-
 343
343
-
 344
344
-
 345
345
-
 346
346
-
 347
347
-
 348
348
-
 349
349
-
 350
350
-
 351
351
-
 352
352
-
 353
353
-
 354
354
-
 355
355
-
 356
356
-
 357
357
-
 358
358
-
 359
359
-
 360
360
-
 361
361
-
 362
362
-
 363
363
-
 364
364
-
 365
365
-
 366
366
-
 367
367
-
 368
368
-
 369
369
-
 370
370
-
 371
371
-
 372
372
-
 373
373
-
 374
374
-
 375
375
-
 376
376
-
 377
377
-
 378
378
-
 379
379
-
 380
380
-
 381
381
-
 382
382
-
 383
383
-
 384
384
-
 385
385
-
 386
386
-
 387
387
-
 388
388
-
 389
389
-
 390
390
-
 391
391
-
 392
392
-
 393
393
-
 394
394
-
 395
395
-
 396
396
-
 397
397
-
 398
398
-
 399
399
-
 400
400
-
 401
401
-
 402
402
-
 403
403
-
 404
404
-
 405
405
-
 406
406


Ask a question and I''ll find the answer in the document
Finding information in a document is now easier with AI
in other languages
- italiano: Mountfield MC438 Istruzioni per l'uso
- français: Mountfield MC438 Mode d'emploi
- español: Mountfield MC438 Instrucciones de operación
- Deutsch: Mountfield MC438 Bedienungsanleitung
- Nederlands: Mountfield MC438 Handleiding
- português: Mountfield MC438 Instruções de operação
- dansk: Mountfield MC438 Betjeningsvejledning
- polski: Mountfield MC438 Instrukcja obsługi
- čeština: Mountfield MC438 Operativní instrukce
- Türkçe: Mountfield MC438 Kullanma talimatları
- eesti: Mountfield MC438 Kasutusjuhend
- svenska: Mountfield MC438 Bruksanvisningar
- suomi: Mountfield MC438 Käyttö ohjeet
- română: Mountfield MC438 Instrucțiuni de utilizare
Related papers
Other documents
-
Ikra IBKH 33 Operating Instructions Manual
-
Hitachi CS25EC (SC) Owner's manual
-
Ribimex RIBILAND 515196 User And Maintenance Manual
-
Oleo-Mac MTH 560 / MTH 5600 Owner's manual
-
Oleo-Mac MT 451 / MT 4510 Owner's manual
-
-
Sparky Group TV 4040 User manual
-
Shindaiwa PT262S User manual
-
Oleo-Mac GSH 400 Owner's manual
-
Scheppach MFH5300-4BP User manual