Page is loading ...

EU Authorized Representative
Drive Medical LTD
Ainley’s Industrial Estate
Elland, West Yorkshire,
United Kingdom HX5 9JP
www.drivemedical.comwww.drivemedical.com
Rev.1.04.29.16
Suction Cup Grab Bar
Barra de Apoyo con Copas
de Succión
Barre D’appui Avec Ventouse
Item # RTL13083, RTL13085

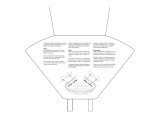
1. Check the vacuum suction discs and the surface it
is to be attached to.
2. Clean the surface thoroughly.
3. Press the rubber discs firmly to the surface. The
tilting vacuum levers must be loose at this point
and the whole of each rubber disc must lie on
the surface.
4. Ensure that the rubber discs are completely on the
tile area or other surfaces so that the discs do
not cover any grouting lines or other joints. The
discs should be positioned at least 1/2” away
from all grout lines or joints.
5. First, press down one tilting lever and then press
down the second. The resistance of the suction
pressure generated must be clearly felt. The
greater the resistance felt on the vacuum lever,
the better the suction power of the grab bar. The
indicator on the top of the suction cup will change
from RED to GREEN when a safe and secure hold
is achieved. If you use the bar regularly, then you
will get a feel for the vacuum strength and the
suction power generated.
Drive Medical Suction Grab Bars are convenient, func-
tional, and offered in a variety of sizes to fit any lifestyle.
They can be attached quickly and are just as easily
removed! The suction pads are specifically designed to
adhere to any smooth, non-porous surface without drill-
ing! Push down on the vacuum toggle lever and the
handles will remain securely in place.
CAUTION
Grab bar is to be used as a balance assist only. Not for
supporting body weight. Always make sure the grab bar
is securely attached before each use and always reat-
tach if loose.
Always test the holding grip on each surface each time
you apply the suction pad to prevent accidents.
Easily and securely attached without drilling.
Provides security and the convenience of mobility.
Won’t rust or corrode.
grab bar installation instructions
INCORRECT CORRECT
RTL13083
Rev.1.04.29.16
RTL13085

removal instructions
1. Release both latches.
2. Slide fingertip under rubber seal at each end to
release suction.
maintenance
1. Always keep the rubber suction discs clear of oil
and dust.
2. Clean the rubber discs with standard household
cleaning agents.
3. Never expose the rubber discs to sunlight for
prolonged periods of time otherwise they will
quickly lose their elasticity.
4. Check the rubber discs for possible deterioration.
If the suction cups show damage, then replace
immediately.
lifetime limited
warranty
Your Drive branded product is warrantied to be
free of defects in materials and workmanship for
the lifetime of the product for the original con-
sumer purchaser.
This device was built to exacting standards and
carefully inspected prior to shipment. This Lifetime
Limited Warranty is an expression of our confi-
dence in the materials and workmanship of our
products and our assurance to the consumer of
years of dependable service.
This warranty does not cover device failure
due to owner misuse or negligence, or normal
wear and tear. The warranty does not extend to
non-durable components, such as rubber
accessories, casters, and grips, which are subject
to normal wear and need periodic replacement.
If you have a question about your Drive device or
this warranty, please contact an authorized Drive
dealer.
© 2016 Medical Depot, Inc. All rights reserved.
Drive is a trademark of Medical Depot, Inc.
Port Washington N.Y. 11050 USA Made in China
6. Before each use, test the firm hold of the suction
device making sure both indicators are GREEN.
If the adhesion seems insufficient, then release
the rail and reattach again. If the required suction
power has not been achieved, the rail should not
be used.
SECURE REAFFIX
Rev.1.04.29.16
/