SUNCO 150W UFO High Bay User manual

Type
User manual

SUNCO 150W UFO High Bay offers a powerful, energy-efficient lighting solution for various indoor and outdoor applications. With its rugged construction and IP65 moisture rating, it is ideal for illuminating industrial facilities, warehouses, workshops, and other demanding environments. This versatile light fixture can be mounted using three different methods: hook mount with lifting ring, ceiling mount, and ½ NPT mount, providing flexibility in installation. The included safety cable ensures secure suspension, preventing accidental falls.

SUNCO 150W UFO High Bay offers a powerful, energy-efficient lighting solution for various indoor and outdoor applications. With its rugged construction and IP65 moisture rating, it is ideal for illuminating industrial facilities, warehouses, workshops, and other demanding environments. This versatile light fixture can be mounted using three different methods: hook mount with lifting ring, ceiling mount, and ½ NPT mount, providing flexibility in installation. The included safety cable ensures secure suspension, preventing accidental falls.

EASY INSTALLATION Hook Mount with Lifting Ring
1. Turn off circuit breaker/switch
before installing.
2. Drill a pilot hole.
3. Securely install hook or adequate
support in ceiling.
If using a chain, cut to correct size to
suspend fixture (chain and ceiling hook
not included).
4. Thread provided lifting ring into
fixture.
5. Screw-in set screw and tighten
firmly.
Required Tools: Drill, Ladder, Hammer, Pliers, Bolt Cutters (for chain install),
Wire Strippers, Tape Measure, Marker, Mounting Bracket (if needed)
Installation Manual
150W UFO HIGH BAY
EASY SET-UP INSTRUCTIONS
Select from 3 installation methods below (Hook Mount with Lifting Ring,
Ceiling Mount, ½ NPT Mount with/without bracket):
6. Hang fixture onto ceiling hook or
chain.
7. Secure light with included safety
cable to prevent it from falling.
• Loop end secures on hanging
hook. Clip end secures to precut
hole between fins on fixture.
8. Connect supply wires to UFO
High Bay wires with included wire
nuts.
Black to Black (Live)
• White to White (Neutral)
• Green to Green (Ground)
Optional: To utilize dimming feature, connect
compatible device (not included) to dimming
signal wires. Cap wires if not adding dimmer
device.
9. Turn on circuit breaker and test
light.
EASY INSTALLATION ½ NPT Pipe Mount
1. Turn off circuit breaker/switch
before installing.
2. Unscrew nuts on ½ NPT.
3. Screw mounting bracket (not
included) onto fixture.
4. Insert ½ NTP stem into
corresponding bracket holes.
5. After connecting NPT and bracket,
either:
a. Re-screw and tighten nuts (from
½ NPT) to secure.
OR
b. Screw pipe into drive hole of light
fixture.
6. Connect UFO High Bay and
supply wires using included wire
nuts.
Black to Black (Live)
• White to White (Neutral)
• Green to Green/ Bare Copper
(Ground)
Optional: To utilize dimming feature, connect
compatible device (not included) to dimming
signal wires. Cap wires if not adding dimmer
device.
7. Modify fixture position by
adjusting bracket screws.
8. Turn on circuit breaker and test
light.
100o
DIM- (Grey or Pink)
Black:ACL
Green
White:ACN
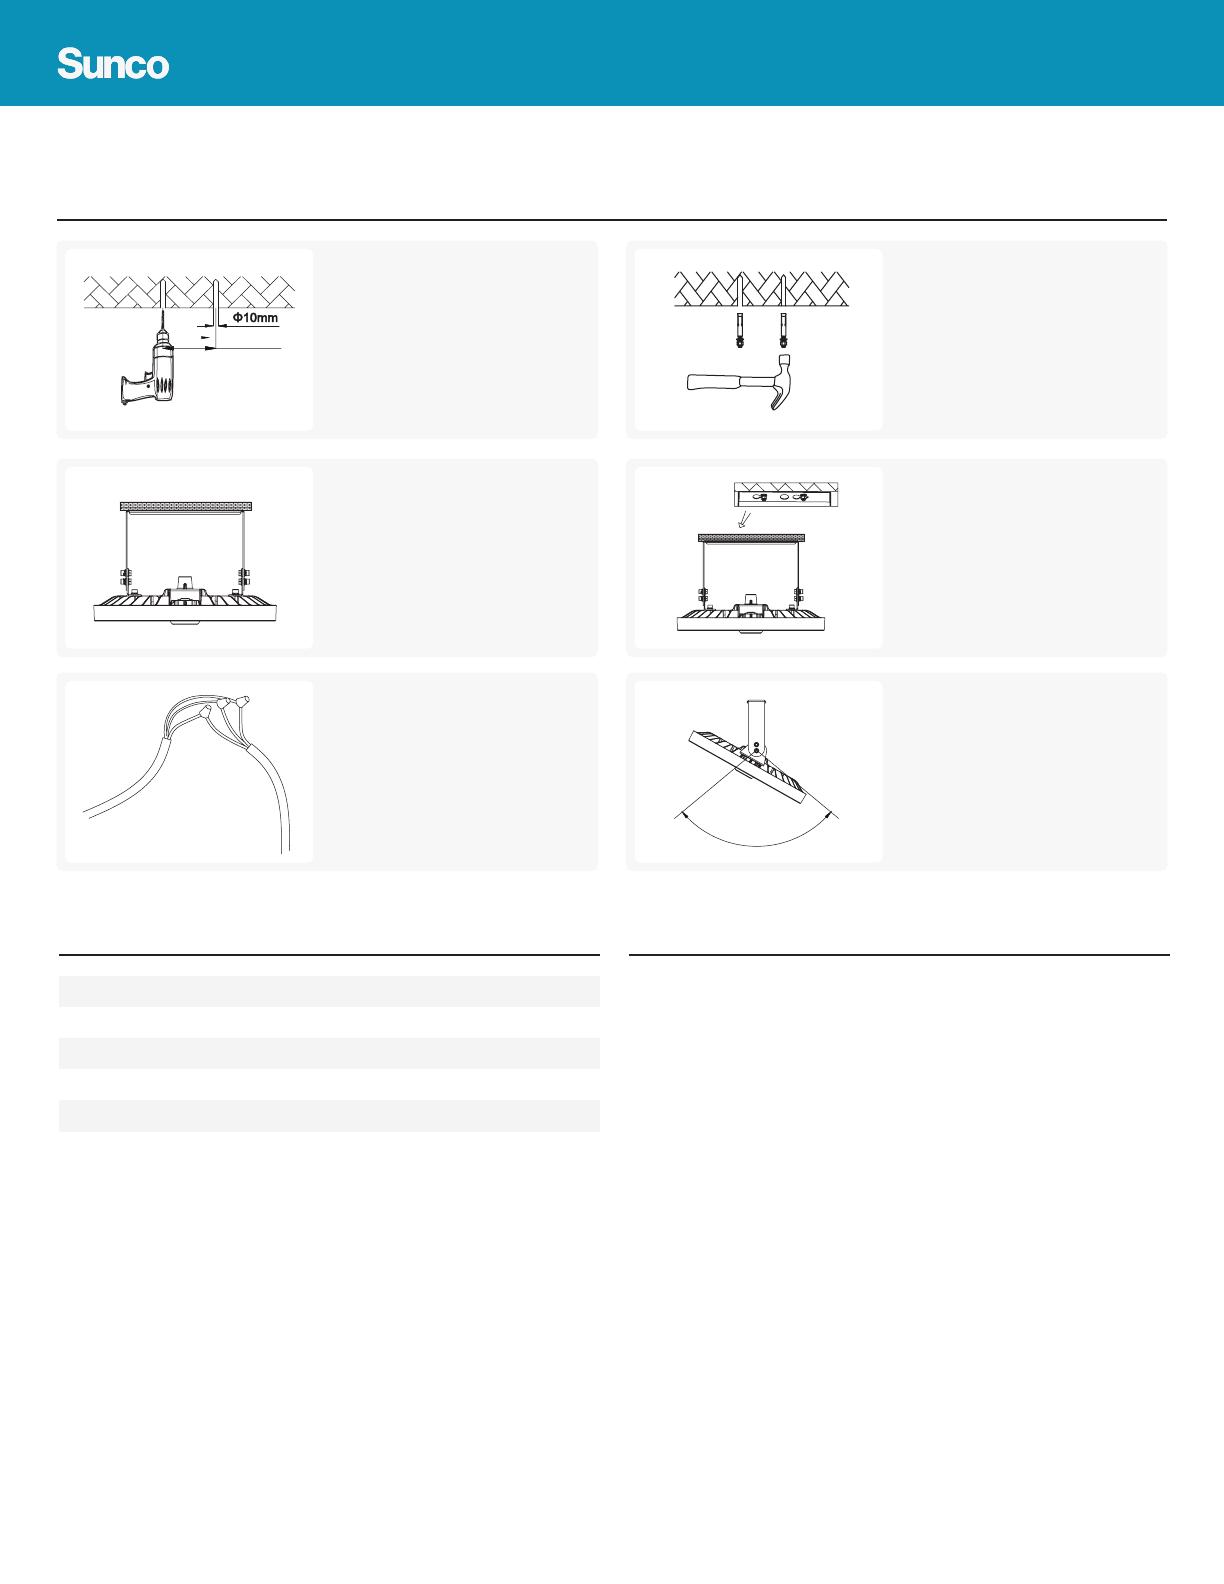
EASY INSTALLATION Ceiling Mount
1. Turn off circuit breaker/switch
before installing.
2. Use marker to label location of
fixture placement.
3. Drill holes into ceiling.
4. Hammer expansion anchors into
prepared holes.
5. Align bracket and fixture holes
with expansion anchors.
6. When holes are aligned, push
fixture up.
Slide to adjust.
7. Tighten fixture nuts.
8. Connect supplywires to UFO High
Bay wires with wire nuts.
Black to Black (Live)
• White to White (Neutral)
• Green to Green (Ground)
Optional: To utilize dimming feature, connect
compatible device (not included) to dimming
signal wires. Cap wires if not adding dimmer
device.
9. Modify fixture position by
adjusting bracket screws.
10. Turn on circuit breaker and test
light.
SPECIFICATIONS
Voltage
Warranty
150W
IP65
Aluminium Alloy
3.74
V
Years
Moisture Rating
Housing Material
Weight
Wattage
WARNING
To reduce the risk of fire, electric shock, or physical injury:
This product should be installed in accordance with regional and local laws or
regulations by a person familiar with the construction and operation of the product
and the hazards involved.
Check for shipping damage prior to installation. If the product is damaged, do not use
it.
Turn off the switch and circuit breaker before installing this light fixture.
Proper grounding is required to ensure safety.
Do not install directly over a heat source (stove, etc.).
This fixture should not be installed on a radiant heating ceiling or on the surface of
combustible material, nor should this light be covered by flammable material.
Please use listed waterproof strain relief bushing when connecting the supply cord
to the outlet box.
Use safety precautions. Safety eyeglasses and gloves are recommended.
FCC NOTES
This device complies with part 15 of the FCC Rules. Operation is subject to the following two conditions: (1) This device may not cause harmful interference,
and (2) this device must accept any interference received, including interference that may cause undesired operation.
Note: This equipment has been tested and found to comply with the limits for a Class B digital device, pursuant to part 15 of the FCC Rules. These limits are
designed to provide reasonable protection against harmful interference in a residential installation. This equipment generates, uses and can radiate radio
frequency energy and, if not installed and used in accordance with the instructions, may cause harmful interference to radio communications. However,
there is no guarantee that interference will not occur in a particular installation. If this equipment does cause harmful interference to radio or television
reception, which can be determined by turning the equipment off and on, the user is encouraged to try to correct the interference by one or more of the
following measures:
— Reorient or relocate the receiving antenna.
— Increase the separation between the equipment and receiver.
— Connect the equipment into an outlet on a circuit different from that to which the receiver is connected.
— Consult the dealer or an experienced radio/TV technician for help.
100mm100mm100mm
100o
Required Tools: Drill, Ladder, Hammer, Pliers, Bolt Cutters (for chain install),
Wire Strippers, Tape Measure, Marker, Mounting Bracket (if needed)
  • Page 1 1
  • Page 2 2

SUNCO 150W UFO High Bay User manual

Type
User manual

SUNCO 150W UFO High Bay offers a powerful, energy-efficient lighting solution for various indoor and outdoor applications. With its rugged construction and IP65 moisture rating, it is ideal for illuminating industrial facilities, warehouses, workshops, and other demanding environments. This versatile light fixture can be mounted using three different methods: hook mount with lifting ring, ceiling mount, and ½ NPT mount, providing flexibility in installation. The included safety cable ensures secure suspension, preventing accidental falls.

Ask a question and I''ll find the answer in the document

Finding information in a document is now easier with AI