Page is loading ...

Bedienungsanleitung
IR-Helikopter Gyro 2-Kanal RtF
Best.-Nr. 2115097 Seite 2 - 21
Operating Instructions
IR helicopter gyro 2-channel RtF
Item No. 2115097 Page 22 - 41

22
Table of Contents
Page
1. Introduction ........................................................................................................................................................23
2. Explanation of symbols ......................................................................................................................................23
3. Intended use ......................................................................................................................................................24
4. Delivery content .................................................................................................................................................24
5. Product description ............................................................................................................................................25
6. Safety Instructions .............................................................................................................................................26
a) General information .....................................................................................................................................26
b) Before ¿rst use ............................................................................................................................................27
c) During use ...................................................................................................................................................27
7. Battery information .............................................................................................................................................28
8. Remote control buttons ......................................................................................................................................29
9. Using the transmitter ..........................................................................................................................................30
a) Inserting the batteries ..................................................................................................................................30
b) Switching on the transmitter ........................................................................................................................31
c) Operation of the IR transmitter ....................................................................................................................31
10. Setting up the model helicopter .........................................................................................................................32
a) Charging the helicopter rechargeable battery .............................................................................................32
b) Checking the rotor blade holders .................................................................................................................34
c) Checking the centrifugal weight rod ............................................................................................................34
d) Switching on the helicopter ..........................................................................................................................35
e) Basic information on controlling model helicopters .....................................................................................35
f) Practical Àight tips for the ¿rst start ..............................................................................................................37
g) Starting the model helicopter .......................................................................................................................37
h) Trimming the helicopter ...............................................................................................................................38
i) Landing the helicopter ................................................................................................................................38
11. Maintenance and cleaning .................................................................................................................................39
12. Troubleshooting .................................................................................................................................................40
13. Disposal .............................................................................................................................................................41
a) Product ........................................................................................................................................................41
b) Battery information ......................................................................................................................................41
14. Technical data ....................................................................................................................................................41
a) Transmitter...................................................................................................................................................41
b) Helicopter ....................................................................................................................................................41

23
1. Introduction
Dear customer,
Thank you for purchasing this product.
This product meets the requirements of current European and national guidelines.
To ensure that the product remains in this state and to guarantee safe operation, always follow the instructions in this
manual.
These operating instructions are part of this product. They contain important notes on commissioning and
handling. Do not give this product to a third party without the operating instructions. Therefore, retain these
operating instructions for reference!
All company and product names are trademarks of their respective owners. All rights reserved.
If there are any technical questions, please contact: www.conrad.com/contact
2. Explanation of symbols
The symbol with an exclamation mark in a triangle is used to highlight important information in these oper-
ating instructions. Always read this information carefully.
The arrow symbol indicates special information and tips on how to use the product.

24
3. Intended use
This product is an electrically powered model helicopter that is wirelessly controlled via infrared signals using the
included remote control. The model helicopter is intended exclusively for private use in the model making sector with
the associated operation times.
The model is intended for indoor use.
It is not suitable for other purposes. Using this product for any purposes other than those described above may dam-
age the product and result in a short circuit, ¿re, electric shock or other hazards.
The product must not become damp or wet.
This product is not suitable for children under 14 years of age.
Always follow the safety information in these operating instructions. It contains important information on
how to use the product safely.
You are responsible for the safe operation of this model!
4. Delivery content
Pre-assembled electric helicopter
Infrared remote control transmitter
USB charging cable
Operating instructions
1Up-to-date operating instructions
Download the up-to-date operating instructions at www.conrad.com/downloads or scan the QR
code shown. Follow the instructions on the website.

25
5. Product description
The pre-assembled IR twin-rotor electric helicopter has two counter-rotating main rotors. Thus, no torque is generated
around the vertical axis and the model reaches lateral stabilisation without a functional tail rotor. The upper main rotor
has rotor blades with a ¿xed angle of attack and a hinged joint that is stabilised by a rotating centrifugal weight rod.
The lower rotor also has a ¿xed angle of attack and is not hinged or stabilised.
The model is lifted and lowered by changing the speed of both main rotors at the same time. The model is steered
around the vertical axis (rotor shaft) by changing the speed of one of the two main rotors.
In addition, the helicopter has a tail boom with a horizontal rear propeller. However, the propeller is not driven in this
model, so that the tail boom serves merely to improve appearance.
A built-in stabilisation system (gyro) ensures that the tail does not swing to one side.
To operate the model, 4 AA/Mignon batteries are required (not included and must be ordered separately).
Please use batteries only instead of rechargeable batteries for operating the IR transmitter.

26
6. Safety Instructions
Damage caused due to failure to observe these instructions will void the warranty. We do not as-
sume any liability for any resulting damage!
We shall not be liable for damage to property or personal injury caused by incorrect handling or
failure to observe the safety information! Such cases will void the warranty/guarantee.
Normal wear and tear during operation (e.g. worn-out gear wheels) and accidental damage (e.g. broken
stand or rotor blades) are excluded from the guarantee and warranty.
Dear customer, these safety instructions are designed to ensure the safe operation of the product and your
personal safety. Read this section very carefully before using the product.
a) General information
Caution, safety hazard!
This model has the potential to cause damage to property and/or individuals. Ensure that you are
sufÀciently insured, e.g. by taking out private liability insurance.
If you already have a policy, check with your insurance company that operation of this model is
covered by the policy.
Important: In some EU countries, you are required to have insurance when using a model aircraft.
Familiarise yourself with the local statutory regulations for operating model aircraft. In Germany,
for example, the regulations for model aircraft are stipulated in the German Air TrafÀc Act. Any
breaches of the statutory regulations could lead to severe penalties as well as restrictions to your
insurance cover.
The unauthorised conversion and/or modi¿cation of the product is prohibited for safety and approval
reasons.
This product is not a toy and is not suitable for children under 14 years of age.
The product must not get damp or wet.
If you do not have suf¿cient knowledge of how to operate remote-controlled models, contact an experi-
enced model user or a model club.
Do not leave packaging material carelessly lying around, it could become a dangerous toy for children.
If you have any questions that are not answered by these operating instructions, contact us (see section
1 for contact information) or an experienced technician.
The operation and use of remote control model helicopters has to be learned! If you have never operated
a model of this kind, start with particular care and get used to the reactions of the model to the remote
control commands ¿rst. Be patient!

27
b) Before Àrst use
Select a suitable location to Ày your model.
When switching on the helicopter, follow the procedure described below in a separate chapter. This en-
sures that the transmitter and receiver connect properly and that your model responds reliably to remote
control commands from your transmitter.
Make sure there are no other operational infrared transmitters such as wireless headphones within the
range of the remote control. Always check if simultaneously operated IR transmitters do not interfere with
your model.
Conduct regular checks to verify that the model and remote control are safe to use. Inspect the parts
for any signs of damage, such as broken connectors or damaged cables. All moving parts on the model
should move freely, but there must be not any slackness in the bearing.
The Àight battery required for operation, which is ¿rmly installed in the model helicopter, must be charged
before operation. Ensure that the batteries in the transmitter have a suf¿cient remaining capacity (trans-
mitter indication). If the batteries are empty, replace all of them at the same time. Never replace individual
batteries.
c) During use
Do not take any risks when using the product! Always use the model responsibly, otherwise you may
endanger yourself and your surroundings.
Improper use can cause serious injury and damage to property! Ensure that you maintain a suf¿cient
distance from people, animals and objects.
Never try to grab the Àying model with your hand.
Only Ày the model when you are fully alert and able to respond. Fatigue, alcohol and medication can affect
your ability to respond.
Arti¿cial light sources or strong sunlight can interfere with the transmission of IR control signals and
signi¿cantly reduce the remote control range (normally approx. 10 – 15 m).
Motors, motor controllers and the rechargeable battery can become hot during operation. For this reason,
take a break of 5 to 10 minutes before charging the rechargeable battery.
Always leave the remote control (IR-transmitter) switched on when the model is in use. After landing,
always switch off the helicopter ¿rst before you switch off the remote control.
Never switch the remote control off when the helicopter is switched on.
Do not expose the model or the remote control to direct sunlight or excessive heat for prolonged periods.

28
7. Battery information
Batteries present numerous safety hazards.
Therefore, always observe the following general information and safety instructions when handling
non-rechargeable and rechargeable batteries.
Keep batteries out of reach of children.
Do not leave batteries lying around, as they present a choking hazard for children and pets. Seek immedi-
ate medical advice if a battery is swallowed.
Batteries/rechargeable batteries must never be short-circuited, taken apart or thrown into ¿re. This may
cause an explosion!
When handling leaking or damaged batteries, always use suitable protective gloves to avoid burning
your skin.
Do not recharge normal batteries. This may cause a ¿re or explosion! Only recharge compatible recharge-
able batteries and ensure that you use a suitable battery charger. Batteries (1.5 V) are meant to be used
once only and must be properly disposed of when empty.
Always ensure that the batteries are inserted and connected to the charger in the correct polarity (observe
the plus/+ and minus/- symbols). Inserting the batteries in the wrong polarity may damage the remote
control, the helicopter and the batteries. iIt may also cause a ¿re or explosion.
Always exchange the entire set of batteries. Do not mix full batteries with half-full batteries. Always use
batteries of the same type and from the same manufacturer.
Never mix non-rechargeable batteries with rechargeable batteries. Always use disposable batteries to
power the remote control.
If you do not plan to use the model for an extended period (e.g. during storage), remove the batteries from
the remote control to prevent them from leaking and causing damage.
Switch off the helicopter after Àight. Do not leave the helicopter switched on when it is not in use (e.g.
during transport or storage). Otherwise, the Àight battery can be fully discharged and thus destroyed/
unusable!
Never charge the helicopter rechargeable battery immediately after use. Always leave the helicopter bat-
tery to cool down until it has reached room/ambient temperature.
Only charge intact and undamaged batteries. Do not charge the rechargeable battery if the external
insulation of the rechargeable battery is damaged, or if the rechargeable battery is deformed or swollen.
In this case there is serious danger of ¿re and explosion!
Never damage the external casing of the helicopter rechargeable battery. Do not tear the ¿lm cover or
prick the helicopter rechargeable battery with sharp objects. This may cause a ¿re or explosion!
Never recharge the Àight battery in the helicopter unattended.
Disconnect the helicopter from the charger (remote control transmitter/USB cable) when it is fully charged.

29
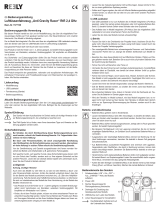
8. Remote control buttons
1. IR transmitter diodes
2. On/off button
3. Button for trimming to the left
4. Joystick for the tail function
5. Button for trimming to the right
6. LED Indicator Light
7. Charging cable cover
8. Lever for altitude function
Figure 1

30
9. Using the transmitter
The numbers used in these instructions refer to the ¿gure alongside the text or the illustrations within the
respective section. Cross-references to other ¿gures are indicated with the corresponding ¿gure number.
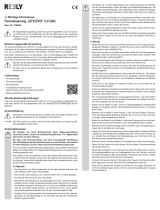
a) Inserting the batteries
The transmitter is supplied by 4 AA/Mignon batteries. To insert the batteries, proceed as follows:
Loosen the retaining screw (1) on the battery compart-
ment cover on the back of the transmitter. Then push
down on the locking lever (2) and lift off the battery com-
partment cover (3).
Insert the batteries according to the instructions on the
battery compartment (4), observing the correct polarity.
Replace the battery compartment cover with the lower
edge ¿rst and press it ¿rmly at the top until the locking
lever engages.
Then re-tighten the retaining screw.
Figure 2

31
b) Switching on the transmitter
First, move the joystick for the pitch function (8) to the low-
est position.
Then press the on/off button (2). The LED indicator light on
the transmitter (6) will Àash slowly.
Now move the joystick for the pitch function (8) to the up-
permost position. The LED indicator light on the transmit-
ter (6) will now Àash faster.
Now move the joystick for the pitch function (8) back to the
lowest position. The LED indicator light on the transmitter
(6) will now glow steadily.
To switch off the transmitter again, press the on/off button
again.
Attention!
If the LED indicator light on the transmitter starts to Àash during operation or the charging process of the
helicopter rechargeable battery via the transmitter takes a disproportionately long time, you must replace
the inserted batteries with new ones.
c) Operation of the IR transmitter
Hold the IR transmitter in both hands and use your thumbs to operate the two joysticks (see Fig. 1, no. 4 and 8). It is
important that you always “aim” towards the model with the IR transmitter diodes (see Fig. 1, no. 1) in order to obtain
an optimal signal transmission.
Figure 3

32
10. Setting up the model helicopter
a) Charging the helicopter rechargeable battery
The built-in helicopter rechargeable battery can be charged either via the transmitter or via the supplied USB cable.
The charging time is approx. 30 to 45 minutes depending on the amount of residual charge of the helicopter recharge-
able battery.
Charging via transmitter:
While charging, the transmitter must be switched off. The
on/off switch on the underside of the model helicopter (1)
must be in the upper position (OFF).
Slide the charging cable compartment cover (2) down
slightly and Àip the cover open.
Remove the charging plug (3) and pull out the charging
cable (4) to the required length.
Insert the charging plug into the charging socket of the
helicopter (5). The charging socket is located on the un-
derside of the helicopter just next to the on/off switch (1).
A red LED (6) lights up inside the model helicopter, which
signals the charging process.
Once the helicopter rechargeable battery is fully charged,
the charging control LED on the model helicopter will go
out.
After charging, the charging plug must be disconnected
from the helicopter. Slide the charging cable back into the
transmitter and close the charging cable compartment
cover.
If you want to charge the helicopter recharge-
able battery via the transmitter, be sure not to
insert NiMH or NiCd rechargeable batteries into
the transmitter.
The helicopter rechargeable battery cannot be
charged properly due to the too low transmit-
ter voltage (batteries = 1.5 V/cell, rechargeable
batteries = 1.2 V/cell)!
Figure 4

33
Charging via USB cable:
In order not to overload the batteries in the transmitter un-
necessarily, you may use the included USB cable (1) to
charge the helicopter rechargeable battery.
Charging is carried out in the same way as when charging
via the remote control transmitter, except that now a USB
socket of a personal computer/laptop or a USB plug-in
charger or a USB hub (2) serves as the voltage source (all
of them are not included).
Important!
The USB port output current must be at least
500 mA.
Do not connect the USB cable to a USB hub
without its own power supply (for example, a
USB port on a keyboard or the like), because
the charging current will be insuf¿cient in this
case.
The operating system will not recognise any new hardware when the charging cable is connected, as the USB port
is only used to charge the rechargeable helicopter battery. Please note that the USB ports on computers/laptop are
normally only active when the computer/laptop is turned on.
We therefore recommend that you only connect the charging cable to a computer/laptop that is switched on.
Important!
Only use the included charging cable to charge the helicopter rechargeable battery in the model helicopter.
Never attempt to charge the rechargeable battery with a different/incompatible charger!
Never charge the helicopter rechargeable battery when the product is unattended!
Figure 5

34
b) Checking the rotor blade holders
To allow the four main rotor blades (1) to automatically
orient themselves at a 180° angle to each other during
Àight, the blade retainer screws (2) reaching into the blade
retainers from below must not be tightened too ¿rmly.
If you tilt the model helicopter 90° to the side, the ro-
tor blades must be able to fold down by themselves, as
shown in Fig. 6 above.
Warning!
Do not loosen the fastening screws too much;
if you do, the tracking of the rotor blades will no
longer correspond, and the blade tips will run at
different heights.
Caution!
Use a suitable screwdriver to tighten the
screws and make sure that you do not use too
much force. The threads or the screw material
may be damaged otherwise.
c) Checking the centrifugal weight rod
The centrifugal weight rod (1) must be easily movable, just
like the main rotor blades.
Move the centrifugal weight rod up and down by hand on
one side (see arrows in Fig. 7), and check that the ball
joints (2) can move freely.
The mechanical parts should move freely, but there must
not be any slackness in the bearing.
Figure 6
Figure 7

35
d) Switching on the helicopter
To operate the helicopter, make sure that the batteries in the transmitter have suf¿cient remaining capacity and the
helicopter rechargeable battery in the model is charged.
Move the joystick for the pitch function (see Fig. 1, no. 8)
to the lowest position and press the on/off button (see Fig.
1, no. 2). The red LED on the transmitter will Àash slowly.
Then slide the model helicopter on/off switch (see Fig.
4 above) from the OFF position to the ON position. The
front-facing LED of the model helicopter will go on.
Then place the helicopter on a Àat start surface. The heli-
copter tail should point to you.
Now move the joystick for the pitch function (see Fig. 1,
no. 8) all the way up and back to the lowest position. The
transmitter LED will now glow steadily.
The helicopter is now ready to start.
Important!
Read the following information carefully before Àying the helicopter.
e) Basic information on controlling model helicopters
Before you Ày your model, you should ¿rst familiarise yourself with the control possibilities in order to operate it safely.
The indoor helicopter is controlled with the aid of the two control sticks on the transmitter. The following functions are
available:
Figure 8

36
Pitch function
The altitude function enables you to control the altitude of the helicopter (see Fig. 9). For control, the left control lever
(also see Fig. 1, no. 8) is used. To do this, you can move the joystick from the lower position to the top. As the angles
of attack cannot be changed, the altitude is changed by adjusting the speed of both rotors.
If the control lever is in the lower position, the motors and the rotors stop. If you push the joystick up slowly, the two
rotors will start to rotate and their speed will increase depending on the joystick position. If the middle position of the
joystick has been reached, the speed of the rotors should be high enough for the helicopter to hover at a constant
Àight altitude.
Figure 9
Tail function
The helicopter is equipped with two counter-rotating rotors, therefore there is no torque around the vertical axis (rotor
shaft). The helicopter therefore needs no functional tail rotor for torque balance. To steer the model around the vertical
axis (rotor shaft), the two main rotors rotate at slightly different speeds. The model rotates either to the left or to the
right depending on which of the two main rotors rotates faster or slower (see Fig. 10).
Use the right joystick to control the tail function (see also Fig. 1, no. 4). If the stick is steered slightly towards the
left, the tip of the fuselage turns towards the left. If you steer towards the right, the tip of the fuselage turns likewise
towards the right.
Figure 10

37
f) Practical Áight tips for the Àrst start
Although the model can be Àown in a very con¿ned space, we recommend using an unobstructed space of approx.
3 x 3 m for the ¿rst Àight attempts.
The surface should be smooth (tiles, parquet, etc.), so that you can see just before taking off whether the model wants
to rotate in a particular direction.
Position yourself directly behind the helicopter. This ensures that the model reacts to remote control commands (right,
left, forwards and backwards) exactly as you see them. However, if you face the cockpit of your model, in the lateral
control mode the model will respond from your perspective exactly the opposite as you steer the transmitter.
Important!
If the rotors hit any objects and become blocked or if the model overturns, turn off the rotor drive motors
immediately. To do this, immediately move the joystick for the pitch function to the lowest position.
If the model is stable during the Àight, do not move the joystick for the pitch function abruptly to the lowest position. In
this case, the helicopter would fall to the ground without propulsion and thus possibly sustain damage.
Never try to grab the Àying helicopter with your hand. There is a high risk of injury!
To prevent the helicopter battery from deep discharging, land the helicopter when the LED on the helicopter starts
to Àash.
Allow the helicopter rechargeable battery in the model helicopter suf¿cient time to cool down before recharging the
rechargeable battery.
g) Starting the model helicopter
Standing behind the ready-to-start model helicopter, push the joystick for the pitch function (see Fig. 1, no. 8) slowly
and sensitively from the lowest position to the top.
When the rotors start up, quickly move the joystick for the pitch function to the middle position.
The model helicopter will then take off and, if correctly adjusted, go into straight forward Àight. The model helicopter
will change its Àight altitude depending on the position of the joystick for the pitch function (see also Fig. 9).
Use the joystick for the tail function (see Fig. 1, no. 4) to specify the Àight direction and thus perform the desired
curves and circles.
Practical tips:
The model helicopter is factory set a little bit top heavy. Therefore, it goes into the slow forward Àight auto-
matically after takeoff. Thus, the two channels are absolutely suf¿cient for control.
The forward Àight speed can be customised by attaching small weights to the tip of the fuselage or tail.

38
h) Trimming the helicopter
If the helicopter keeps turning to one side, you can trim the controls accordingly.
If the helicopter wants to turn to the right with the tip of the fuselage, press and hold down the button for trimming to
the left (see also Fig. 1, no. 3). Keep the button pressed until the model no longer has a tendency to turn to the right.
If the tip of the fuselage turns to the left, be sure to perform a trim correction using the button for trimming to the right
(see also Fig. 1, no. 5).
Figure 11
i) Landing the helicopter
If the joystick for the pitch function needs to be pushed further forward all the time to hold the helicopter at the desired
Àight altitude, this is an indication that the helicopter rechargeable battery is running low. At the latest when the front-
facing LED on the helicopter starts to Àash, be sure to land the model to prevent deep discharge of the helicopter
rechargeable battery.
To land the model helicopter, use the joystick for the pitch function to sensitively reduce the Àight altitude (see also
Fig. 1, no. 8). Since the model is always in forward Àight, you should choose the takeoff site so that you have enough
room for manoeuvre.
Once the model touches the ground, slide the joystick for the pitch function to the lowest position to turn off the rotors.

39
11. Maintenance and cleaning
Clean the exterior of the model and the remote control with a soft, dry cloth or brush. Never use abrasive cleaning
agents or chemical solutions, as these may damage the surface of the case.
Replacing the rotor blades
The rotor blades may be damaged if they hit an object when they are rotating. If this occurs, the defective rotor blades
must be replaced.
Warning!
Do not Ày the helicopter if the rotor blades are damaged, as this may result in vibrations that cause further
damage to the model.
Ensure that the main rotor blades are inserted in the correct orientation.
The rotor blades of the upper rotor (1) rotate clockwise as
viewed from above and the rotor blades of the lower rotor
(2) rotate counter-clockwise.
Do not overtighten the screws on the rotor blade holders.
(see also Fig. 6)
Important!
When replacing mechanical parts, always
purchase genuine replacement parts from the
manufacturer.
The spare parts list can be found on our website in the
download area for the respective product.
Figure 12

40
12. Troubleshooting
This model and the remote control were built using the latest technology. However, faults and malfunction may still
occur. The following section shows you how to troubleshoot potential problems.
Problem Solution
The remote control doesn't respond. Check the non-rechargeable batteries in the transmitter.
Check the polarity of the batteries in the remote control.
The brightness of LED indicator has decreased. Check or replace the batteries in the remote control.
The charging control LED on the model goes out
quickly.
The helicopter rechargeable battery is already charged.
The batteries in the transmitter are too weak.
The rotors do not start. Check the helicopter rechargeable battery charge level.
Check that the mechanical parts can move freely.
Repeat the power on procedure
The helicopter does not take off. Check the helicopter rechargeable battery charge level.
Check that the mechanical drive parts can move freely.
The rotor blades are faulty.
The helicopter doesn’t respond to the remote
control.
Interferences due to direct sunlight, strong light sources or
other IR transmitters such as wireless IR headphones.
The helicopter rotates about the vertical axis (ro-
tor shaft).
Trim the model (see Fig. 11).
Repeat the power on procedure and ensure that you do not
move or rotate the helicopter.
Check that the mechanical drive parts can move freely.
The model always drifts in one direction. Unfavourable Àight conditions due to draught or wind.
The Àight time is too short. Recharge the helicopter battery.
The helicopter battery is faulty.
The mechanical parts cannot move freely.
The rotor blades are faulty.
If the helicopter is charged via the transmitter, be sure to
insert only batteries into the transmitter and do no insert re-
chargeable batteries.
/