Danfoss VLT AutomationDrive FC 301 Programming Guide

Type
Programming Guide
Contents
1. Introduction
3
Approvals 3
Symbols 3
Abbreviations 4
Definitions 4
2. How to Programme
11
The Graphical and Numerical Local Control Panels 11
How to Programme on the Graphical LCP 11
The LCD-Display 12
Quick Transfer of Parameter Settings between Multiple Frequency Converters 14
Display Mode 16
Display Mode - Selection of Read-Outs 16
Parameter Set-Up 17
Quick Menu Key Functions 17
Main Menu Mode 20
Parameter Selection
20
Changing Data 20
Changing a Text Value 20
Changing a Group of Numeric Data Values 21
Infinitely Variable Change of Numeric Data Value 21
Changing a Data Value,Step-by-Step 22
Read-out and Programming of Indexed Parameters 22
How to Programme on the Numerical Local Control Panel 23
Local Control Keys 24
Initialisation to Default Settings 25
Parameters: Operation and Display 27
Parameters: Load and Motor 42
Parameters: Brakes 63
Parameters: Reference/Ramps 70
Parameters: Limits/Warnings 86
Parameters: Digital In/Out 94
Parameters: Analog In/Out 112
Parameters: Controllers 121
Parameters: Communications and Options 127
Parameters: Profibus 134
Parameters: DeviceNet CAN Fieldbus 145
Parameters: Smart Logic Control 153
Parameters: Special Functions 171
FC 300 Programming Guide Contents
MG.33.M2.02 - VLT
®
is a registered Danfoss trademark
1
Parameters: Drive Information 181
Parameters: Data Read-outs 190
Parameters: Encoder Input 198
Parameter Lists 202
Index
229
Contents FC 300 Programming Guide
2
MG.33.M2.02 - VLT
®
is a registered Danfoss trademark
1. Introduction
1.1.1. Approvals
1.1.2. Symbols
Symbols used in this guide.
NB!
Indicates something to be noted by the reader.
Indicates a general warning.
Indicates a high-voltage warning.
* Indicates default setting
FC 300 Programming Guide 1. Introduction
MG.33.M2.02 - VLT
®
is a registered Danfoss trademark
3
1
1.1.3. Abbreviations
Alternating current AC
American wire gauge AWG
Ampere/AMP A
Automatic Motor Adaptation AMA
Current limit I
LIM
Degrees Celsius °C
Direct current DC
Drive Dependent D-TYPE
Electro Magnetic Compatibility EMC
Electronic Thermal Relay ETR
drive FC
Gram g
Hertz Hz
Kilohertz kHz
Local Control Panel LCP
Meter m
Millihenry Inductance mH
Milliampere mA
Millisecond ms
Minute min
Motion Control Tool MCT
Nanofarad nF
Newton Meters Nm
Nominal motor current I
M,N
Nominal motor frequency f
M,N
Nominal motor power P
M,N
Nominal motor voltage U
M,N
Parameter par.
Protective Extra Low Voltage PELV
Printed Circuit Board PCB
Rated Inverter Output Current I
INV
Revolutions Per Minute RPM
Second s
Torque limit T
LIM
Volts V
1.1.4. Definitions
Drive:
D-TYPE
Size and type of the connected drive (dependencies).
I
VLT,MAX
The maximum output current.
I
VLT,N
The rated output current supplied by the frequency converter.
U
VLT, MAX
The maximum output voltage.
Input:
Control command
You can start and stop the connected motor
by means of LCP and the digital inputs.
Functions are divided into two groups.
Functions in group 1 have higher priority than
functions in group 2.
Group 1 Reset, Coasting stop, Reset
and Coasting stop, Quick-stop,
DC braking, Stop and the "Off"
key.
Group 2 Start, Pulse start, Reversing,
Start reversing, Jog and
Freeze output
1. Introduction FC 300 Programming Guide
4
MG.33.M2.02 - VLT
®
is a registered Danfoss trademark
1
Motor:
f
JOG
The motor frequency when the jog function is activated (via digital terminals).
f
M
The motor frequency.
f
MAX
The maximum motor frequency.
f
MIN
The minimum motor frequency.
f
M,N
The rated motor frequency (nameplate data).
I
M
The motor current.
I
M,N
The rated motor current (nameplate data).
M-TYPE
Size and type of the connected motor (dependencies).
n
M,N
The rated motor speed (nameplate data).
P
M,N
The rated motor power (nameplate data).
T
M,N
The rated torque (motor).
U
M
The instantaneous motor voltage.
U
M,N
The rated motor voltage (nameplate data).
Break-away torque
FC 300 Programming Guide 1. Introduction
MG.33.M2.02 - VLT
®
is a registered Danfoss trademark
5
1
η
VLT
The efficiency of the frequency converter is defined as the ratio between the power output and
the power input.
Start-disable command
A stop command belonging to the group 1 control commands - see this group.
Stop command
See Control commands.
References:
Analog Reference
A signal transmitted to the analog inputs 53 or 54, can be voltage or current.
Binary Reference
A signal transmitted to the serial communication port.
Preset Reference
A defined preset reference to be set from -100% to +100% of the reference range. Selection of
eight preset references via the digital terminals.
Pulse Reference
A pulse frequency signal transmitted to the digital inputs (terminal 29 or 33).
Ref
MAX
Determines the relationship between the reference input at 100% full scale value (typically 10 V,
20mA) and the resulting reference. The maximum reference value set in par. 3-03.
Ref
MIN
Determines the relationship between the reference input at 0% value (typically 0V, 0mA, 4mA)
and the resulting reference. The minimum reference value set in par. 3-02.
Miscellaneous:
Analog Inputs
The analog inputs are used for controlling various functions of the frequency converter.
There are two types of analog inputs:
Current input, 0-20 mA and 4-20 mA
Voltage input, 0-10 V DC (FC 301)
Voltage input, -10 - +10 V DC (FC 302).
Analog Outputs
The analog outputs can supply a signal of 0-20 mA, 4-20 mA, or a digital signal.
Automatic Motor Adaptation, AMA
AMA algorithm determines the electrical parameters for the connected motor at standstill.
Brake Resistor
The brake resistor is a module capable of absorbing the brake power generated in regenerative
braking. This regenerative braking power increases the intermediate circuit voltage and a brake
chopper ensures that the power is transmitted to the brake resistor.
CT Characteristics
Constant torque characteristics used for all applications such as conveyor belts, displacement
pumps and cranes.
1. Introduction FC 300 Programming Guide
6
MG.33.M2.02 - VLT
®
is a registered Danfoss trademark
1
Digital Inputs
The digital inputs can be used for controlling various functions of the frequency converter.
Digital Outputs
The drive features two Solid State outputs that can supply a 24 V DC (max. 40 mA) signal.
DSP
Digital Signal Processor.
ETR
Electronic Thermal Relay is a thermal load calculation based on present load and time. Its purpose
is to estimate the motor temperature.
Hiperface
®
Hiperface
®
is a registered trademark by Stegmann.
Initialising
If initialising is carried out (par. 14-22), the frequency converter returns to the default setting.
Intermittent Duty C ycle
An intermittent duty rating refers to a sequence of duty cycles. Each cycle consists of an on-load
and an off-load period. The operation can be either periodic duty or non-periodic duty.
LCP
The Local Control Panel (LCP) makes up a complete interface for control and programming of the
FC 300 Series. The control panel is detachable and can be installed up to 3 metres from the
frequency converter, i.e. in a front panel by means of the installation kit option.
lsb
Least significant bit.
msb
Most significant bit.
MCM
Short for Mille Circular Mil, an American measuring unit for cable cross-section. 1 MCM = 0.5067
mm
2
.
On-line/Off-line Parameters
Changes to on-line parameters are activated immediately after the data value is changed. Changes
to off-line parameters are not activated until you enter [OK] on the LCP.
Process PID
The PID regulator maintains the desired speed, pressure, temperature, etc. by adjusting the out-
put frequency to match the varying load.
Pulse Input/Incremental Encoder
An external, digital pulse transmitter used for feeding back information on motor speed. The en-
coder is used in applications where great accuracy in speed control is required.
RCD
Residual Current Device.
FC 300 Programming Guide 1. Introduction
MG.33.M2.02 - VLT
®
is a registered Danfoss trademark
7
1
Set-up
You can save parameter settings in four Set-ups. Change between the four parameter Set-ups
and edit one Set-up, while another Set-up is active.
SFAVM
Switching pattern called
Stator Flux oriented Asynchronous Vector Modulation (par. 14-00).
Slip Compensation
The frequency converter compensates for the motor slip by giving the frequency a supplement
that follows the measured motor load keeping the motor speed almost constant..
Smart Logic Control (SLC)
The SLC is a sequence of user defined actions executed when the associated user defined events
are evaluated as true by the SLC. (Parameter group 13-xx).
FC Standard Bus
Includes RS 485 bus with FC protocol or MC protocol. See parameter 8-30.
Thermistor:
A temperature-dependent resistor placed where the temperature is to be monitored (frequency
converter or motor).
Trip
A state entered in fault situations, e.g. if the frequency converter is subject to an over-temperature
or when the frequency converter is protecting the motor, process or mechanism. Restart is pre-
vented until the cause of the fault has disappeared and the trip state is cancelled by activating
reset or, in some cases, by being programmed to reset automatically. Trip may not be used for
personal safety.
Trip Locked
A state entered in fault situations when the frequency converter is protecting itself and requiring
physical intervention, e.g. if the frequency converter is subject to a short circuit on the output. A
locked trip can only be cancelled by cutting off mains, removing the cause of the fault, and re-
connecting the frequency converter. Restart is prevented until the trip state is cancelled by
activating reset or, in some cases, by being programmed to reset automatically. Trip may not be
used for personal safety.
VT Characteristics
Variable torque characteristics used for pumps and fans.
VVCplus
If compared with standard voltage/frequency ratio control, Voltage Vector Control (VVC
plus
) im-
proves the dynamics and the stability, both when the speed reference is changed and in relation
to the load torque.
60° AVM
Switching pattern called 60°
Asynchronous Vector Modulation (par. 14-00).
Power Factor
The power factor is the relation between I
1
and I
RMS
.
Power factor
=
3
xU xI
1
xcos
ϕ
3
xU xI
RMS
The power factor for 3-phase control:
=
I
1
xcos
ϕ1
I
RMS
=
I
1
I
RMS
since cos
ϕ1=1
1. Introduction FC 300 Programming Guide
8
MG.33.M2.02 - VLT
®
is a registered Danfoss trademark
1
The power factor indicates to which extent the
frequency converter imposes a load on the
mains supply.
The lower the power factor, the higher the
I
RMS
for the same kW performance.
I
RMS
=
I
1
2
+
I
5
2
+
I
7
2
+.. +
I
n
2
In addition, a high power factor indicates that the different harmonic currents are low.
The FC 300 frequency converters' built-in DC coils produce a high power factor, which minimizes
the imposed load on the mains supply.
The voltage of the frequency converter is dangerous whenever connected to mains.
Incorrect installation of the motor, frequency converter or fieldbus may cause dam-
age to the equipment, serious personal injury or death. Consequently, the instruc-
tions in this manual, as well as national and local rules and safety regulations, must
be complied with.
Safety Regulations
1. The frequency converter must be disconnected from mains if repair work is to be carried
out. Check that the mains supply has been disconnected and that the necessary time has
passed before removing motor and mains plugs.
2. The [STOP/RESET] key on the control panel of the frequency converter does not dis-
connect the equipment from mains and is thus not to be used as a safety switch.
3. Correct protective earthing of the equipment must be established, the user must be pro-
tected against supply voltage, and the motor must be protected against overload in
accordance with applicable national and local regulations.
4. The earth leakage currents are higher than 3.5 mA.
5. Protection against motor overload is not included in the factory setting. If this function
is desired, set par. 1-90 to data value ETR trip or data value ETR warning.
6. Do not remove the plugs for the motor and mains supply while the frequency converter
is connected to mains. Check that the mains supply has been disconnected and that the
necessary time has passed before removing motor and mains plugs.
7. Please note that the frequency converter has more voltage inputs than L1, L2 and L3,
when load sharing (linking of DC intermediate circuit) and external 24 V DC have been
installed. Check that all voltage inputs have been disconnected and that the necessary
time has passed before commencing repair work.
FC 300 Programming Guide 1. Introduction
MG.33.M2.02 - VLT
®
is a registered Danfoss trademark
9
1
2. How to Programme FC 300 Programming Guide
10
MG.33.M2.02 - VLT
®
is a registered Danfoss trademark
2
2. How to Programme
2.1. The Graphical and Numerical Local Control Panels
The easiest programming of the frequency converter is performed by the Graphical Local Control
Panel (LCP 102). It is necessary to consult the frequency converter Design Guide, when using the
Numeric Local Control Panel (LCP 101).
2.1.1. How to Programme on the Graphical LCP
The following instructions are valid for the graphical LCP (LCP 102):
The control panel is divided into four
functional groups:
1. Graphical display with Status lines.
2. Menu keys and indicator lights -
changing parameters and switching
between display functions.
3. Navigation keys and indicator lights
(LEDs).
4. Operation keys and indicator lights
(LEDs).
All data is displayed in a graphical LCP display,
which can show up to five items of operating
data while displaying [Status].
Display lines:
a. Status line: Status messages dis-
playing icons and graphic.1
b. Line 1-2: Operator data lines dis-
playing data defined or chosen by
the user. By pressing the [Status]
key, up to one extra line can be add-
ed.1
c. Status line: Status messages dis-
playing text.1
FC 300 Programming Guide 2. How to Programme
MG.33.M2.02 - VLT
®
is a registered Danfoss trademark
11
2
2.1.2. The LCD-Display
The LCD-display has back light and a total of 6 alpha-numeric lines. The display lines show the
direction of rotation (arrow), the chosen Set-up as well as the programming Set-up. The display
is divided into 3 sections:
Top section shows up to 2 measurements in
normal operating status.
The top line in the Middle section shows up
to 5 measurements with related unit, regard-
less of status (except in the case of alarm/
warning).
Bottom section always shows the state of
the frequency converter in Status mode.
130BP074.10
Top section
Middle section
Bottom section
The Active Set-up (selected as the Active Set-up in par. 0-10) is shown. When programming an-
other Set-up than the Active Set-up, the number of the programmed Set-up appears to the right.
Display Contrast Adjustment
Press [status] and [] for darker display
Press [status] and [] for brighter display
Most FC 300 parameter set-ups can be changed immediately via the control panel, unless a pass-
word has been created via par. 0-60
Main Menu Password
or via par. 0-65
Quick Menu
Password
.
Indicator lights (LEDs):
If certain threshold values are exceeded, the alarm and/or warning LED lights up. A status and
alarm text appear on the control panel.
The ON LED is activated when the frequency converter receives mains voltage or via a DC bus
terminal or 24 V external supply. At the same time, the back light is on.
Green LED/On: Control section is
working.
•Yellow LED/Warn.: Indicates a warn-
ing.
Flashing Red LED/Alarm: Indicates
an alarm.
130BP040.10
LCP keys
The control keys are divided into functions.
The keys below the display and indicator
lamps are used for parameter Set-up, includ-
ing choice of display indication during normal
operation.
130BP045.1
0
2. How to Programme FC 300 Programming Guide
12
MG.33.M2.02 - VLT
®
is a registered Danfoss trademark
2
[Status] indicates the status of the frequency converter and/or the motor. You can choose be-
tween 3 different readouts by pressing the [Status] key:
5 line readouts, 4 line readouts or Smart Logic Control.
Use [Status] for selecting the mode of display or for changing back to Display mode from either
the Quick Menu mode, the Main Menu mode or Alarm mode. Also use the [Status] key to toggle
single or double read-out mode.
[Quick Menu] allows quick access to different Quick Menus such as:
- My Personal Menu
- Quick Set-up
- Changes Made
- Loggings
Use [Quick Menu] for programming the parameters belonging to the Quick Menu. It is possible
to switch directly between Quick Menu mode and Main Menu mode.
[Main Menu] is used for programming all parameters.
It is possible to switch directly between Main Menu mode and Quick Menu mode.
Parameter shortcut can be carried out by pressing down the [Main Menu] key for 3 seconds.
The parameter shortcut allows direct access to any parameter.
[Alarm Log] displays an Alarm list of the five latest alarms (numbered A1-A5). To obtain addi-
tional details about an alarm, use the arrow keys to manoeuvre to the alarm number and press
[OK]. You will now receive information about the condition of your frequency converter right be-
fore entering the alarm mode.
[Back] takes you to the previous step or layer in the navigation structure.
[Cancel] annuls your last change or command as long as the display has not been changed.
[Info] supplies information about a com-
mand, parameter, or function in any display
window. [Info] provides detailed information
whenever help is needed.
Exit info mode by pressing either [Info],
[Back], or [Cancel].
Navigation Keys
The four navigation arrows are used to navigate between the different choices available in [Quick
Menu], [Main Menu] and [Alarm Log]. Use the keys to move the cursor.
[OK] is used for choosing a parameter marked by the cursor and for enabling the change of a
parameter.
Local Control Key for local control are found
at the bottom of the control panel.
130BP046.1
0
[Hand On] enables control of the frequency converter via the LCP. [Hand on] also starts the
motor, and it is now possible to enter the motor speed data by means of the arrow keys. The key
can be selected as Enable [1] or Disable [0] via par.
0-40 [Hand on] key on LCP.
FC 300 Programming Guide 2. How to Programme
MG.33.M2.02 - VLT
®
is a registered Danfoss trademark
13
2
External stop signals activated by means of control signals or a serial bus will override a “start”
command via the LCP.
The following control signals will still be active when [Hand on] is activated:
[Hand on] - [Off] - [Auto on]
Reset
Coasting stop inverse
Reversing
Set-up select bit 0- Set-up select bit 1
Stop command from serial communication
•Quick stop
•DC brake
[Off] stops the connected motor. The key can be selected as Enable [1] or Disable [0] via par.
0-41 [Off] key on LCP.
If no external stop function is selected and the [Off] key is inactive the
motor can be stopped by disconnecting the voltage.
[Auto On] enables the frequency converter to be controlled via the control terminals and/or serial
communication. When a start signal is applied on the control terminals and/or the bus, the fre-
quency converter will start. The key can be selected as Enable [1] or Disable [0] via par.
0-42
[Auto on] key on LCP.
NB!
An active HAND-OFF-AUTO signal via the digital inputs has higher priority than the
control keys [Hand on] – [Auto on].
[Reset] is used for resetting the frequency converter after an alarm (trip). It can be selected as
Enable
[1] or
Disable
[0] via par. 0-43
Reset Keys on LCP
.
The parameter shortcut can be carried out by holding down the [Main Menu] key for 3 seconds.
The parameter shortcut allows direct access to any parameter.
2.1.3. Quick Transfer of Parameter Settings between Multiple Fre-
quency Converters
Once the set-up of a frequency converter is
complete, we recommend that you store the
data in the LCP or on a PC via MCT 10 Set-up
Software Tool.
Data storage in LCP:
1. Go to par. 0-50
LCP Copy
2. How to Programme FC 300 Programming Guide
14
MG.33.M2.02 - VLT
®
is a registered Danfoss trademark
2
2. Press the [OK] key
3. Select “All to LCP”
4. Press the [OK] key
All parameter settings are now stored in the LCP indicated by the progress bar. When 100% is
reached, press [OK].
You can now connect the LCP to another frequency converter and copy the parameter settings to
this frequency converter as well.
Data transfer from LCP to frequency converter:
1. Go to par. 0-50
LCP Copy
2. Press the [OK] key
3. Select “All from LCP”
4. Press the [OK] key
The parameter settings stored in the LCP are now transferred to the frequency converter indicated
by the progress bar. When 100% is reached, press [OK].
FC 300 Programming Guide 2. How to Programme
MG.33.M2.02 - VLT
®
is a registered Danfoss trademark
15
2
2.1.4. Display Mode
In normal operation, up to 5 different operating variables can be indicated continuously in the
middle section: 1.1, 1.2, and 1.3 as well as 2 and 3.
2.1.5. Display Mode - Selection of Read-Outs
It is possible to toggle between three status
read-out screens by pressing the [Status] key.
Operating variables with different formatting
are shown in each status screen - see below.
The table shows the measurements you can
link to each of the operating variables. Define
the links via par. 0-20, 0-21, 0-22, 0-23, and
0-24.
Each readout parameter selected in par. 0-20
to par. 0-24 has its own scale and digits after
a possible decimal point. By larger numeric
value of a parameter fewer digits are dis-
played after the decimal point.
Ex.: Current readout
5.25 A; 15.2 A 105 A.
Operating variable: Unit:
Par. 16-00 Control Word hex
Par. 16-01 Reference [unit]
Par. 16-02 Reference %
Par. 16-03 Status Word hex
Par. 16-05 Main Actual Value %
Par. 16-10 Power [kW]
Par. 16-11 Power [HP]
Par. 16-12 Motor Voltage [V]
Par. 16-13 Frequency [Hz]
Par. 16-14 Motor Current [A]
Par. 16-16 Torque Nm
Par. 16-17 Speed [RPM]
Par. 16-18 Motor Thermal %
Par. 16-20 Motor Angle
Par. 16-30 DC Link Voltage V
Par. 16-32 Brake Energy / s kW
Par. 16-33 Brake Energy / 2 min kW
Par. 16-34 Heatsink Temp. C
Par. 16-35 Inverter Thermal %
Par. 16-36 Inv. Nom. Current A
Par. 16-37 Inv. Max. Current A
Par. 16-38 SL Control State
Par. 16-39 Control Card Temp. C
Par. 16-40 Logging Buffer Full
Par. 16-50 External Reference
Par. 16-51 Pulse Reference
Par. 16-52 Feedback [Unit]
Par. 16-53 Digi Pot Reference
Par. 16-60 Digital Input bin
Par. 16-61 Terminal 53 Switch Set-
ting
V
Par. 16-62 Analog Input 53
Par. 16-63 Terminal 54 Switch Set-
ting
V
Par. 16-64 Analog Input 54
Par. 16-65 Analog Output 42 [mA]
Par. 16-66 Digital Output [bin]
Par. 16-67 Freq. Input #29 [Hz]
Par. 16-68 Freq. Input #33 [Hz]
Par. 16-69 Pulse Output #27 [Hz]
Par. 16-70 Pulse Output #29 [Hz]
Par. 16-71 Relay Output
Par. 16-72 Counter A
Par. 16-73 Counter B
Par. 16-80 Fieldbus CTW hex
Par. 16-82 Fieldbus REF 1 hex
Par. 16-84 Comm. Option STW hex
Par. 16-85 FC Port CTW 1 hex
Par. 16-86 FC Port REF 1 hex
Par. 16-90 Alarm Word
Par. 16-92 Warning Word
Par. 16-94 Ext. Status Word
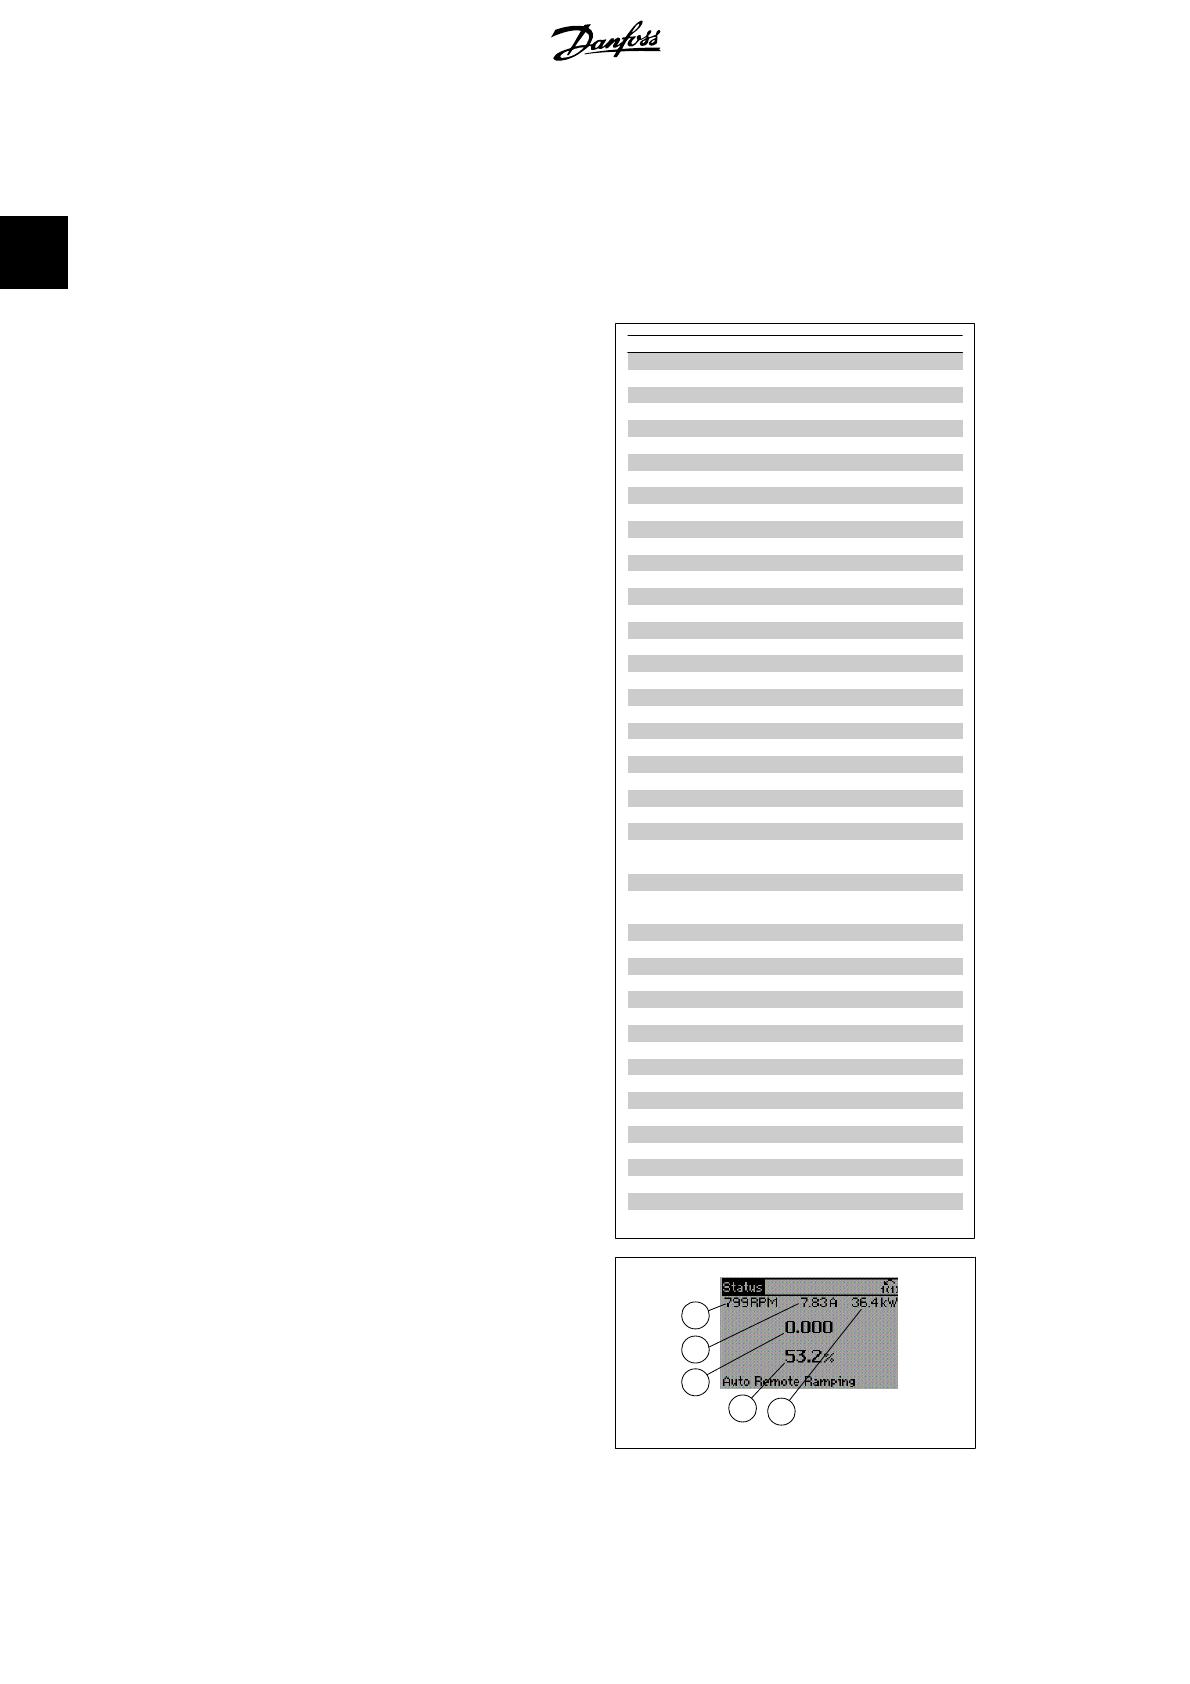
Status screen I:
This read-out state is standard after start-up
or initialization.
Use [INFO] to obtain information about the
measurement links to the displayed operating
variables (1.1, 1.2, 1.3, 2 and 3).
See the operating variables shown in the
screen in this illustration.
130BP041.10
1.1
1.3
2
1.2
3
2. How to Programme FC 300 Programming Guide
16
MG.33.M2.02 - VLT
®
is a registered Danfoss trademark
2
Status screen II:
See the operating variables (1.1, 1.2, 1.3 and
2) shown in the screen in this illustration.
In the example, Speed, Motor current, Motor
power and Frequency are selected as varia-
bles in the first and second.
130BP062.10
2
1.2
1.3
1.1
Status screen III:
This state displays the event and action of the
Smart Logic Control. For further information,
see section
Smart Logic Control
.
130BP063.10
2.1.6. Parameter Set-Up
The FC 300 Series can be used for practically all assignments, which is why the number of pa-
rameters is quite large. The series offers a choice between two programming modes - a Main
Menu and a Quick Menu mode.
The former provides access to all parameters. The latter takes the user through a few parameters
making it possible to start operating the frequency converter.
Regardless of the mode of programming, you can change a parameter both in the Main Menu
mode and in the Quick Menu mode.
2.1.7. Quick Menu Key Functions
Pressing [Quick Menus] The list indicates the
different areas contained in the Quick menu.
Select
My Personal Menu
to display the chosen
personal parameters. These parameters are
selected in par. 0-25
Personal Menu
. Up to 20
different parameters can be added in this
menu.
Select
Quick setup
to go through a limited amount of parameters to get the motor running almost
optimally. The default setting for the other parameters considers the desired control functions and
the configuration of signal inputs/outputs (control terminals).
The selection of parameter is effected by means of the arrow keys. The parameters in the following
table are accessible.
FC 300 Programming Guide 2. How to Programme
MG.33.M2.02 - VLT
®
is a registered Danfoss trademark
17
2
Parameter Designation Setting
0-01 Language
1-20 Motor Power [kW]
1-22 Motor Voltage [V]
1-23 Motor Frequency [Hz]
1-24 Motor Current [A]
1-25 Motor Nominal Speed [rpm]
5-12 Terminal 27 Digital Input [0] No function*
1-29 Automatic Motor Adaptation (AMA) [1] Enable complete AMA
3-02 Min Reference [rpm]
3-03 Max Reference [rpm]
3-41 Ramp 1 Ramp-up Time [sec]
3-42 Ramp 1 Ramp-down Time [sec]
3-13 Reference Site
* If terminal 27 is set to “no function”, no connection to +24 V on terminal 27 is necessary.
Select
Changes made
to get information
about:
the last 10 changes. Use the [] []
navigation keys to scroll between the
last 10 changed parameters.
the changes made since default set-
ting.
Select
Loggings
to get information about the
display line read-outs. The information is
shown as graphs.
Only display parameters selected in par. 0-20
and par. 0-24 can be viewed. It is possible to
store up to 120 samples in the memory for
later reference.
2. How to Programme FC 300 Programming Guide
18
MG.33.M2.02 - VLT
®
is a registered Danfoss trademark
2
2.1.8. Initial Commissioning
The easiest way of carrying out the initial commissioning is by using the Quick Menu button and
follow the quick set-up procedure using LCP 102 (read table from left to right):
Press
Q2 Quick Menu
0-01 Language Set language
1-20 Motor power Set Motor nameplate power
1-22 Motor voltage
Set Nameplate voltage
1-23 Motor frequency Set Nameplate frequency
1-24 Motor current
Set Nameplate current
1-25 Motor nominal speed Set Nameplate speed in RPM
5-12 Terminal 27 Digital
Input
If terminal default is
Coast inverse
it is
possible to change this setting to
No
function
. No connection to terminal 27
is then needed for running AMA
1-29 Automatic Motor
Adaptation
Set desired AMA function. Enable com-
plete AMA is recommended
3-02 Minimum reference
Set the minimum speed of the motor
shaft
3-03 Maximum reference
Set the maximum speed of the motor
shaft
3-41 Ramp1 up time
Set the ramping up time with reference
to nominal motor speed (set in par.
1-25)
3-42 Ramp1 down time
Set the ramping down time with refer-
ence to nominal motor speed (set in par.
1-25)
3-13 Reference site
Set the site from where the reference
must work
FC 300 Programming Guide 2. How to Programme
MG.33.M2.02 - VLT
®
is a registered Danfoss trademark
19
2
2.1.9. Main Menu Mode
Start the Main Menu mode by pressing the
[Main Menu] key. The read-out shown to the
right appears on the display.
The middle and bottom sections on the display
show a list of parameter groups which can be
chosen by toggling the up and down buttons.
130BP066.10
Each parameter has a name and number which remain the same regardless of the programming
mode. In the Main Menu mode, the parameters are divided into groups. The first digit of the
parameter number (from the left) indicates the parameter group number.
All parameters can be changed in the Main Menu. However, depending on the choice of configu-
ration (par. 1-00), some parameters can be "missing". E.g. open loop hides all the PID parameters,
and other enabled options make more parameter groups visible.
2.1.10. Parameter Selection
In the Main menu mode, the parameters are
divided into groups. You select a parameter
group by means of the navigation keys.
The following parameter groups are accessi-
ble:
Group no. Parameter group:
0 Operation/Display
1Load/Motor
2 Brakes
3 References/Ramps
4 Limits/Warnings
5 Digital In/Out
6 Analog In/Out
7 Controls
8 Comm. and Options
9Profibus
10 CAN Fieldbus
11 Reserved Com. 1
12 Reserved Com. 2
13 Smart Logic
14 Special Functions
15 Drive Information
16 Data Readouts
17 Motor Feedb. Option
After selecting a parameter group, choose a
parameter by means of the navigation keys.
The middle section on the display shows the
parameter number and name as well as the
selected parameter value.
130BP067.10
2.1.11. Changing Data
The procedure for changing data is the same whether you select a parameter in the Quick menu
or the Main menu mode. Press [OK] to change the selected parameter.
The procedure for changing data depends on whether the selected parameter represents a nu-
merical data value or a text value.
2.1.12. Changing a Text Value
2. How to Programme FC 300 Programming Guide
20
MG.33.M2.02 - VLT
®
is a registered Danfoss trademark
2
  • Page 1 1
  • Page 2 2
  • Page 3 3
  • Page 4 4
  • Page 5 5
  • Page 6 6
  • Page 7 7
  • Page 8 8
  • Page 9 9
  • Page 10 10
  • Page 11 11
  • Page 12 12
  • Page 13 13
  • Page 14 14
  • Page 15 15
  • Page 16 16
  • Page 17 17
  • Page 18 18
  • Page 19 19
  • Page 20 20
  • Page 21 21
  • Page 22 22
  • Page 23 23
  • Page 24 24
  • Page 25 25
  • Page 26 26
  • Page 27 27
  • Page 28 28
  • Page 29 29
  • Page 30 30
  • Page 31 31
  • Page 32 32
  • Page 33 33
  • Page 34 34
  • Page 35 35
  • Page 36 36
  • Page 37 37
  • Page 38 38
  • Page 39 39
  • Page 40 40
  • Page 41 41
  • Page 42 42
  • Page 43 43
  • Page 44 44
  • Page 45 45
  • Page 46 46
  • Page 47 47
  • Page 48 48
  • Page 49 49
  • Page 50 50
  • Page 51 51
  • Page 52 52
  • Page 53 53
  • Page 54 54
  • Page 55 55
  • Page 56 56
  • Page 57 57
  • Page 58 58
  • Page 59 59
  • Page 60 60
  • Page 61 61
  • Page 62 62
  • Page 63 63
  • Page 64 64
  • Page 65 65
  • Page 66 66
  • Page 67 67
  • Page 68 68
  • Page 69 69
  • Page 70 70
  • Page 71 71
  • Page 72 72
  • Page 73 73
  • Page 74 74
  • Page 75 75
  • Page 76 76
  • Page 77 77
  • Page 78 78
  • Page 79 79
  • Page 80 80
  • Page 81 81
  • Page 82 82
  • Page 83 83
  • Page 84 84
  • Page 85 85
  • Page 86 86
  • Page 87 87
  • Page 88 88
  • Page 89 89
  • Page 90 90
  • Page 91 91
  • Page 92 92
  • Page 93 93
  • Page 94 94
  • Page 95 95
  • Page 96 96
  • Page 97 97
  • Page 98 98
  • Page 99 99
  • Page 100 100
  • Page 101 101
  • Page 102 102
  • Page 103 103
  • Page 104 104
  • Page 105 105
  • Page 106 106
  • Page 107 107
  • Page 108 108
  • Page 109 109
  • Page 110 110
  • Page 111 111
  • Page 112 112
  • Page 113 113
  • Page 114 114
  • Page 115 115
  • Page 116 116
  • Page 117 117
  • Page 118 118
  • Page 119 119
  • Page 120 120
  • Page 121 121
  • Page 122 122
  • Page 123 123
  • Page 124 124
  • Page 125 125
  • Page 126 126
  • Page 127 127
  • Page 128 128
  • Page 129 129
  • Page 130 130
  • Page 131 131
  • Page 132 132
  • Page 133 133
  • Page 134 134
  • Page 135 135
  • Page 136 136
  • Page 137 137
  • Page 138 138
  • Page 139 139
  • Page 140 140
  • Page 141 141
  • Page 142 142
  • Page 143 143
  • Page 144 144
  • Page 145 145
  • Page 146 146
  • Page 147 147
  • Page 148 148
  • Page 149 149
  • Page 150 150
  • Page 151 151
  • Page 152 152
  • Page 153 153
  • Page 154 154
  • Page 155 155
  • Page 156 156
  • Page 157 157
  • Page 158 158
  • Page 159 159
  • Page 160 160
  • Page 161 161
  • Page 162 162
  • Page 163 163
  • Page 164 164
  • Page 165 165
  • Page 166 166
  • Page 167 167
  • Page 168 168
  • Page 169 169
  • Page 170 170
  • Page 171 171
  • Page 172 172
  • Page 173 173
  • Page 174 174
  • Page 175 175
  • Page 176 176
  • Page 177 177
  • Page 178 178
  • Page 179 179
  • Page 180 180
  • Page 181 181
  • Page 182 182
  • Page 183 183
  • Page 184 184
  • Page 185 185
  • Page 186 186
  • Page 187 187
  • Page 188 188
  • Page 189 189
  • Page 190 190
  • Page 191 191
  • Page 192 192
  • Page 193 193
  • Page 194 194
  • Page 195 195
  • Page 196 196
  • Page 197 197
  • Page 198 198
  • Page 199 199
  • Page 200 200
  • Page 201 201
  • Page 202 202
  • Page 203 203
  • Page 204 204
  • Page 205 205
  • Page 206 206
  • Page 207 207
  • Page 208 208
  • Page 209 209
  • Page 210 210
  • Page 211 211
  • Page 212 212
  • Page 213 213
  • Page 214 214
  • Page 215 215
  • Page 216 216
  • Page 217 217
  • Page 218 218
  • Page 219 219
  • Page 220 220
  • Page 221 221
  • Page 222 222
  • Page 223 223
  • Page 224 224
  • Page 225 225
  • Page 226 226
  • Page 227 227
  • Page 228 228
  • Page 229 229
  • Page 230 230
  • Page 231 231
  • Page 232 232
  • Page 233 233
  • Page 234 234

Danfoss VLT AutomationDrive FC 301 Programming Guide

Type
Programming Guide

Ask a question and I''ll find the answer in the document

Finding information in a document is now easier with AI