Page is loading ...

*WARNING:RISK OF FIRE AND ELECTRIC SHOCK.THIS PRODUCT REQUIRES
PROPER FIELD WIRING AND IS INTENDED TO BE INSTALLED BY A QUALIFIE
D
ELECTRICIAN ONLY.
ITEM NO.: RK70
IMPORTANT SAFETY INSTRUCTIONS
Important: When replacing Gu10 bulbs, be sure the Wattage of the bulb is 50W or less. Using higher wattag
e
bulb may damage the fixtures.
CAUTION: To reduce the risk of fire, the bare conductors shall be installed a minimum 7 feet from the ground
and minimum 6 inches from the ceiling or curtains.
CAUTION: Hot surface, keep away from curtains and combustible materials.
CAUTION: Risk of burn, before energizing, ensure that the bare conductors are free from any metallic objects
not part of this lighting system.
When installing or using the lighting system, basic safety precautions should always be followed including the
following.
1). Read all instructions.
2). Do not conceal or extend bus-bar conductors through a building wall.
3). Do not install this system in damp or wet locations.
3)
.
Do
not
install
this
system
in
damp
or
wet
locations
.
4). Do not install any part of this system less than 7 feet above floor.
5). To reduce the risk of fire and overheating, make sure all connections are tight.
6). To reduce the risk of fire and burns, do not install this lighting system where the uninsulated open bus-bar
conductors can be shorted or contact conductive materials.
7). Do not install any luminaire closer than 6 inches from any curtain, or similar combustible materials.
8). Turn off electrical power before modifying the light system in any way,or during re-lamping.
Caution: To reduce risk of fire, use only the type of lamp and maximum wattage marked on the fixtures
Caution: To reduce risk of fire, do not use lamps identified for use in enclosed fixtures.
Caution: Indoor use.
Caution: Use only type GU10, rated 120 volts, 50W maximum.
*Please inform your dealer immediately in case of any parts shortage.
*Save these instructions for future reference.
ITEM NO.: RK70

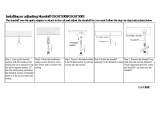
ASSEMBLY INSTRUCTIONS:
Please carefully unpack and place all lamp parts on a flat surface.
Step1:
WARNING: TO PREVENT ELECTRICAL SHOCK TURN OFF POWER TO FIXTURE LOCATION
Step2:
AT MAIN BREAKER.
(1)Loosen set screw(I) and
slide down canopy(G)(careful
not to scratch finish)
(3)Using a screw driver and the
screw provided(C) attach the
threaded cup(B) to the ceiling.
(4)Secure the standoff
assembly(D) to the
threaded.
(1)Drill a hole in the
ceiling.
(2)Use a hammer to tap
anchor(A) into the ceiling.
B
A
B
C
(2)Fasten cross bar (E) to junction box with screws(F).
(3)Connect the Ground Wire from fixture to crossbar (E), connect the Ground Wire
from outlet box to crossbar (E).
Connect the wire (Neutral) from fixture to wire(Neutral) from power supply with the
wire nut.
Connect the wire (Live) from fixture to wire (Live) from power supply with the wire nut.
(4)Slide up canopy(G) to the ceiling and tighten set screw(I).
4
(1)Loosen set screw(I) and
slide down canopy(G)(careful
not to scratch finish).
S
E
I
F
G
H
R

ITEM NO.: RK70
adaptor. These two must be lined up with each other for
easy assembly. Once lined up push down on cap and turn clockwise.
installing rail to power feed and support the label
must point towards the ceiling
To install Cylinder or Pendant(2#)
:-You will
notice an indent "
. " on the cap and a set screw on the
Step5: Tighten the screw on the adapter.
Place the shade (P) over the socket clip.
install the bulb (Q)( Max 50W, type GU10)
into the socket
Step4: Remove the fixture cap (N) from each fixture,
Attention:Please read below
To Install Rail(1#)-You will notice a "this way
up"label is affixed to the top of the rail.When
Step3:
Remove cap(L) and open the adaptor half(J)of power
feed,place rail(marked this side up) into adaptor making sure
the two connector tabs are on the same side as the two rail
connectors.Close adaptor and place cap on adaptor by lining
up the indent on cap with the set screw on the adaptor,push
down and tighten to lock in place.
slide the adapter onto the rail and secure the cap (N).
T
H
I
S
W
A
Y
U
P
T
H
I
S
W
A
Y
U
P
(1)
(2)
(3)
Step6: Check for loose connections. 1. Turn the power to electrical box on. 2. Turn on the system and let
it run for 5 minutes turn the system off and be careful all connection points are not hot to the touch (warm
is acceptable), if a connection is hot, be sure to firmly tighten the connection.
A: Power Feed Connection. B: Fixture Connections. C: Ensure bulbs are Secure.
into
the
socket
.
A: Power Feed Connection
B: Fixture Connections
C: Ensure bulbs are Secure.
/