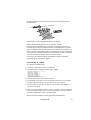
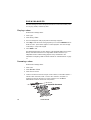
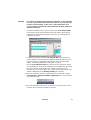
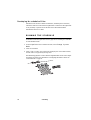
Martin LightCorder is a DMX recorder that can record and playback DMX control signals, allowing you to easily capture and transport lighting programs. Connect it to any lighting console's DMX outlet, and it's ready to record. You can playback recorded shows at the touch of a button, making it a cost-effective substitute for expensive on-site controllers. It also serves as a backup to your main lighting console.
Martin LightCorder is a DMX recorder that can record and playback DMX control signals, allowing you to easily capture and transport lighting programs. Connect it to any lighting console's DMX outlet, and it's ready to record. You can playback recorded shows at the touch of a button, making it a cost-effective substitute for expensive on-site controllers. It also serves as a backup to your main lighting console.


-
 1
1
-
 2
2
-
 3
3
-
 4
4
-
 5
5
-
 6
6
-
 7
7
-
 8
8
-
 9
9
-
 10
10
-
 11
11
-
 12
12
-
 13
13
-
 14
14
-
 15
15
-
 16
16
-
 17
17
-
 18
18
-
 19
19
-
 20
20
-
 21
21
-
 22
22
-
 23
23
-
 24
24
-
 25
25
-
 26
26
-
 27
27
-
 28
28
-
 29
29
-
 30
30
-
 31
31
-
 32
32
-
 33
33
-
 34
34
-
 35
35
-
 36
36
-
 37
37
-
 38
38
-
 39
39
-
 40
40


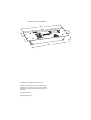
Martin LightCorder is a DMX recorder that can record and playback DMX control signals, allowing you to easily capture and transport lighting programs. Connect it to any lighting console's DMX outlet, and it's ready to record. You can playback recorded shows at the touch of a button, making it a cost-effective substitute for expensive on-site controllers. It also serves as a backup to your main lighting console.
Ask a question and I''ll find the answer in the document
Finding information in a document is now easier with AI
Related papers
-
Martin MP 2 Uploader User manual
-
-
Martin Alien 02 Pendant User manual
-
-
Martin MAC 301 Wash User manual
-
-
-
Martin Xciter User manual
-
-
Martin Freekie User manual
Other documents
-
PROEL PLBR256MH2 - REV 07-2006 User manual
-
Robe Led Blinder 196 LT User manual
-
High End Systems Power Cue DMX Console User manual
-
-
ETC Emphasis Lighting Control System User manual
-
Qtx DMX-24 User manual
-
SGM Studio 12 User manual
-
-
Elation Emulation Pro Control Software User manual
-
Leviton N2448-V User guide