Page is loading ...

1
1.800.221.3379
DESTIN
UNDERMOUNT BATHROOM SINK
LAVAMANOS DE PORCELANA Y MONTAJE INFERIOR DESTIN
SKU: 948175, 948174, 948631, 950500
REVISED 06/05/2020
CODES: SHU1713G, SHU1713, SHU1616, SHDEU2114
GETTING STARTED
BEFORE YOU BEGIN
We recommend consulting a professional if you are
Hardware accepts no liability for any damage to the
sink, countertop, or for personal injury during
installation.
Observe all local plumbing and building codes.
Unpack and inspect the sink for shipping damage.
If any damage is found, contact our Customer
Relations team at 1-800-221-3379.
Ensure that you have gathered all the required
materials that are needed for the installation.
TOOLS AND MATERIALS:
HERRAMIENTAS Y MATERIALES:
ANTES DE COMENZAR
Le recomendamos que consulte a un profesional si no
sabe cómo instalar accesorios de plomería. Signature
Hardware no asume ninguna responsabilidad con
respecto a los daños causados al lavamanos o la
encimera, ni por lesiones personales que se produzcan
durante la instalación.
Cumpla con todas las normas locales de plomería y
construcción.
Retire el lavamanos del empaque y verifique si se
produjeron daños durante el envío.
Si encuentra algún daño, comuníquese con nuestro
equipo de Servicio al cliente al 1-800-221-3379.
CÓMO COMENZAR
Asegúrese de haber reunido todos los materiales
necesarios para la instalación.
Tape Measure
Cinta métrica
Drill
Taladro
Silicone Sealant
(100% Neutral Cure)
Sellador de silicona
(100% curado neutro)
Pencil
Lápiz
Scissors
Tijeras
Claw Hammer
Martillo sacaclavos
Jigsaw
Sierra
caladora
Safety Glasses
Gafas de seguridad
Note:
install this sink to countertop materials other than
wood or wood composites.
Nota:
Es posible que requiera herramientas diferentes o más
especializadas para instalar el lavamanos bajo un
mostrador hecho de un material distinto a la madera o
de compuestos de madera.

2
1.800.221.3379
3. Check the desired sink location for clearance
between the backsplash, faucet and sink. Verify
cabinet clearance beneath the countertop. Cut out the
template where indicated for countertop opening. Cut
along the inside of the cutting line.
3. Examine la ubicación deseada para el lavamanos, para
determinar el espacio libre entre el protector trasero, el
grifo y el lavamanos. Verifique el espacio libre que queda
debajo del mostrador. Recorte la plantilla donde se indica
el sitio donde irá empotrado el lavamanos. Recorte
a lo largo de la parte interior de la línea de corte.
4. Position and trace around the template on the
countertop with a pencil. Mark the faucet hole
centerline on the countertop.
4. Coloque la plantilla en el mostrador y trace en él una
línea a lápiz siguiendo la forma de la plantilla. Trace en el
mostrador la línea de centro del hueco del grifo.
2. Use the template supplied with the sink. Refer to
the roughing in information to ensure proper
installation for ADA applications.
2. Use la plantilla suministrada con el lavamanos. Para
asegurarse de realizar una instalación adecuada y
compatible con las normas de la ADA, consulte las
dimensiones de instalación.
INSTALLATION
INSTALACIÓN
1. Corte el agua.
DESTIN
UNDERMOUNT BATHROOM SINK
LAVAMANOS DE PORCELANA Y MONTAJE INFERIOR DESTIN
SKU: 948175, 948174, 948631, 950500
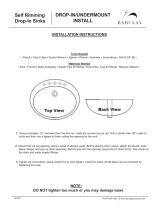
Inside Rim
of Sink
Outer Rim
of Sink
Finished Wall/Back Splash
Note: Before Cutting Countertop Allow
For Handle Clearance
Centerline of Fitting
Undercounter Lavatory
Cut-Out Template
Anchor
Locations
5/16”
8mm
2-1/2”
64mm
2” Min.
51mm
Inside Rim
of Sink
Outer Rim
of Sink
Finished Wall/Back Splash
Note: Before Cutting Countertop Allow
For Handle Clearance
Centerline of Fitting
Undercounter Lavatory
Cut-Out Template
Anchor
Locations
5/16”
8mm
2-1/2”
64mm
2” Min.
51mm

3
1.800.221.3379
6a. For wood countertops:
Mark and pre-drill the wood screw holes at the
locations shown on the template. Waterproof any
6a. Para mostradores de madera:
Marque y taladre previamente los agujeros para los
tornillos para madera en las ubicaciones indicadas en la
plantilla. Impermeabilice cualquier área de madera
que quede expuesta.
6b. For marble/stone countertops:
Position the countertop upside down on foam padding
to protect the surface. Mark and drill 3/8” holes 5/8”
(1.6 cm) deep at the locations shown on the template.
Use a setting tool and hammer to secure the anchors.
6b. Para mostradores de mármol/piedra:
Coloque el mostrador hacia abajo sobre el relleno de
espuma, a n de proteger la. Marque y taladre agujeros
de3/8” (0,9 cm) de diámetro y 5/8” (1,6 cm) de
profundidad en las ubicaciones indicadas en la plantilla.
Use una herramienta de instalación y un martillo para
asegurar los anclajes.
5. Cut out the opening by carefully following the
pencil line traced from the template.
5. Corte el hueco para el lavamanos siguiendo
atentamente la línea trazada a lápiz mediante la plantilla.
Note:
The screws and anchors provided should be used on
countertops with a minimum 1” (2.5 cm) thickness.
For thinner countertops, use appropriate anchors and
fasteners (not provided).
Nota:
Los tornillos y los anclajes deben usarse en mostradores
con un grosor mínimo de 1” (2,5 cm). En el caso de
mostradores más delgados, use anclajes y sujetadores
apropiados (no suministrados).
countertop
encimera
countertop
encimera
1” (25mm) min.
1” (25mm) min.
0.25” (6mm)
sink
lavamanos
sink
lavamanos
sealant
sellador
sealant
sellador
wood screw
tornillo para madera
screw
tornillo
washer
arandela
washer
arandela
bracket
abrazadera
bracket
abrazadera
brass insert
la arandela
0.75” (20mm)
DESTIN
UNDERMOUNT BATHROOM SINK
LAVAMANOS DE PORCELANA Y MONTAJE INFERIOR DESTIN
SKU: 948175, 948174, 948631, 950500

4
1.800.221.3379
7. For all undercounter installations:
If the countertop has not been installed, install it at this
time. Drill the faucet holes according to the faucet
installation instructions. Install the faucet to the
countertop according to the faucet manufacturer’s
instructions. Install the drain to the sink according to
the drain manufacturer’s instructions.
7. Para la instalación empotrada en todo tipo de
mostrador:
Si el mostrador no ha sido instalado aún, instálelo en este
momento. Taladre los agujeros del grifo de acuerdo a las
instrucciones de instalación del grifo. Instale el grifo en el
mostrador de acuerdo a las instrucciones del fabricante
del grifo. Instale el desagüe en el lavamanos de acuerdo a
las instrucciones del fabricante del desagüe.
8. Apply a continuous bead of quality sealant to the
top surface of the lavatory rim where it will contact the
countertop.
Note: Do not use adhesives or adhesive sealants.
8. Aplique una línea continua de sellador de calidad en la
e superior del borde del lavamanos que quede en
contacto con el mostrador.
Nota: No utilice adhesivos ni selladores adhesivos.
9. For marble countertops, install the sink to the
countertop with the clamps and screws provided.
For other countertop materials, refer to the
countertop manufacturer’s instructions for
recommended fasteners.
9. En el caso de mostradores de mármol, instale el
lavamanos en el mostrador conlos sujetadores y tornillos
suministrados. En el caso de mostradores de otro tipo de
material, consulte las instrucciones del fabricante del
mostrador para determinar los sujetadores
recomendados.
10. Position the sink squarely under the cutout before
tightening the clamps. Draw the lavatory rim up
against the countertop until it is snug. Do not
overtighten.
10. Sitúe el lavamanos a escuadra bajo el hueco donde
irá empotrado antes de apretar los sujetadores. Ajuste
el borde del lavamanos contra el mostrador hasta que
quede apretado. No apriete demasiado.
marble
mármol
setting tool
herramieantde
instalación
foam padding
relleno de espuma
anchor
anclaje
clamp
sujetador
wood screw
tornillo para madera
anchor screw
tornillo de anclaje
DESTIN
UNDERMOUNT BATHROOM SINK
LAVAMANOS DE PORCELANA Y MONTAJE INFERIOR DESTIN
SKU: 948175, 948174, 948631, 950500

5
1.800.221.3379
for 30 minutes before proceeding. Connect and
tighten the trap to the drain, and complete the water
supply connections to the faucet according to the
instructions provided with the faucet.
11. Quite con un paño cualquier exceso de sellador y
rellene con sellador cualquier espacio no cubierto.
Deje secar el sellador al menos 30 minutos antes de
continuar con el resto del procedimiento. Conecte y
apriete el sifón al desagüe, y termine de realizar todas las
conexiones de suministro de agua con el grifo, de
acuerdo a las instrucciones incluidas en el empaque
del grifo.
DESTIN
UNDERMOUNT BATHROOM SINK
LAVAMANOS DE PORCELANA Y MONTAJE INFERIOR DESTIN
SKU: 948175, 948174, 948631, 950500
/