Adata SU800 User guide

Type
User guide

ADATA SU800: Unleash the Power of Speed and Reliability

The ADATA SU800 is a high-performance solid-state drive (SSD) designed to enhance your computing experience. With its advanced controller and 3D NAND Flash technology, the SU800 delivers incredible read/write speeds of up to 560/520MB/s, making it ideal for demanding applications, multitasking, and gaming. Its intelligent SLC caching algorithm further optimizes performance, ensuring exceptional responsiveness and seamless data transfer.

Initialize new disks
Applies To: Windows 10, Windows 8.1, Windows 7, Windows Server (Semi-Annual Channel), Windows Server 2019,
Windows Server 2016, Windows Server 2012 R2, Windows Server 2012
If you add a brand new disk to your PC and it doesn't show up in File Explorer, you might need to add a drive letter, or
initialize it before using it. You can only initialize a drive that's not yet formatted. Initializing a disk erases everything on it
and prepares it for use by Windows, after which you can format it and then store files on it.
To initialize new disks
Here's how to initialize a new disk using Disk Management. If you prefer using PowerShell, use the initialize-disk cmdlet
instead.
1. Open Disk Management with administrator permissions.
To do so, in the search box on the taskbar, type Disk Management, select and hold (or right-click) Disk
Management, then select Run as administrator > Yes. If you can't open it as an administrator, type Computer
Management instead, and then go to Storage > Disk Management.
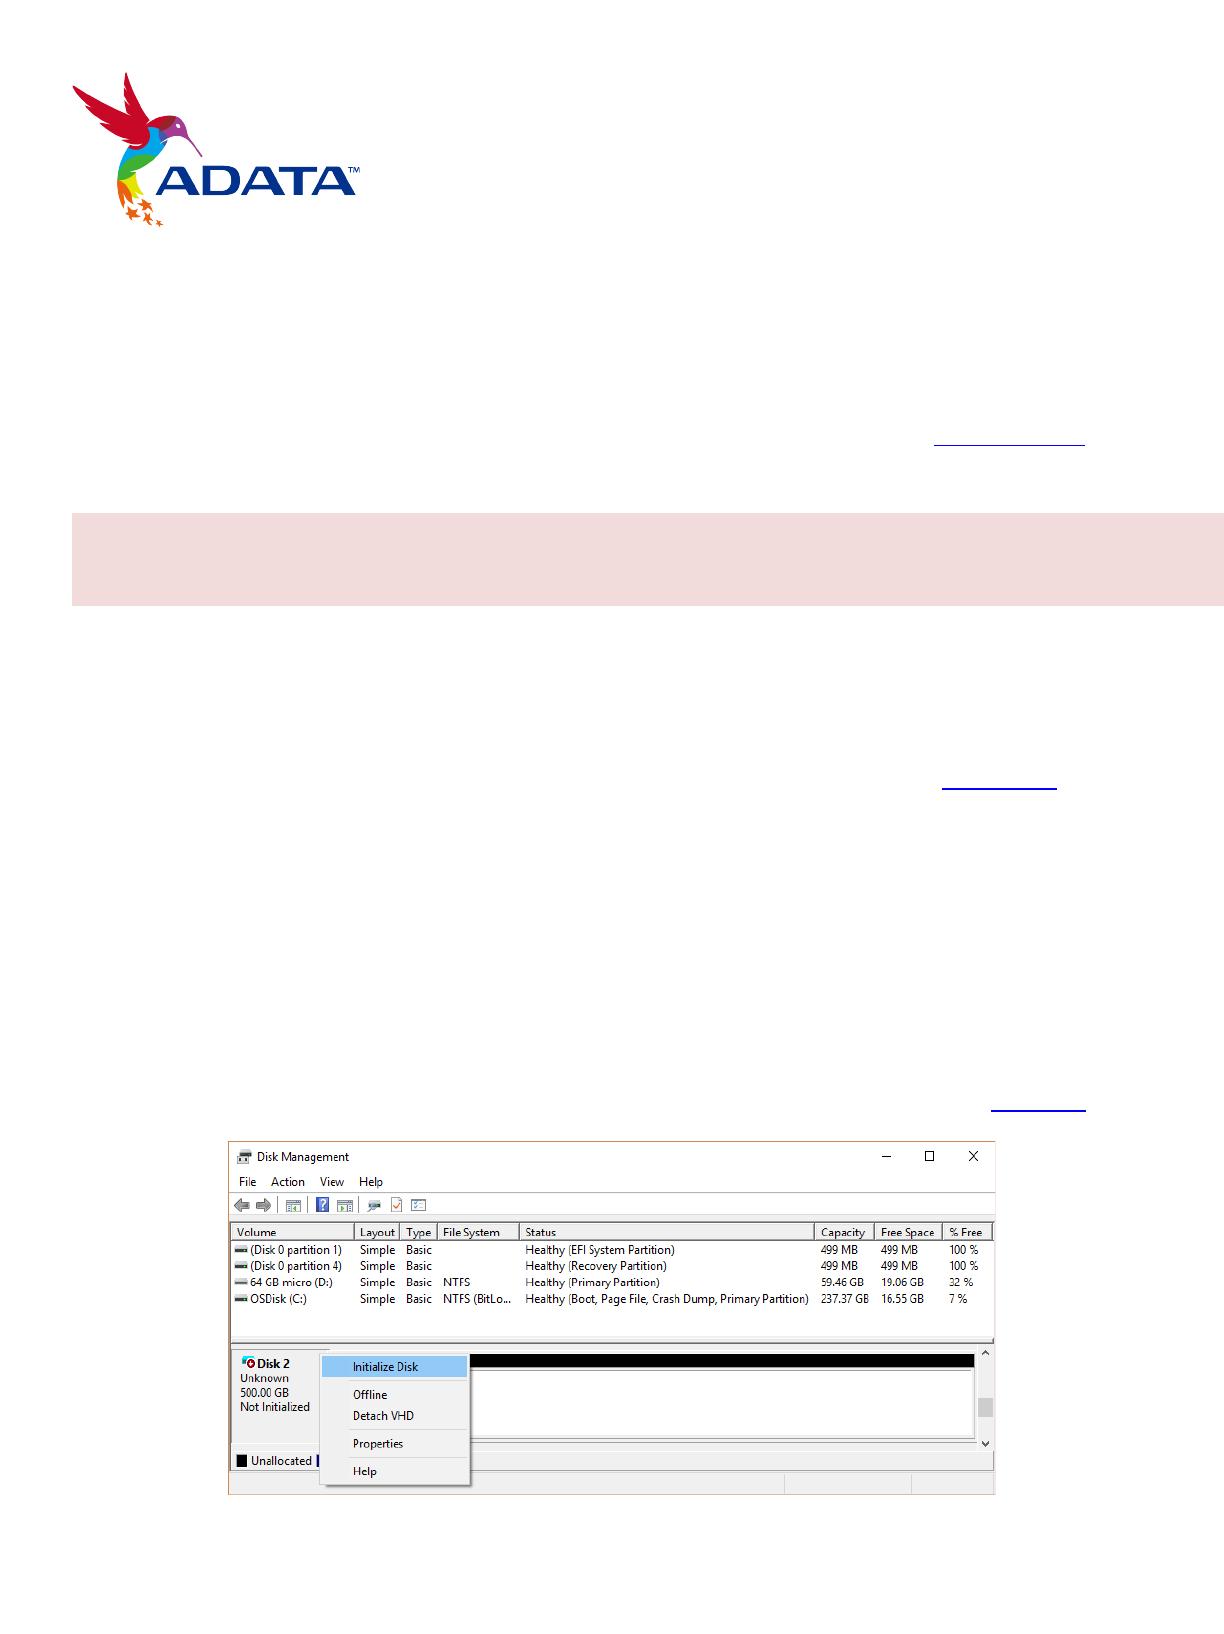
2. In Disk Management, right-click the disk you want to initialize, and then click Initialize Disk (shown here). If the
disk is listed as Offline, first right-click it and select Online.
Note that some USB drives don't have the option to be initialized, they just get formatted and a drive letter.
Warning
If your disk already has files on it that you care about, don't initialize it - you'll lose all the files. Instead we recommend
troubleshooting the disk to see if you can read the files - see A disk's status is Not Initialized or the disk is missing entirely.
3. In the Initialize Disk dialog box (shown here), check to make sure that the correct disk is selected and then
click OK to accept the default partition style. If you need to change the partition style (GPT or MBR) see About
partition styles - GPT and MBR.
The disk status briefly changes to Initializing and then to the Online status. If initializing fails for some reason,
see A disk's status is Not Initialized or the disk is missing entirely.
4. Select and hold (or right-click) the unallocated space on the drive and then select New Simple Volume.
5. Select Next, specify the size of the volume (you'll likely want to stick with the default, which uses the whole drive),
and then select Next.
6. Specify the drive letter you want to assign to the volume and then select Next.
7. Specify the file system you want to use (usually NTFS), select Next, and then Finish.
About partition styles - GPT and MBR
Disks can be divided up into multiple chunks called partitions. Each partition - even if you have only one - has to have a
partition style - GPT or MBR. Windows uses the partition style to understand how to access the data on the disk.
As fascinating as this probably isn't, the bottom line is that these days, you don't usually have to worry about partition
style - Windows automatically uses the appropriate disk type.
Most PCs use the GUID Partition Table (GPT) disk type for hard drives and SSDs. GPT is more robust and allows for
volumes bigger than 2 TB. The older Master Boot Record (MBR) disk type is used by 32-bit PCs, older PCs, and removable
drives such as memory cards.
To convert a disk from MBR to GPT or vice versa, you first have to delete all volumes from the disk, erasing everything on
the disk. For more info, see Convert an MBR disk into a GPT disk, or Convert a GPT disk into an MBR disk.
Source: https://docs.microsoft.com/en-us/windows-server/storage/disk-management/initialize-new-disks
To watch video instruction, please visit:
https://www.youtube.com/watch?v=96-3wxrWboc&feature=youtu.be
  • Page 1 1
  • Page 2 2
  • Page 3 3

Adata SU800 User guide

Type
User guide

ADATA SU800: Unleash the Power of Speed and Reliability

The ADATA SU800 is a high-performance solid-state drive (SSD) designed to enhance your computing experience. With its advanced controller and 3D NAND Flash technology, the SU800 delivers incredible read/write speeds of up to 560/520MB/s, making it ideal for demanding applications, multitasking, and gaming. Its intelligent SLC caching algorithm further optimizes performance, ensuring exceptional responsiveness and seamless data transfer.

Ask a question and I''ll find the answer in the document

Finding information in a document is now easier with AI