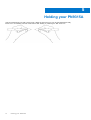
Dell PN9315A is a Bluetooth-enabled active pen designed to enhance your creativity and productivity. With its pressure-sensitive tip, you can write, draw, and navigate your touchscreen device with precision. The two programmable buttons on the pen allow for quick access to frequently used functions, such as erasing or right-clicking. It is compatible with a wide range of Dell computers and tablets, and can be easily paired via Bluetooth.
Dell PN9315A is a Bluetooth-enabled active pen designed to enhance your creativity and productivity. With its pressure-sensitive tip, you can write, draw, and navigate your touchscreen device with precision. The two programmable buttons on the pen allow for quick access to frequently used functions, such as erasing or right-clicking. It is compatible with a wide range of Dell computers and tablets, and can be easily paired via Bluetooth.


-
 1
1
-
 2
2
-
 3
3
-
 4
4
-
 5
5
-
 6
6
-
 7
7
-
 8
8
-
 9
9
-
 10
10
-
 11
11
-
 12
12
-
 13
13
-
 14
14
-
 15
15
-
 16
16
-
 17
17
-
 18
18


Dell PN9315A is a Bluetooth-enabled active pen designed to enhance your creativity and productivity. With its pressure-sensitive tip, you can write, draw, and navigate your touchscreen device with precision. The two programmable buttons on the pen allow for quick access to frequently used functions, such as erasing or right-clicking. It is compatible with a wide range of Dell computers and tablets, and can be easily paired via Bluetooth.
Ask a question and I''ll find the answer in the document
Finding information in a document is now easier with AI
