Dell Inspiron 7306 2-in-1 User guide

Category
Notebooks
Type
User guide

Dell Inspiron 7306 2-in-1: With its versatile 2-in-1 design, this laptop seamlessly transforms into a tablet, offering flexibility for various usage scenarios. Equipped with an active pen, unleash your creativity with natural and precise digital sketching, note-taking, and more. Enjoy immersive entertainment with exceptional audio quality and stunning visuals on its vibrant display. Stay productive and multitask effortlessly with its powerful processor and ample memory. Experience enhanced security with the integrated fingerprint reader and privacy shutter for the webcam.

Dell Inspiron 7306 2-in-1: With its versatile 2-in-1 design, this laptop seamlessly transforms into a tablet, offering flexibility for various usage scenarios. Equipped with an active pen, unleash your creativity with natural and precise digital sketching, note-taking, and more. Enjoy immersive entertainment with exceptional audio quality and stunning visuals on its vibrant display. Stay productive and multitask effortlessly with its powerful processor and ample memory. Experience enhanced security with the integrated fingerprint reader and privacy shutter for the webcam.

Inspiron 7306 2-in-1 Black
Setup and Specifications
Regulatory Model: P125G
Regulatory Type: P125G002
October 2020
Rev. A01
Notes, cautions, and warnings
NOTE: A NOTE indicates important information that helps you make better use of your product.
CAUTION: A CAUTION indicates either potential damage to hardware or loss of data and tells you how to avoid
the problem.
WARNING: A WARNING indicates a potential for property damage, personal injury, or death.
© 2020 Dell Inc. or its subsidiaries. All rights reserved. Dell, EMC, and other trademarks are trademarks of Dell Inc. or its subsidiaries. Other
trademarks may be trademarks of their respective owners.
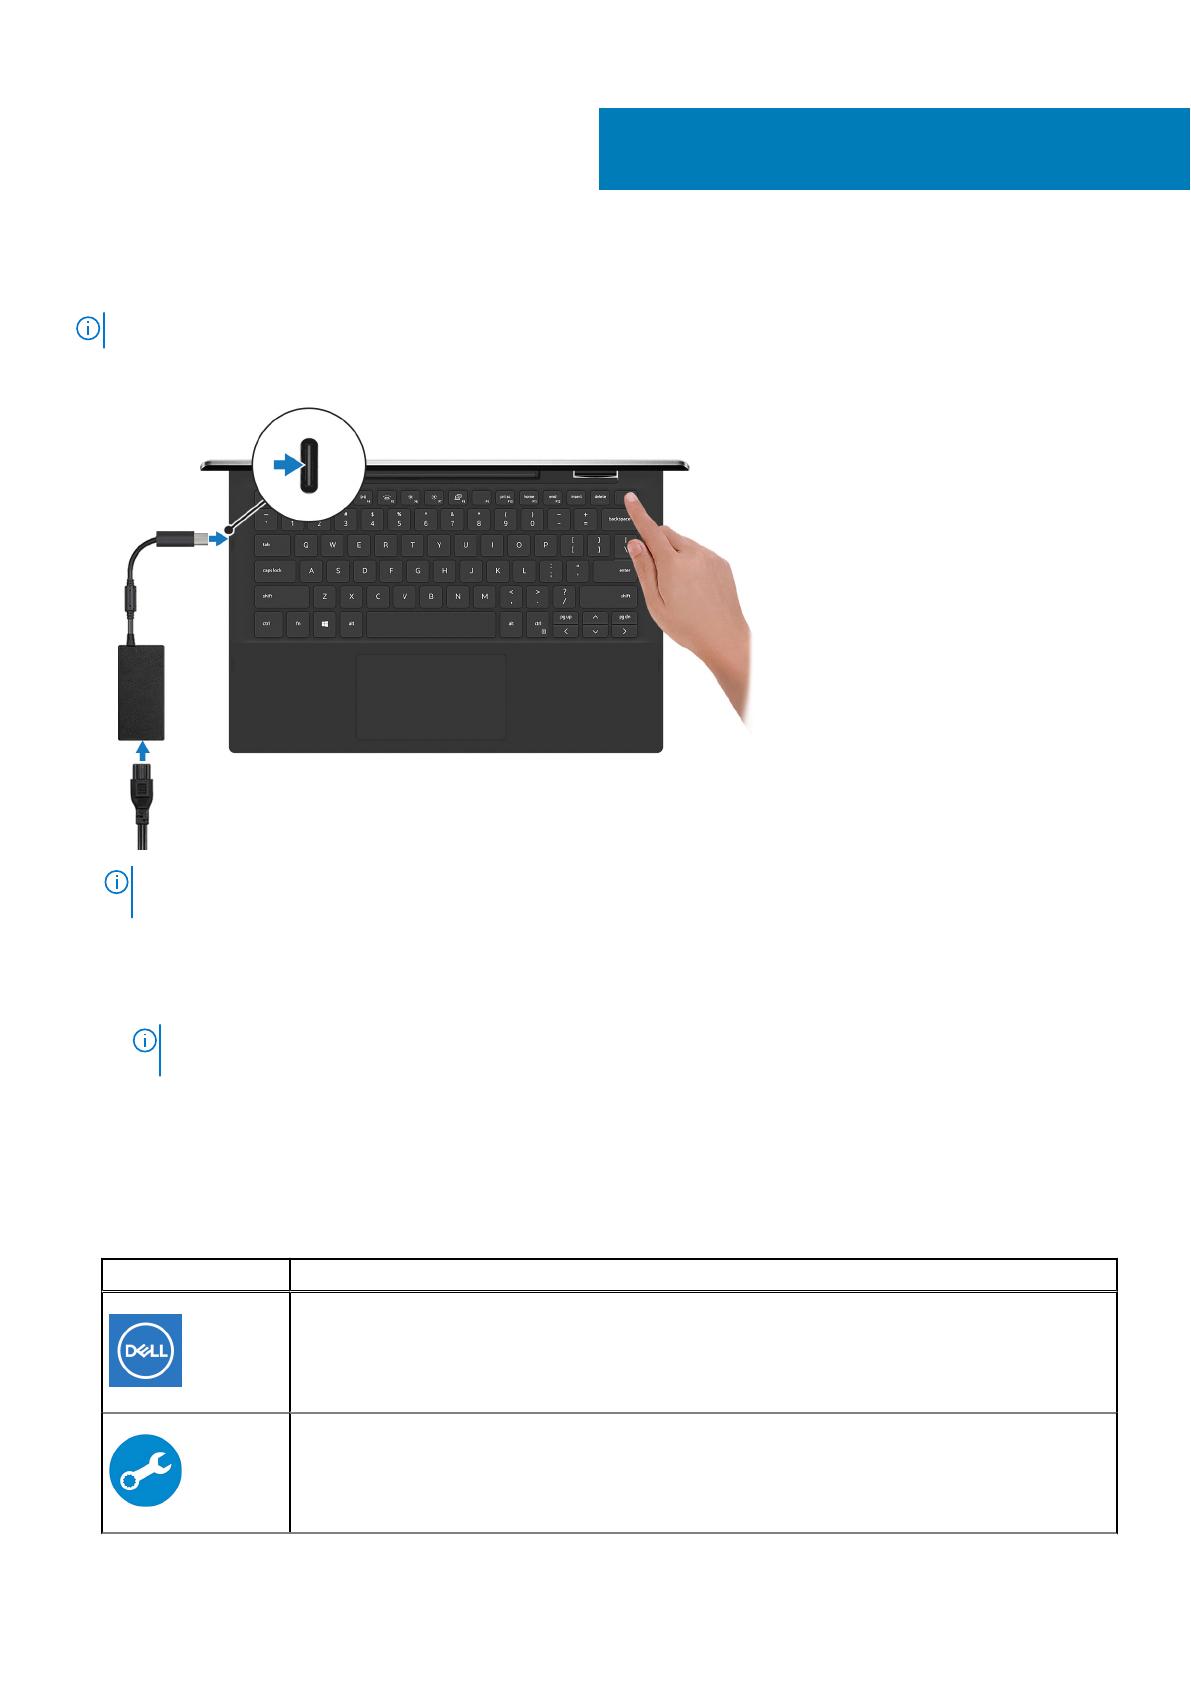
Chapter 1: Set up your Inspiron 7306 2-in-1 Black..........................................................................5
Chapter 2: Views of Inspiron 7306 2-in-1 Black.............................................................................. 7
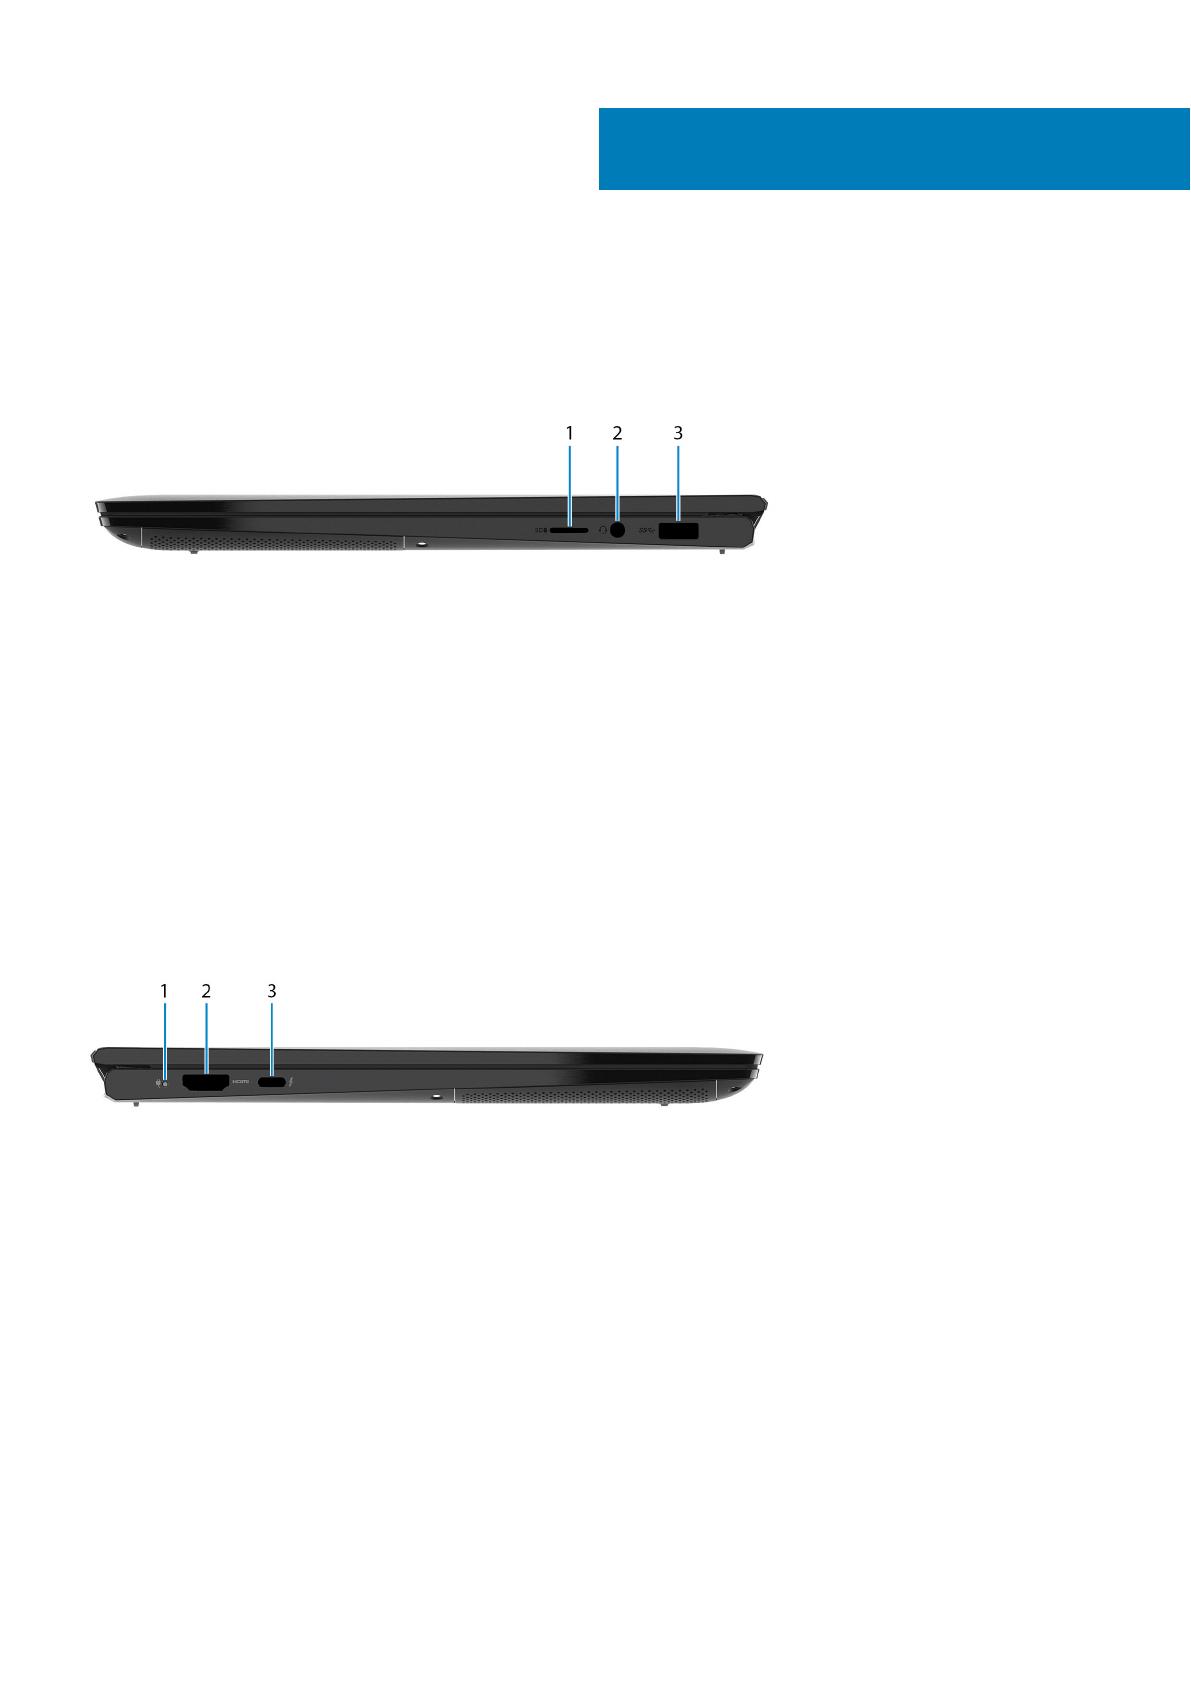
Right........................................................................................................................................................................................7
Left.......................................................................................................................................................................................... 7
Base........................................................................................................................................................................................ 8
Display.................................................................................................................................................................................... 9
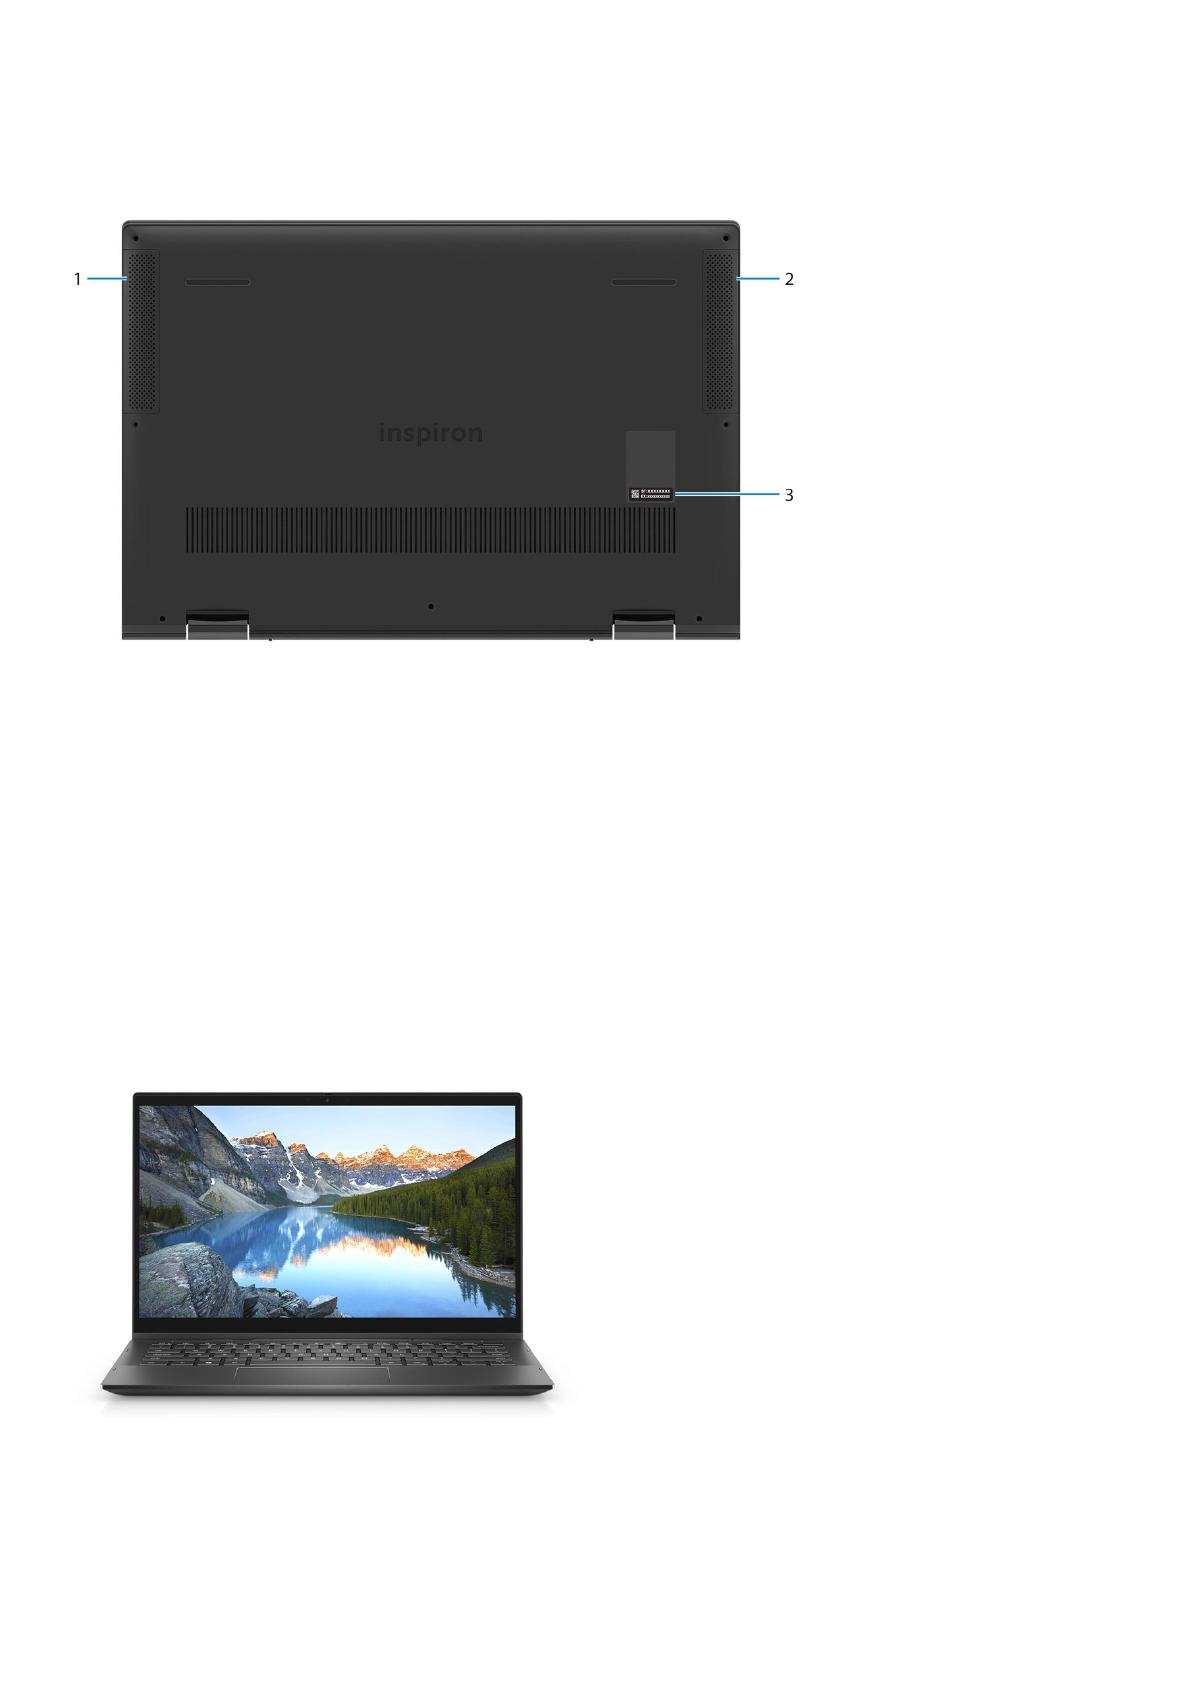
Bottom..................................................................................................................................................................................10
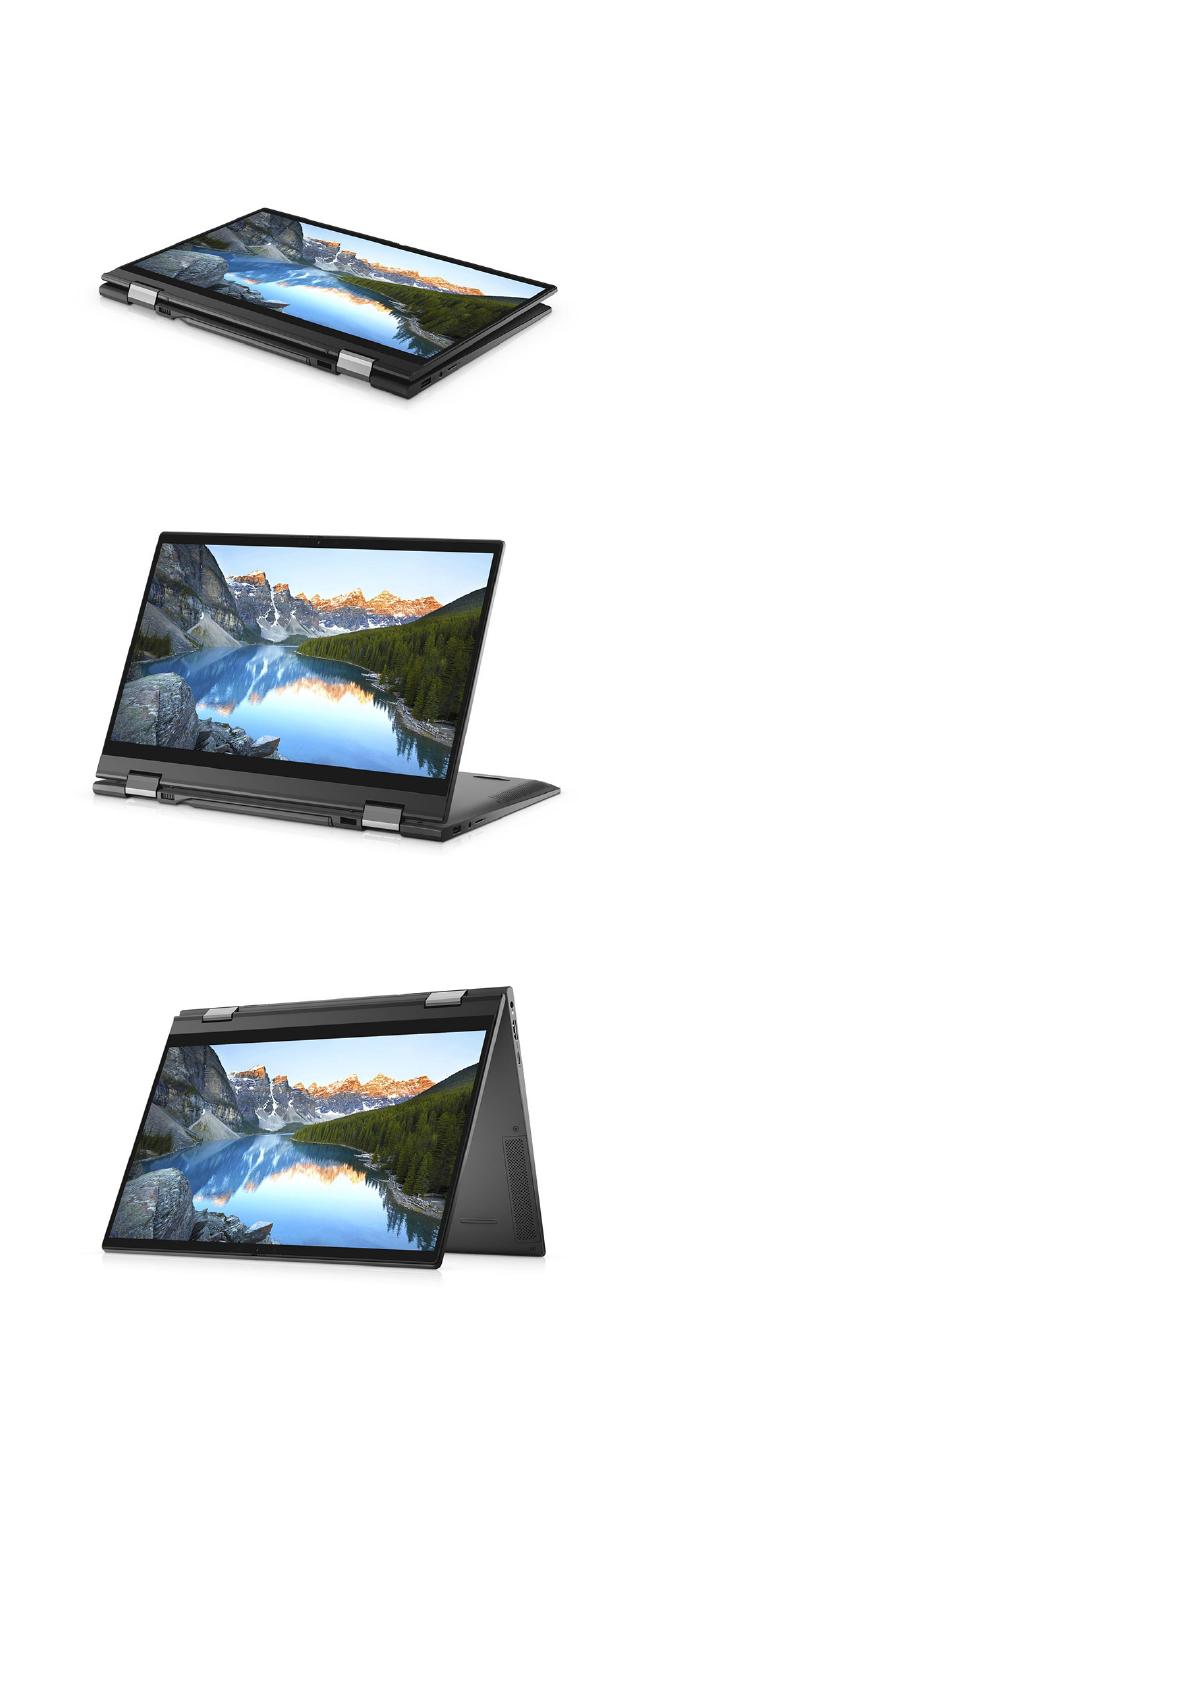
Modes................................................................................................................................................................................... 10
Chapter 3: Using the privacy shutter........................................................................................... 12
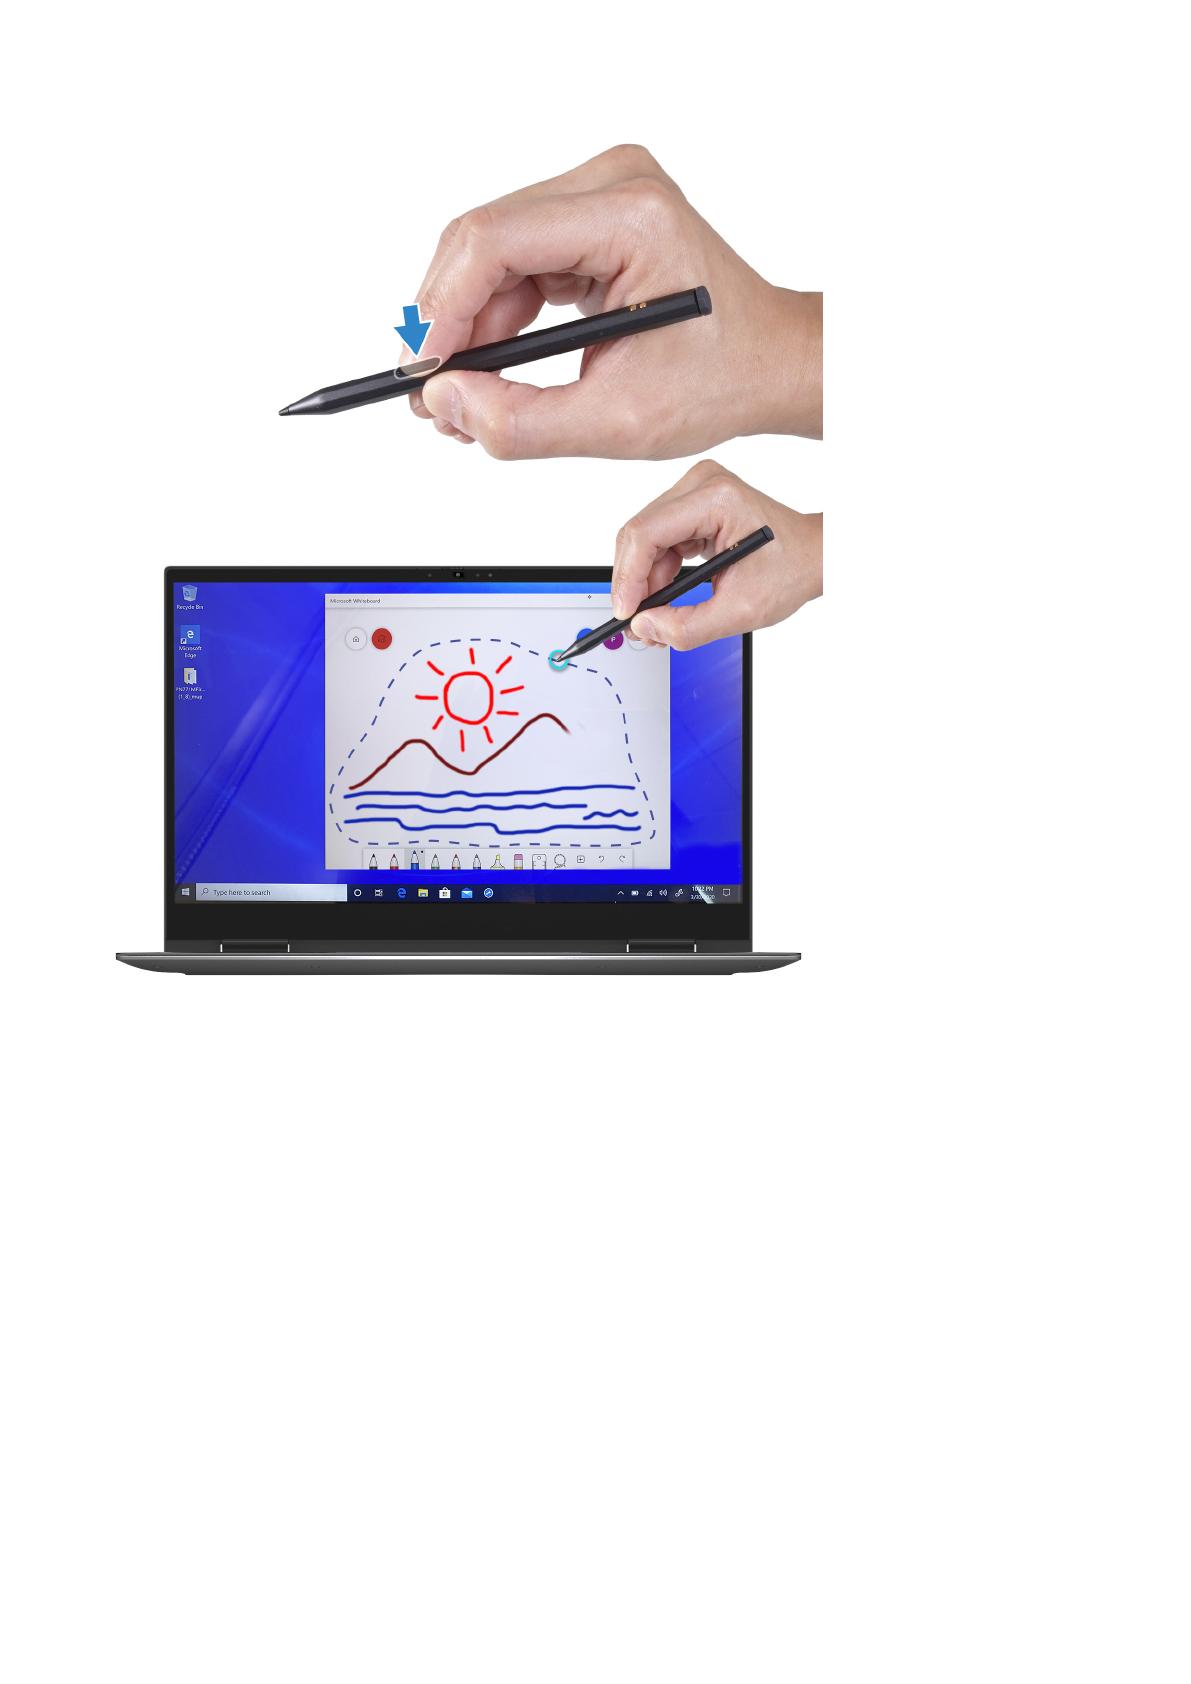
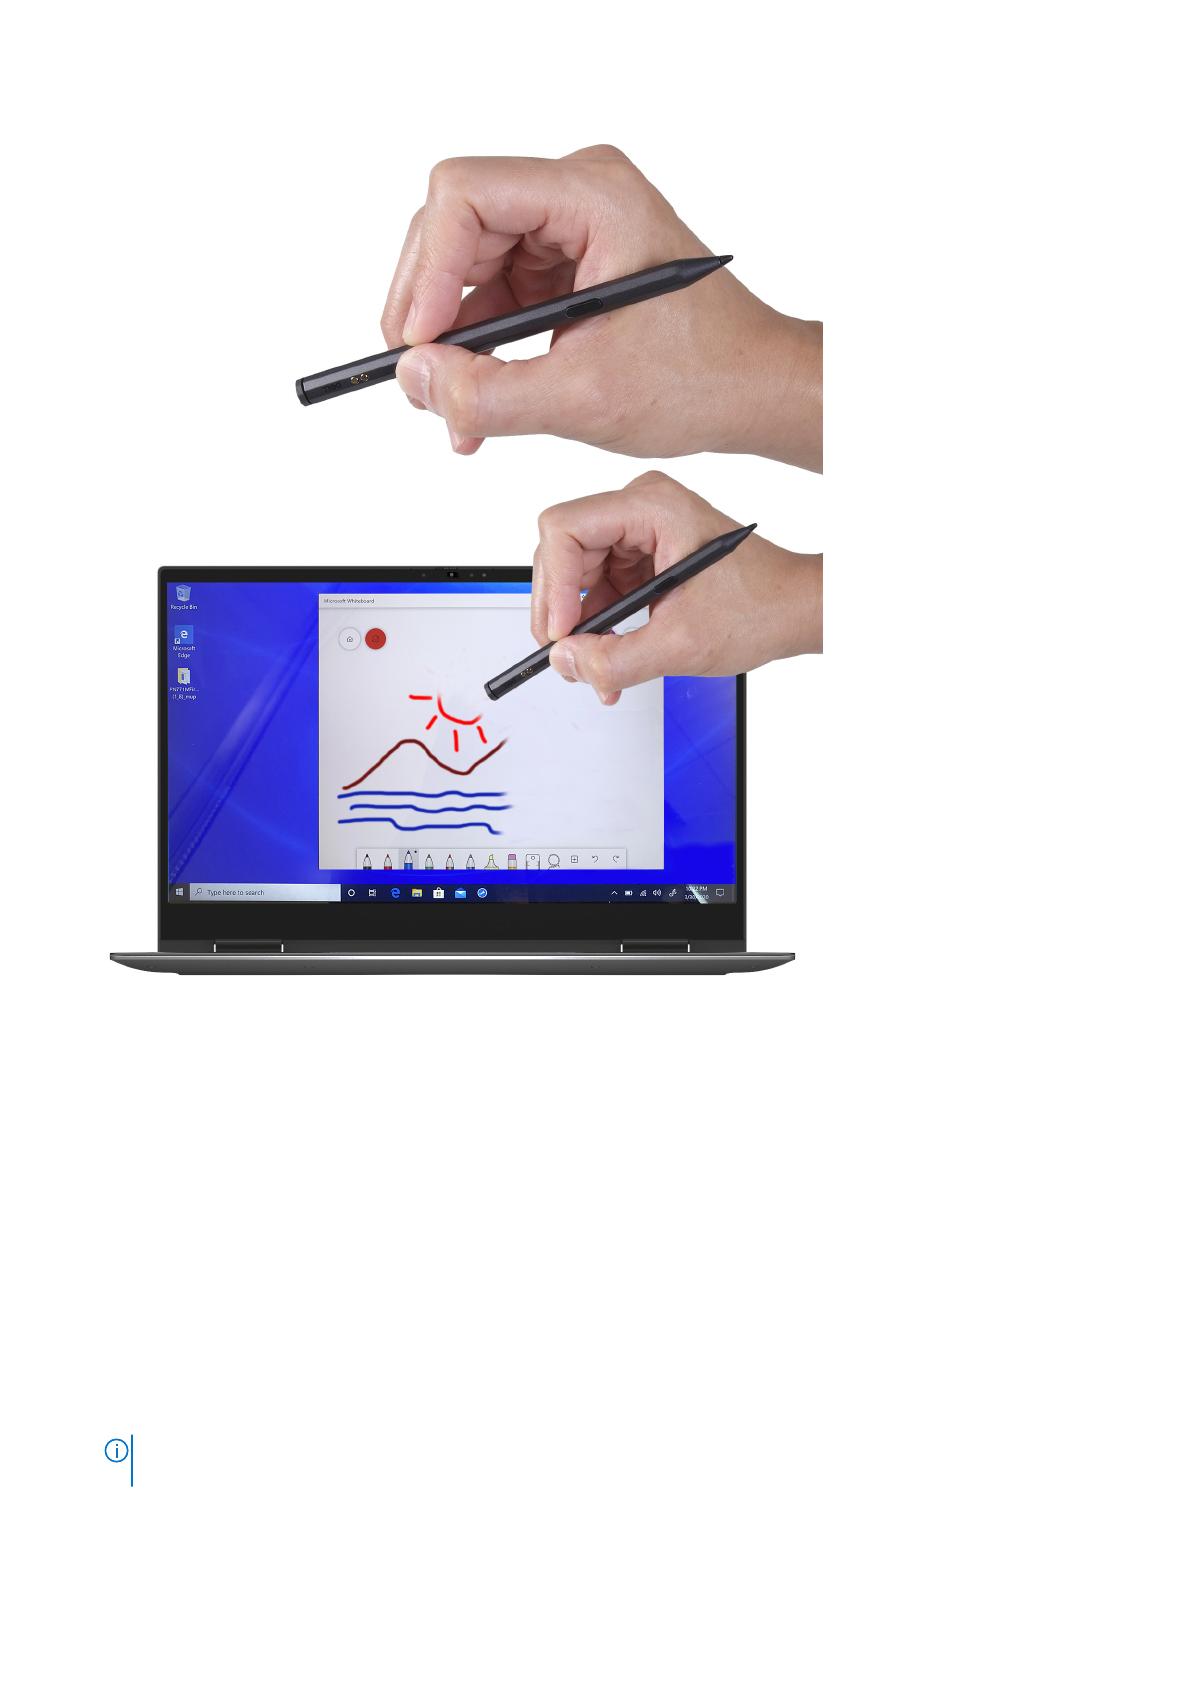
Chapter 4: Dell Chargeable Active Pen......................................................................................... 13
Active Pen Features.......................................................................................................................................................... 13
Pairing the Active Pen with new computer................................................................................................................. 14
Using the pen garage.................................................................................................................................................. 14
Using the tail button....................................................................................................................................................14
Pairing the Active Pen with existing computer.......................................................................................................... 14
Using the pen garage.................................................................................................................................................. 14
Using the tail button....................................................................................................................................................14
Reconnecting Bluetooth on the Active Pen................................................................................................................ 15
Using the pen garage.................................................................................................................................................. 15
Using the tail button....................................................................................................................................................15
Charging the Active Pen.................................................................................................................................................. 15
Checking the Active Pen battery status...................................................................................................................... 15
Using Windows Settings.............................................................................................................................................15
Using Windows taskbar.............................................................................................................................................. 16
Functions of the Active Pen............................................................................................................................................16
Configuring the tail button in Windows....................................................................................................................... 20
Configuring tail button in Pen & Windows Ink..................................................................................................... 20
Specifications of Active Pen........................................................................................................................................... 21
Active Pen troubleshooting............................................................................................................................................. 21
Chapter 5: Specifications of Inspiron 7306 2-in-1 Black...............................................................23
Dimensions and weight.................................................................................................................................................... 23
Processor............................................................................................................................................................................ 23
Chipset.................................................................................................................................................................................24
Operating system.............................................................................................................................................................. 24
Memory................................................................................................................................................................................24
External ports.....................................................................................................................................................................25
Internal slots....................................................................................................................................................................... 25
Wireless module.................................................................................................................................................................25
Audio.....................................................................................................................................................................................26
Storage................................................................................................................................................................................ 26
Contents
Contents 3
Intel Optane Memory H10 with solid-state storage (optional)...............................................................................27
Media-card reader.............................................................................................................................................................27
Keyboard..............................................................................................................................................................................28
Camera.................................................................................................................................................................................28
Touchpad.............................................................................................................................................................................29
Power adapter....................................................................................................................................................................29
Battery................................................................................................................................................................................. 30
Display..................................................................................................................................................................................30
Fingerprint reader.............................................................................................................................................................. 31
GPUIntegrated............................................................................................................................................................... 31
Operating and storage environment.............................................................................................................................32
Chapter 6: Keyboard shortcuts....................................................................................................33
Chapter 7: Getting help and contacting Dell................................................................................ 35
4 Contents
Set up your Inspiron 7306 2-in-1 Black
NOTE: The images in this document may differ from your computer depending on the configuration you ordered.
1. Connect the power adapter and press the power button.
NOTE: The battery may go into power-saving mode during shipment to conserve charge on the battery. Ensure that the
power adapter is connected to your computer when it is turned on for the first time.
2. Finish Windows setup.
Follow the on-screen instructions to complete the setup. When setting up, Dell recommends that you:
Connect to a network for Windows updates.
NOTE:
If connecting to a secured wireless network, enter the password for the wireless network access when
prompted.
If connected to the Internet, sign in with or create a Microsoft account. If not connected to the Internet, create an
offline account.
On the Support and Protection screen, enter your contact details.
3. Locate and use Dell apps from the Windows Start menuRecommended.
Table 1. Locate Dell apps
Resources Description
My Dell
Centralized location for key Dell applications, help articles, and other important information about
your computer. It also notifies you about the warranty status, recommended accessories, and
software updates if available.
SupportAssist
Proactively checks the health of your computers hardware and software. The SupportAssist OS
Recovery tool troubleshoots issues with the operating system. For more information, see the
SupportAssist documentation at www.dell.com/support.
1
Set up your Inspiron 7306 2-in-1 Black 5
Table 1. Locate Dell apps (continued)
Resources Description
NOTE: In SupportAssist, click the warranty expiry date to renew or upgrade your warranty.
Dell Update
Updates your computer with critical fixes and latest device drivers as they become available. For
more information about using Dell Update, see the knowledge base article SLN305843 at
www.dell.com/support.
Dell Digital Delivery
Download software applications, which are purchased but not pre-installed on your computer. For
more information about using Dell Digital Delivery, see the knowledge base article 153764 at
www.dell.com/support.
6 Set up your Inspiron 7306 2-in-1 Black
Views of Inspiron 7306 2-in-1 Black
Right
1. microSD-card slot
Reads from and writes to the microSD-card. The computer supports the following card types:
micro-Secure Digital (mSD)
micro-Secure Digital High Capacity (mSDHC)
micro-Secure Digital Extended Capacity (mSDXC)
2. Headset port
Connect headphones or a headset (headphone and microphone combo).
3. USB 3.2 Gen 1 port
Connect devices such as external storage devices and printers. Provides data transfer speeds up to 5 Gbps.
Left
1. Power and battery-status light
Indicates the power state and battery state of the computer.
Solid whitePower adapter is connected and the battery is charging.
Solid amberBattery charge is low or critical.
OffBattery is fully charged.
2. HDMI port
Connect to a TV or another HDMI-in enabled device. Provides video and audio output.
3. Thunderbolt 4 USB Type-C port with Power Delivery
Supports USB4 Gen 3 Type-C, DisplayPort 2.0, Thunderbolt 4 and also enables you to connect to an external display using a
display adapter. Provides data transfer rates of up to 20 Gbps for USB4 Gen 3 and up to 40 Gbps for Thunderbolt 4.
Supports Power Delivery that enables two-way power supply between devices. Provides up to 5 V/3 A power output that
enables faster charging.
2
Views of Inspiron 7306 2-in-1 Black 7
NOTE: You can connect a Dell Docking Station to the Thunderbolt 4 port. For more information, see the knowledge
base article SLN286158 at www.dell.com/support.
NOTE: A USB Type-C to DisplayPort adapter (sold separately) is required to connect a DisplayPort device.
NOTE: Connecting a USB Type-C power adapter to this port provides power to your computer and also charges the
battery.
Base
1. Pen garage
Allows you to charge the Active Pen. Replace the Active Pen here after use.
2. Touchpad
Move your finger on the touchpad to move the mouse pointer. Tap to left-click and two finger tap to right-click.
3. Left-click area
Press to left-click.
4. Right-click area
Press to right-click.
5. Power button with fingerprint reader
Press to turn on the computer if it is turned off, in sleep state, or in hibernate state.
When the computer is turned on, press the power button to put the computer into sleep state; press and hold the power
button for 10 seconds to force shut-down the computer.
Place your finger on the power button to log-in with the fingerprint reader.
NOTE:
You can customize power-button behavior in Windows. For more information, see Me and My Dell at
www.dell.com/support/manuals.
8 Views of Inspiron 7306 2-in-1 Black
Display
1. Left microphone
Provides digital sound input for audio recording and voice calls.
2. Infrared emitter
Emits infrared light, which enables the infrared camera to sense and track motion.
3. Privacy shutter
Slide the privacy shutter to cover the camera lens and protect your privacy when the camera is not in use.
4. Camera (RGB and Infrared)
This camera provides both three color channel (RGB) functionality that enables you to video chat, capture photos, and
record videos as well as Infrared (IR) functionality that enables Windows Hello tracking.
5. Camera-status light
Turns on when the camera is in use.
6. Infrared emitter
Emits infrared light, which enables the infrared camera to sense and track motion.
7. Right microphone
Provides digital sound input for audio recording and voice calls.
Views of Inspiron 7306 2-in-1 Black
9
Bottom
1. Left speaker
Provides audio output.
2. Right speaker
Provides audio output.
3. Service Tag label
The Service Tag is a unique alphanumeric identifier that enables Dell service technicians to identify the hardware
components in your computer and access warranty information.
Modes
Notebook
10
Views of Inspiron 7306 2-in-1 Black
Tablet
Stand
Tent
Views of Inspiron 7306 2-in-1 Black
11
Using the privacy shutter
1. Slide the privacy shutter to the left to access the camera lens.
2. Slide the privacy shutter to the right to cover the camera lens.
3
12 Using the privacy shutter
Dell Chargeable Active Pen
The Dell Chargeable Active Pen is a digital input device that enables you to write and draw. It contains integrated rechargeable
lithium-ion battery and supports Bluetooth 5.
Active Pen Features
1. Tail button
Use the tail button to erase the content that is written on the screen using the pen.
2. Active Pen status light
Indicates the different status of the Active Pen as listed in the following table.
NOTE:
The Active Pen status light is hidden. It only turns on when there is activity such as Bluetooth pairing, low
battery indication, or when battery is getting charged.
Table 2. Active Pen status light
Activity Light status What it means?
Bluetooth pairing White - Slow continuous pulsing (dim to
bright) white light for 60 seconds.
Active Pen is in pairing mode.
Bluetooth pairing White - Solid white light for 3 seconds
and turns off
Bluetooth connection is established.
Low battery Amber - Flashing amber light for 5
seconds and turns off
Battery is low or less than 10%.
Charging White - Solid Active Pen is getting charged and will
turn off when charging is complete.
Windows Ink apps White - Flicker once The Windows Ink apps are displayed.
Bluetooth reconnection failed Amber - Flickers continuously Indicates the Bluetooth reconnection
failure.
3. Pogo pins (2)
Enables charging the Active Pen when the pen is placed in the garage.
NOTE: Ensure both pogo pins on the Active Pen are aligned with the contact points on the pen garage.
4. Barrel button
This button opens the context menu or enables right-click.
5. Tip
Use the tip to move the pointer on the touchscreen. Enables you to write, draw, and select objects.
4
Dell Chargeable Active Pen 13
Pairing the Active Pen with new computer
Using the pen garage
NOTE: Ensure that the Bluetooth on your computer is turned on before performing the following steps.
To pair the Active Pen on a new computer, do the following:
1. Place the Active Pen in the pen garage.
Show notifications connect using Swift Pair appears on the right side of the taskbar.
2. Click Yes.
New Bluetooth found appears on the right side of the taskbar.
3. Click Connect.
Using the tail button
NOTE: Ensure that the Bluetooth on your computer is turned on before performing the following steps.
To pair the Active Pen to a new computer using the tail button, do the following:
1. Press and hold the tail button for five seconds, until the LED starts to blink white.
Show notifications connect using Swift Pair appears on the right side of the task bar.
2. Click Yes.
New Bluetooth found appears on the right side of the taskbar.
3. Click Connect.
Pairing the Active Pen with existing computer
Using the pen garage
NOTE: Ensure that the Bluetooth on your computer is turned on before performing the following steps.
To pair the Active Pen to a existing computer, do the following:
1. Place the Active Pen in the pen garage.
On the taskbar, a notification appears to add bluetooth or other devices.
2. Click Add Bluetooth or other devices.
Add a device window appears.
3. Click Bluetooth.
A list of bluetooth enabled devices within the range are displayed.
4. Click PN771M Pen from the list of devices displayed.
5. Click Connect, and then click Done.
Using the tail button
NOTE: Ensure that the Bluetooth on your computer is turned on before performing the following steps.
You can also pair the Active Pen to existing computer, using the tail button.
1. Press and hold the tail button for five seconds, until the LED starts to blink white.
New Bluetooth pen found message is displayed on the taskbar.
2. Click Add Bluetooth or other devices.
Add a device window appears.
3. Click Bluetooth.
14
Dell Chargeable Active Pen
A list of bluetooth enabled devices within the range are displayed.
4. Click PN771M Pen from the list of devices displayed.
5. Click Connect, and then click Done.
Reconnecting Bluetooth on the Active Pen
If the Active Pen is out of the Bluetooth range, you can reconnect the Active Pen to your computer.
Using the pen garage
NOTE: Ensure that the bluetooth on your computer is turned on before performing the following steps.
To reconnect the Bluetooth, do the following:
1. Place the Active Pen in the pen garage.
2. In the taskbar, click Bluetooth, and then click Go to Settings.
The Bluetooth & other devices window is displayed.
3. In Bluetooth & other devices window, the status of the Active Pen is changed from paired to connected.
Using the tail button
NOTE: Ensure that the Bluetooth on your computer is turned on before performing the following steps.
You can also reconnect the Active Pen using the tail button.
1. Click the tail button one time, until the LED starts to blink white.
2. In the taskbar, click Bluetooth, and then click Go to Settings.
The Bluetooth & other devices window is displayed.
3. In Bluetooth & other devices window, the Active Pen status changes from paired to connected.
Charging the Active Pen
To charge the Active Pen, do the following:
1. Align the two pogo pins on the Active Pen with the contact points on the Active Pen garage.
2. Place the Active Pen into the Active Pen garage. The Active Pen starts charging.
NOTE:
The estimated time taken to charge the Active Pen is given in the following table.
Table 3. Charging time
Estimated charging time Battery charge status
5 minutes 0% to 20%
30 minutes 0% to 98%
45 minutes 100%
Checking the Active Pen battery status
Using Windows Settings
You can check the Active Pen battery status in the Bluetooth & other devices window.
Dell Chargeable Active Pen
15
1. Click Settings.
2. Click Bluetooth & other devices.
The battery status of the Active Pen is displayed under Mouse, keyboard & pen.
Using Windows taskbar
You can also view the battery status of the Active Pen from the taskbar.
1. On the taskbar, click Bluetooth Devices.
2. Click Show Bluetooth Devices.
The Bluetooth & other devices window is displayed. The battery status of the Active Pen is displayed under Mouse,
keyboard & pen category.
Functions of the Active Pen
NOTE: The functions of the Active Pen that is listed below work only on supported applications such as Microsoft
Whiteboard.
1. Draw
Touch the tip of the Active Pen on the screen and start drawing.
16 Dell Chargeable Active Pen
2. Enabling right-click
a. Press and hold the barrel button on the Active Pen.
b. Tap the tip of the Active Pen on the screen once to right-click.
Dell Chargeable Active Pen
17
3. Make a selection
a. Press and hold the barrel button on the Active Pen.
b. Place the tip of the Active Pen on the screen and continue moving it to select the content.
18
Dell Chargeable Active Pen
4. Erase
Place the tail button of the Active Pen on the screen and continue moving it to erase the content.
Dell Chargeable Active Pen
19
Configuring the tail button in Windows
When the Active Pen is paired using Windows 10, it supports Windows Ink workshop shortcuts. You can configure the shortcuts
as listed below.
1. Click Settings.
The Settings window is displayed.
2. Click Pen & Windows Ink.
The Pen & WIndows Ink window is displayed.
Configuring tail button in Pen & Windows Ink
1. Click once
When the tail button is clicked once, the screen snipping is enabled by default. Then place the tip of the Active Pen on the
screen and draw the selection area that you want to snip.
NOTE:
You can also configure to open other applications like Windows Ink Workspace, OneNote, Launch a classic app or
Launch a universal app on a single click of the tail button.
2. Double-click
20
Dell Chargeable Active Pen
  • Page 1 1
  • Page 2 2
  • Page 3 3
  • Page 4 4
  • Page 5 5
  • Page 6 6
  • Page 7 7
  • Page 8 8
  • Page 9 9
  • Page 10 10
  • Page 11 11
  • Page 12 12
  • Page 13 13
  • Page 14 14
  • Page 15 15
  • Page 16 16
  • Page 17 17
  • Page 18 18
  • Page 19 19
  • Page 20 20
  • Page 21 21
  • Page 22 22
  • Page 23 23
  • Page 24 24
  • Page 25 25
  • Page 26 26
  • Page 27 27
  • Page 28 28
  • Page 29 29
  • Page 30 30
  • Page 31 31
  • Page 32 32
  • Page 33 33
  • Page 34 34
  • Page 35 35

Dell Inspiron 7306 2-in-1 User guide

Category
Notebooks
Type
User guide

Dell Inspiron 7306 2-in-1: With its versatile 2-in-1 design, this laptop seamlessly transforms into a tablet, offering flexibility for various usage scenarios. Equipped with an active pen, unleash your creativity with natural and precise digital sketching, note-taking, and more. Enjoy immersive entertainment with exceptional audio quality and stunning visuals on its vibrant display. Stay productive and multitask effortlessly with its powerful processor and ample memory. Experience enhanced security with the integrated fingerprint reader and privacy shutter for the webcam.

Ask a question and I''ll find the answer in the document

Finding information in a document is now easier with AI