Page is loading ...

DOC346.53.80493
AS950 Controller
06/2016, Edition 8
Operations


Table of Contents
Product overview....................................................................................................... 3
User interface and navigation.............................................................................. 3
Keypad and display description................................................................................... 3
Main menu overview.................................................................................................... 4
Operation....................................................................................................................... 5
Configuration............................................................................................................... 5
Configure the general settings.............................................................................. 5
Configure the hardware settings........................................................................... 6
Configure the sensors................................................................................... 6
Configure the AUX I/O port......................................................................... 10
Configure data logging....................................................................................... 11
Select and configure the alarms......................................................................... 12
Sampling program configuration......................................................................... 13
Select the type of program.......................................................................... 13
Enter the bottle and tubing information....................................................... 14
Select the sample pacing............................................................................ 14
Select the sample volume........................................................................... 15
Select the sample distribution—multiple bottles.......................................... 16
Select when the sampling program starts................................................... 19
Select when the program stops................................................................... 20
Configure cascade sampling (optional).............................................................. 20
Configure synchronized sampling (optional)...................................................... 21
Calibration.................................................................................................................. 21
Volume calibration.............................................................................................. 21
Calibrate the sample volume—liquid detector enabled............................... 22
Adjust the sample volume calibration (optional).......................................... 22
Calibrate the sample volume—liquid detector disabled.............................. 23
Verify the sample volume............................................................................ 23
Calibrate the sensors.......................................................................................... 23
Calibrate the cabinet temperature—AWRS sampler.......................................... 24
Start or stop the program........................................................................................... 24
Show data and alarms............................................................................................... 24
Show the program status.................................................................................... 24
Show the sample history.................................................................................... 26
Show the measurement data.............................................................................. 26
Show the event log............................................................................................. 26
Show the alarm log............................................................................................. 27
Show system information........................................................................................... 27
Save logs and settings to a USB drive...................................................................... 27
Use FSDATA Desktop (optional)............................................................................... 28
Manual operation....................................................................................................... 28
Collect a grab sample......................................................................................... 28
Move the distributor arm..................................................................................... 28
Start or stop the pump........................................................................................ 29
Troubleshooting....................................................................................................... 29
Do a diagnostic test................................................................................................... 29
1

Calibrate the liquid detector....................................................................................... 30
Appendix...................................................................................................................... 30
Manning roughness coefficients................................................................................ 30
Table of Contents
2

Product overview
N O T I C E
The manufacturer is not responsible for any damages due to misapplication or misuse of this product including,
without limitation, direct, incidental and consequential damages, and disclaims such damages to the full extent
permitted under applicable law. The user is solely responsible to identify critical application risks and install
appropriate mechanisms to protect processes during a possible equipment malfunction.
The AS950 controller is the controller for the AS950 AWRS, refrigerated and portable samplers.
Refer to Figure 1 on page 3. The AS950 controller can also be used as the controller for the
SD900 samplers and 900MAX samplers (AWRS, refrigerated and portable).
Refer to the sampler installation and maintenance documentation for the AS950 controller
specifications, installation, startup and maintenance information and the AS950 controller
replacement parts and accessories.
User interface and navigation
Keypad and display description
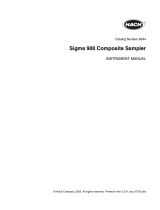
Figure 1 shows the controller keypad. Refer to Table 1 for the functions of the keys on the keypad.
Refer to Table 2 for the indicator light description.
Push the power key to set the controller to on or off. To save power, the display switches off after
5 minutes of no keypad use. Push a key to set the display back to on.
Figure 1 Controller keypad and display
1 Power key 5 Indicator light 9 CALIBRATION key
2 Arrow keys 6 STATUS key 10 MANUAL OPERATION key
3 Soft keys 7 MENU key 11 RUN/HALT key
4 Display 8 STOP key
English 3

Table 1 Key functions
Key Function
Soft keys Selects the function shown on the display.
Arrow keys Scrolls through the menus and the options. Enters values. Push and hold the arrow
keys to scroll through values quickly.
MENU Shows the main menu. Refer to Main menu overview on page 4.
STOP Stops the pump.
CALIBRATION Shows the Calibration menu. Refer to the Calibration option in Table 3 on page 4.
Power Sets the power to on or off.
MANUAL OPERATION Shows the Manual Operation menu. Refer to the Manual Operation option in Table 3
on page 4.
RUN/HALT Starts, temporarily stops or stops the sampling program.
STATUS Shows the status of the current sampling program and the power supply. Shows the
sample status, data log status, alarm status and hardware status. Refer to Show the
program status on page 24.
Table 2 Indicator light description
Color Status Description
Red Error The controller is on. One or more of the measurements the sampler is configured to use (e.g.,
pH and flow) is not available. Refer to Troubleshooting on page 29.
Green No Error The controller is on. There are no errors.
Main menu overview
Table 3 shows the main menu options.
Table 3 Main menu options
Option Description
Programming
Configures data logging, the alarms and the sampling program.
Review Data
Shows the sampling history (e.g., samples collected and missed samples). Shows the
measurement data (the data log).
Manual Operation
Collects a grab sample, moves the distributor arm to a selected bottle position or operates
the pump in the forward or reverse direction.
Calibration
Calibrates the sample volume, the attached sensors and the analog input (for flow pacing)
at the AUX port, if applicable.
Export/Import
Saves measurement data, sample history and program settings to a memory stick. Copies
the program settings from a memory stick to the sampler.
4 English

Table 3 Main menu options (continued)
Option Description
Hardware Setup
Configures the sampler, sampler ports and attached sensors. Configures and calibrates the
liquid detector.
Diagnostics
Shows the Status screen, event log, alarm log and memory use. Shows the status and
configuration of the AUX I/O port. Shows the cabinet temperature (AWRS sampler only).
Completes a diagnostic test of the attached sensors, distributor arm, keypad and display.
Shows the total run time, forward run time and reverse run time of the pump motor.
General settings
Shows the instrument information (e.g., serial number). Configures the display settings (e.g.,
language, date and measurement units). Configures the security settings. Configures the
tubing life reminder setting. Erases the sampling history and/or the selected logs.
Operation
Configuration
Configure the general settings
1. Push MENU.
2. Select General Settings.
3. Select an option.
Push the UP and DOWN arrows to change the value. Push the LEFT and RIGHT arrows to move
the cursor.
Option Description
Date and Time Sets the time and date. Selects the format for the date and time. Options: dd/mm/yyyy
12h, dd/mm/yyyy 24h, mm/dd/yyyy 12h, mm/dd/yyyy 24h, yyyy/mm/dd 12h, yyyy/mm/dd
24h.
Display Adjusts the brightness of the display (default: 50%).
Security Enables security for password protection. When enabled, the user settings that can
change the data in the logs or the sampling program cannot be changed until the
password is entered.
When the display switches off or the controller power is set to off, the password must be
entered again.
Language Sets the display language.
Unit Preferences Unit System—Sets the system of measurement that shows on the display. Options: US
Customary or Metric. Select Units—Sets the individual measurement units that show on
the display (e.g., level, velocity, flow, temperature, surface velocity, distance, minimum
distance, maximum distance, surge level, rain, cabinet temperature, level raw
1
and surge
velocity).
Tubing Life Sets a reminder when the pump tubing is to be changed. Enter the number of pump
cycles used for the reminder (10 to 99,999).
An event is recorded to the event log when the total pump cycles are more than the pump
cycles selected. Also, an error icon shows near to the tubing life setting on the
Diagnostics>Pump screen.
After the pump tubing is changed, select Diagnostics>Pump>Reset Counters to reset the
pump cycle count to 0.
1
Level raw is the value of the level measurement before the algorithm that adjusts for the
Bernoulli effect is applied.
English 5

Option Description
Clear Data Erases the sample history and/or the log(s) selected. Options: Sample History, Data Log,
Event Log, Alarm Log and Diagnostics Log.
Restore Factory
Defaults
Sets all the controller settings back to the factory defaults. Erases the logs and sample
history. The display shows the startup screen for approximately 2 minutes while the
defaults are restored back to the factory defaults.
Configure the hardware settings
1. Push MENU.
2. Select Hardware Setup.
3. Select an option.
Option Description
Sampler Site ID—Enters the name for the sampling location (16 characters). Rinses—Sets the
number of intake tube rinses before a sample is collected (0 to 3). Sample Retries—Sets
the number of sampling tries after a sampling failure occurs (0 to 3).
Configure
Sensors
Configures the attached sensors. Refer to Configure the sensors on page 6.
AUX and I/O Port Type—Configures the AUX I/O port. Refer to Configure the AUX I/O port on page 10.
Liquid Detect Enables or disables the liquid detector. Calibrates the liquid detector
2
. Refer to Calibrate
the liquid detector on page 30.
Enabled (default)—Select enabled to use the liquid detector to sense liquid in the tube,
which is an important part of volume accuracy and repeatability. Make sure to select
enabled in applications where liquid level changes occur. Disabled—Select disabled
when the sample is collected from a pressurized line or when the sampler is below the
sample source, which can result in trapped water.
Rain and
RS485 Port
Configures the Rain port for connection to the Hach tipping bucket rain gauge or
RS485 communications. Options: Rain or RS485.
When RS485 is selected, sets the Modbus address (1 to 255), the baud rate (9600,
19200, 38400, 57600 or 115200) and the parity (None, Even or Odd).
Thermal (AWRS
sampler)
Sets the temperature inside the AWRS refrigerated cabinet. Options: 2.00 to 10.00 °C
(default: 4.00 °C). Calibrates the temperature inside the AWRS refrigerated cabinet.
Configure the sensors
1. Push MENU.
2. Select Hardware Setup>Configure Sensors>[Select Sensor].
3. Select an option.
Note: Not all of the options that follow apply to all sensors.
Refer to Table 4 for descriptions of all the pH sensor settings. Refer to Table 5 for descriptions of
all the US900x sensor settings. Refer to Table 6 for descriptions of all the AV9000 sensor
settings.
Option Description
Setup Wizard Configures all the sensor settings. Calibrates the sensor. Obey the screen
prompts to complete the procedures. Refer to Calibrate the sensors
on page 23.
Calibration Calibrates the sensor. Refer to Calibrate the sensors on page 23.
Basic Settings Configures the basic sensor settings.
2
Calibrate the liquid detector only with the guidance of technical support.
6 English

Option Description
Flow Settings Configures the sensor settings that are used to calculate the flow.
Application Settings
(US900x)
Configures the sensor settings that are used to control the sensor operation.
Advanced Settings Configures the optional, advanced sensor settings.
Restore Defaults Sets the sensor settings and the sensor calibration back to the factory defaults.
Table 4 Configuration options—pH sensor
Option Description
Basic Settings
AC Frequency Selects the power line frequency to get the best noise rejection. Options: 50 or 60 Hz (default).
Always On Sets the sensor to operate continuously or to only operate during the data logging interval for the
sensor. Options: Enabled (default) or Disabled. Select Disable to increase the battery life.
Table 5 Configuration options—US900X ultrasonic sensor
Option Description
Basic Settings
Sensor Type Selects the sensor type. Options: Downlooking or In-Pipe.
Sediment Enters the level of sediment in the bottom of the channel. Options: 0.00 to 0.30 m (0.00 to
12.00 in.).
Level Offset
(optional)
Enters the difference between the measured level and the actual level. Options: –0.61 to
0.61 m (–24.00 to 24.00 in.). Use Level Offset to correct an offset error without having to do
a calibration.
Adjust Level Completes a distance measurement to use for level adjust.
Flow Settings
Device Selects the primary device. Enters the device specifications. Refer to Table 7.
Application Settings
Filter Size Selects the number of readings the sampler does and averages for one data point. Options:
1 to 50 (default: 16).
Reject High Selects the number of the highest values that are discarded. Options: 0 to 49 (default: 4).
For example, if the filter size is 16 and the reject high and reject low values are 4, the
sensor collects 16 measurements and discards the highest 4 and the lowest
4 measurements. The other 8 values are used to calculate the average data point of level.
Reject Low Select the number of the lowest values that are discarded. Options: 1 to 49 (default: 4).
Number of Holds Selects the number of times the last recorded data point is saved to the log if a failed
reading occurs due to echo loss. Options: 0 to 15 (default: 4).
For example, if the number of holds is 5, the last data point replaces the next five
consecutive failed readings or until a successful reading occurs.
Median Filter Selects the number of data points used in the median filter. The sampler takes median of 3,
5, 7, 9 or 11 data points to decrease noise or outliers (default: None). Only the median
values are logged. Raw data values are not logged.
Advanced Settings
Sample Rate Selects the number of measurements done per second. Options: 1 to 10 (default:
4 seconds).
English 7

Table 5 Configuration options—US900X ultrasonic sensor (continued)
Option Description
Min Dist Selects the minimum distance from the sensor to the water. Options: 0.13 to 3.96 m
(5.25 to 150.75 in.). Distances less than the minimum distance of the sensor are ignored.
Max Dist Selects the maximum distance from the sensor to the water. Options: 0.13 to 3.96 m
(10.50 to 156.00 in.). Distances more than the maximum distance of the sensor are
ignored.
Profile Do not change this setting without guidance from technical support. This setting is used to
increase the performance of the sampler when the sampler is used in very difficult
conditions. Options: Free Air Low, Free Air Mid (default), Free Air High, Stilling Tube Low,
Stilling Tube Mid or Stilling Tube High.
Transmit Power Do not change this setting without guidance from technical support. This setting is used to
increase the performance of the sampler when the sampler is used in very difficult
conditions. Options: 2 to 30 (default: 10).
Table 6 Configuration options—AV9000S sensor
Option Description
Basic Settings
Sensor Direction Selects the installation direction of the sensor. Select Reversed if the sensor is installed in the
reverse direction. Options: Normal (default) or Reversed.
Sensor Offset Sets the offset used to adjust the measured level value to the correct value.
Sediment Enters the level of sediment in the bottom of the channel. Options: 0.00 to 0.30 m (0.00 to
12.00 in.).
Level Offset
(optional)
Enters the difference between the measured level and the actual level. Options: –0.61 to
0.61 m (–24.00 to 24.00 in.). Use to correct an offset error without having to do a calibration.
Flow Settings
Device Selects the primary device. Enters the device specifications. Refer to Table 7.
Advanced Settings
AV9000S Level Filter Settings—Selects the type of filter and the filter size (factory default is none). Takes the
average and/or median of 3, 5, 7, 9 or 11 data points to reduce noise or outliers. Only the
average and/or median values are logged—raw data values are not logged. A significant
delay can occur before sudden changes in flow are logged, therefore this option is not
recommended for stormwater applications. Options: None, Average, Median or Average and
Median.
AV9000S
Velocity
Neg. Vel to Zero—Enable to replace all negative velocity measurements with 0. Site
Multiplier—The value that adjusts the sensor velocity reading to be the same as the velocity
reading from a different instrument. If not sure, use the default value of 1.0. Low Level
Cutout—Forces the velocity to a substitute value when the level measurement is below a
user-specified value. The value of the substitute velocity is typically 0. The factory default is
enabled at 0.8 inches. Filter Settings—Selects the type of filter and the filter size (factory
default is none). Takes the average and/or median of 3, 5, 7, 9 or 11 data points to reduce
noise or outliers. Only the average and/or median values are logged—raw data values are not
logged. A significant delay can occur before sudden changes in flow are logged, therefore this
option is not recommended for stormwater applications. Options: None, Average, Median or
Average and Median.
8 English

Table 7 Primary device options
Option Description
Area Velocity Select the method of calculating the area, then go to Table 8. Options: Circular, Rectangular,
Trapezoidal or U-Shaped.
Flume Select an option, then go to Table 9. Options: British Rectangle, Cuthroat, H-Type, Leopold-
Lagco, Montana, Palmer-Bowlus, Parshall, RBC, San Dimas or Trapezoidal.
Manning Enter the pipe shape. Options: Circular, Rectangular, Trapezoidal or U-Shaped.
Enter the pipe diameter or the width(s) and height, percent slope and manning roughness
coefficient. Refer to Manning roughness coefficients on page 30.
Percent slope—1 unit per hundred units = 0.01 slope. For example, 1 m of decline for every
100 m = 0.01 slope
Nozzle Enter the nozzle shape. California Pipe—Enter the nozzle diameter (0.01 to 0.91 m). Kennison
—Enter the nozzle diameter (6, 8, 10, 12, 16. 20, 24, 30 or 36 in.) and half-section or no half-
section.
Weir Select an option, then go to Table 10. Options: Cipolletti, Compound Notch, Contracted
Rectangular, Non-Contracted Rectangle or Thel-Mar. V-Notch.
Table 8 Area velocity options
Option Description
Circular Enter the pipe diameter. For the US900x, in addition enter the source of the velocity measurement.
For example, when an ultrasonic sensor is connected to Sensor 1 port and a submerged area
velocity sensor is connected to Sensor 2 port, select Sensor 2 port.
Rectangular Enter the width and the height of the channel. For the US900x, in addition enter the source of the
velocity measurement.
Trapezoidal Enter the width of the top and bottom of the channel and the height of the channel. For the
US900x, in addition enter the source of the velocity measurement.
U-shaped Enter the channel width. Options: 10 to 2540 cm (4 to 999.99 in.). For the US900x, in addition enter
the channel height and the source of the velocity measurement.
Table 9 Flume options
Option Description
British Rectangle Enter the flume throat length, width and flume throat width.
Cutthroat Enter the flume width and length.
H-Large Enter the flume size. Options: 3.0 or 4.0 ft.
H-Medium Enter the flume size. Options: 0.50, 0.75, 1.00, 1.50, 2.00, 2.50, 3.00 or 4.50 ft.
H-Small Enter the flume size. Options: 0.4, 0.6, 0.8 or 1.0 ft.
Leopold-Lagco Enter the flume size. Options: 4, 6, 8, 10, 12, 15, 18, 20, 21, 24, 27, 30, 36, 42, 48, 54 or
60 inches.
Montana Enter the flume throat width. Options: 1, 2, 3, 6, 9, 12, 18, 24, 30, 36, 48, 60, 72, 84, 96, 108,
120, 144, 180, 240, 300, 360, 480 or 600 inches.
Palmer-Bowlus Enter the flume throat size. Options: 4, 6, 8, 10, 12, 15, 18, 21, 24, 27, 30, 36, 42, 48, 60 or
72 inches.
Parshall Enter the flume size. Options: 1, 2, 3, 6, 9, 12, 18, 24, 30, 36, 48, 60, 72, 84, 96, 108, 120,
144, 180, 240, 300, 360, 480 or 600 inches.
RBC Enter the flume size. Options: 50, 75, 100, 150 or 200 mm.
English 9

Table 9 Flume options (continued)
Option Description
San Dimas Enter the flume width.
Trapezoidal Enter the flume size. Options: 12" 45°, 2" 45°, 8" 60°, Large 60°, Small 60° or XLarge 60°.
Table 10 Weir options
Option Description
Cipolletti Enter the crest length.
Compound V-Notch Enter the angle of notch in degrees (22.5 to 120°), notch height, crest width and
contracted or non-contracted.
Contracted Rectangular Enter the crest length.
Non-Contracted Rectangular Enter the crest length.
Thel-Mar Enter the size. Options: 6, 8, 10, 12 or 15 inches.
V-Notch Enter the angle of notch in degrees (22.5 to 120°).
Configure the AUX I/O port
Configure the AUX I/O port if the AUX I/O port is connected to a Hach flow meter or third-party
device.
Note: If the optional IO9000 module is connected to the AUX I/O port, refer to the IO9000 module documentation to
configure the AUX I/O port.
1. Push MENU.
2. Select Hardware Setup>AUX and I/O Port.
3. Make sure that Type is set to AUX.
4. Select an option.
Option Description
Mode Selects the AUX I/O port mode of operation. Sample Event—Sends sample information to a
Hach flow meter when a sample is collected: time stamp for the sample, success or fail and
the bottle number. When there are two sampling programs, the sample information is sent
when a sample is collected by either sampling program. Program Complete—Sends a signal
when the sampling program is complete. Refer to the auxiliary connector information in the
AS950 sampler documentation. When there are two sampling programs, a signal is sent when
both sampling programs are complete.
Flow
Reading
Selects the type of flow input signal that is supplied by the flow meter to the AUX I/O port.
Options: AUX-Pulse or AUX-mA (4–20 mA).
5. When Flow Reading is set to AUX-Pulse, configure the sampler pacing setting of the external flow
meter. The sampler pacing setting identifies the flow volume that agrees with one pulse (one
count) from the flow meter. Refer to the flow meter documentation.
6. When Flow Reading is set to AUX-mA, select an option.
Note: To set the AUX I/O port settings and the analog input calibration to the factory defaults, select Restore
Defaults.
Option Description
Flow Unit Selects the flow units that show on the display. Options: cubic meters (m
3
) per day, hour,
minute or second or liters (L) per day, hour, minute or second.
10 English

Option Description
4mA Value Enters the flow volume that agrees with a 4 mA input at the AUX I/O port.
Configure the analog output (flow output signal) of the flow meter to have the same flow value
for 4 mA.
20mA Value Enters the flow volume that agrees with a 20 mA input at the AUX I/O port.
Configure the analog output (flow output signal) of the flow meter to have the same flow value
for 20 mA.
7. When Flow Reading is set to AUX-mA, select Calibrate and obey the screen prompts.
To supply 4 mA and 20 mA to the AUX I/O port:
a. Connect the auxillary multi-purpose half cable to the AUX I/O port.
b. Connect the orange wire (analog input) and blue wire (common) of the cable to an analog
signal source that can supply 4 mA and 20 mA.
Configure data logging
N O T I C E
Configure the hardware settings before data logging is configured.
Select the measurements (e.g., pH and level) that are recorded to the data log and how often the
measurements are saved to the data log (logging interval). Select a maximum of 16 measurements.
Measurements that can be recorded are supplied by the:
• Controller
• Sensors connected to the sensor ports
• Sensors connected to the analog inputs of the optional IO9000 module
Note: A flow measurement supplied by an external flow meter that is connected directly to the AUX I/O port cannot
be recorded.
Only the recorded measurements:
• Show on the Status screen and the Measurement Data (data log) screen.
• Can be used to configure setpoint alarms.
• Can be used for flow-based pacing
• Can be used to control when the sampling program starts (or starts and stops).
1. Push MENU.
2. To configure sensors that are not yet connected to the sampler, select the sensor port
assignments. Select Programming>Datalog Programming>Change Port Assignments. Select the
sensor(s) that will be connected to the Sensor 1 port and the Sensor 2 port.
3. Select a measurement to record as follows:
a. Select Channel Logging.
b. Select the source of the measurement.
c. Select the measurement, then push Check to record the measurement.
d. Push Save.
4. Select the logging Interval for the measurement as follows:
a. Select Logging Intervals. The primary and secondary logging intervals show.
For example "15, 15" identifies that the primary logging interval is 15 minutes and the
secondary logging interval is 15 minutes.
b. Select the source of the measurement.
c. Enter the logging intervals, then push OK. Options: 1, 2, 3, 5, 6, 10, 12, 15, 20, 30 or
60 minutes.
• Primary logging interval—The logging interval that is used when no alarm is configured for the
measurement. If an alarm is configured for the measurement, the primary logging interval is
English
11

used when the alarm for the measurement is not active or when the alarm configuration is not
set to Switch Log Interval.
• Secondary logging interval—The logging interval that is used when the alarm for the
measurement is active and the alarm is set to Switch Log Interval.
Select and configure the alarms
N O T I C E
Configure data logging before the alarms are configured.
Select and configure the alarms that show on the Status screen and are recorded to the alarm log.
There are two types of alarms: system alarms and channel alarms. The list of system alarms follows:
Program start Pump forward Entire sample Distributor error
Program end Pump reverse Missed sample Pump fault
Bottle change Sample complete Purge error Full bottle
The channel alarms are setpoint alarms for the recorded measurements (channels), such as the pH,
level and power supply voltage.
Note: Channel alarms are set to on or off at the logging interval. Refer to Configure data logging on page 11.
System alarms occur in real time.
1. Push MENU.
2. Select Programming>Alarm Programming.
3. Add a system alarm as follows:
a. Select System Alarms>Add New Alarm>[Select System Alarm].
b. Push Next.
4. Add a channel alarm as follows:
a. Select Channel Alarms>Add New Alarm>[Select Channel Alarm], then push Next.
Note: The number that follows a channel alarm identifies the source sensor. For example, Temp 2 is the
temperature measurement supplied by Sensor 2. An IO number that follows a channel alarm identifies the
analog inputs of the optional IO9000 module.
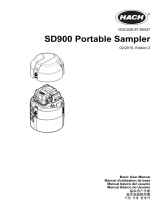
5. Select an option, then push Next. Refer to Figure 2 for an example of a high alarm setpoint.
Option Description
Low/Low Sets the lowest alarm setpoint and the deadband for the lowest alarm setpoint.
Low Sets the low alarm setpoint and the deadband for the low alarm setpoint.
High Sets the high alarm setpoint and the deadband for the high alarm setpoint.
High/High Sets the highest alarm setpoint and the deadband for the highest alarm setpoint.
Rate of Change Sets the alarm setpoint, deadband for the setpoint and the amount of time for the rate of
change (rain only).
6. Select an option, then push OK.
Note: More options show when the optional IO9000 module is connected to the AUX port. Refer to the
IO9000 module documentation.
Option Description
Log Only Sets the alarm to be recorded to the alarm log when the alarm occurs.
Switch Log Interval Sets the data logging interval to change to the secondary logging interval while the
alarm is active. Refer to Configure data logging on page 11.
12 English

Figure 2 High setpoint example
1 Measurement value 3 Setpoint trigger off 5 Setpoint value
2 Setpoint trigger on 4 Deadband 6 Time
Sampling program configuration
N O T I C E
For flow-based sampling, configure the hardware settings before the sampling program is configured.
N O T I C E
When an alarm is used to control sampling, configure the alarms before the sampling program is configured.
The sampling program identifies:
• When a sample is collected (pacing)
• The volume of each sample
• The sample distribution among the bottles
• When the sampling program starts
• When the sampling program stops
Complete all the tasks that follow to configure the sampling program.
Select the type of program
Select the type of sampling program to configure.
1. Push MENU.
2. Go to Programming>Sample Programming.
3. Select the first row.
4. Select an option.
Option Description
Custom Single One sampling program.
Custom Dual Dual sampling program. The bottles in the sampler are divided between two sampling
programs. The two sampling programs can operate in parallel, in series or
independently (default).
CTVV One sampling program for a constant time variable volume application.
English 13

Option Description
Stormwater Dual sampling program for a stormwater application. The bottles in the sampler are
divided between the two sampling programs. For example, one sampling program has a
fixed time interval between samples. The other sampling program has a fixed flow
interval between samples.
Setpoint Sampling One sampling program for a setpoint (upset) application.
Enter the bottle and tubing information
Enter the number of bottles in the sampler, the bottle size and the intake tubing size.
1. Push MENU.
2. Go to Programming>Sample Programming.
3. Select an option.
Option Description
Total Bottles Selects the number of bottles in the sampler.
Bottles per
Program
3
Selects the number of bottles used by each sampling program. The bottles in the sampler are
divided between the two sampling programs.
Bottle
Volume
Enters the volume capacity of each bottle. To change the units, select the units and push the
UP or DOWN arrow key.
Tubing Enters the length and diameter of the intake tubing. Length—Enters the length of the intake
tubing from the strainer to the liquid detector. Diameter—Selects the diameter of the intake
tubing 6.33 mm (¼ in.) or 9.5 mm (
3
/
8
in.).
Note: An accurate length is necessary to get an accurate sample volume.
Select the sample pacing
Select when a sample is collected. For example, set the sampling program to collect a sample at a
15-minute interval or a 100-liter flow interval.
1. Push MENU.
2. Go to Programming>Sample Programming>Pacing.
3. Select an option.
Option Description
Time
Weighted
Collects a sample at a set time interval, such as every 15 minutes. Select this option for time-
weighted sampling. Time Weighted—Sets The time interval between samples (1 minute to
999 hours). Take First—Sets the first sample to be collected immediately or collected after the
first time interval.
Flow
Weighted
Collects a sample at a set flow interval, such as every 100 liters (or 100 gallons). Select this
option for flow-weighted sampling. An external flow meter or an optional flow sensor is
necessary. Refer to the sampler documentation to connect a flow meter or flow sensor.
Flow Source—Selects the source of the flow measurement signal: AUX I/O port (e.g, AUX-mA),
sensor port (e.g., Flow 1) or the optional IO9000 module (e.g., IO 1). A flow measurement
supplied through a sensor port or the IO9000 module is only available for selection if the flow
measurement is recorded to the data log. Refer to Configure data logging on page 11. Override
—When enabled, collects a sample when the specified volume has not been measured within
the selected maximum time between samples. Enter the maximum time between samples.
When a flow-based sample is collected, the override timer is set to zero. Target—Selects the
flow volume between samples (counts or analog input signal). Take First—Sets the first sample
to be collected immediately or collected after the first flow interval.
3
Available only when Custom Dual or Stormwater is selected. Refer to Select the type of
program on page 13.
14 English

Option Description
Time
Table
Collects a sample at two or more time intervals. Select this option for time-weighted sampling.
Time Intervals—Selects the number of time intervals. Edit Intervals—Configures each time
interval.
Example: The time intervals selected are 50, 70 and 100 minutes. The Take First setting is set
to After Interval. The Sample End setting is set to None (continuous sampling). The sampler
collects a sample after 50, 120, 220, 270 and 340 minutes and so on after the program starts.
When the Sample End setting is set to 6 samples, a sample is collected after 50, 120, 220, 270,
340 and 440 minutes after the program starts and then the sampling program is complete and
stops.
Flow
Table
Collects a sample at two or more flow intervals. Select this option for flow-weighted sampling.
An external flow meter or an optional flow sensor is necessary. Refer to the sampler
documentation to connect a flow meter or flow sensor.
Flow Source—Selects the source of the flow measurement signal: AUX I/O port (e.g, AUX-mA),
sensor port (e.g., Flow 1) or the optional IO9000 module (e.g., IO 1). A flow measurement
supplied through a sensor port or the IO9000 module is only available for selection if the flow
measurement is recorded to the data log. Refer to Configure data logging on page 11. Override
—When enabled, collects a sample even if the flow is lower than estimated. Enter the maximum
time between samples. When a flow-based sample is collected, the override timer is set to zero.
Flow Intervals—Selects the number of flow intervals. Edit Intervals—Configures the flow
intervals. Take First—Sets the first sample to be collected immediately or collected after the first
interval.
Example: The flow intervals selected are 50, 70 and 100 gallons. The Take First setting is set to
After Interval. The Sample End setting is set to None (continuous sampling). The sampler
collects a sample after 50, 120, 220, 270 and 340 gallons and so on after the program starts.
When the Sample End setting is set to 6 samples, a sample is collected after 50, 120, 220, 270,
340 and 440 gallons after the program starts and then the sampling program is complete and
stops.
Event Collects a sample when one or more of the selected channel alarms occur. Select this option for
upset sampling.
Event Type—Selects the type of event. Options: Setpoint. Event—Selects the channel alarm(s)
for the event trigger. To configure more channel alarms, select Add New Alarm and refer to
Select and configure the alarms on page 12. Event Trigger—Sets a sample to be collected
when any or all of the selected alarms occur.
Select the sample volume
Select the volume of a sample. For example, set the sampling program to collect 50 mL samples.
1. Push MENU.
2. Go to Programming>Sample Programming>Sample Volume.
3. Select an option.
Option Description
Fixed Sets the sample volume to a fixed quantity, such as 500 mL. Volume—Sets the volume of each
sample (10 to 10,000 mL).
Variable Sets the sample volume to increase linearly as the flow rate increases (or decreases) between the
low flow rate and high flow rate that is entered. An external flow meter or an optional flow sensor is
necessary. Refer to the sampler documentation to connect a flow meter or flow sensor.
Note: The liquid sensor must be enabled.
Flow Source—Selects the source of the flow measurement signal: AUX I/O port (e.g, AUX-mA),
sensor port (e.g., Flow 1) or the optional IO9000 module (e.g., IO 1). A flow measurement supplied
through a sensor port or the IO9000 module is only available for selection if the flow measurement
is recorded to the data log. Refer to Configure data logging on page 11. Flow Unit—Selects the
measurement units for flow. Low Flow—Enter the actual flow rate that agrees with 4 mA. Low
Flow Sample—Sets the sample volume to collect when the flow is at the low flow rate. High Flow
—Enter the actual high flow rate that agrees with 20 mA. High Flow Sample—Sets the sample
volume to collect when the flow is at the high flow rate.
For a description of fixed time interval, variable volume sampling, refer to CTVV sampling
on page 16.
English 15

CTVV sampling
Constant Time Variable Volume (CTVV) sampling collects samples at a fixed time interval. But, the
actual volume of each sample is based on the:
• Entered flow range for the site
• Entered sample volume range
• Actual measured flow at the time of sampling
The sample volume collected is based on the measured flow of the stream when the sample is
collected. The sample volume increases linearly as the flow rate increases (or decreases) between
the low flow rate and high flow rate entered.
When CTVV is used for sampling:
• The liquid detector is always enabled.
• The first sample is collected after the first time interval set in the Pacing setting.
• The flow source can be any flow source with the exception of AUX-Pulse.
• Samples are only collected when the flow is between the entered low flow value and high flow
value.
The sampler calculates the sample volume to collect based on the user settings and the actual
measured flow. For example, the actual measured flow is 200 gph and the entered values are:
• Low Flow: 150 gph
• High Flow: 300 gph
• Low Flow Sample: 1500 mL (sample volume for low flow)
• High Flow Sample: 3000 mL (sample volume for high flow)
Calculation 1: Sample volume per unit of flow
(High Flow Sample – Low Flow Sample) ÷ (High Flow – Low Flow) = 1500 mL ÷ 150 gph =
10 mL/gph
Calculation 2: Sample volume
Measured flow at time of sampling × Sample volume per unit of flow = 200 gph x 10 mL/gph =
2000 mL of sample collected
Select the sample distribution—multiple bottles
Select the sample distribution among the bottles.
1. Push MENU.
2. Go to Programming>Sample Programming>Distribution.
16
English

3. Select an option.
Option Description
Sample-
Based
Sets the sampler to divide each sample between a selected number of bottles or put multiple
samples in one bottle.
Bottles per Sample (BPS)—Sets the sampler to divide a sample equally between a selected
number of bottles (e.g., when the sample volume is larger than the bottle volume). Refer to item
2 in Figure 3. Samples per Bottle (SPB)—Sets the sampler to put a selected number of samples
into each bottle (composite sampling). Refer to item 1 in Figure 3.
When 1 BPS and 1 SPB is selected, the sample is not divided. Each bottle holds one sample
(discrete sampling).
To collect identical sets of composite samples or a composite sample that is larger than the
capacity of a single bottle, enter a value that is more than one for BPS and SPB. For example,
when 2 BPS and 2 SPB are selected, the sampler puts the first sample in both Bottle 1 and Bottle
2. When the second sample is collected, the sampler puts the sample again in both Bottle 1 and
Bottle 2. When the third sample is collected, the sampler puts the sample into Bottle 3 and Bottle
4. Refer to item 3 in Figure 3.
Time-
Based
Sets the sampler to put the sample(s) that are collected during a time interval in each bottle.
Options: 5 minutes to 24 hours (default: 1 hour). Duration—Sets the time interval. First Bottle—
Sets the first bottle used in the sampling program.
Note: If the Program Start setting is a date and/or time in the past (e.g., yesterday at 08:00), the first sample is not
put in the first bottle selected. The sampler distributor goes forward one bottle for each time interval between the
programmed start time and the actual start time.
When it is necessary for the bottle numbers (positions) to identify the time (or day) the samples
they hold were collected, use time-based distribution (time-switched sampling). Refer to Figure 4
through Figure 6 for examples of time-switched sampling. Refer to Configure time-switched
sampling (optional) on page 18.
Figure 3 Examples—Sample-based distribution
1 Two samples per bottle (SPB: 2, BPS: 1) 3 Two samples per bottle and two bottles per sample
(SPB: 2, BPS: 2)
2 Two bottles per sample (SPB: 1, BPS: 2)
Figure 4 Example—Time-based distribution, 24-hour pacing and distribution
Bottle 1 Bottle 2 Bottle 3 Bottle 7
Day 1, 08:00 Day 2, 08:00 Day 3, 08:00 Day 7, 08:00
English 17

Figure 5 Example—Time-based distribution, 2-hour pacing and distribution
Bottle 1 Bottle 2 Bottle 3 Bottle 12
08:00 to 09:59 10:00 to 11:59 12:00 to 13:59 06:00 to 07:59
Figure 6 Example—Time-based distribution, 1000 L pacing and 2-hour distribution
Bottle 1 Bottle 2 Bottle 3 Bottle 12
08:00 to 09:59 10:00 to 11:59 12:00 to 13:59 06:00 to 07:59
3 samples—Collected
after 0 L, 1000 L and
2000 L of flow
3 samples—Collected
after 3000 L, 4000 L
and 5000 L of flow
2 samples—Collected
after 6000 L and
7000 L of flow
1 sample—Collected
after 21,000 L of flow
Configure time-switched sampling (optional)
N O T I C E
When a time-switched sampling program must be stopped before it is complete (e.g., to change a user setting),
do the steps that follow before the sampling program is started again. Then, future samples are put in the correct
bottles. These steps are not necessary when the sampling program is temporarily stopped and then started again.
• Change the Program Start setting to the current date. Do not change the start time.
• If each bottle represents 1 full day (24 hours) of samples, in addition change the First Bottle setting to the bottle
number that represents the day (e.g., Thursday or December 4) the next sample will be collected.
When it is necessary for the bottle numbers (positions) to identify the time (or day) the samples they
hold were collected, configure the sampler for time-based distribution (time-switched sampling).
1. Push MENU.
2. Select Sample Programming>Distribution.
3. Set the options as follows.
Option Set to:
Distribution Time-Based
Duration Enter the time interval that sample is put in each bottle. Options: 5 minutes to 24 hours.
First Bottle Enter the first bottle used in the sampling program, such as Bottle 1.
4. Push Back.
5. Select Program Start.
6. Select After Delay, then push Next.
18
English
/